Electron이란
NodeJS 등장이후 프론트를 만드는 데만 쓰이던 js가 서버, 모바일 앱, 데스크톱 앱에 쓰일 수 있게 되었다.
서버 - NodeJS
앱 - React Native
데스크톱 앱 - Electron
Electron은 HTML, CSS, JS로 Desktop 앱을 만들 수 있게 해주는 프레임워크이다.
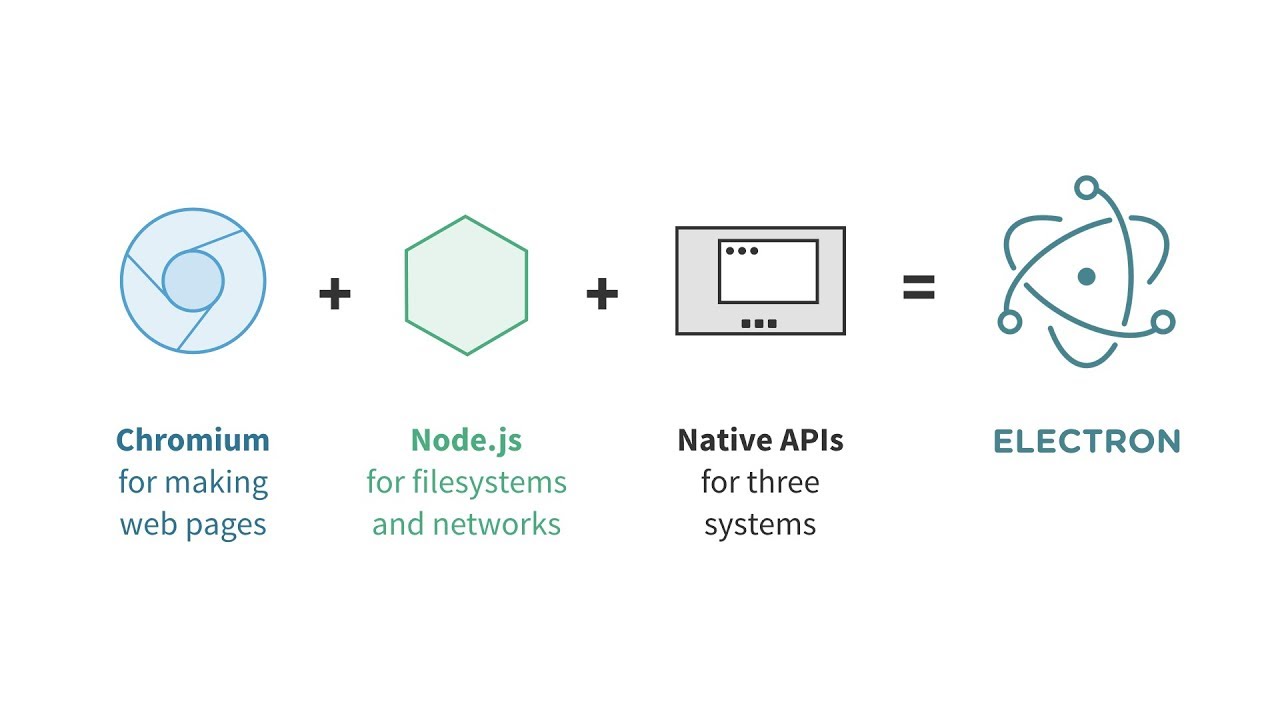
Electron에서 HTML, CSS, JS를 이용하여 뷰를 표현하기 위해 Chromium 환경을 이용한다. 하지만 웹 브라우저 환경에서는 기본적으로 클라이언트 컴퓨터에 파일을 쓰는 것이 불가능하기 때문에 NodeJS 서버를 함께 두어 리소스 접근을 가능하게 만든다.
이러한 이유로 한 프로그램에 두개의 Process가 동작하게 된다. 일반적으로 브라우저와 서버의 통신에는 Rest API가 사용되지만 Electron에서는 IPC 통신을 이용하여 자료를 전달한다.
프로그램을 작성할 때도 Main Process와 Renderer Process를 구분해서 만들어야 한다. 서버와 브라우저를 함께 만든다고 생각하면 된다.
Electron & 필요 라이브러리 설치
Electron의 초기 설정은 정말 별거 없다.
만약 TypeScript를 사용하지 않는다면 공식 문서를 따라하면 된다.
npm init -y
npm i -D electron
다만 이 글에선 타입스크립트를 사용할 것이기 때문에 아래와 같이 추가 설치를 진행한다.
npm i -D typescript
npm i -D webpack
npm i -D ts-loader
npm i -D prettier
한 줄에 여러 라이브러리를 설치할 수도 있지만 간혹 에러가 나는 경우가 있어 하나하나 설치하는 것을 선호한다.
배포, 테스트와 관련된 라이브러리는 관련 글에서 설치하고 진행하도록 하겠다.
webpack.config.js
root 폴더에 webpack.config.js 파일을 생성하고 아래와 같이 작성한다.
const path = require('path');

console.log(__dirname);
// 공통 설정 부분
const common_config = {
  node: {
    __dirname: true,
  },
  mode: process.env.ENV || 'development',
  module: {
    rules: [
      {
        test: /\.tsx?$/, // ts나 tsx 파일은 ts-loader가 처리한다.
        use: 'ts-loader',
        exclude: [/node_modules/],
      },
    ],
  },
  resolve: {
    extensions: ['.tsx', '.ts', '.js'],
  },
  devtool: 'source-map', // 이 설정으로 devtool이 ts파일의 오류 위치를 알려줄 수 있다.
  mode: 'development',
};

// Main Process와 Renderer Process 두가지가 필요하기 때문에 각각 설정한다.
module.exports = [
  Object.assign({}, common_config, {
    target: 'electron-main',// electron main에 맞게 변환한다.
    entry: {
      index: './src/main/main.ts', // Main Process 진입 파일
    },
    output: {
      filename: '[name]-bundle.js',
      path: path.resolve(__dirname, 'src/main/dist'), // 변환된 js 파일이 담길 위치
    },
  }),
  Object.assign({}, common_config, {
    target: 'electron-renderer', // electron renderer에 맞게 변환한다.
    entry: {
      index: './src/renderer/Modules/index.ts', // Renderer Process 진입 파일
    },
    output: {
      filename: '[name]-bundle.js',
      path: path.resolve(__dirname, 'src/renderer/dist'), // 변환된 js 파일이 담길 위치
    },
  }),
];
Main Process와 Renderer Process를 따로 작성해야 하기 때문에 웹팩으로 생성하는 파일도 두 개가 필요하다.
TypeScript 설정
tsconfig.json
{
  "compileOnSave": false,
  "compilerOptions": {
      "target": "es6",
      "moduleResolution": "node",
      "pretty": true,
      "newLine": "LF",
      "allowSyntheticDefaultImports": true,
      "strict": true,
      "noUnusedLocals": true,
      "noUnusedParameters": true,
      "sourceMap": true,
      "skipLibCheck": true,
      "allowJs": true,
      "jsx": "preserve"
  },
  "exclude": [
    "node_modules",
  ],
  "include": ["index.d.ts"]
}
index.d.ts
png, mp3등의 리소스를 임포트 할 일이 있을 경우 필요하다.
declare module '*.png';
declare module '*.jpg';
declare module '*.json';
declare module '*.mp3';
package.json
{
  "name": "electron",
  "version": "0.1.0",
  "author": "Jhon Doe",
  "description": "electron",
  "main": "./src/main/dist/index-bundle.js",
  "build": {
    "productName": "electron",
    "asar": true,
    "nsis": {
      "oneClick": false,
      "allowToChangeInstallationDirectory": true
    },
    "files": [
      "src/**/*"
    ]
  },
  "scripts": {
    "start": "electron .",
    "build": "webpack --config webpack.config.js",
  },
  "devDependencies": {
    "electron": "^11.2.3",
    "file-loader": "^6.2.0",
    "prettier": "2.2.1",
    "spectron": "^13.0.0",
    "ts-loader": "^8.0.17",
    "typescript": "^4.1.5",
    "webpack": "^5.21.2",
    "webpack-cli": "^4.5.0"
  }
}
script를 통해 build(ts -> js)와 start를 하도록 만들었다.