
이 글은 udemy의 '한입 크기로 잘라 먹는 리액트(React.js)'를 수강하고 적는 글입니다.
📌 섹션 5: React
5-1. React가 필요한 이유
1. 문제 : 중복 코드 작성 -> Shotgun Surgery (산탄총 수술)
- React는 Component 기반의 UI 라이브러리
2.
- 명령형 프로그래밍 : jQuery
절차를 하나하나 다 나열해야 함
- 선언형 프로그래밍 : React
그냥 목적을 바로 말함
3. Virtual DOM
DOM (Document Object Model) : 브라우저가 실제로 사용하는 객체
- Browser DOM은 매번 업데이트를 해야 하지만 Virtual DOM은 한번에 묶어 업데이트
5-2. Create React App
- Webpack : 다수의 자바스크립 파일을 하나의 파일로 합쳐주는 모듈 번들 라이브러리
- Babel : JSX 등의 쉽고 직관적인 자바스크립트 문법을 사용할 수 있도록 해주는 라이브러리
- favicon.ico 페이지 상단 탭에 표시되는 아이콘
export default App; //내보내기
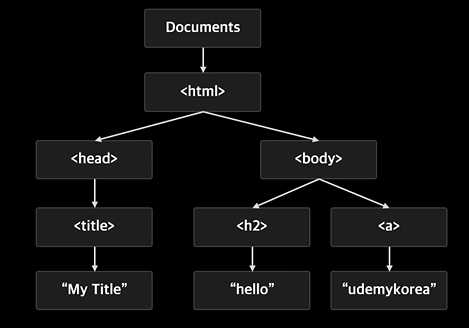
import App from './App'; //가져오기5-3. JSX
- JSX : html + js
컴포넌트 만들기
JSX 문법
- 태그 닫기
- 반드시 하나의 최상위 태그가 필요함
최상위 태그를 대체하는 방법
import React from "react";- <React.Fragment><React.Fragment/> 또는 <></>로 감싸기
1) App.js 안에서 다 해결
import MyHeader from './MyHeader';

function App() {
  let name="김서현";

  const style = {
    App : {
      backgroundColor: "black",
    },
    h2 : {
      color:"red" ,
    },
    bold_text: {
      color:"green",
    },
  };

  const number = 5;

  const func = () => {
    return "func";
  };

  return (
    <div style={style.App}>
      <MyHeader/>
      <h2 style={style.h2}>안녕 리액트 {func()}</h2>
      <b style={style.bold_text} id='bold_text'>
        {number}는 : {number % 2 === 0 ? "짝수" : "홀수"}
      </b>
    </div>
  );
}

export default App; //내보내기
2) App.css 불러와서 적용
.App {
  background-color: black;
}

h2 {
  color: red;
}

#bold_text {
  color: green;
}
import './App.css';
import MyHeader from './MyHeader';
function App() {
let name="김서현";
const number = 5;
const func = () => {
return "func";
};
return (
<div className="header">
<MyHeader/>
<h2>안녕 리액트 {func()}</h2>
<b id='bold_text'>
{number}는 : {number % 2 === 0 ? "짝수" : "홀수"}
</b>
</div>
);
}
export default App; //내보내기5-4. State
State : 계속해서 변화하는 특정 상태. 상태에 따라 각각 다른 동작을 함.
- React에서 어떤 컴포넌트가 가진 State가 바뀌면 그 State가 Rerender됨. (함수 다시 호출)
- 한 컴포넌트가 여러개의 State를 가져도 됨.
📁App.js
import MyHeader from './MyHeader';
import Counter from './Counter';

function App() {
  const number = 5;

  return (
    <div>
      <MyHeader/>
      <Counter/>
    </div>
  );
}

export default App; //내보내기
📁Counter.js
import React,{useState} from 'react';

const Counter = () => {
    //0에서 출발
    //1씩 증가하고
    //1씩 감소하는
    //count 상태

    const [count, setCount] = useState(0);

    const onIncrease = () => {
        setCount(count + 1);
    }

    const onDecrease = () => {
        setCount(count -1);
    }

    return (
        <div>
            <h2>{count}</h2>
            <button onClick = {onIncrease}>+</button>
            <button onClick = {onDecrease}>-</button>
        </div>
    )
}

export default Counter;
useState
import React,{useState} from 'react';const [count, setCount] = useState(0);
useState(초기값)은 배열을 반환
[count, setCount] : 상태의 값
[count, setCount] : 상태변화함수
5-5. Props
Props : 컴포넌트에 데이터를 전달하는 방법
Rerender되는 경우
1. 본인이 가지고 관리하는 State가 바뀔 때마다
2. 나에게 내려오는 Props가 바뀔 때마다
3. 내 부모가 Rerender가 될 때
📁App.js
import MyHeader from './MyHeader';
import Counter from './Counter';
import Container from './Container';

function App() {
  const number = 5;

  const counterProps = {
    a:1,
    b:2,
    c:3,
    d:4,
    e:5,
    initialValue:5,
  }
  return (
    <Container>
      <div>
        <MyHeader/>
        <Counter {...counterProps} />
      </div>
    </Container>
  );
}

export default App;
📁Counter.js
import React,{useState} from 'react';
import OddEvenResult from './OddEvenResult';

//매개변수로 props 객체를 받음. 비구조화 할당으로 특정 값만 꺼내 쓰기도 가능
const Counter = ({initialValue}) => {
    const [count, setCount] = useState(initialValue);

    const onIncrease = () => {
        setCount(count + 1);
    }

    const onDecrease = () => {
        setCount(count -1);
    }

    return (
        <div>
            <h2>{count}</h2>
            <button onClick = {onIncrease}>+</button>
            <button onClick = {onDecrease}>-</button>
            <OddEvenResult count = {count}/>
        </div>
    )
}

//props를 전달 받지 못할 경우를 대비하여 기본값 설정
Counter.defaultProps = {
    initialVlaue: 0,
}

export default Counter;
📁OddEvenResult.js
const OddEvenResult = ({count}) => {
    return <>{count % 2 === 0 ? "짝수" : "홀수"}</>;
}

export default OddEvenResult;
📁Container.js
const OddEvenResult = ({count}) => {
    return <>{count % 2 === 0 ? "짝수" : "홀수"}</>;
}

export default OddEvenResult;
📝 비구조화 할당
- 배열이나 객체의 속성 혹은 값을 해체하여 그 값을 변수에 각각 담아 사용하는 것
📌 섹션 6: React 기본 - 일기장 만들어보기
6-1. React에서 사용자 입력 처리하기

📁App.js
import './App.css';
import DiaryEditor from './DiaryEditor';

function App() {
  return (
    <div className="App">
      <DiaryEditor/>
    </div>
  );
}

export default App;
📁Container.js
import { useState } from "react";

const DiaryEditor = () => {
    const [author, setAuthor] = useState("");
    const [content, setContent] = useState("");

    return (
        <div className = "DiaryEditor">
            <h2>오늘의 일기</h2>
            <div>
                <input
                    name="author"
                    value={author}
                    onChange={(e) => { //이벤트값 받기
                    setAuthor(e.target.value);
                }}
                />
            </div>
            <div>
                <textarea
                    value={content}
                    onChange={(e) => {
                        setContent(e.target.value);
                    }}
                />
            </div>
        </div>
    );
};

export default DiaryEditor;
🔽🔽🔽 useState author, content 둘 다 state로 바꿔서 코딩 🔽🔽🔽
import { useState } from "react";

const DiaryEditor = () => {

    const [state, setState] = useState({
        author:"",
        content:"",
    });

    return (
        <div className = "DiaryEditor">
            <h2>오늘의 일기</h2>
            <div>
                <input
                    name="author"
                    value={state.author}
                    onChange={(e) => { // 이벤트값 받기
                        setState({
                            ...state, //순서 ...state 먼저 써야
                            author:e.target.value, //update 됨
                        });
                    }}
                />
            </div>
            <div>
                <textarea
                    value={state.content}
                    onChange={(e) => {
                        setState({
                            ...state,
                            content: e.target.value,
                        });
                    }}
                />
            </div>
        </div>
    );
};

export default DiaryEditor;
🔽🔽🔽 setState를 함수 handleChangeState로 만들어서 코딩 🔽🔽🔽
import { useState } from "react";

const DiaryEditor = () => {

    const [state, setState] = useState({
        author:"",
        content:"",
        emotion:1,
    });

    const handleChangeState = (e) => {
        console.log(e.target.name);
        console.log(e.target.value);

        setState({
            ...state,
            [e.target.name]: e.target.value,
        })
    }

    const handleSubmit = (e) => {
        console.log(state);
        alert("저장 성공");
    }

    return (
        <div className = "DiaryEditor">
            <h2>오늘의 일기</h2>
            <div>
                <input
                    name="author"
                    value={state.author}
                    onChange={handleChangeState}
                />
            </div>
            <div>
                <textarea
                    name="content"
                    value={state.content}
                    onChange={handleChangeState}
                />
            </div>
            <div>
                <select name="emotion" value={state.emotion} onChange={handleChangeState}>
                    <option value={1}>1</option>
                    <option value={2}>2</option>
                    <option value={3}>3</option>
                    <option value={4}>4</option>
                    <option value={5}>5</option>
                </select>
            </div>
            <div>
                <button onClick={handleSubmit}>일기 저장하기</button>
            </div>
        </div>
    );
};

export default DiaryEditor;
📁App.css
.DiaryEditor {
  border: 1px solid gray;
  text-align: center;
  padding: 20px;
}

.DiaryEditor input, textarea {
  margin-bottom: 20px;
  width: 500px;
  padding: 10px;
}

.DiaryEditor textarea {
  height: 150px;
}

.DiaryEditor select {
  width:300px;
  padding: 10px;
  margin-bottom:20px;
}

.DiaryEditor button {
  width:500px;
  padding: 10px;
  cursor: pointer;
}📝onChange
- oninput : 요소의 값이 변경되는 모먼트 (요소 값이 변경된 직후에 이벤트 발생)
- onchange : 요소의 값이 변경되는 모먼트 (포커스를 잃을 때 발생)
📝점 표기법 vs 괄호 표기법
- 객체 내부 프로퍼티에 접근하는 방법ㅂ
- 점 표기법 : 가독성 측면에 좋음
- 괄호 표기법 : 객체의 프로퍼티에
변수를 활용하여 접근 가능함.
6-2. React에서 DOM 조작하기 - useRef
📁DiaryEditor.js
import { useRef, useState } from "react";DOM 접근하기 위한 레퍼런스 객체 만들기
const authorInput = useRef();
const contentInput = useRef();
DOM 접근하기
const handleSubmit = (e) => {
        if(state.author.length < 1){
            authorInput.current.focus();
            return;
        }
        if(state.content.length < 5) {
            contentInput.current.focus();
            return;
        }
        alert("저장 성공");
    }
📝useRef(저장공간, 변수 관리)
current속성을 가지고 있는 객체를 반환 ( 인자로 넘어온 초기값에 해당 )current속성은 값을 변경해도 state를 변경할 때처럼 컴포넌트가 리랜더링 되지 않음. 값 또한 유실되지 않고 그대로 유지됨.
6-3. React에서 배열 사용하기1 - 리스트 렌더링 (조회)
📁DiaryList.js
import DiaryItem from "./Diaryitem";

const DiaryList = ({diaryList}) => {
    return (
    <div className="DiaryList">
        <h2>일기 리스트</h2>
        <h4>{diaryList.length}개의 일기가 있습니다.</h4>
        <div>
            {diaryList.map((it) => ( //원소 한 번씩 순회
                <DiaryItem key={it.id} {...it}/>
            ))}
        </div>
    </div>
    );
};

//배열을 받지 못했을 때를 대비
DiaryList.defaultProps = {
    diaryList: [],
}

export default DiaryList;
📁DiaryItem.js
const DiaryItem = ({author, content, created_date, emotion, id}) => {
    return (
    <div className="DiaryItem">
        <div className= "info">
            <span>
                작성자 : {author} | 감정점수 : {emotion}
            </span>
            <br />
            <span className="date">{new Date(created_date).toLocaleString()}</span>
        </div>
        <div className="content">{content}</div>
    </div>
    );
};

export default DiaryItem;
📁App.css
/*List*/
.DiaryList {
  border: 1px solid gray;
  padding: 20px;
  margin-top: 20px;
}

.DiaryList h2 {
  text-align: center;
}

/* Item */

.DiaryItem {
  background-color: rgb(240, 240, 240);
  margin-bottom: 10px;
  padding:20px;
}

.DiaryItem .info {
  border-bottom: 1px solid gray;
  padding-bottom: 10px;
  margin-bottom: 10px;
}
.DiaryItem .date {
  color: gray;
}

.DiaryItem .content {
  margin-bottom: 30px;
  margin-top: 30px;
  font-weight: bold;
}

.DiaryItem textarea {
  padding: 10px;
}
6-4. React에서 배열 사용하기2 - 데이터 추가하기
-
React는 단방향으로만 데이터가 흐른다. (Data는 위에서 아래로, Event는 아래서 위로 흐름)
-
컴포넌트 트리에서 같은 레벨끼리 데이터를 주고 받을 수 없다.
-
App.js에서 useState 만들어서 DiaryEditor(와 DiaryList에) 주고 받음
📁DiaryEditor.js
const DiaryEditor = ({onCreate}) => {

    const authorInput = useRef(); //DOM 접근하기 위한 레퍼런스 객체
    const contentInput = useRef();

    const [state, setState] = useState({
        author:"",
        content:"",
        emotion:1,
    });

    const handleChangeState = (e) => {
        setState({
            ...state,
            [e.target.name]: e.target.value,
        })
    }

    const handleSubmit = () => {
        if(state.author.length < 1){
            authorInput.current.focus();
            return;
        }

        if(state.content.length < 5) {
            contentInput.current.focus();
            return;
        }

        console.log("여기까지 옴");

        onCreate(state.author, state.content, state.emotion);

        alert("저장 성공");
        setState({
            author:"",
            content:"",
            emotion:1
        })
    }
📁App.js
function App() {

  const [data, setData] = useState([]);

  const dataId = useRef(0);

  const onCreate = (author, content, emotion) => {
    const created_date = new Date().getTime();
    const newItem = {
      author,
      content,
      emotion,
      created_date,
      id : dataId.current,
    };
    dataId.current += 1;
    setData([newItem, ...data]);
  }
  return (
    <div className="App">
      <DiaryEditor onCreate={onCreate}/>
      <DiaryList diaryList={data}/>
    </div>
  );
}
6-5. React에서 배열 사용하기3 - 데이터 삭제하기
📁App.js
  const onDelete = (targetId) => {
    console.log(`${targetId}가 삭제되었습니다`);
    const newDiaryList = data.filter((it) => it.id !== targetId);
    setData(newDiaryList);
  }
📁DiaryList.js
const DiaryList = ({onDelete, diaryList}) => {
    return (
    <div className="DiaryList">
        <h2>일기 리스트</h2>
        <h4>{diaryList.length}개의 일기가 있습니다.</h4>
        <div>
            {diaryList.map((it) => ( //원소 한 번씩 순회
                <DiaryItem key={it.id} {...it} onDelete = {onDelete}/>
            ))}
        </div>
    </div>
    );
};
📁DiaryItem.js
const DiaryItem = ({onDelete, author, content, created_date, emotion, id}) => {
    return (
    <div className="DiaryItem">
        <div className= "info">
            <span>
                작성자 : {author} | 감정점수 : {emotion}
            </span>
            <br />
            <span className="date">{new Date(created_date).toLocaleString()}</span>
        </div>
        <div className="content">{content}</div>
        <button onClick={() => {
            console.log(id);
            if(window.confirm(`${id}번째 일기를 정말 삭제하시겠습니까?`)) {
                onDelete(id);
            }
        }}>삭제하기</button>
    </div>
    );
};

export default DiaryItem;
6-6. React에서 배열 사용하기4 - 데이터 수정하기
📁App.js
 const onEdit = (targetId, newContent) => {
    setData (
      data.map((it) => it.id === targetId ? {...it, content:newContent} : it)
    )
  }
📁DiaryList.js
const DiaryList = ({onEdit, onRemove, diaryList}) => {
    return (
    <div className="DiaryList">
        <h2>일기 리스트</h2>
        <h4>{diaryList.length}개의 일기가 있습니다.</h4>
        <div>
            {diaryList.map((it) => ( //원소 한 번씩 순회
                <DiaryItem key={it.id} {...it} onEdit = {onEdit} onRemove = {onRemove}/>
            ))}
        </div>
    </div>
    );
};
📁DiaryItem.js
return (
    <div className="DiaryItem">
        <div className= "info">
            <span className="author_info">
                작성자 : {author} | 감정점수 : {emotion}
            </span>
            <br />
            <span className="date">{new Date(created_date).toLocaleString()}</span>
        </div>
        <div className="content">
            {isEdit ? (<><textarea
            ref = {localContentInput}
            value={localContent}
            onChange= {(e) => setLocalContent(e.target.value)}/></>): (<>{content}</>)}
        </div>
        {isEdit ?
        <><button onClick={handleQuitEdit}>수정 취소</button>
        <button onClick={handleEdit}>수정 완료</button></>
        : <><button onClick={handleRemove}>삭제하기</button>
            <button onClick={toggleISEdit}>수정하기</button></>}
    </div>
    );
6-7. React Lifecycle 제어하기 - useEffect
-
Mount: 화면에 나타나는 것 Ex. 초기화 작업
-> Update(=Rerender): 업데이트(리렌더) Ex. 예외 처리 작업
-> UnMount: 화면에서 사라짐 Ex. 메모리 정리 작업 -
ComponentDidMount -> ComponentDidUpdate -> ComponentWillUnmount
React Hooks
useEffect
useEffect(() => {
  // todo...
}, []);
- 첫번째 파라미터
콜백함수- 두번째 파라미터
Dependency Array(의존성 배열) : 이 배열 내에 들어가는 값이 변화하면 콜백 함수가 수행된다.
📁Lifecycle.js(1)
import React, {useEffect, useState} from "react";

const Lifecycle = () => {

    const [count,setCount] = useState(0);
    const [text, setText] = useState("");

    useEffect(() => {
        console.log("Mount!");
    },[]);

    useEffect(()=>{
        console.log("Upate!");
    });

    useEffect(()=>{
        console.log(`count is update : ${count}`);
        if(count > 5){
            alert("count가 5를 넘었습니다 따라서 1로 초기화합니다");
            setCount(1);
        }
    },[count]);

    useEffect(() =>{
        console.log(`text is update : ${text}`);
    }, [text]);

    return (
    <div style = {{padding: 20}}>
        <div>
            {count}
            <button onClick={() => setCount(count+1)}>+</button>
        </div>
        <div>
            <input value={text} onChange= {(e) => setText(e.target.value)}/>
        </div>
    </div>)
};

export default Lifecycle;
📁Lifecycle.js(2)
import React, {useEffect, useState} from "react";

const UnmountTest = () => {

    useEffect(() => {
        console.log("Mount!");

        return () => {
          //Unmount 시점에 실행하게 됨
            console.log("Unmount!");
        };
    },[]);
    return <div>Unmount Testing Component</div>;
};

const Lifecycle = () => {

    const [isVisible, setIsVisible] = useState(false);
    const toggle = () => setIsVisible(!isVisible);

    return (
    <div style = {{padding: 20}}>
        <button onClick={toggle}>ON/OFF</button>
        {isVisible && <UnmountTest/>}
        {/* isVisible이 true 일 때 UnmountTest가 렌더링됨 */}
    </div>);
};

export default Lifecycle;
Mount 제어하기
useEffect(() => {
        console.log("Mount!");
    },[]);
Update 제어하기
useEffect(()=>{
        console.log("Upate!");
    });
    useEffect(()=>{
        console.log(`count is update : ${count}`);
        if(count > 5){
            alert("count가 5를 넘었습니다 따라서 1로 초기화합니다");
            setCount(1);
        }
    },[count]);
    useEffect(() =>{
        console.log(`text is update : ${text}`);
    }, [text]);
UnMount 제어하기
useEffect(() => {
        console.log("Mount!");
        return () => {
          //Unmount 시점에 실행하게 됨
            console.log("Unmount!");
        };
    },[]);
6-8. React에서 API 호출하기
useEffect를 이용하여 컴포넌트 Mount 시점에 API를 호출하고 해당 API의 결과값을 일기 데이터의 초기값으로 이용하기
getData, API 호출
- async를 통해 getData를 Promise 객체 반환 비동기 함수로 만듬 (await을 쓰기 위해)
  const getData = async() => {
    const res = await fetch('https://jsonplaceholder.typicode.com/comments').then((res) => res.json())
API 데이터 사용하기
    const initData = res.slice(0, 20).map((it) =>{
      return {
        author : it.email,
        content : it.body,
        emotion : Math.floor(Math.random() *5)+1, //Math.floor : 소수점 자리를 버려서 정수로 바꿔줌
        created_date : new Date().getTime(),
        id : dataId.current++
      }
    }); //API 0~19까지 잘라내서 map에서 return하는 값을 가지고 initData 객체배열을 만듬.
    setData(initData);
  }
useEffect
- 컴포넌트 Mount 시점에 getData 실행
 useEffect(() => {
   getData();
 },[])
6-9. React developer tools
6-10. 최적화1 - useMemo
- 연산 결과 재사용
현재 일기 데이터를 분석하는 함수를 제작하고 해당 함수가 일기 데이터의 길이가 변화하지 않을 때 값을 다시 계산하지 않도록 하기
Memoization : 이미 계산 해 본 연산 결과를 기억 해 두었다가 동일한 계산을 시키면, 다시 연산하지 않고 기억 해 두었던 데이터를 반환 시키게 하는 방법
useMemo()
useMemo(() =>{
//todo...
}, [])
- 첫번째 파라미터
콜백함수- 두번째 파라미터
Dependency Array(의존성 배열) : 이 배열 내에 들어가는 값이 변화하면 콜백 함수가 다시 수행됨.
6-11. 최적화2 - React.memo
함수형 컴포넌트에게 업데이트 조건을 걸자
리액트 공식 문서 : https://ko.reactjs.org/
React.memo
- 고차 컴포넌트
- 동일한 prop로 동일한 결과를 렌더링한다면 메모이징하여 렌더링함. (리렌더링하지 않음)
import React, { useEffect, useState } from "react";

const Textview = React.memo(({ text }) => {
  useEffect(() => {
    console.log(`update :: Text : ${text}`);
  });
  return <div>{text}</div>;
});

const CountView = React.memo(({ count }) => {
  useEffect(() => {
    console.log(`Update :: Count : ${count}`);
  });
  return <div>{count}</div>;
});

const OptimizeTest = () => {
  const [count, setCount] = useState(1);
  const [text, setText] = useState("");

  return (
    <div style={{ padding: 50 }}>
      <div>
        <h2>count</h2>
        <CountView count={count} />
        <button onClick={() => setCount(count + 1)}>+</button>
      </div>
      <div>
        <h2>text</h2>
        <Textview text={text} />
        <input value={text} onChange={(e) => setText(e.target.value)} />
      </div>
    </div>
  );
};

export default OptimizeTest;- Textview와 CountView에 React.memo를 사용하여 count값이 바뀌면 CountView만 리렌더, text 값이 바뀌면 Textview만 리렌더되도록 함.
그런데 Props가 객체인 경우에는 리렌더가 된다..!
const CounterB = React.memo(({ obj }) => {
  useEffect(() => {
    console.log(`CounterB Update - count : ${obj.count}`);
  });
  return <div>{obj.count}</div>;
});
- 얕은 비교를 하기 때문 : 값에 의한 비교가 아닌 객체의 주소에 의한 비교를 한다.
🔽🔽🔽 해결 🔽🔽🔽const CounterB = ({ obj }) => { useEffect(() => { console.log(`CounterB Update - count : ${obj.count}`); }); return <div>{obj.count}</div>; }; const areEqual = (prevProps, nextProps) => { if (prevProps.obj.count === nextProps.obj.count) { return true; //이전 프롭스 현재 프롭스가 같다 -> 리렌더링을 일으키지 않게 된다 } return false; //더 좋은 코드 : return prevProps.obj.count === nextProps.obj.count }; const MemoizedCounterB = React.memo(CounterB, areEqual);
6-12. 최적화3 - useCallback
useCallback
- 특정 함수를 새로 만들지 않고 재사용
- 메모제이션된 함수를 반환하는 함수
- 의존 배열안에 넣어준 값이 바뀔 때에만 새로운 객체를 생성한다. (리렌더링)
- `const add = useCallback(() => x+ y, [x, y]);
  const onCreate = useCallback((author, content, emotion) => {
    const created_date = new Date().getTime();
    const newItem = {
      author,
      content,
      emotion,
      created_date,
      id: dataId.current,
    };
    dataId.current += 1;
    setData((data) => [newItem, ...data]); //함수형 업데이트 : 최신의 데이터를 사용할 수 있도록 해줌
  }, []);
6-13. 최적화4 - 최적화 완성
const onRemove = useCallback((targetId) => {
    setData((data) => data.filter((it) => it.id !== targetId));
  }, []);

  const onEdit = useCallback((targetId, newContent) => {
    setData((data) =>
      data.map((it) =>
        it.id === targetId ? { ...it, content: newContent } : it
      )
    );
}, []);- 데이터의 양이 많고, 리소스까지 추가되면 리렌더링에 굉장히 큰 메모리 소모가 일어나므로 비효율적임.`
6-14. 복잡한 상태변화 로직 분리
useReducer
useState의 대안const [state, dispatch] = useReducer(reducer, initialState);state: 우리가 앞으로 컴포넌트에서 사용할 수 있는 상태dispatch: 액션을 발생시키는 함수- `dispatch({type: 'INCREMENT'})
useReducer의 첫번째 파라미터 : reducer 함수useReducer의 두번째 파라미터 : 초기 상태const reducer = (state, action) => { switch (action.type) { case "INIT": { return action.data; } case "CREATE": { const created_date = new Date().getTime(); const newItem = { ...action.data, created_date, }; return [newItem, ...state]; } case "REMOVE": { return state.filter((it) => it.id !== action.targetId); } case "EDIT": { return state.map((it) => it.id === action.targetId ? { ...it, content: action.newContent } : it ); } default: return state; } };const [data, dispatch] = useReducer(reducer, []);const getData = async () => { const res = await fetch( "https://jsonplaceholder.typicode.com/comments" ).then((res) => res.json()); const initData = res.slice(0, 20).map((it) => { return { author: it.email, content: it.body, emotion: Math.floor(Math.random() * 5) + 1, //Math.floor : 소수점 자리를 버려서 정수로 바꿔줌 created_date: new Date().getTime(), id: dataId.current++, }; }); dispatch({ type: "INIT", data: initData }); }; const onCreate = useCallback((author, content, emotion) => { dispatch({ type: "CREATE", data: { author, content, emotion, id: dataId.current }, }); dataId.current += 1; }, []); const onRemove = useCallback((targetId) => { dispatch({ type: "REMOVE", targetId }); }, []); const onEdit = useCallback((targetId, newContent) => { dispatch({ type: "EDIT", targetId, newContent }); }, []);
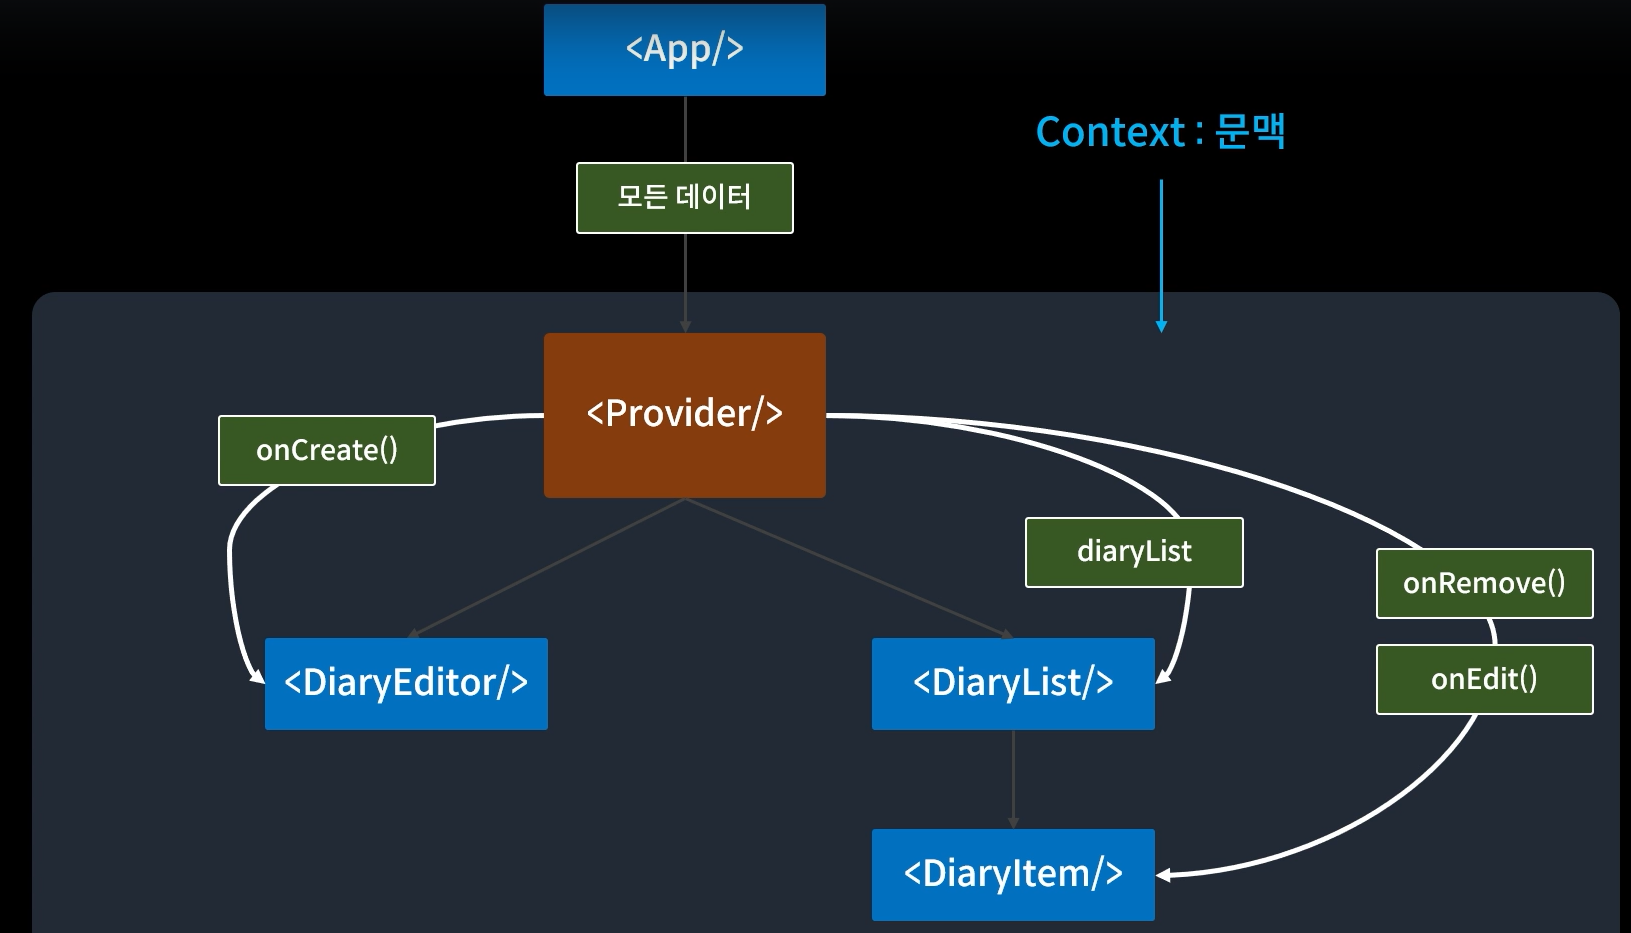
6-15. 컴포넌트 트리에 데이터 공급

🔽🔽🔽
export와 export default 차이
- export default : 이름 바꿔서 import 받을 수 있음
- export : 이름 그대로 import 받아야함
export const DiaryStateContext = React.createContext();
export const DiaryDispatchContext = React.createContext();
return ( <DiaryStateContext.Provider value={data}> <DiaryDispatchContext.Provider value={memoizedDispatches}> <div className="App"> <DiaryEditor /> <div>전체 일기 : {data.length}</div> <div>기분 좋은 일기 개수 : {goodCount}</div> <div>기분 나쁜 일기 개수 : {badCount}</div> <div>기분 좋은 일기 비율 : {goodRatio}</div> <DiaryList /> </div> </DiaryDispatchContext.Provider> </DiaryStateContext.Provider> );