이 글은 udemy의 '한입 크기로 잘라 먹는 리액트(React.js)'를 수강하고 적는 글입니다.
📌 섹션 2: Javascript 기본
2-9. 객체
- 객체 선언 방식
let person = new Object();
// 주로 아래 방식 (객체 리터럴 방식) 사용
let person = {
  // 프로퍼티 (객체 프로퍼티)
  // 멤버 : 프로퍼티 중 함수가 아닌 것
  name: "이정환",
  age: 25,

  // 메소드 : 객체 안의 함수
  say: function () {
    console.log(`안녕 나는 ${this.name}`);
  }
};

console.log(person.name);
console.log(person["name"]);
console.log(getPropertyValue("name"));
person.say();

function getPropertyValue(key) {
  return person[key];
}
- 프로퍼티 값 추가, 수정, 삭제
const로 선언하고 값 추가, 수정해도 오류 X -> person 자체를 수정하는 것이 아니라 프로퍼티의 값을 변경하는 것이기 때문
// 프로퍼티 추가
person.location = "한국";
person["gender"] = "남성";

// 프로퍼티 수정
person.name = "이정환 A";

// 프로퍼티 삭제
delete person.age; //프로퍼티 자체 삭제
person.name = null; // 프로퍼티 값 삭제 <-- 주로 이 방법 사용- 프로퍼티 값 존재 확인
console.log(`name: ${"name" in person}`); //name이란 프로퍼티가 객체 안에 있는가? true of false2-10. 배열
let arr = [1, 2, 3, 4, 5]; //배열 리터럴
console.log(arr[0]);

arr.push(6); // 맨 뒤에 원소 추가
arr.push({ key: "value"}); //객체도 추가 가능
console.log(arr.length); //배열의 길이
2-11. 반복문
const arr = ["a", "b", "c"];

for (let i = 0; i < arr.length; i++) {
  console.log(arr[i]);
}- 객체와 배열
let person = {
  name: "이정환",
  age: 25,
  tall: 175
};

const personKeys = Object.keys(person); //객체의 키를 배열로 반환해주는 함수
const personValues = Object.values(person); //객체의 value를 배열로 반환해주는 함수

console.log(personKeys);
for (let i = 1; i < personKeys.length; i++) {
  const curKey = personKeys[i];
  const curValue = person[curKey];

  console.log(`${curKey} : ${curValue}`);
}
2-12. 배열 내장함수
forEach, map, includes, indexOf
js const arr = [1, 2, 3, 4];
- forEach
for (let i = 0; i < arr.length; i++) {
  console.log(arr[i]);
}
🔽🔽🔽
arr.forEach((elm) => console.log(elm));
- map
const newArr = [];
arr.forEach((elm) => newArr.push(elm * 2));
🔽🔽🔽
const newArr = arr.map((elm) => {//원소 순회
  return elm * 2;
});
- includes
let number = 3;
arr.forEach((elm) => {
  if (elm === number) {
    console.log(true);
  }
});
🔽🔽🔽
console.log(arr.includes(number));
- indexOf
console.log(arr.indexOf(number)); //-1 : 없다
findIndex, find, filter, slice
const arr = [
{ num:1, color: "red" },
{ num:2, color: "black" },
{ num:3, color: "blue" },
{ num:4, color: "green" },
{ num:5, color: "blue" }
];
- findIndex : 인덱스 받기
console.log(
  arr.findIndex((elm) => {
    return elm.color === "green";
  })
);
- find : 요소 받기
const element = arr.find((elm) => {
  return elm.color === "blue";
});
- filter : 배열 필터링
console.log(arr.filter((elm) => elm.color === "blue"));
- slice : 배열 자르기
console.log(arr.slice(0, 2)); // 0부터 2전까지 자르기
concat, sort, join
- concat : 배열 붙이기
const arr1 = [
  { num:1, color: "red" },
  { num:2, color: "black" },
  { num:3, color: "blue" }
];
const arr2 = [
  { num:4, color: "green" },
  { num:5, color: "blue" }
];
console.log(arr1.concat(arr2)); // arr1에 arr2붙이기
- sort : 배열 정렬하기
let chars = ["나", "다", "가"];
chars.sort(); //원본 배열을 사전 순으로 정렬
let numbers = [0, 1, 3, 2, 10, 30, 20]; numbers.sort(); //문자열 순으로 정렬하기 때문에 이상하게 나옴 const compare = (a, b) => { if(a > b) { return 1; } if(a < b) { return -1; } return 0; } //1이 나오면 뒤로 보내고 -1이 나오면 앞으로 보내고 0이 나오면 그대로 numbers.sort(compare);
- join : 문자열로 요소들 하나로 합쳐 반환
괄호 안 : 각 요소 사이에 넣어지는 값, default : 온점const arr = ["이정환", "님", "안녕하세요", "또오셨군요"]; console.log(arr.join(" ")); //문자열로 하나로 합쳐줌
📌 섹션 3: Javascript 응용
3-1. Truthy & Falsy
Truthy
- []
- {}
- 숫자 0 제외
- "문자열"
- Infinity
Falsy
- null
- undefined
- 0, -0
- NaN
- "" (빈 문자열)
const getName = (person) => {
  if(person === undefined || person == null){
    return  "객체가 아닙니다";
  }
  return person.name;
};

let person = {name: "이정환"};
const name = getName(person);
console.log(name);
🔽🔽🔽
const getName = (person) => {
  if(!person) {
    return "객체가 아닙니다";
  }
  return person.name;
};

let person = {name: "이정환"};
const name = getName(person);
console.log(name);
3-2. 삼항 연산자
조건문 ? 참 : 거짓
let a = 3;
a >= 0 ? console.log("양수") : console.log("음수");

let b = [];
b.length === 0 ? console.log("빈 배열") : console.log("안 빈 배열");
const arrayStatus = a.length === 0 ? "빈 배열" : "안 빈 배열";
삼항 연산자와 Truthy & Falsy
let a; //undefined
const result = a ? true : false;
console.log(result);
삼항 연산자 중첩
- TODO : 학점 계산 프로그램
90점 이상 A+
50점 이상 B+
둘 다 아니면 Flet score = 100; score >= 90 ? console.log("A+"):score >= 50 ? console.log("B+"):console.log("F"); ```
3-3. 단락 회로 평가
단락 회로 평가 : 뒤의 피연산자를 볼 필요가 없는 것
- false && true
- true || false
const getName = (person) => {
  if(!person) {
    return "객체가 아닙니다";
  }
  return person.name;
};

let person = {name: "이정환"};
const name = getName(person);
console.log(name);
🔽🔽🔽
const getName = (person) => {
  const name = person && person.name;
  return name || "객체가 아닙니다.";
};

let person = null;
consolr.log(getName(perso));
3-4. 조건문 Upgrade
function isKoreanFood(food) {
  if (["불고기", "떡볶이", "비빔밥"].includes(food)) {
    return true;
  }
  return false;
}

const food1 = isKoreanFood("불고기");
const meal = {
한식: "불고기",
중식: "멘보샤",
일식: "초밥",
양식: "스테이크",
인도식: "카레"
};
const getMeal = (mealType) => {
return meal[mealType] || "굶기";
};
console.log(getMeal("한식"));3-5. 비 구조화 할당
배열
let arr = ["one", "two", "three"];1.
let one = arr[0];
let two = arr[1];
let three = arr[2];
2.
let [one, two, three] = arr;3.
let [one, two, three] = ["one", "two", "three"];SWAP
let a = 10;
let b = 20;
[a, b] = [b, a];
console.log(a, b);
객체
- 순서가 아닌 key 값을 기준으로 할당
let object = {one : "one", two : "two", three = "three", name:"이정환"};
let {name: myName, one, two, three} = object;
//다른 변수명을 사용하고 싶으면 myName처럼 : 뒤에 써서 사용
3-6. spread 연산자
const cookie = {
  base: "cookie",
  madeIn: "Korea"
};

const chocochipCookie = {
  ...cookie,
  toping: "chocochip"
};

const strawberryCookie = {
  ...cookie,
  toping: "strawberry"
};

const noTopingCookies = ['촉촉한쿠키', '안촉촉한쿠키'];
const topingCooies = ["바나나쿠키", "블루베리쿠키", "딸기쿠키"];

const allCookies = [...noTopingCookies, ...topingCooies];
3-7. 동기 & 비동기
동기 & 비동기
자바스크립트의 싱글 스레드 작업 수행 방식
- 자바스크립트는 코드가 작성된 순서대로 작업을 처리함
- 이전 작업이 진행 중 일 때는 다음 작업을 수행하지 않고 기다림
- 먼저 작성된 코드를 먼저 다 실행하고 나서 뒤에 작성된 코드를 실행한다.
=>동기 방식의 처리(블로킹 방식)문제점
- 하나의 작업이 너무 오래 걸리게 될 시, 모든 작업이 오래 걸리는 하나의 작업이 종료되기 전까지 올 스탑 되기 때문에, 전반적인 흐름이 느려진다.
멀티 쓰레드
- 일꾼이 여러개 -> 그러나 자바스크립트는 싱글 스레드
동기 방식 극복
- 여러 개의 작업을 동시에 실행시킴
- 먼저 작성된 코드의 결과를 기다리지 않고 다음 코드를 바로 실행함.
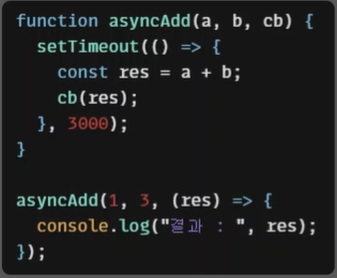
=>비동기 방식의 처리(논 블로킹 방식)콜백함수를 붙여서 비동기 방식의 작업이 잘 끝났는지와 결과값을 확인함.
function taskA(a, b, cb) {
setTimeout(() => {
const res = a + b;
cb(res); //콜백 함수
}, 3000); //3초
}
function taskB(a, cb) {
setTimeout(() => {
const res = a * 2;
cb(res);
}, 1000);
}
function taskC(a, cb) {
setTimeout(() => {
const res = a * -1;
cb(res);
}, 2000);
}
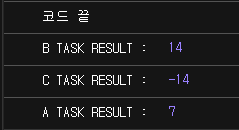
taskA(3, 4, (res) => {
console.log("A TASK RESULT : ", res);
});
taskB(7, (res) => {
console.log("B TASK RESULT : ", res);
});
taskC(14, (res) => {
console.log("C TASK RESULT : ", res);
});
console.log("코드 끝");
console
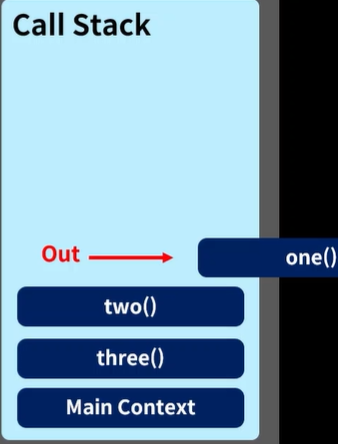
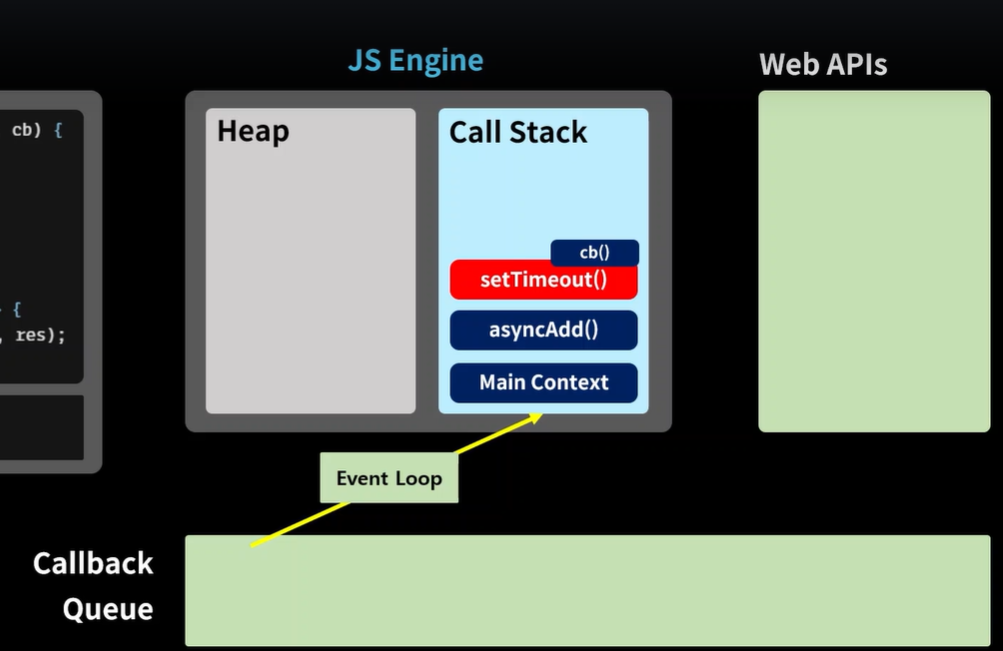
JS Engine - Call Stack
동기식 작업
- Code
- Call Stack
비동기식 작업
- Code
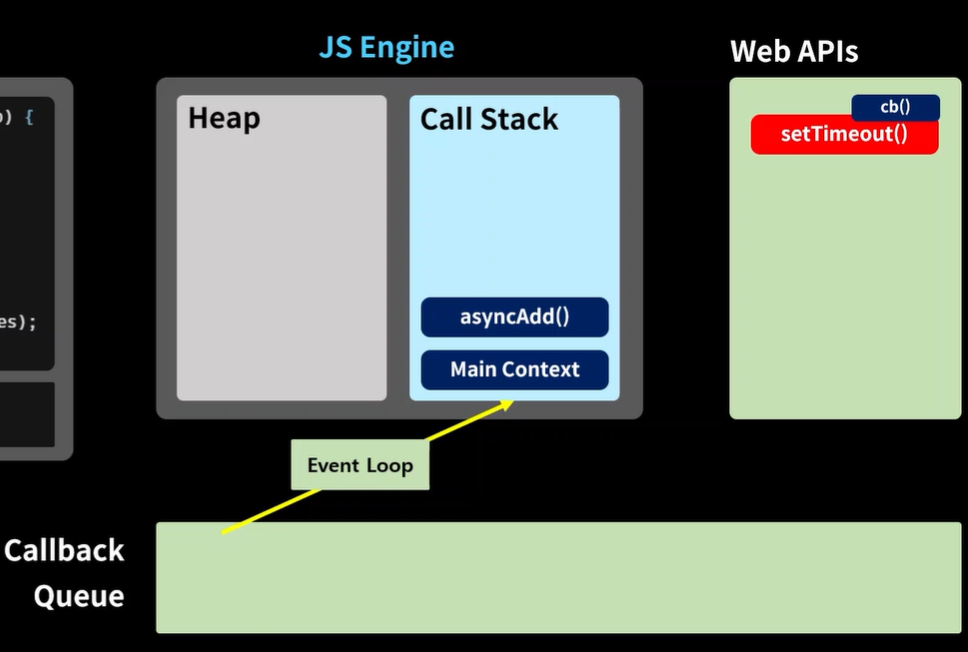
- Call Stack, Web APIs, Callback Queue
+) 빨간색 : 비동기식 함수
-> 3초 대기
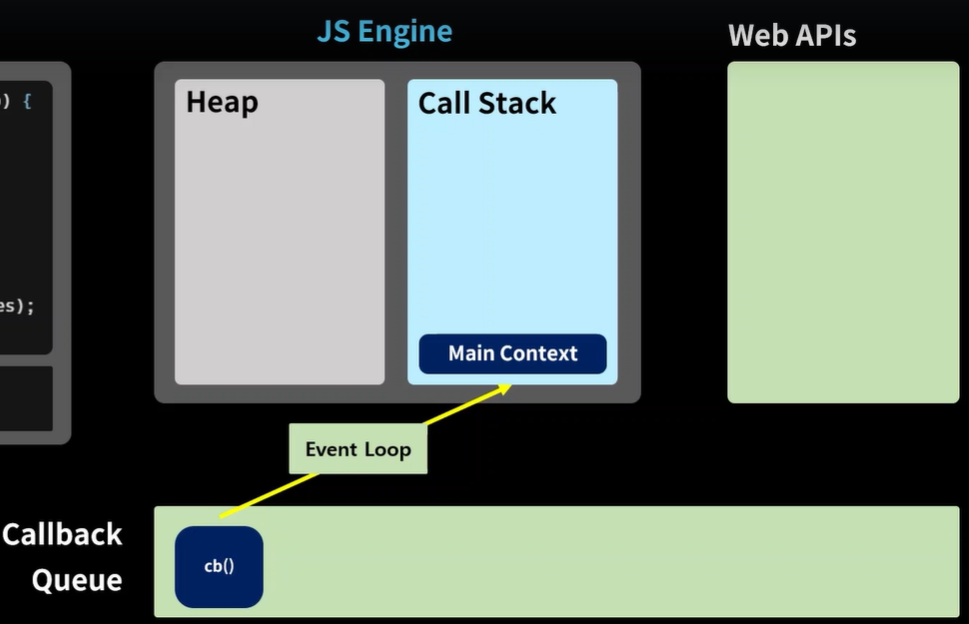
-> Event Loop이 Call Stack에 Main Context 이외에 남아있는게 있는지 계속적으로 확인

function taskA(a, b, cb) {
  setTimeout(() => {
    const res = a + b;
    cb(res); //콜백 함수
  }, 3000); //3초
}

function taskB(a, cb) {
  setTimeout(() => {
    const res = a * 2;
    cb(res);
  }, 1000);
}

function taskC(a, cb) {
  setTimeout(() => {
    const res = a * -1;
    cb(res);
  }, 2000);
}

taskA(4, 5, (a_res) => {
  console.log("A RESULT : ", a_res);
  taskB(a_res, (b_res) => {
    console.log("B RESULT : ", b_res);
    taskC(b_res, (c_res) => {
      console.log("C RESULT : ", c_res);
    });
  });
});
3-8. Promise | 콜백지옥 탈출
- 비동기 작업이 가질 수 있는 3가지 상태
- Pending(대기 상태)
- Fulfilled(성공)
- Rejected(실패)
Pending ➡ resolve(해결) ➡ Fulfilled
Pending ➡ reject(거부) ➡ Rejected
- 콜백 함수
function isPositive(number, resolve, reject) {
  setTimeout(() => {
    if (typeof number === "number") {
      resolve(number >= 0 ? "양수" : "음수");
    } else {
      reject("주어진 값이 숫자형 값이 아닙니다.");
    }
  }, 2000);
}

isPositive(
  10,
  (res) => {
    console.log("성공적으로 수행됨 : ", res);
  },
  (err) => {
    console.log("실패 하였음 : ", err);
  }
);
🔽🔽🔽
- Promise : 실행 함수는 프로미스를 이행(resolve)하거나 거부(reject)할 수 있음.
- Promise.resolve()
Promise.resolve()가 반환하는 프로미스는 then 메서드를 "따라가서" 자신의 최종상태를 결정 - Promise.reject()
주어진 사유로 거부하는 Promise 객체를 반환 - then(), catch()
프로미스를 이행했을 때 할 일은 then() 호출로 정의하고, 거부됐을 때 할 일은 catch() 호출로 정의
- Promise.resolve()
function isPositiveP(number) {
  const executor = (resolve, reject) => {
    setTimeout(() => {
      if (typeof number === "number") {
        resolve(number >= 0 ? "양수" : "음수");
      } else {
        reject("주어진 값이 숫자형 값이 아닙니다.");
      }
    }, 2000);
  };
  const asyncTask = new Promise(executor);
  return asyncTask;
}

const res = isPositiveP(101);

//Promise 메소드 : then, catch
res
  .then((res) => {
    console.log("작업 성공 : ", res);
  })
  .catch((err) => {
    console.log("작업 실패 : ", err);
});- 콜백 지옥
function taskA(a, b, cb) {
  setTimeout(() => {
    const res = a + b;
    cb(res); //콜백 함수
  }, 3000); //3초
}

function taskB(a, cb) {
  setTimeout(() => {
    const res = a * 2;
    cb(res);
  }, 1000);
}

function taskC(a, cb) {
  setTimeout(() => {
    const res = a * -1;
    cb(res);
  }, 2000);
}

taskA(4, 5, (a_res) => {
  console.log("A RESULT : ", a_res);
  taskB(a_res, (b_res) => {
    console.log("B RESULT : ", b_res);
    taskC(b_res, (c_res) => {
      console.log("C RESULT : ", c_res);
    });
  });
});
🔽🔽🔽
- Promise로 해결 : then 체인
function taskA(a, b) {
  return new Promise((resolve, reject) => {
    setTimeout(() => {
      const res = a + b;
      resolve(res);
    }, 3000);
  });
}

function taskB(a) {
  return new Promise((resolve, reject) => {
    setTimeout(() => {
      const res = a * 2;
      resolve(res);
    }, 1000);
  });
}

function taskC(a) {
  return new Promise((resolve, reject) => {
    setTimeout(() => {
      const res = a * -1;
      resolve(res);
    }, 2000);
  });
}

taskA(5, 1)
  .then((a_res) => {
    console.log("A RESULT : ", a_res);
    return taskB(a_res); // taskB의 Promise 전달
  })
  .then((b_res) => {
    console.log("B RESULT : ", b_res);
    return taskC(b_res); // taskC의 Promise 전달
  })
  .then((c_res) => {
    console.log("C RESULT : ", c_res);
  });

/*위와 같은 코드인데 중간에 끊기 가능함을 보여줌*/
const bPromiseResult = taskA(5, 1)
  .then((a_res) => {
    console.log("A RESULT : ", a_res);
    return taskB(a_res); // taskB의 Promise 전달
  });

bPromiseResult.then((b_res) => {
    console.log("B RESULT : ", b_res);
    return taskC(b_res); // taskC의 Promise 전달
  })
  .then((c_res) => {
    console.log("C RESULT : ", c_res);
  });
3-9. async / await | 직관적인 비동기 처리
- async : 반드시 프라미스를 반환, 프라미스가 아닌 것은 프라미스로 감싸 반환
function delay(ms) {
  return new Promise((resolve) => {
    setTimeout(resolve, ms);
  });
}

/*자동적으로 Promise를 호출함*/
async function helloAsync() {
  return delay(3000).then(() => {
    return "hello Async";
  });
}

helloAsync().then((res) => {
  console.log(res);
});
- await : 프라미스가 처리될 때까지 기다림. async 함수 안에서만 동작
async function helloAsync() {
  await delay(3000); //동기적 작동
  return "hello Async";
}
async function main (){
  const res = await helloAsync();
  console.log(res);
}
3-10. API 호출하기
- API(Application Programming Interface) : 응용 프로그램 프로그래밍 인터페이스

- API 호출 : SERVER와의 대화 (Request, Response)

오픈 API : https://jsonplaceholder.typicode.com/
- Response 자체를 가져옴
let response = fetch("https://jsonplaceholder.typicode.com/posts").then((res) =>
  console.log(res)
);- json 형태의 정보들을 가져옴
async function getData() {
  let rawResponse = await fetch("https://jsonplaceholder.typicode.com/posts");
  let jsonResponse = await rawResponse.json();
  console.log(jsonResponse);
}

getData();