
배열 : 연관된 데이터를 모아 그룹으로 관리하기 위해 사용하는 데이터타입.
- 여러 개의 데이터를 하나의 변수에 저장하기 위해 사용
- 모든 데이터유형(문자열, 숫자 및 boolean 포함) 을 저장할 수 있음
- list와 마찬가지로 순서가 지정되어 있어 배열을 꺼낼 때 [ ]를 이용하여 index를 넣어 불러옴
1. 배열만들기
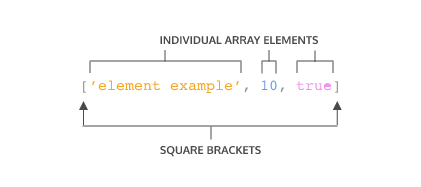
배열은 대괄호 내에 각 요소들이 쉼표로 구분되어 있으며, 배열을 변수에 저장할 수도 있음
2. Accessing Elements
배열의 각 요소에는 index가 매겨져 있으며 0부터 시작함
let student = ['gemma', 'monica', 'dani']배열을 꺼낼 때는 대괄호 안에 index를 넣어 불러옴
예)
alert(student[0]);

//print : 'gemma'
3. Update Elements
인덱스를 이용하여 기존값을 새로운 값으로 변경
let seasons = ['Winter', 'Spring', 'Summer', 'Fall'];

seasons[3] = 'Autumn';
console.log(seasons);

//Output: ['Winter', 'Spring', 'Summer', 'Autumn']
4. Arrays with let and const
let과 const 에서 const는 상수이므로 변경이 안된다고 하였으나,
배열에서는 [ ] 내 값이 변경 가능함
let condiments = ['Ketchup', 'Mustard', 'Soy Sauce', 'Sriracha'];
const utensils = ['Fork', 'Knife', 'Chopsticks', 'Spork'];

condiments[0] = 'Mayo';
console.log(condiments); // print : ['Mayo', 'Mustard', 'Soy Sauce', 'Sriracha']

condiments = ['Mayo']; // print : ['Mayo']

utensils[3] = 'Spoon';

console.log(utensils); // print : ['Fork', 'Knife', 'Chopsticks', 'Spoon']
5. .length property
배열에 몇 개의 요소가 있는지 알고싶을 때 .length 속성을 이용할 수 있음
const hobbies = ['singing', 'reading', 'running'];

console.log(objectives.length);

// print : 3
6. .push() Method
Js 메서드 중 하나인 .push()는 배열 끝에 항목을 추가해줌
- push()는 단일 인수 또는 쉼표로 구분된 여러 인수를 사용할 수 있음
const hobbies = ['running', 'reading', 'driving'];

hobbies.push('studying', 'riding');

console.log(hobbies);

//print : ['running', 'reading', 'driving', 'studying', 'riding']
7. .pop() Method
배열의 마지막 항목을 삭제함
.pop()은 인수를 취하지 않으며 단순히 마지막 요소를 제거하기만 함
const hobbies = ['running', 'reading', 'driving', 'studying', 'riding'];

hobbies.pop();

console.log(hobbies);

// print : ['running', 'reading', 'driving', 'studying']
8. 그외 기타 method
.slice(시작인덱스, 종료인덱스):- 시작인덱스를 지정하지 않을 경우 0부터 slice되며,
- 음수로 지정한 경우 배열 끝에서부터의 길이를 나타냄(slice(-2)면 배열 마지막 2개 요소 추출)
- 종료인덱스를 지정하지 않을 경우 배열 끝까지 slice되며,
- 음수를 지정한 경우 배열 끝에서부터의 길이를 나타냄 (slice(2,-1)을 하면 세번째부터 끝에서 두번째 요소까지 추출)
let num = [1, 2, 3, 4, 5, 6, 7, 8, 9, 10];
num.slice(3, 5) // [4, 5]
num.slice(-3) // [8, 9, 10]
num.slice(-3, 9) // [8, 9]
num.slice(5, -4) // [6]
.splice(시작인덱스, 제거할요소수, 추가할 요소): 추가할 요소를 입력하지 않으면 제거만 됨
const name = ['a', 'b', 'c', 'd', 'e']
name.splice(2, 0, 'x');
//print : ['a', 'b', 'x', 'c', 'd', 'e']

name.splice(0, 0, 'y');
//print : ['y', 'a', 'b', 'x', 'c', 'd', 'e']

name.splice(2, 1); //b 삭제
//print : ['y', 'a', 'x', 'c', 'd', 'e'].shift(): 배열 앞에서부터 항목 제거하기unshift(): 배열 앞에 항목 추가하기indexOf(): 인덱스 위치 찾기includes(): 배열에 해당하는 값이 있는지 true/false로 확인lastIndexOf(): 동일한 값이 있을 때indexOf()는 가장 처음 값의 index를 알려주는 반면,lastIndexOf()는 제일 마지막 값의 index를 출력함concat(): 두 가지 배열 합치기
const color = ['blue', 'gray', 'pink'];
const color2 = ['white', 'black'];

const newColor = color.concat(color2);
console.log(newColor);

//output:  ["blue", "gray", "pink", "white", "black"]
9. 배열과 함수
const color = ['white', 'blue', 'yellow']
function addcolor(arr) {
  arr.push('black');
}

addcolor(color);
console.log(color); // ['white', 'blue', 'yellow', 'black']
10. Nested Arrays
배열이 다른 배열을 저장하는 것을 중첩 배열이라고 함
const nestedArr = [[1], [2, 3]];
- 중첩 배열에 접근하려면, 다른 요소에 접근할때와 마찬자기로 인덱스 값과 함께 대괄호를 사용
const nestedArr = [[1], [2, 3]];

console.log(nestedArr[1]); // Output: [2, 3]- 중첩 배열 내의 요소에 접근하려는 경우 더 많은 대괄효로 연결
const nestedArr = [[1], [2, 3]];

console.log(nestedArr[1]); // Output: [2, 3]
console.log(nestedArr[1][0]); // Output: 2
배열과 반복문
1) for문을 이용
function get_student() {
	return ['gemma', 'monica', 'dani'];
}
student = get_student();
for(i = 0; i < student.length; i++) {
	document.write(student[i].toUpperCase() + '<br>');
}
2) for...of를 이용
function get_student() {
	return ['gemma', 'monica', 'dani'];
}
student = get_student();

for (let std of student) {
  console.log(std);
}
3) forEach 활용 forEach(value: , indexL, array:)
function get_student() {
	return ['gemma', 'monica', 'dani'];
}
student = get_student();

student.forEach(function(std, index, array) {
    console.log(std, index, array);
})

/*output
gemma 0 (3) ["gemma", "monica", "dani"]
monica 1 (3) ["gemma", "monica", "dani"]
dani 2 (3) ["gemma", "monica", "dani"] */
보통은 array를 표시하지 않으며, function 대신 =>를 사용
student.forEach((std, index) => {
  console.log(std, index);
});

위처럼 한줄만 있는 경우는 중괄호도 생략되어 아래와 같이 더 간략하게 작성할 수 있음

student.forEach((std, index) => console.log(std, index));
파주