[42cursurs]Ray Tracing in One Weekend 11-Positionable Camera
miniRT (ray tracing tutorial)
이번엔 카메라 기능들을 구현해 본다. 먼저 시야를 조정하는 데 쓰는 field of view(fov)를 구현하자. fov는 수직, 수평 중 수직 fov를 사용할 것이다.
결국 fov가 뭐하는 거냐면, 지금까지 같은 뷰포트로 이미지를 출력했다면 fov값으로 뷰포트의 크기를 줄이고 늘일 수 있게 한다. 또 뷰포트를 크기 조정이 된다는 건, 출력되는 이미지, 출력하고자하는 풍경의 범위를 조절할 수 있게 된다.
fov라는 시야각을 어떻게 조절할 수 있을까?
Camera Viewing Geometry
아래의 이미지에서 θ가 시야각이다. 이 값에 따라
h=tan(θ/2)
로 h가 결정된다. 이 값이 곧 뷰포트의 크기를 결정하도록 할 수 있다.

위의 아이디어로 fov를 추가한 camera를 구현해보자.
camera.h
class camera {
    public:
        camera(
            double vfov, // vertical field-of-view in degrees
            double aspect_ratio
        ) {
            auto theta = degrees_to_radians(vfov);
            auto h = tan(theta/2);
            auto viewport_height = 2.0 * h;
            auto viewport_width = aspect_ratio * viewport_height;

            auto focal_length = 1.0;

            origin = point3(0, 0, 0);
            horizontal = vec3(viewport_width, 0.0, 0.0);
            vertical = vec3(0.0, viewport_height, 0.0);
            lower_left_corner = origin - horizontal/2 - vertical/2 - vec3(0, 0, focal_length);
        }

        ray get_ray(double u, double v) const {
            return ray(origin, lower_left_corner + u*horizontal + v*vertical - origin);
        }

    private:
        point3 origin;
        point3 lower_left_corner;
        vec3 horizontal;
        vec3 vertical;
};
camera를 적용해 main.cc을 수정하자.
main.cc
int main() {
    ...
    // World

    auto R = cos(pi/4);
    hittable_list world;

    auto material_left  = make_shared<lambertian>(color(0,0,1));
    auto material_right = make_shared<lambertian>(color(1,0,0));

    world.add(make_shared<sphere>(point3(-R, 0, -1), R, material_left));
    world.add(make_shared<sphere>(point3( R, 0, -1), R, material_right));

    // Camera

    camera cam(90.0, aspect_ratio);

    // Render

    std::cout << "P3\n" << image_width << " " << image_height << "\n255\n";

    for (int j = image_height-1; j >= 0; --j) {
    ...
이미지를 출력하면 아래처럼 나온다. 분명 구를 출력했는데 좌우로 퍼진 모양이 되는 이유는 원점에서만 광선이 쏘아지기 때문에 생긴 오차 때문이다.
광원의 위치가 물체와 멀수록 오차가 줄어들어 의도했던 물체에 가까운 이미지를 잘 형성한다. 이때 뷰포트는 그대로 유지할 수 있어야 한다. 뷰포트도 함께 움직이면 다음에 설명할 zoom out효과가 나서 원하던 이미지가 아닐 수 있다.
아니면 광선을 쏠때마다 뷰포트에 수직이되도록 광선을 쏘는 방법도 있지만 추천하지는 않는다.
 Image 17: A wide-angle view
Positioning and Orienting the Camera
이제 카메라의 위치를 변경할 수 있게 해보자. 몇가지 알아야할 개념이 나온다.
- look-from: 카메라(지금까지는 광원인 원점이였다)의 위치
- look-at: 우리가 바라보는 지점(뷰포트)이다. look-from에서 뷰포트 위로 수직으로 뻗은 지점 쯤 된다.
lookat과 lookfrom을 지나는 직선을 중심축으로 카메라를 회전시킬 수 있다.
 Figure 15: Camera view direction
카메라의 방향을 표현하기 위한 세가지 벡터를 알아야한다. 여기서는 u, v, w이며 카메라를 기준으로 새로운 좌표계를 만든다고 생각하면 좋다. 이 세 벡터가 카메라 좌표계의 x, y, z축이라고 보자. 원문의 orthonormal basis는 그냥 이런 성질들을 내포하는 말이다.
Figure 15: Camera view direction
카메라의 방향을 표현하기 위한 세가지 벡터를 알아야한다. 여기서는 u, v, w이며 카메라를 기준으로 새로운 좌표계를 만든다고 생각하면 좋다. 이 세 벡터가 카메라 좌표계의 x, y, z축이라고 보자. 원문의 orthonormal basis는 그냥 이런 성질들을 내포하는 말이다.
 Figure 16: Camera view up direction
위의 이미지는 u, v, w를 구하는 과정을 표현한다. 외적이 이해하기 힘들다면 그냥 저렇게 하면 그런게 나온다하고 넘어가면 좋겠다.
Figure 16: Camera view up direction
위의 이미지는 u, v, w를 구하는 과정을 표현한다. 외적이 이해하기 힘들다면 그냥 저렇게 하면 그런게 나온다하고 넘어가면 좋겠다.
- vup: 카메라 기울기를 결정하며 사용자가 지정한다.
- w: 카메라 좌표계의 z축이라고 생각하자. lookfrom - lookat의 단위벡터다.
- u: 카메라 좌표계의 x축이라고 생각하자. vup과 w의 외적으로 구할 수 있다.
- v: 카메라 좌표계의 y축이라고 생각하자. u, w의 외적으로 구한다.
주의할 점은 vup벡터와 v는 같을 수도 있지만 다른 벡터라는 점이다. vup은 카메라의 기울기를 조절하기 위해 사용자가 지정해준다. 지금까지는 vup과 v가 (0, 1, 0)로 같았다.
camera.h
class camera {
    public:
        camera(
            point3 lookfrom,
            point3 lookat,
            vec3   vup,
            double vfov, // vertical field-of-view in degrees
            double aspect_ratio
        ) {
            auto theta = degrees_to_radians(vfov);
            auto h = tan(theta/2);
            auto viewport_height = 2.0 * h;
            auto viewport_width = aspect_ratio * viewport_height;

            auto w = unit_vector(lookfrom - lookat);
            auto u = unit_vector(cross(vup, w));
            auto v = cross(w, u);

            origin = lookfrom;
            horizontal = viewport_width * u;
            vertical = viewport_height * v;
            lower_left_corner = origin - horizontal/2 - vertical/2 - w;
        }

        ray get_ray(double s, double t) const {
            return ray(origin, lower_left_corner + s*horizontal + t*vertical - origin);
        }

    private:
        point3 origin;
        point3 lower_left_corner;
        vec3 horizontal;
        vec3 vertical;
};
main.cc
hittable_list world;
auto material_ground = make_shared<lambertian>(color(0.8, 0.8, 0.0));
auto material_center = make_shared<lambertian>(color(0.1, 0.2, 0.5));
auto material_left = make_shared<dielectric>(1.5);
auto material_right = make_shared<metal>(color(0.8, 0.6, 0.2), 0.0);
world.add(make_shared<sphere>(point3( 0.0, -100.5, -1.0), 100.0, material_ground));
world.add(make_shared<sphere>(point3( 0.0, 0.0, -1.0), 0.5, material_center));
world.add(make_shared<sphere>(point3(-1.0, 0.0, -1.0), 0.5, material_left));
world.add(make_shared<sphere>(point3(-1.0, 0.0, -1.0), -0.45, material_left));
world.add(make_shared<sphere>(point3( 1.0, 0.0, -1.0), 0.5, material_right));
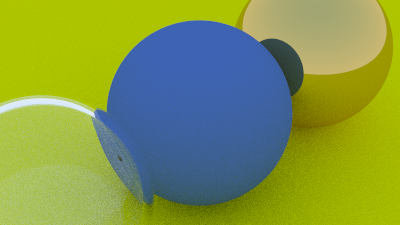
camera cam(point3(-2,2,1), point3(0,0,-1), vec3(0,1,0), 90, aspect_ratio); Image 18: A distant view
fov를 줄여서 뷰포트가 작아지면 zoom in이 된다.
main.cc
camera cam(point3(-2,2,1), point3(0,0,-1), vec3(0,1,0), 20, aspect_ratio); Image 19: Zooming in