산은 산이요. 물은 물이렷다.
Authentication
How to implement authentication in Next.js
인증 프로세스는 3개의 컨셉으로 나뉜다.
- Authentication : 인증. 유저가 누구인지 검증한다. (예: 로그인)
- Session Management : 요청 간 사용자의 인증상태를 추적한다.
- Authorization : 사용자가 어떤 데이터에 접근할 수 있는지 인가한다.
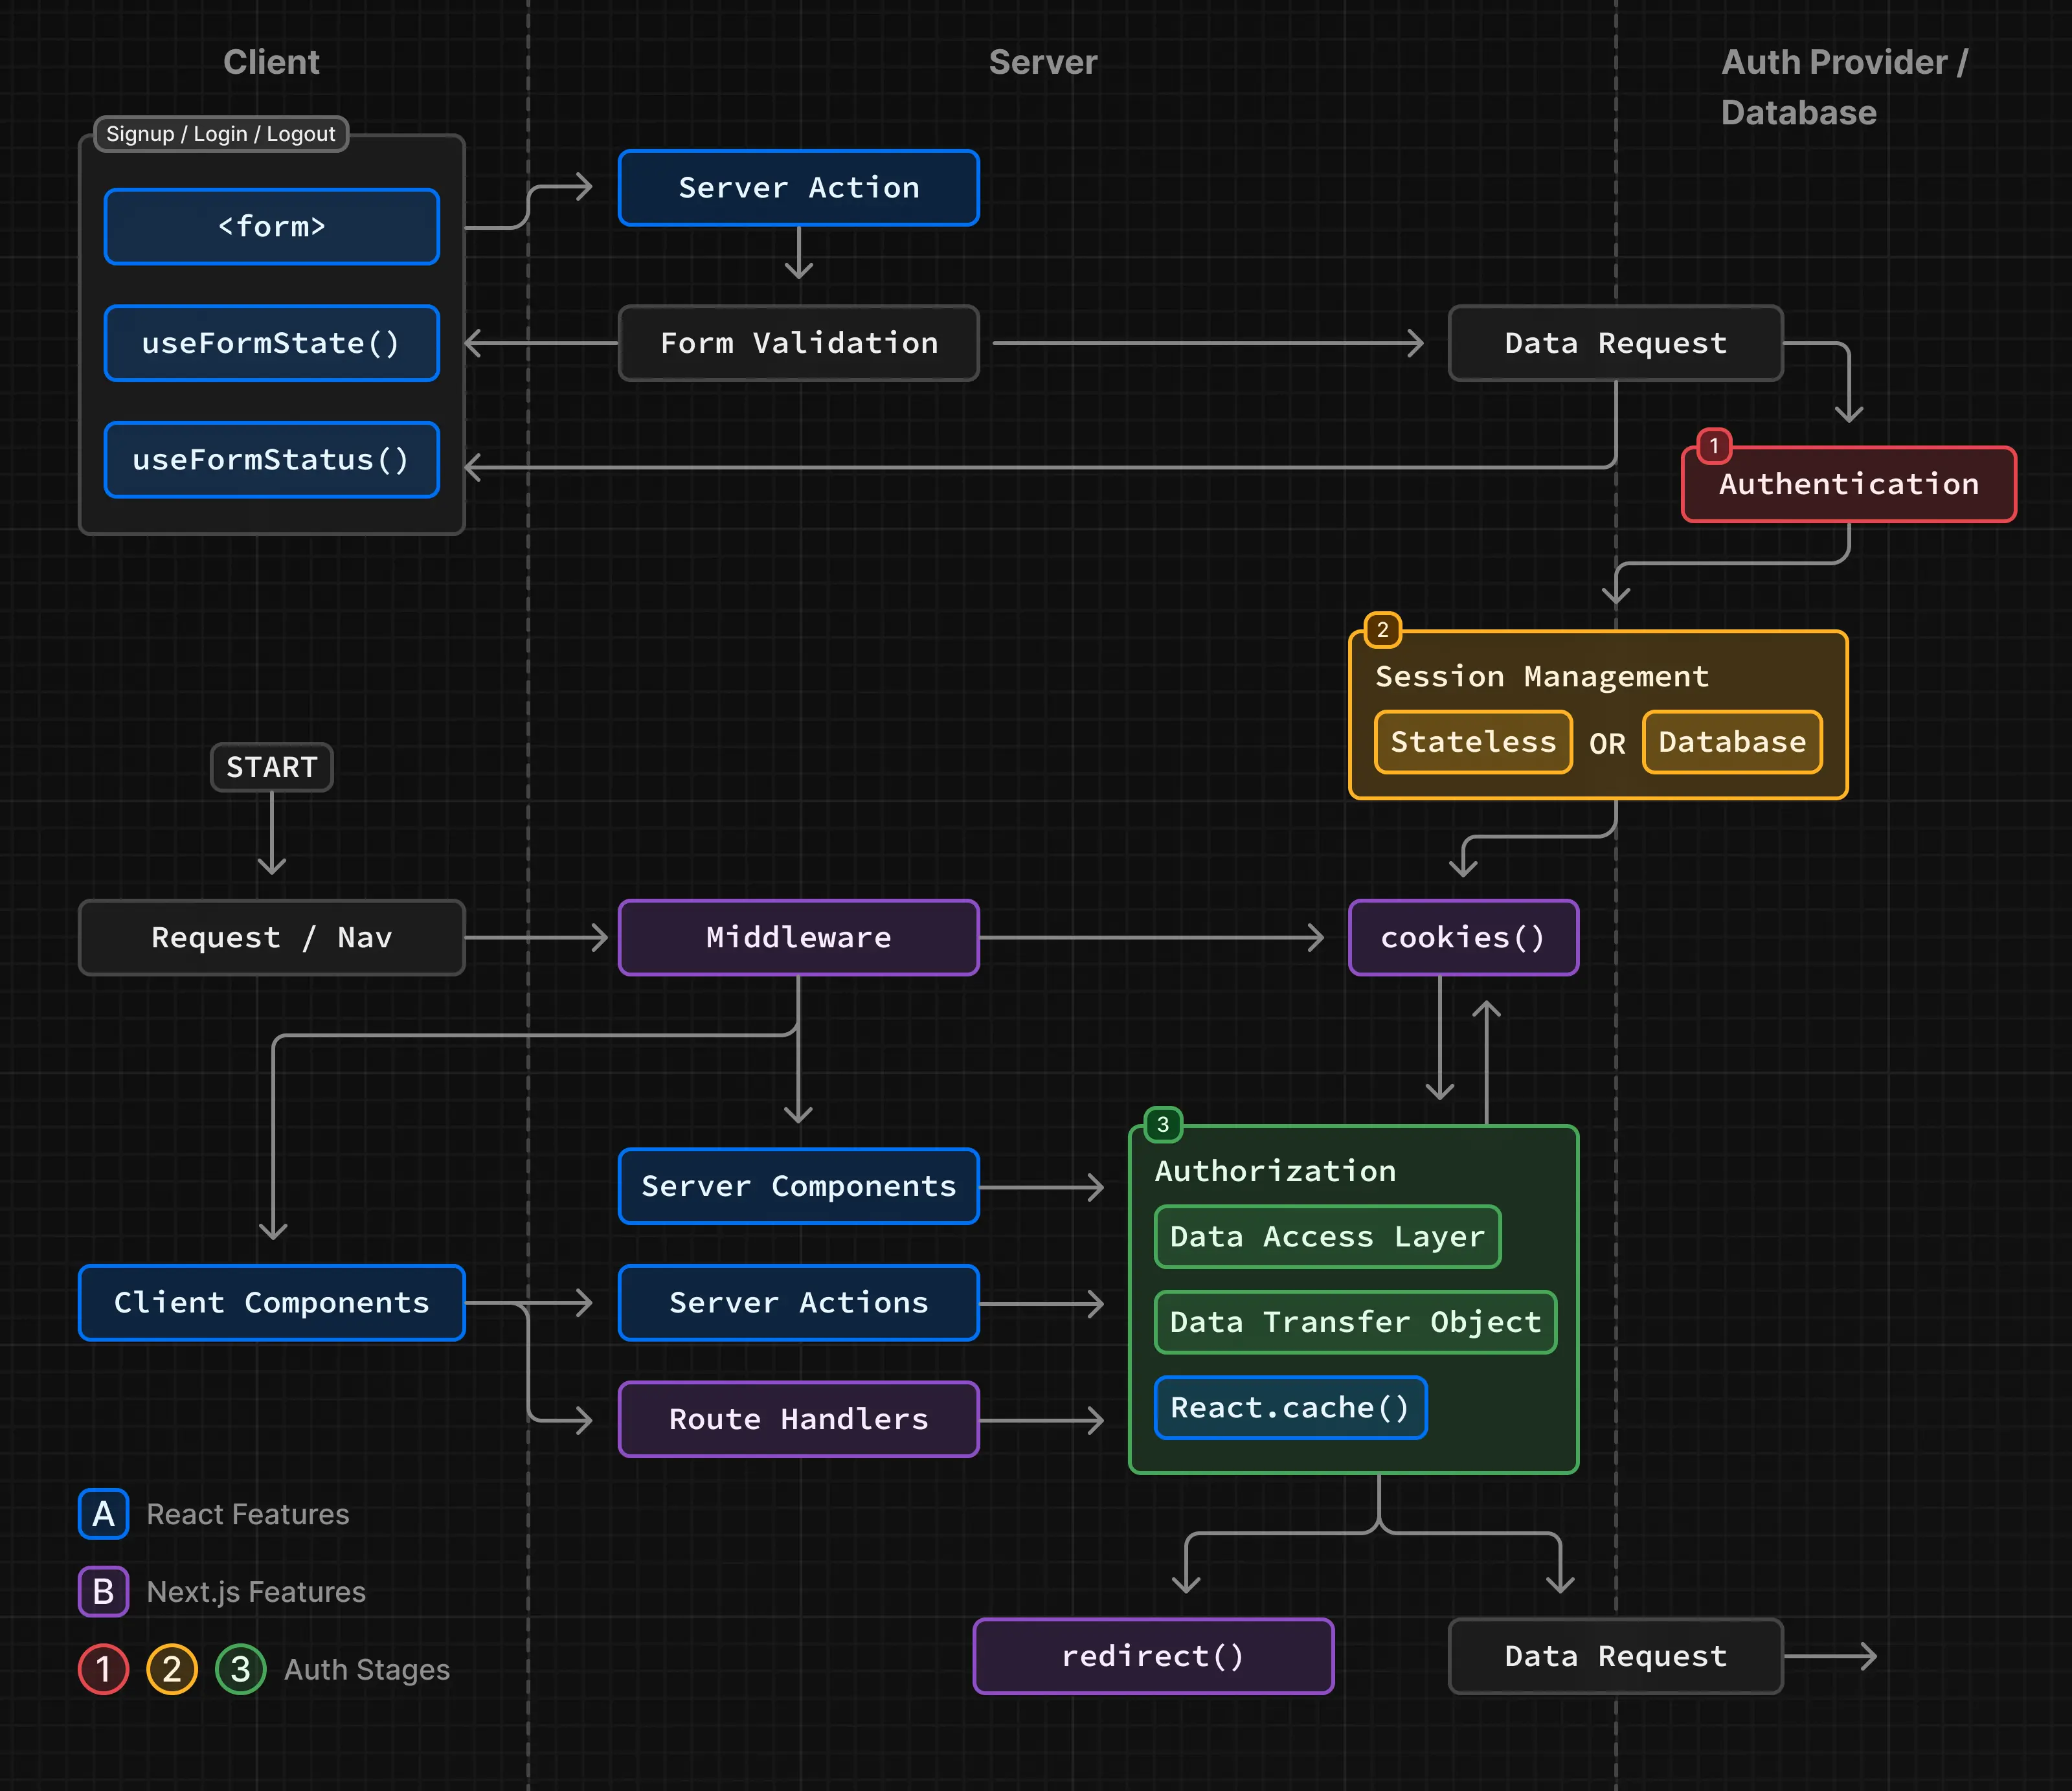
위 다이어그램은 이름과 비밀번호로 인증하는 일반적인 방법이다. 이것 말고도 Auth Libraries 들은 위의 기능과 더불어 소셜 로그인, MFA(다중 인증), 역할 기반 접근 제어도 가능하다.
Authentication
Sign-up and login functionality
<form> 과 리액트 Server Actions, useActionState 를 이용하여 사용자 인증, form 값 검증, 인증 API 혹은 DB 호출이 가능하다. signup/login 기능 구현은 다음과 같다.
- Capture user credentials
form 태그를 이용해 사용자 정보를 얻어야 한다.
- Validate form fields on the server
Server Action 을 이용해서 form 필드들을 검증한다. zod 나 yup 등을 이용해서 클라이언트 레벨에서 해도 좋다.
zod 를 이용한 검증은 넣어두면 좋다. 불필요한 Server Action 을 줄일 수 있기 때문이다.
이미 signup 하였는지 등의 나머지 작업은 Server Action 을 통해 진행한다.
- Create a user or check user credentials
Server Action 에서 2차적으로 체크하도록 함수를 만든다.
export async function signup(state: FormState, formData: FormData) {
  // 1. Validate form fields
  // ...

  // 2. Prepare data for insertion into database
  const { name, email, password } = validatedFields.data
  // e.g. Hash the user's password before storing it
  const hashedPassword = await bcrypt.hash(password, 10)

  // 3. Insert the user into the database or call an Auth Library's API
  const data = await db
    .insert(users)
    .values({
      name,
      email,
      password: hashedPassword,
    })
    .returning({ id: users.id })

  const user = data[0]

  if (!user) {
    return {
      message: 'An error occurred while creating your account.',
    }
  }

  // TODO:
  // 4. Create user session
  // 5. Redirect user
}
이제 사용자 세션을 만들 차례이다. 위의 그림에 따르면 세션은 쿠키 / DB 혹은 두 곳 모두에 저장된다.
Tips:
- 웬만하면 직접 구현하는 것보다 라이브러리를 사용하는 것을 추천한다.
- UX 를 위해 useDebounce 를 이용해서 사용자 입력과 동시에 중복된 정보를 체크할 수 있다.
Session Management
Session Management 란 사용자 인증 상태가 리퀘스트마다 유지되는 것을 말한다. 세션 혹은 토큰을 Creating, Storing, Refreshing, Deleting 할 수 있다.
여기에는 2가지 타입의 세션들이 존재한다.
- Stateless : 세션 데이터 혹은 쿠키가 브라우저의 쿠키에 저장되어 있는 경우이다. 각 요청마다 쿠키가 전송되며, 서버에서 세션이 인증된다. 간단하지만 자칫 잘못하면 보안 상 문제가 발생한다.
- Database : 세션 데이터가 DB 에 저장되어 있는 경우이다. 사용자의 브라우저는 암호화된 세션 아이디만을 수신한다. 보안 상 더 우수하지만 구현이 복잡하고 서버 자원을 더 많이 쓴다.
Stateless Sessions
- 비밀키를 생성하여 세션을 인증한다. 그리고 환경변수로 저장한다.
- 세션 관리 라이브러리로 암호화/복호화 로직을 작성한다.
- Next.js 의 cookies API 를 이용해서 쿠키를 관리한다.
사용자가 앱을 다시 사용할 때를 대비해 세션을 update / refresh 하는 기능 또한 고려해 보자. 사용자가 로그아웃하면 delete 도 해야 한다.
- 비밀키 생성
openssl 을 사용할 수 있다. 아래는 32자의 랜덤 문자열을 생성한다.
openssl rand -base64 32이를 환경변수 파일에 저장한다.
# .env 파일
SESSION_SECRET=your_secret_key
그리고 이 키를 참조할 수 있다.
const secretKey = process.env.SESSION_SECRET- 세션 암호화 / 복호화
session management library 를 이용할 수 있다. 이 중 아래는 Jose 를 사용하고 server-only 패키지를 임포트하기 때문에 서버에서 실행됨을 보장한다.
import 'server-only'
import { SignJWT, jwtVerify } from 'jose'
import { SessionPayload } from '@/app/lib/definitions'

const secretKey = process.env.SESSION_SECRET
const encodedKey = new TextEncoder().encode(secretKey)

export async function encrypt(payload: SessionPayload) {
  return new SignJWT(payload)
    .setProtectedHeader({ alg: 'HS256' })
    .setIssuedAt()
    .setExpirationTime('7d')
    .sign(encodedKey)
}

export async function decrypt(session: string | undefined = '') {
  try {
    const { payload } = await jwtVerify(session, encodedKey, {
      algorithms: ['HS256'],
    })
    return payload
  } catch (error) {
    console.log('Failed to verify session')
  }
}
payload 는 항상 최소한으로 유지하라. 개인을 특정할 수 있는 정보는 넣지 마라.
Setting cookies (recommended options)
세션을 쿠키에 저장할 때 Next.js 의 cookie API 를 사용해보자. cookie API 는 아래 간편한 옵션이 있다.
- HttpOnly : client-side javascript 가 쿠키에 접근하는 것을 방지한다.
- Secure : 쿠키를 보낼 때 https 만 사용한다.
- SameSite : cross-site 정책을 설정한다.
- Max-Age or Expired : 쿠키의 유효기간을 설정한다.
- Path : cookie 의 URL path 를 설정한다.
import 'server-only'
import { cookies } from 'next/headers'

export async function createSession(userId: string) {
  const expiresAt = new Date(Date.now() + 7 * 24 * 60 * 60 * 1000)
  const session = await encrypt({ userId, expiresAt })
  const cookieStore = await cookies()

  cookieStore.set('session', session, {
    httpOnly: true,
    secure: true,
    expires: expiresAt,
    sameSite: 'lax',
    path: '/',
  })
}

import { createSession } from '@/app/lib/session'

// 위의 signup 함수.
export async function signup(state: FormState, formData: FormData) {
  // Previous steps:
  // 1. Validate form fields
  // 2. Prepare data for insertion into database
  // 3. Insert the user into the database or call an Library API

  // Current steps:
  // 4. Create user session
  await createSession(user.id)
  // 5. Redirect user
  redirect('/profile')
}
쿠키를 서버에서만 세팅하여 client-side tempering 을 방지하자. 자세한 사항은 Youtube
Updating (or refreshing) sessions
session 의 만료기간을 늘릴 수 있다. 자동 로그인에 필요.
import 'server-only'
import { cookies } from 'next/headers'
import { decrypt } from '@/app/lib/session'

export async function updateSession() {
  const session = (await cookies()).get('session')?.value
  const payload = await decrypt(session)

  if (!session || !payload) {
    return null
  }

  const expires = new Date(Date.now() + 7 * 24 * 60 * 60 * 1000)

  const cookieStore = await cookies()
  cookieStore.set('session', session, {
    httpOnly: true,
    secure: true,
    expires: expires,
    sameSite: 'lax',
    path: '/',
  })
}
Deleting the session
import 'server-only'
import { cookies } from 'next/headers'

export async function deleteSession() {
  const cookieStore = await cookies()
  cookieStore.delete('session')
}

import { cookies } from 'next/headers'
import { deleteSession } from '@/app/lib/session'

export async function logout() {
  deleteSession()
  redirect('/login')
}
Database Sessions
- DB 에 세션을 저장할 테이블을 과 데이터를 생성한다. 아니면 Auth Library 사용.
- 세션 삽입, 수정, 삭제를 구현한다.
- 세션ID 를 브라우저에서 미리 암호화한 뒤 저장하고 쿠키와 DB 의 싱크를 확인한다. (필수는 아니지만 Middleware 안정성을 위해 필요)
import cookies from 'next/headers'
import { db } from '@/app/lib/db'
import { encrypt } from '@/app/lib/session'

export async function createSession(id: number) {
  const expiresAt = new Date(Date.now() + 7 * 24 * 60 * 60 * 1000)

  // 1. Create a session in the database
  const data = await db
    .insert(sessions)
    .values({
      userId: id,
      expiresAt,
    })
    // Return the session ID
    .returning({ id: sessions.id })

  const sessionId = data[0].id

  // 2. Encrypt the session ID
  const session = await encrypt({ sessionId, expiresAt })

  // 3. Store the session in cookies for optimistic auth checks
  const cookieStore = await cookies()
  cookieStore.set('session', session, {
    httpOnly: true,
    secure: true,
    expires: expiresAt,
    sameSite: 'lax',
    path: '/',
  })
}
Authorization
사용자가 인증되었고 세션이 생성되었다면 권한을 부여하여 사용자가 접근할 수 있는 권한을 설정해야 한다.
2 개의 권한 검증 타입이 존재한다.
- Optimistic : 쿠키에 저장된 세션 데이터를 통해 특정 라우트나 액션이 가능한지 검증한다. 이런 타입은 UI 숨기기 혹은 강제 리다이렉트 등에 유용하다.
- Secure : DB에 저장된 세션 데이터를 통해 특정 라우트나 액션이 가능한지 검증한다. 민감 정보나 액션 관련 작업에 유용하다.
이와 관련하여 추천되는 유즈 케이스는 아래와 같다.
- Data Access Layer 를 생성하여 권한 로직을 통합한다.
- Data Transfer Objects (DTO) 를 사용해서 데이터를 반환한다.
- Optimistic 권한 체크에는 Middleware 를 사용한다.
Optimistic checks with Middelware (Optional)
- Middleware 는 모든 라우트에서 동작한다. 리다이렉트와 비인가 유저 필터링을 통합하기에 좋은 방법이다.
- 사용자 간 데이터를 교환하는 정적 라우트를 방지한다.
Middleware 는 모든 라우트에서 동작하므로 세션은 쿠키에서 읽어와야 한다.(optimistic checks, DB 는 성능 이슈로 제외해야 함)
import { NextRequest, NextResponse } from 'next/server'
import { decrypt } from '@/app/lib/session'
import { cookies } from 'next/headers'

// 1. Specify protected and public routes
const protectedRoutes = ['/dashboard']
const publicRoutes = ['/login', '/signup', '/']

export default async function middleware(req: NextRequest) {
  // 2. Check if the current route is protected or public
  const path = req.nextUrl.pathname
  const isProtectedRoute = protectedRoutes.includes(path)
  const isPublicRoute = publicRoutes.includes(path)

  // 3. Decrypt the session from the cookie
  const cookie = (await cookies()).get('session')?.value
  const session = await decrypt(cookie)

  // 4. Redirect to /login if the user is not authenticated
  if (isProtectedRoute && !session?.userId) {
    return NextResponse.redirect(new URL('/login', req.nextUrl))
  }

  // 5. Redirect to /dashboard if the user is authenticated
  if (
    isPublicRoute &&
    session?.userId &&
    !req.nextUrl.pathname.startsWith('/dashboard')
  ) {
    return NextResponse.redirect(new URL('/dashboard', req.nextUrl))
  }

  return NextResponse.next()
}

// Routes Middleware should not run on
export const config = {
  matcher: ['/((?!api|_next/static|_next/image|.*\\.png$).*)'],
}
Middleware 가 마지막 데이터 방어책이 되면 안된다. 보안의 총책은 data source 에서 담당해야 한다.
Creating a Data Access Layer(DAL)
DAL 로 데이터 요청과 권한 로직을 통합하는 것이 좋다. DAL 에는 사용자의 세션을 검증하는 로직이 들어가 있어야 한다. 최소한 세션을 리다이렉트 하거나 사용자 정보를 반환할 수 있어야 한다.
예를 들어 verifySession 을 포함한 DAL 파일을 만든다. 리액트의 cache API 로 반환값을 memoize 한다.
import 'server-only'

import { cookies } from 'next/headers'
import { decrypt } from '@/app/lib/session'

export const verifySession = cache(async () => {
  const cookie = (await cookies()).get('session')?.value
  const session = await decrypt(cookie)

  if (!session?.userId) {
    redirect('/login')
  }

  return { isAuth: true, userId: session.userId }
})

export const getUser = cache(async () => {
  const session = await verifySession()
  if (!session) return null

  try {
    const data = await db.query.users.findMany({
      where: eq(users.id, session.userId),
      // Explicitly return the columns you need rather than the whole user object
      columns: {
        id: true,
        name: true,
        email: true,
      },
    })

    const user = data[0]

    return user
  } catch (error) {
    console.log('Failed to fetch user')
    return null
  }
})
- DAL 은 런타임의 요청 시 사용된다. 하지만 정적 라우팅으로 사용자 간 데이터를 교환하면, 데이터는 빌드 시 fetch 된다. Middleware 를 사용하면 정적 라우팅 시 사용자 간 데이터 교환을 방지한다.
- 보안 체크를 위해 DB 의 세션 ID 를 검증할 수 있다. 리액트의 cache 함수는 불필요한 DB 확인을 방지한다.
- verifySession 은 모든 요청과 관련된 Javascript 클래스에서 사용할 수 있다.
Using Data Transfer Objects(DTO)
데이터를 반환 받았을 때 전체 객체가 아닌 DTO 를 사용하자.
import 'server-only'
import { getUser } from '@/app/lib/dal'

function canSeeUsername(viewer: User) {
  return true
}

function canSeePhoneNumber(viewer: User, team: string) {
  return viewer.isAdmin || team === viewer.team
}

export async function getProfileDTO(slug: string) {
  const data = await db.query.users.findMany({
    where: eq(users.slug, slug),
    // Return specific columns here
  })
  const user = data[0]

  const currentUser = await getUser(user.id)

  // Or return only what's specific to the query here
  return {
    username: canSeeUsername(currentUser) ? user.username : null,
    phonenumber: canSeePhoneNumber(currentUser, user.team)
      ? user.phonenumber
      : null,
  }
}
Server Components
Server Compoentns 에서의 인증은 권한 접근에 유용하다. 부분 렌더링 예시이다.
import { verifySession } from '@/app/lib/dal'

export default function Dashboard() {
  const session = await verifySession()
  const userRole = session?.user?.role // Assuming 'role' is part of the session object

  if (userRole === 'admin') {
    return <AdminDashboard />
  } else if (userRole === 'user') {
    return <UserDashboard />
  } else {
    redirect('/login')
  }
}
Layouts and auth checks
Partial Rendering 에서 Layout 이 네비게이션에서 다시 렌더링되지 않는다는 사실은 중요하다. 사용자 세션이 모든 라우팅에서 같지 않기 때문이다.
이를 위해 사용자 세션 검증 data source 나 컴포넌트를 레이아웃과 가까이 둔다. 아래 예시는 레이아웃에서 getUser 함수를 통해 DAL 에서 사용자 세션 체크를 하고 있다.
export const getUser = cache(async () => {
  const session = await verifySession()
  if (!session) return null

  // Get user ID from session and fetch data
})

export default async function Layout({
  children,
}: {
  children: React.ReactNode;
}) {
  const user = await getUser();

  return (
    // ...
  )
}
SPA 에서 인증되지 않은 사용자는 return null 하는 것이 일반적이다. Next.js 에선 이런 방식이 좋지 않다. Next.js 는 많은 엔트리 포인트가 있는데 nested route segments 나 Server Action 에의 접근을 막지 않는다.
Server Actions
Server Actions 자체는 public API 로 두고 사용자가 mutation 을 수행할 수 있는지 내부에서 검증한다.
'use server'
import { verifySession } from '@/app/lib/dal'

export async function serverAction(formData: FormData) {
  const session = await verifySession()
  const userRole = session?.user?.role

  // Return early if user is not authorized to perform the action
  if (userRole !== 'admin') {
    return null
  }

  // Proceed with the action for authorized users
}
Route Handlers
위와 같이 라우팅도 public API 로 두고 내부에서 검증한다.
import { verifySession } from '@/app/lib/dal'

export async function GET() {
  // User authentication and role verification
  const session = await verifySession()

  // Check if the user is authenticated
  if (!session) {
    // User is not authenticated
    return new Response(null, { status: 401 })
  }

  // Check if the user has the 'admin' role
  if (session.user.role !== 'admin') {
    // User is authenticated but does not have the right permissions
    return new Response(null, { status: 403 })
  }

  // Continue for authorized users
}
Context Providers
Context Providers 는 인증 작업에 interleaving 이 필요할 때 사용한다. Context Provider 는 서버에서 우선 렌더링되고 Client Component 는 Context Provider 의 세션 데이터(저장소)에 접근한다.
import { ContextProvider } from 'auth-lib'

export default function RootLayout({ children }) {
  return (
    <html lang="en">
      <body>
        // Server 에서 렌더링 됨.
        <ContextProvider>{children}</ContextProvider>
      </body>
    </html>
  )
}
"use client";
import { useSession } from "auth-lib";
export default function Profile() {
const { userId } = useSession();
const { data } = useSWR(`/api/user/${userId}`, fetcher)
return (
// ...
);
}Client Component 에서 세션 정보가 필요하면 리액트의 taintUniqueValue API 를 사용해서 민감 세션 정보가 클라이언트에 노출되지 않도록 하자.