40.1 이벤트 드리븐 프로그래밍
클릭, 키보드입력, 마우스 이동등 이 일어나면 브라우저는 이름 감지하여 특정한 타입의 이벤트를 발생.
이벤트핸들러 - 이벤트 발생시 호출될 함수.
이벤트 핸들러 등록 - 이벤트 발생시 브라우저에게 이벤트 핸들러의 호출을 위임하는 것.
이벤트 드리븐 프로그래밍
프로그램의 흐름을 이벤트 중심으로 제어하는 프로그래밍 방식.
40.2 이벤트 타입
이벤트 타입은 약 200여가지가 있고, 사용빈도가 높은 이벤트.
40.3 이벤트 핸들러 등록
40.3.1 이벤트 핸들러 어트리뷰트 방식
<!DOCTYPE html>
<html>
<body>
  <button onclick="sayHi('Lee')">Click me!</button>
  <script>
    function sayHi(name) {
      console.log(`Hi! ${name}.`);
    }
  </script>
</body>
</html>
CBD (Component Based Development) 이벤트핸들러 어트리뷰트 방식으로 이벤트처리. 관심사 분리를 하지않음
// 이벤트 핸들러 어트리뷰트 방식
<button onclick="myFunction()">클릭하세요</button>
이렇게 작성시 문제점
- 관심사의 분리가 어려움.
- 가독성과 유지보수
이를 해결하려면,
<button id="myButton">클릭하세요</button>

//자바스크립트 파일(코드)
function myFunction() {
    alert("버튼이 클릭되었습니다.");
}

// 이벤트 핸들러를 할당
document.getElementById("myButton").addEventListener("click", myFunction);
CBD에서의 방식.
import React from 'react';
import './style.css';

export default function App() {
  const onclickHandler = () => {
    alert('클릭되었습니다.');
  };
  return (
    <div>
      <h1>CBD 방식</h1>
      <p>
        CBD (Component Based Development) 이벤트핸들러 어트리뷰트 방식으로
        이벤트처리. 관심사 분리를 하지않음
      </p>
      <button onClick={onclickHandler}>이벤트 핸들러 어트리뷰트 방식.</button>
    </div>
  );
}
40.3.2 이벤트 핸들러 프로퍼티 방식
window 객체와 Document, HtmlElement타입의 DOM 노드 객체는 이벤트에 대응하는 이벤트 핸들러 프로퍼티를 가지고 있다.
<!DOCTYPE html>
<html>
<body>
  <button>Click me!</button>
  <script>
    const $button = document.querySelector('button');

    // 이벤트 핸들러 프로퍼티에 이벤트 핸들러를 바인딩
    $button.onclick = function () {
      console.log('button click');
    };
  </script>
</body>
</html>
이벤트 핸들러 프로퍼티 방식은 Html과 js가 섞이는 문제는 해결할 수 있다. 하지만 하나의 이벤트 핸들러만 바인딩할 수 있다는 단점은 존재.
<!DOCTYPE html>
<html>
<body>
  <button>Click me!</button>
  <script>
    const $button = document.querySelector('button');

    // 이벤트 핸들러 프로퍼티 방식은 하나의 이벤트에 하나의 이벤트 핸들러만을 바인딩할 수 있다.
    // 첫 번째로 바인딩된 이벤트 핸들러는 두 번째 바인딩된 이벤트 핸들러에 의해 재할당되어
    // 실행되지 않는다.
    $button.onclick = function () {
      console.log('Button clicked 1');
    };

    // 두 번째로 바인딩된 이벤트 핸들러
    $button.onclick = function () {
      console.log('Button clicked 2');
    };
  </script>
</body>
</html>
40.3.3 addEventListener 메서드 방식.
DOM Level 2 에서 도입된 EventTarget.prototype.addEventListener 메서드를 사용하여 등록할 수 있다.

<!DOCTYPE html>
<html>
<body>
  <button>Click me!</button>
  <script>
    const $button = document.querySelector('button');

    // 이벤트 핸들러 프로퍼티 방식
    // $button.onclick = function () {
    //   console.log('button click');
    // };

    // addEventListener 메서드 방식
    $button.addEventListener('click', function () {
      console.log('button click');
    });
  </script>
</body>
</html>
<!DOCTYPE html>
<html>
<body>
<button>Click me!</button>
<script>
const $button = document.querySelector('button');
// 이벤트 핸들러 프로퍼티 방식
$button.onclick = function () {
console.log('[이벤트 핸들러 프로퍼티 방식]button click');
};
// addEventListener 메서드 방식
$button.addEventListener('click', function () {
console.log('[addEventListener 메서드 방식]button click');
});
</script>
</body>
</html>addEventListener 메서드 방식은 이벤트핸들러 프로퍼티에 바인딩 된 이벤트 핸들러에 아무런영향 x 2개모두 호출됨.
하나이상등록 되고, 순서대로 호출.
<!DOCTYPE html>
<html>
<body>
  <button>Click me!</button>
  <script>
    const $button = document.querySelector('button');

    // addEventListener 메서드는 동일한 요소에서 발생한 동일한 이벤트에 대해
    // 하나 이상의 이벤트 핸들러를 등록할 수 있다.
    $button.addEventListener('click', function () {
      console.log('[1]button click');
    });

    $button.addEventListener('click', function () {
      console.log('[2]button click');
    });
  </script>
</body>
</html>
중복되면 하나의 핸들러만 등록.
40.4 이벤트 핸들러 제거
removeEventListener 와 addEventLister의 인수가 동일해야 제거 가능.
<!DOCTYPE html>
<html>
<body>
  <button>Click me!</button>
  <script>
    const $button = document.querySelector('button');

    const handleClick = () => console.log('button click');

    // 이벤트 핸들러 등록
    $button.addEventListener('click', handleClick);

    // 이벤트 핸들러 제거
    // addEventListener 메서드에 전달한 인수와 removeEventListener 메서드에
    // 전달한 인수가 일치하지 않으면 이벤트 핸들러가 제거되지 않는다.
    $button.removeEventListener('click', handleClick, true); // 실패
    $button.removeEventListener('click', handleClick); // 성공
  </script>
</body>
</html>
40.5 이벤트 객체
이벤트가 발생하면 이벤트에 관련한 다양항 정보를 담고 있는 이벤트 객체가 동적으로 생성
생성된 이벤트 객체는 이벤트 핸들러의 첫번째 인수로 전달.
<!DOCTYPE html>
<html>
<body>
  <p>클릭하세요. 클릭한 곳의 좌표가 표시됩니다.</p>
  <em class="message"></em>
  <script>
    const $msg = document.querySelector('.message');

    // 클릭 이벤트에 의해 생성된 이벤트 객체는 이벤트 핸들러의 첫 번째 인수로 전달된다.
    function showCoords(e) {
      $msg.textContent = `clientX: ${e.clientX}, clientY: ${e.clientY}`;
    }

    document.onclick = showCoords;
  </script>
</body>
</html>
function onclick(event) {
showCoords(event);
}40.5.1 이벤트 객체의 상속 구조
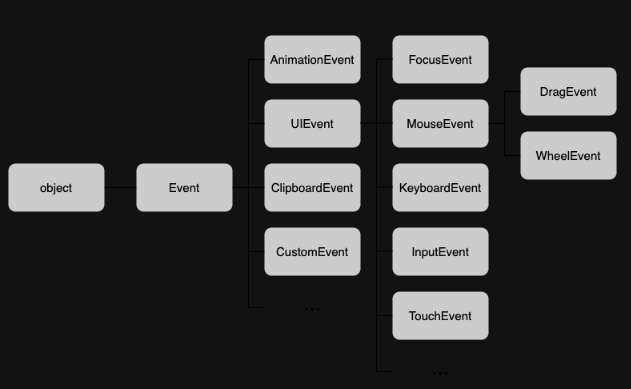
40.5.2 이벤트 객체의 공통 프로퍼티
이벤트 객체의 공통 프로퍼티
Event 인터페이스, 즉 Event.prototype에 정의되어 있는 이벤트 관련 프로퍼티는 모든 이벤트 객체가 상속받는 공통 프로퍼티다. MouseEvent나 KeyboradEvent 등 다른 이벤트들은 각각 이벤트에 맞는 다른 프로퍼티를 가지고 있다.
공통 프로퍼티 설명 타입

체크 박스상태가 변경되면 현재 체크상태를 출력하는 코드
<!DOCTYPE html>
<html>
<body>
  <input type="checkbox">
  <em class="message">off</em>
  <script>
    const $checkbox = document.querySelector('input[type=checkbox]');
    const $msg = document.querySelector('.message');

    // change 이벤트가 발생하면 Event 타입의 이벤트 객체가 생성된다.
    $checkbox.onchange = e => {
      console.log(Object.getPrototypeOf(e) === Event.prototype); // true

      // e.target은 change 이벤트를 발생시킨 DOM 요소 $checkbox를 가리키고
      // e.target.checked는 체크박스 요소의 현재 체크 상태를 나타낸다.
      $msg.textContent = e.target.checked ? 'on' : 'off';
    };
  </script>
</body>
</html>
40.5.3 마우스 정보 취득
마우스 포인터의 좌표정보를 나타내는 프로퍼티 : screenX/Y, clientX/Y, pageX/Y, offsetX/Y
버튼 정보를 나타내는 프로퍼티 : altKey,ctrlKey, shiftKey, button
<!DOCTYPE html>
<html>
<head>
  <style>
    .box {
      width: 100px;
      height: 100px;
      background-color: #fff700;
      border: 5px solid orange;
      cursor: pointer;
    }
  </style>
</head>
<body>
  <div class="box"></div>
  <script>
    // 드래그 대상 요소
    const $box = document.querySelector('.box');

    // 드래그 시작 시점의 마우스 포인터 위치
    const initialMousePos = { x: 0, y: 0 };
    // 오프셋: 이동할 거리
    const offset = { x: 0, y: 0 };

    // mousemove 이벤트 핸들러
    const move = e => {
      // 오프셋 = 현재(드래그하고 있는 시점) 마우스 포인터 좌표 - 드래그 시작 시점의 마우스 포인터 좌표
      offset.x = e.clientX - initialMousePos.x;
      offset.y = e.clientY - initialMousePos.y;

      // translate3d는 GPU를 사용하므로 absolute의 top, left를 사용하는 것보다 빠르다.
      // top, left는 레이아웃에 영향을 준다.
      $box.style.transform = `translate3d(${offset.x}px, ${offset.y}px, 0)`;
    };

    // mousedown 이벤트가 발생하면 드래그 시작 시점의 마우스 포인터 좌표를 저장한다.
    $box.addEventListener('mousedown', e => {
      // 이동 거리를 계산하기 위해 mousedown 이벤트가 발생(드래그를 시작)하면
      // 드래그 시작 시점의 마우스 포인터 좌표(e.clientX/e.clientY: 뷰포트 상에서 현재
      // 마우스의 포인터 좌표)를 저장해 둔다. 한번 이상 드래그로 이동한 경우 move에서
      // translate3d(${offset.x}px, ${offset.y}px, 0)으로 이동한 상태이므로
      // offset.x와 offset.y를 빼주어야 한다.
      initialMousePos.x = e.clientX - offset.x;
      initialMousePos.y = e.clientY - offset.y;

      // mousedown 이벤트가 발생한 상태에서 mousemove 이벤트가 발생하면
      // box 요소를 이동시킨다.
      document.addEventListener('mousemove', move);
    });

    // mouseup 이벤트가 발생하면 mousemove 이벤트를 제거해 이동을 멈춘다.
    document.addEventListener('mouseup', () => {
      document.removeEventListener('mousemove', move);
          console.log(initialMousePos.x);
 		  console.log(initialMousePos.y);
    });
  </script>
</body>
</html>
참고 및 출처 : https://velog.io/@niyu/40%EC%9E%A5-%EC%9D%B4%EB%B2%A4%ED%8A%B8