간단한 설명
github action을 이용해서 ecs fargate로 컨테이너화하는 CICD
github action에서 docker image build하고 ECR에 image push
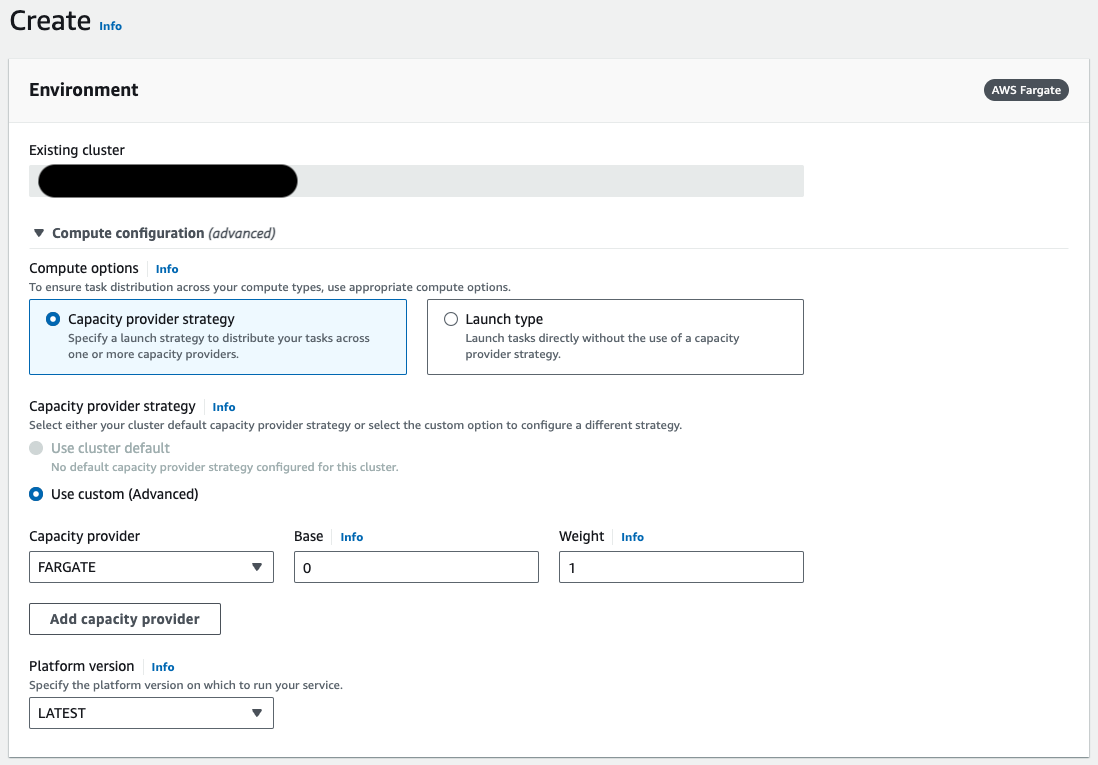
cluster, task definition, service, task, target group, load balancer, rds 생성
dockerfile
# syntax=docker/dockerfile:experimental

FROM python:3.11-slim as python-base

RUN apt-get update \
&& apt-get install default-mysql-client gdal-bin libgdal-dev docker.io gettext curl -yqq

FROM python-base as poetry-base
RUN mkdir /project-dir
WORKDIR /project-dir
COPY pyproject.toml pyproject.toml
COPY poetry.lock poetry.lock

ENV \
  # Poetry's configuration:
  POETRY_NO_INTERACTION=1 \
  POETRY_VIRTUALENVS_CREATE=false \
  POETRY_CACHE_DIR='/var/cache/pypoetry' \
  POETRY_HOME='/usr/local' \
  POETRY_VERSION=1.6.1

RUN curl -sSL https://install.python-poetry.org | python3 - --version 1.6.1

RUN poetry install --no-interaction --no-ansi

FROM poetry-base as app
WORKDIR /project-dir
COPY . .

RUN chmod +x bin/run.production.sh
CMD ["sh", "-c", "bin/run.production.sh"]
gunicorn.conf.py
import logging
import os

from gunicorn import glogging

workers = 2
worker_class = "gevent"
bind = "0.0.0.0:8080"
accesslog = "-"
errorlog = "-"
loglevel = "debug"
capture_output = True

os.environ["DJANGO_SETTINGS_MODULE"] = "{dir}.settings.production"

class CustomGunicornLogger(glogging.Logger):
    def setup(self, cfg):
        try:
            super().setup(cfg)

            access_logger = logging.getLogger("gunicorn.access")
            access_logger.addFilter(HealthCheckFilter())
            error_logger = logging.getLogger("gunicorn.error")
            error_logger.addFilter(HealthCheckFilter())
        except Exception as e:
            error_logger = logging.getLogger("gunicorn.error")
            error_logger.debug(e)
            raise

class HealthCheckFilter(logging.Filter):
    def filter(self, record):
        excludes = [f"/health", "Closing connection"]
        for exclude in excludes:
            if exclude in record.getMessage():
                return False
        return True

logger_class = CustomGunicornLogger
appspec-production.yaml
version: 0.0
Resources:
  - TargetService:
      Type: AWS::ECS::Service
      Properties:
        TaskDefinition: "arn:aws:ecs:ap-northeast-2:xxx:task-definition/ecs-td-production:latest"
        LoadBalancerInfo:
          ContainerName: "app"
          ContainerPort: 8080
        PlatformVersion: "LATEST"
task-definition.json
작업 정의는 aws GUI에서 간단하게 만들고 자세한 내용은 파일로 관리한다. 작업 정의로 docker-compose.yaml처럼 여러 컨테이너의 설정을 관리할 수 있다.
{
    "containerDefinitions": [
        {
            "name": "app",
            "image": "xxx.dkr.ecr.ap-northeast-2.amazonaws.com/ecs-ecr-production",
            "cpu": 2048,
            "memory": 4096,
            "portMappings": [
                {
                    "containerPort": 8080,
                    "hostPort": 8080,
                    "protocol": "tcp"
                }
            ],
            "essential": true,
            "logConfiguration": {
                "logDriver": "awslogs",
                "options": {
                    "awslogs-group": "/ecs/ecs-td-production",
                    "awslogs-region": "ap-northeast-2",
                    "awslogs-stream-prefix": "app"
                }
            }
        }
    ],
    "family": "ecs-td-production",
    "taskRoleArn": "arn:aws:iam::xxx:role/ecsTaskExecutionRole",
    "executionRoleArn": "arn:aws:iam::xxx:role/ecsTaskExecutionRole",
    "networkMode": "awsvpc",
    "requiresCompatibilities": [
        "FARGATE"
    ],
    "cpu": "4096",
    "memory": "8192"
}
Cloudwatch
작업 정의에서 지정한 로그 그룹 awslogs-group을 생성한다.
Github secrets
github repository settings → Environments → Environment secrets
development 생성
production 생성
AWS_ACCESS_KEY_ID
AWS_SECRET_ACCESS_KEY
AWS_REGION
run script
run.production.sh
poetry run gunicorn {app_name}.wsgi:application -c gunicorn/gunicorn.conf.py
SecretsManager
json 형태로 환경변수를 저장할거라
- Other type of secret 선택하고 plaintext에 json 저장.
- secret 이름은 github action에서 환경변수를 가져올 때 사용함.
- development, stage, production 등 환경 prefix를 붙이는 걸 추천함. 예) dev/x-project-secrets
IAM
ecsTaskExecutionRole. 이 IAM role은 service 생성 시 CodeDeploy를 사용할 수 있도록 service에 할당해줌
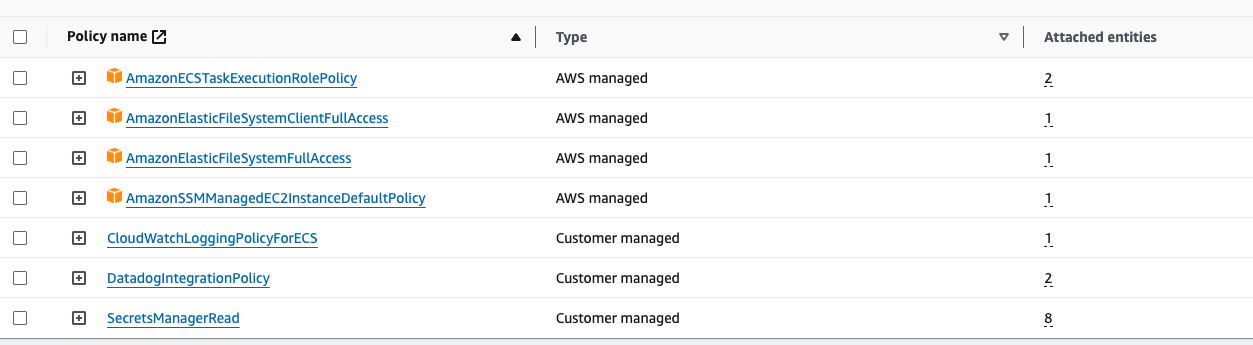
CloudWatchLoggingPolicyForECS
{
    "Version": "2012-10-17",
    "Statement": [
        {
            "Effect": "Allow",
            "Action": [
                "logs:CreateLogGroup",
                "logs:CreateLogStream",
                "logs:PutLogEvents",
                "logs:DescribeLogStreams"
            ],
            "Resource": [
                "arn:aws:logs:*:*:*"
            ]
        }
    ]
}
SecretsManagerRead
{
    "Version": "2012-10-17",
    "Statement": [
        {
            "Sid": "VisualEditor0",
            "Effect": "Allow",
            "Action": [
                "secretsmanager:GetRandomPassword",
                "secretsmanager:GetResourcePolicy",
                "secretsmanager:GetSecretValue",
                "secretsmanager:DescribeSecret",
                "secretsmanager:ListSecretVersionIds",
                "secretsmanager:ListSecrets"
            ],
            "Resource": "*"
        }
    ]
}
DatadogIntegrationPolicy (datadog 안쓰면 없어도 됨)
{
    "Version": "2012-10-17",
    "Statement": [
        {
            "Action": [
                "apigateway:GET",
                "autoscaling:Describe*",
                "backup:List*",
                "budgets:ViewBudget",
                "cloudfront:GetDistributionConfig",
                "cloudfront:ListDistributions",
                "cloudtrail:DescribeTrails",
                "cloudtrail:GetTrailStatus",
                "cloudtrail:LookupEvents",
                "cloudwatch:Describe*",
                "cloudwatch:Get*",
                "cloudwatch:List*",
                "codedeploy:List*",
                "codedeploy:BatchGet*",
                "directconnect:Describe*",
                "dynamodb:List*",
                "dynamodb:Describe*",
                "ec2:Describe*",
                "ecs:Describe*",
                "ecs:List*",
                "elasticache:Describe*",
                "elasticache:List*",
                "elasticfilesystem:DescribeFileSystems",
                "elasticfilesystem:DescribeTags",
                "elasticfilesystem:DescribeAccessPoints",
                "elasticloadbalancing:Describe*",
                "elasticmapreduce:List*",
                "elasticmapreduce:Describe*",
                "es:ListTags",
                "es:ListDomainNames",
                "es:DescribeElasticsearchDomains",
                "events:CreateEventBus",
                "fsx:DescribeFileSystems",
                "fsx:ListTagsForResource",
                "health:DescribeEvents",
                "health:DescribeEventDetails",
                "health:DescribeAffectedEntities",
                "kinesis:List*",
                "kinesis:Describe*",
                "lambda:GetPolicy",
                "lambda:List*",
                "logs:DeleteSubscriptionFilter",
                "logs:DescribeLogGroups",
                "logs:DescribeLogStreams",
                "logs:DescribeSubscriptionFilters",
                "logs:FilterLogEvents",
                "logs:PutSubscriptionFilter",
                "logs:TestMetricFilter",
                "organizations:Describe*",
                "organizations:List*",
                "rds:Describe*",
                "rds:List*",
                "redshift:DescribeClusters",
                "redshift:DescribeLoggingStatus",
                "route53:List*",
                "s3:GetBucketLogging",
                "s3:GetBucketLocation",
                "s3:GetBucketNotification",
                "s3:GetBucketTagging",
                "s3:ListAllMyBuckets",
                "s3:PutBucketNotification",
                "ses:Get*",
                "sns:List*",
                "sns:Publish",
                "sqs:ListQueues",
                "states:ListStateMachines",
                "states:DescribeStateMachine",
                "support:DescribeTrustedAdvisor*",
                "support:RefreshTrustedAdvisorCheck",
                "tag:GetResources",
                "tag:GetTagKeys",
                "tag:GetTagValues",
                "xray:BatchGetTraces",
                "xray:GetTraceSummaries"
            ],
            "Effect": "Allow",
            "Resource": "*"
        }
    ]
}
Security group
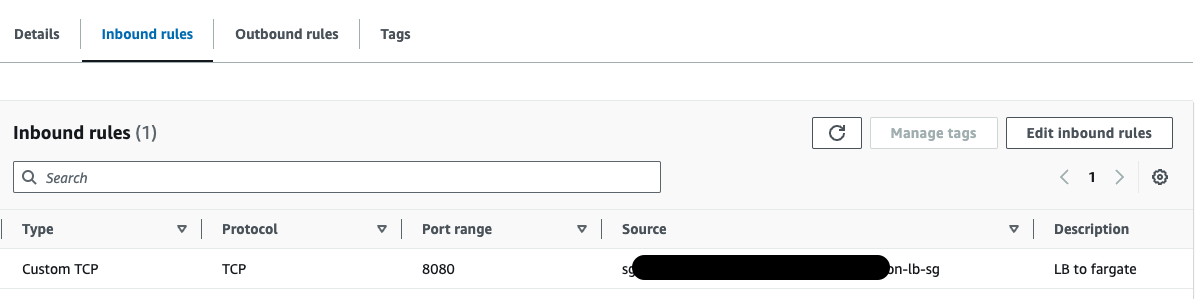
LB의 보안 그룹에 HTTP, HTTPS inbound rule을 추가한다.
fargate 보안 그룹의 inbound rule에 서버의 port를 지정하고 LB 트래픽이 들어올 수 있도록 LB 보안 그룹을 지정해준다.
ECR
ECR에 이미지를 push하면 task 생성 시 service가 이미지를 pull해서 컨테이너를 생성한다. dockerhub처럼 aws가 제공하는 이미지 저장소임.
Cluster
ecs-xxx-cluster-production 생성
Target group
ECS Fargate는 인스턴스가 아닌 컨테이너 IP 주소를 사용하므로, 대상 그룹의 타입을 IP address로 선택한다. 이렇게 해야 Load balancer가 fargate의 동적 IP에 트래픽을 전달할 수 있다.
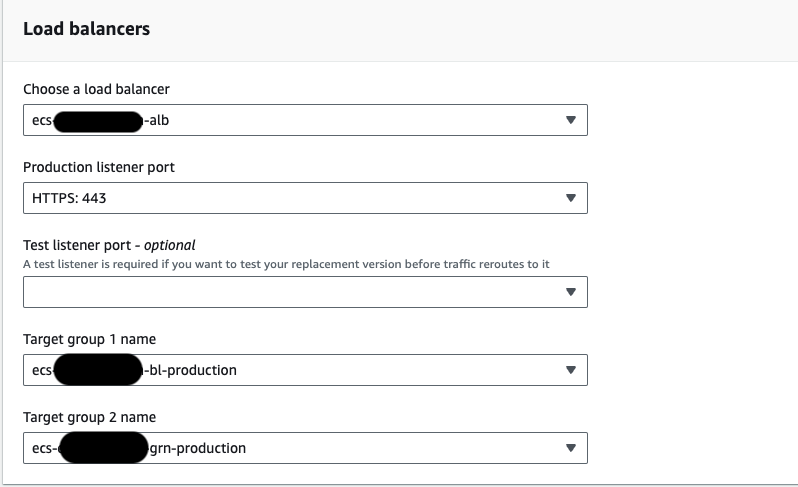
무중단 배포를 할 수 있고 빠른 롤백이 가능한 blue green 배포를 할 것이기 때문에 대상 그룹을 2개 만들어줘야 한다.
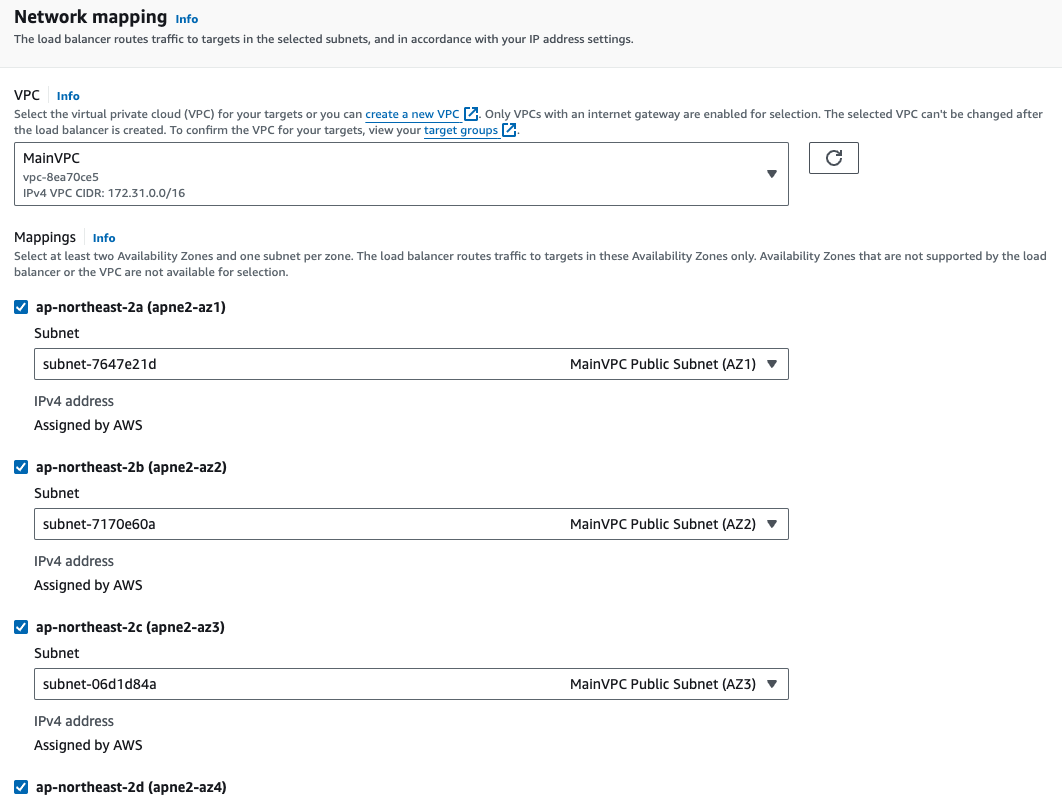
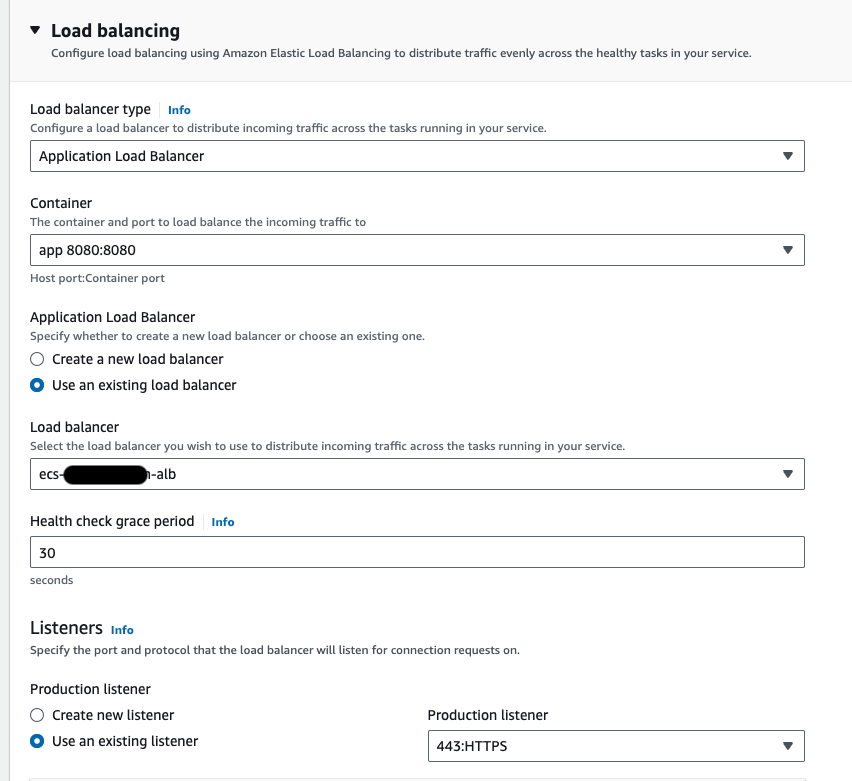
Application Load Balancer
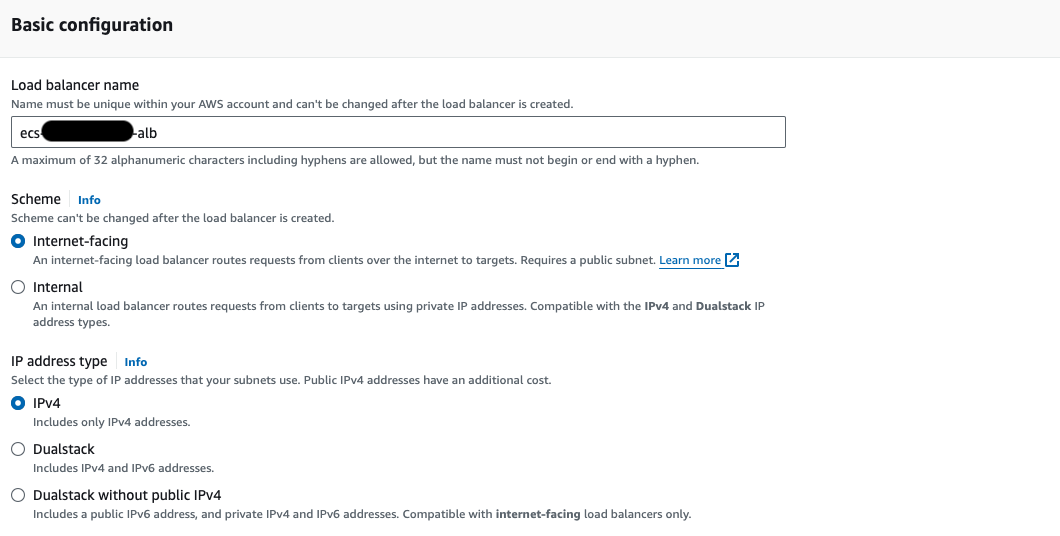
보안 그룹은 lb 보안 그룹 지정
ALB listeners and rules에서 80 port로 들어온 요청을 443으로 redirect해야 함
80 → 443 → prod or dev target group으로 포트 포워딩
Route 53
Certificate (from ACM) request. domain 지정해서 요청하고 생성될 때까지 대기 후 적용. 이미 있으면 기존 거 사용
dev a record 생성
prod a record 생성
a record 생성하고 ALB랑 연결하기

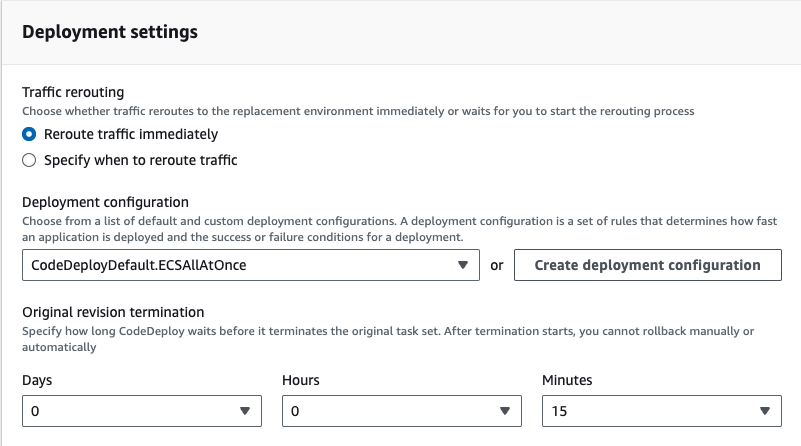
Service
blue green 배포 선택
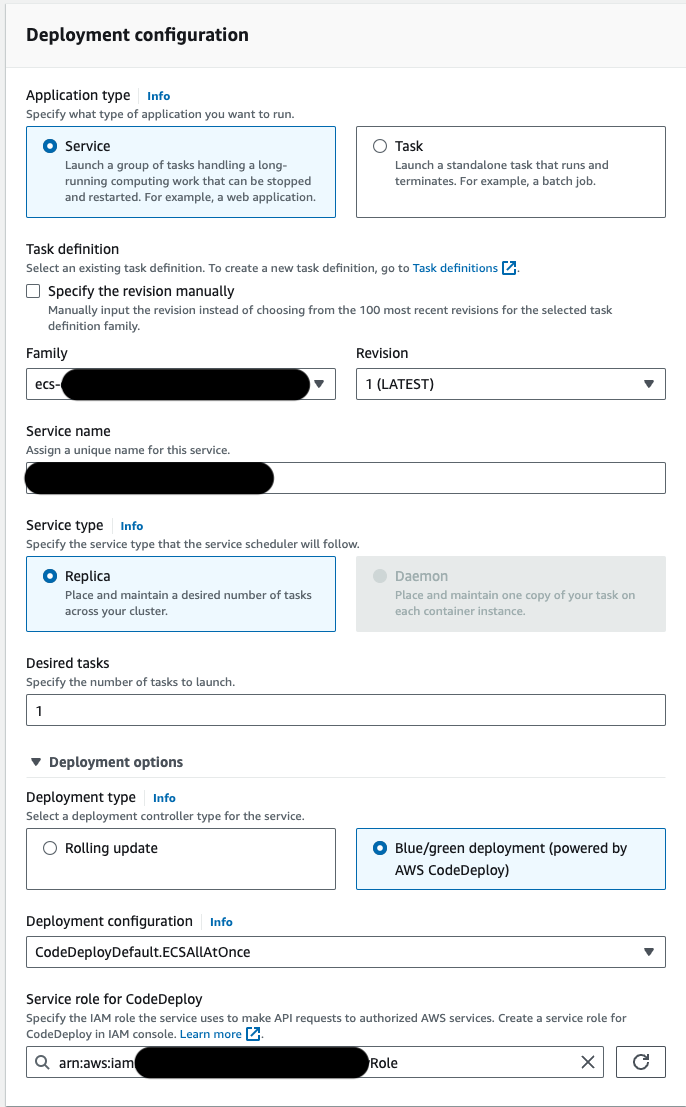
8080 port로 지정된 컨테이너를 선택한다
host로 dev, prod 환경을 구분했기 때문에 리스너 rule에 host, path에 따라 대상 그룹에 트래픽이 전달되도록 했다.
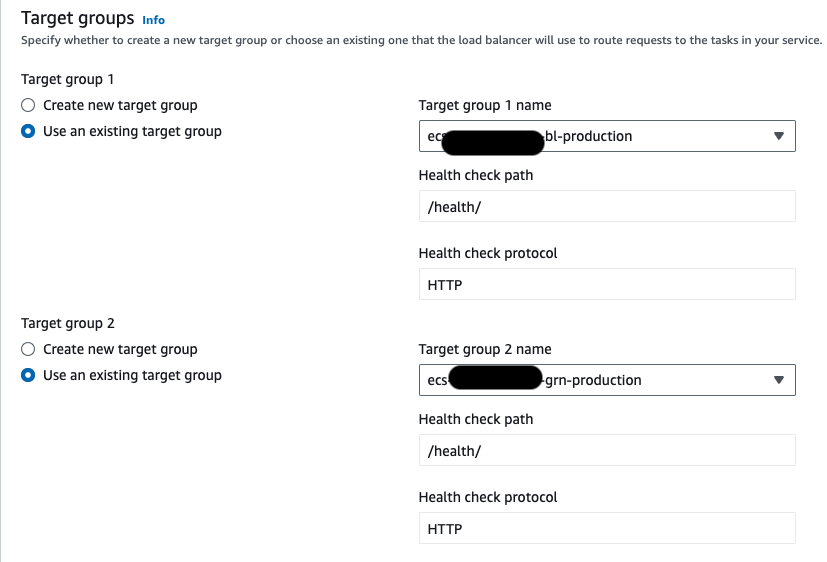
블루, 그린 대상 그룹 지정
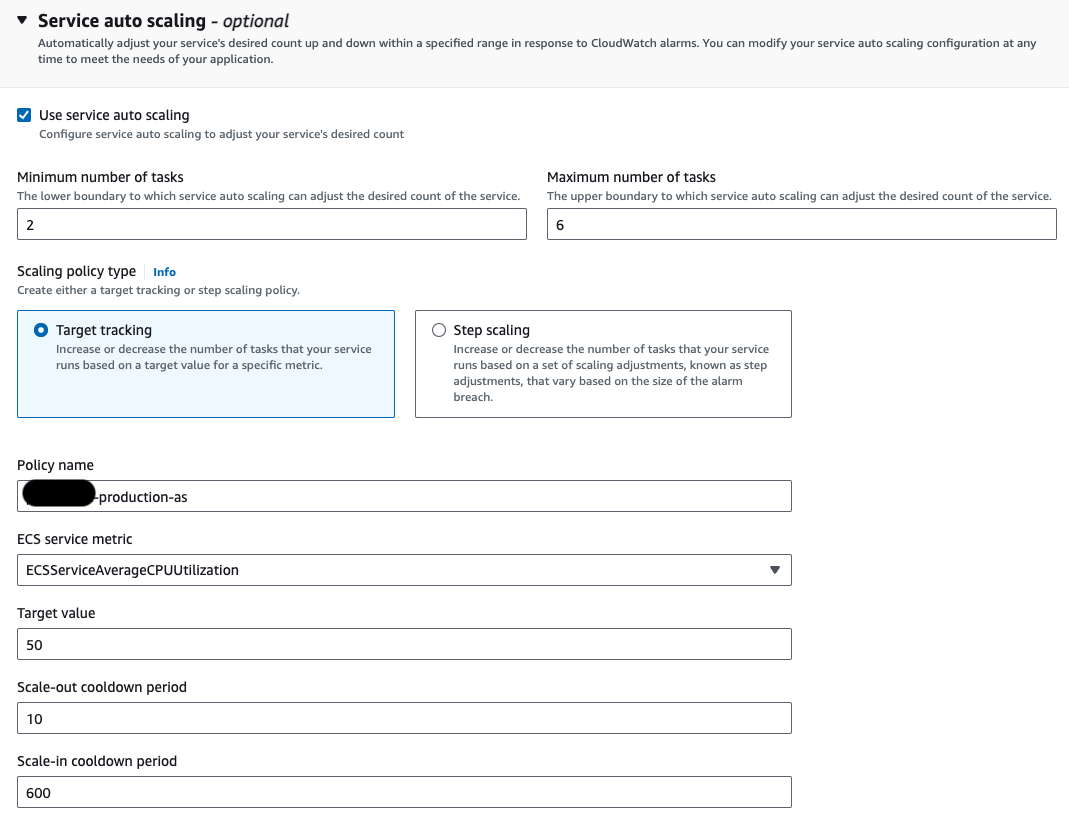
auto scaling은 생략, 서버 안정성을 위해 필요하면 지정해야 함
Target Tracking : CPU, 메모리 사용률에 대한 목표값을 유지하기 위해 task를 조절하는 방식
Step Scaling : 단계별로 task 수를 증가, 감소 시킴. 예) CPU 사용률 x% 초과 시 task 2개로 증가, CPU 사용률 y% 초과 시 task 3개로 증가
RDS
적절한 RDS 스펙을 설정하고 보안 그룹에서 DB port에 fargate에 설정된 보안 그룹을 지정해서 트래픽을 받을 수 있게 inbound rule 추가
Github action
on:
  push:
    branches: [ main ]

name: 🚀 Deploy production server

jobs:
  build:
    environment: production
    name: Build
    runs-on: ubuntu-latest

    steps:
      - name: Checkout
        uses: actions/checkout@v3

      - name: Configure AWS credentials
        uses: aws-actions/configure-aws-credentials@v1
        with:
          aws-access-key-id: ${{ secrets.AWS_ACCESS_KEY_ID }}
          aws-secret-access-key: ${{ secrets.AWS_SECRET_ACCESS_KEY }}
          aws-region: ${{ secrets.AWS_REGION }}

      - name: Login to Amazon ECR
        id: login-ecr
        uses: aws-actions/amazon-ecr-login@v1

      - name: Get Secrets using AWS CLI
        run: |
          aws secretsmanager get-secret-value --secret-id production/xxx --query SecretString --output text > xxx/settings/secrets_production.json

      - name: Set up Docker Buildx
        uses: docker/setup-buildx-action@v3

      - name: Build, tag, and push image to Amazon ECR
        id: build-image
        uses: docker/build-push-action@v5
        env:
          ECR_REGISTRY: xxxxx.dkr.ecr.ap-northeast-2.amazonaws.com
          ECR_REPOSITORY: ecs-ecr-production
          IMAGE_TAG: latest
        with:
          file: dockerfile-production
          context: .
          push: true
          tags: ${{ env.ECR_REGISTRY }}/${{ env.ECR_REPOSITORY }}:${{ env.IMAGE_TAG }}
          cache-from: type=gha
          cache-to: type=gha,mode=max

      - name: Image Path
        id: image-path
        env:
          ECR_REGISTRY: xxxxx.dkr.ecr.ap-northeast-2.amazonaws.com
          ECR_REPOSITORY: ecs-ecr-production
          IMAGE_TAG: latest
        run: |
          echo "django_image=${{ env.ECR_REGISTRY }}/${{ env.ECR_REPOSITORY }}:${{ env.IMAGE_TAG }}" >> $GITHUB_OUTPUT

      - name: Fill in the new image ID in the Amazon ECS task definition
        id: app-task-def
        uses: aws-actions/amazon-ecs-render-task-definition@v1
        with:
          task-definition: task-definition-production.json
          container-name: app
          image: ${{ steps.image-path.outputs.django_image }}

      - name: Deploy Amazon ECS task definition
        uses: aws-actions/amazon-ecs-deploy-task-definition@v1
        with:
          task-definition: ${{ steps.app-task-def.outputs.task-definition }}
          service: service
          cluster: ecs--cluster-production
          codedeploy-deployment-group: DgpECS-cluster-production-service
          codedeploy-appspec: appspec-production.yaml
          wait-for-service-stability: true
CodeDeploy
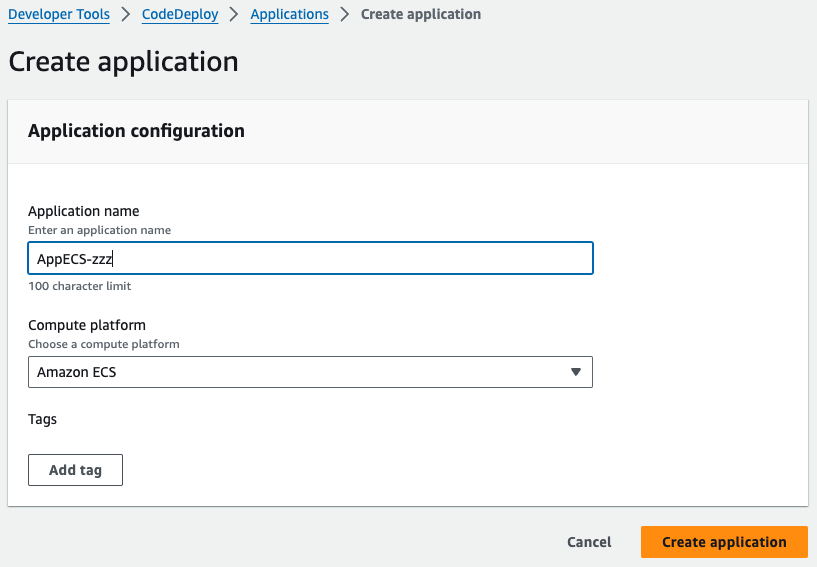
create application으로 AppECS-{클러스터명}-{서비스명} 이름의 application 생성
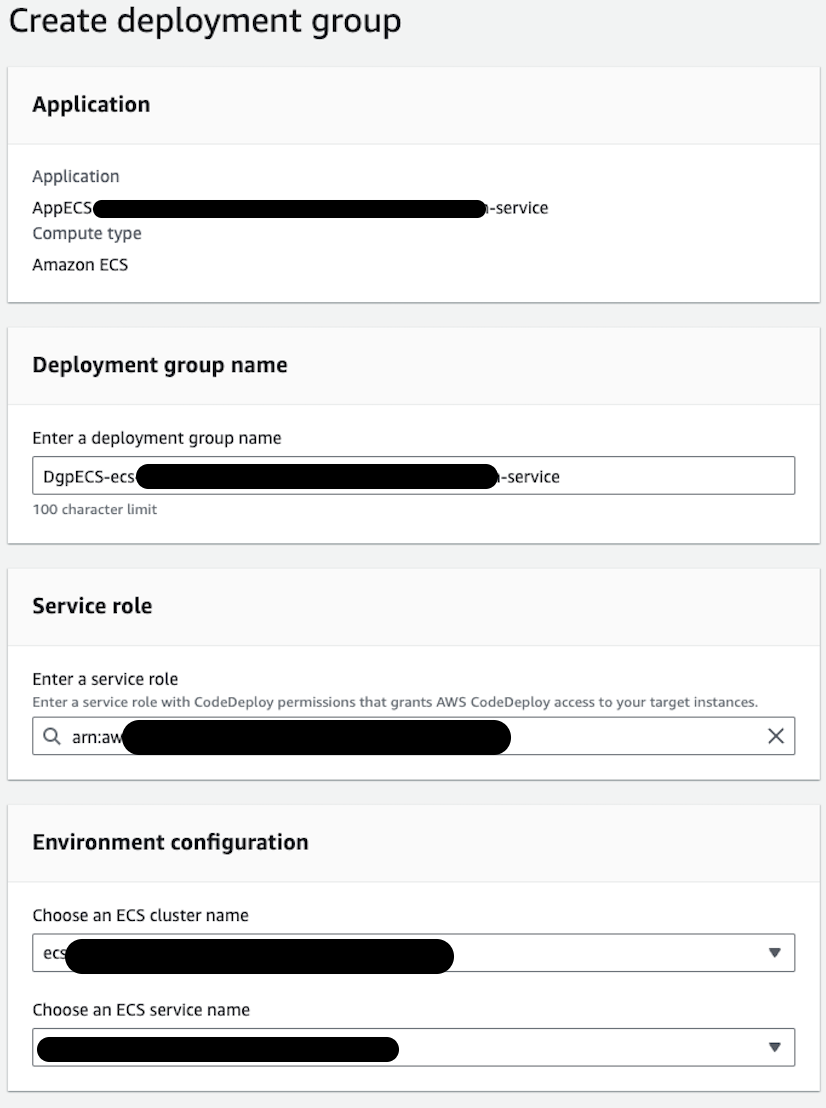
deployment group 생성
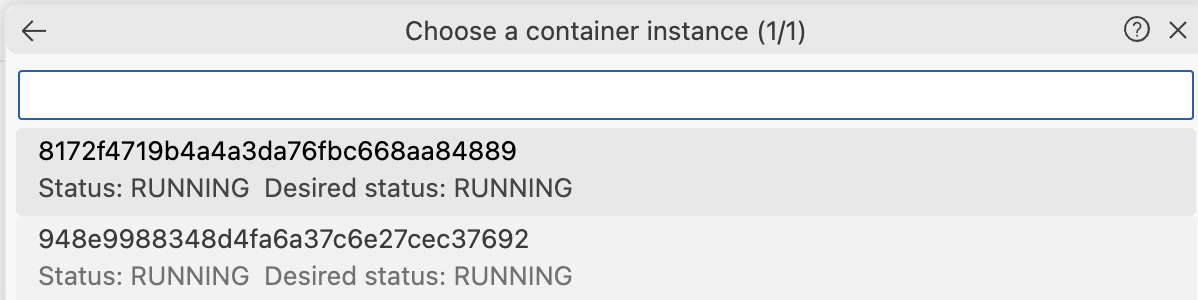
VSCODE AWS Toolkit 에서 ECS container terminal에 접속하기
vscode에서 AWS Toolkit 플러그인 설치. pycharm은 설치해도 컨테이너 접근이 안됨…
AWS Toolkit을 사용할 수 있도록 설정하고 터미널에서 아래 명령어 실행. cluster, service, region은 생성된 것에 맞게 바꿔야함.
aws ecs update-service --cluster ecs-cluster-production --servic {service-name} --region ap-northeast-2 --enable-execute-commandAn error occurred (InvalidParameterException) when calling the UpdateService operation: Cannot force a new deployment on services with a CODE_DEPLOY deployment controller. Use AWS CodeDeploy to trigger a new deployment.
→ force-new-deployment 옵션 제거
enableExecuteCommand 설정 검증하기
aws ecs describe-services \
    --cluster ecs-cluster-production \
    --service service \
    --region ap-northeast-2 \
| jq -r '.[] | .[].enableExecuteCommand'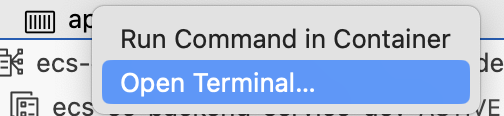
접속하고 싶은 컨테이너 선택
ls로 컨테이너 내부의 디렉토리, 파일 확인

trouble shooting
LB가 대상 그룹에 트래픽을 전달하지 못하는 문제
Target group is not configured to receive traffic from the load balancer
→ LB listener에서 대상 그룹이 제대로 지정되어 있는지 확인. green 대상 그룹에 트래픽을 전달해야하는데, blue로 되어 있는 경우 green으로 포워딩해주기
service의 task에서 container가 running인데 health check에 실패하거나 timeout이 발생하면 fargate 보안그룹에 ALB 트래픽을 받을 수 있게 inbound rule을 추가해줘야 함.
배포 그룹 생성 시 assume role 에러
AWS CodeDeploy does not have the permissions required to assume the role 가 발생하면 IAM -> 역할 -> ecsTaskExecutionRole -> 신뢰 관계 -> 신뢰 정책 편집에서 아래처럼 수정.
codedeploy.amazonaws.com 이 부분이 있어야 함
{
	"Version": "2008-10-17",
	"Statement": [
		{
			"Sid": "",
			"Effect": "Allow",
			"Principal": {
				"Service": "ecs-tasks.amazonaws.com"
			},
			"Action": "sts:AssumeRole"
		},
		{
            "Effect": "Allow",
            "Principal": {
                "Service": "codedeploy.amazonaws.com"
            },
            "Action": "sts:AssumeRole"
        }
    ]
}