AppStore 클론코딩
구현 화면
TabBarViewController
- TabBar는 화면 하단에 나오는 메뉴 탭 같은 역할을 한다. 대부분의 경우는 TabBar를 클릭하면 해당 하는 View가 보여지게끔 사용한다. 앱스토어에서도 5개의 TabBarItem이 있으며, 각각 투데이, 게임, 앱, 아케이드, 검색이다. 하지만 아케이드는 구독하는 시스템이라서 해당 기능은 추가하지 않고 4개의 TabbarItem만 사용하게 되었다.
- Storyboard로 구현을 한다면 정말 간단하게 UITabBarViewController를 추가해서 사용하면 되지만, 코드로는 처음에는 어떻게 구현을 해야하는지 몰랐다.
- 찾아보니 Scenedelegate에서 TabBar를 구현하는 사람도 있고, 다양한 방법이 있었지만 나는 UITabBarController를 따로 만들었다. 그 이유는 NavBarController를 사용하기 위해서도 있다.
- 우선 새로운 swift파일을 만들어서 UITabBarController를 상속받게 구현한다. UITabBarController도 사실은 UIViewController를 상속받고 있기 때문에, 우리가 사용하는 일단 UIViewController처럼 사용이 가능하다.
- 하지만 UITabBarViewController은 기본적으로 UITabBarDelegate Protocol를 채태하고 있기 때문에 TabBar를 사용하기 더욱 더 간편하다.
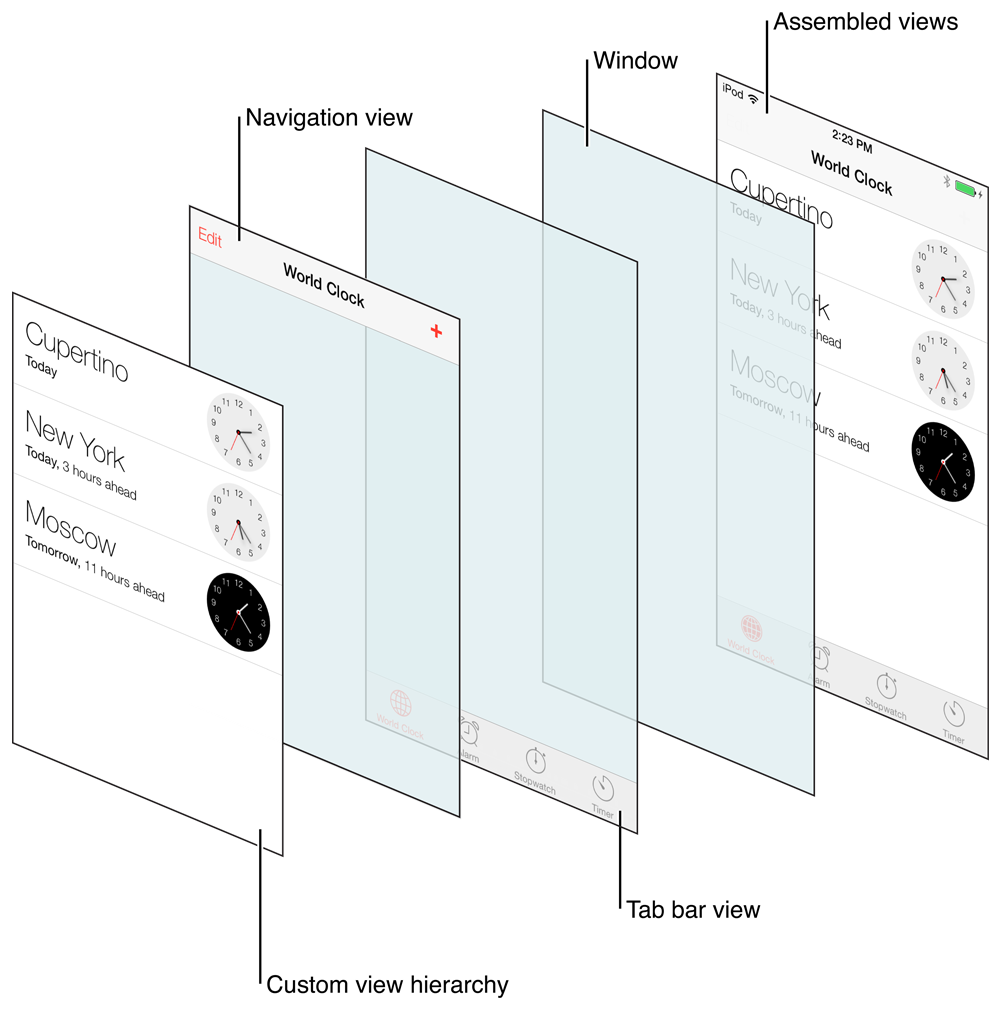
- 애플 공식문서 를 보면 TabBarView를 사용할때의 view hierechy 예시가 나와있다. 그리고 아래처럼 써져있다.
You can use navigation controllers or custom view controllers as the root view controller for a tab. If the root view controller is a navigation controller, the tab bar controller makes further adjustments to the size of the displayed navigation content so that it doesn’t overlap the tab bar.
Tab의 RootViewController 는 navigationController 또는 CustomViewController를 사용할 수 있습니다. RootViewController가 navigationController인 경우 TabBarController는 표시되는 콘텐츠의 크기를 TabBar와 겹치지 않게 추가로 조정합니다.
 |
|---|
- 정리해서 말하자면, TabBarViewController에서 각각의 Tab에다가 Navigation Controller를 넣어서 사용하게 되면, Navigation View + Tab bar View + custom View를 다 보여줄수 있다는 것이다.
- 나도 이런한 이유 때문에 TabBarViewController를 사용했다.
- 아래는 TabBarViewController의 구현 코드이다.
import UIKit

class TabController: UITabBarController {

    override func viewDidLoad() {
        super.viewDidLoad()
        self.setupTabs()
        self.tabBar.isTranslucent = true
        self.tabBar.backgroundColor = .clear

    }

    private func setupTabs(){
        let today = self.createNav(with: "투데이", and: UIImage(systemName: "doc.text.image"), vc: TodayViewController())
        let game = self.createNav(with: "게임", and: UIImage(systemName: "gamecontroller"), vc: GameViewController())
        let app = self.createNav(with: "앱", and: UIImage(systemName: "square.stack.3d.up.fill"), vc: AppViewController())
        let search = self.createNav(with: "검색", and: UIImage(systemName: "magnifyingglass"), vc: SearchViewController())
        self.setViewControllers([today,game,app,search], animated: true)

    }

    private func createNav(with title: String, and image: UIImage?, vc: UIViewController) -> UINavigationController {
        vc.view.backgroundColor = .systemBackground

        let nav = UINavigationController(rootViewController: vc)
        nav.setupNavBar()
        nav.tabBarItem.title = title
        nav.tabBarItem.image = image

        nav.viewControllers.first?.navigationItem.title = title
        nav.navigationBar.prefersLargeTitles = true
        nav.navigationBar.isTranslucent = true

        nav.navigationItem.largeTitleDisplayMode = .always

        nav.viewControllers.first?.navigationItem.rightBarButtonItem = UIBarButtonItem(image: UIImage(systemName: "person.crop.circle"), style: .plain, target: self, action: nil)

        return nav
    }

}
extension  UINavigationController {

    func setupNavBar(){
        let appearance = UINavigationBarAppearance()
        appearance.configureWithTransparentBackground()
        appearance.backgroundColor = .systemBackground
        appearance.titleTextAttributes = [NSAttributedString.Key.foregroundColor : UIColor.label]
        appearance.largeTitleTextAttributes = [NSAttributedString.Key.foregroundColor : UIColor.label]
        self.navigationBar.standardAppearance = appearance
        self.navigationBar.scrollEdgeAppearance = appearance
        self.navigationBar.compactAppearance = appearance
    }
}
- 사실 코드로만 봐도 어떤 행동을 하는지 정확히 알 수 있으나, 처음 사용해보는 부분만 짚고 넘어가면 좋을꺼 같다.
- TabBarviewController에서 tab을 설정하기 위한 코드
self.setViewControllers([today,game,app,search], animated: true)이 부분이 제일 중요하다 정도만 기억하면 좋을꺼 같다.
- 위에 TabBarViewController를 다 구현하고 실행을 하면 사실 아무것도 달라진게 없다. 왜냐하면 기본적으로 Swift Project에서 처음으로 실행되는 Viewcontroller는 TabController가 아니기 때문이다.
- 따라서 아래와 같이 수정을 해줘야한다.
스토리보드 삭제, SceneDelegate 수정
- 해당 프로젝트는 가능한 스토리보드를 사용하지 않기 때문에, 우선 Storyboard 파일을 삭제 해줘야한다.
- 그리고 Info.plist에서 SceneConfiguration -> Application session Role -> Storyboard name 를 삭제해줘야한다.
- 그리고 project target 에서 Build Settings -> main 검색 -> UIKit Main Storyboard File Base Name를 삭제해줘야한다.
- 여기까지 했으면 메인 스토리보드는 이제 해당 프로젝트에서 삭제가 된거다. 하지만 문제는 기본적으로 스토리보드는 ViewController랑 연결이 되어 있기 때문에, 이제는 window를 수정해줘야한다.
- SceneDelegate에서 추가해줘야한다.
func scene(_ scene: UIScene, willConnectTo session: UISceneSession, options connectionOptions: UIScene.ConnectionOptions) {

    guard let windowScene = (scene as? UIWindowScene) else { return }

    window = UIWindow(windowScene: windowScene)
    window?.rootViewController = ViewController() // 원하는 시작 ViewController
    window?.makeKeyAndVisible()

}- 이렇게 하면! 원하는 ViewController를 스토리보드 없이 rootViewController로 지정할 수 있다.
UIWindow?
- SceneDelgate를 수정하는데 처음 보는 객체를 사용한다. UIWindow?
- 애플 공식 문서에서는 이렇게 설명하고 있다.
The backdrop for your app’s user interface and the object that dispatches events to your views.
앱 UI 의 배경막 역할을 하고 뷰에 이벤트를 전달하는 오브젝트
- 이게 무슨소리인가 싶지만, 쉽게 설명을 하자면 윈도우는 뷰들을 담는 컨테이너 역할을 하며, 이벤트를 전달해주는 역할을 한다고 한다.
- 우리는 사실 UIWindow를 항상 사용하고 있었지만, 스토리보드를 사용할때는 아무 코드가 필요없이 알아서 작동이 되고 있었다는 것이다. (메인 window가 자동으로 제공됨)
- 그러면 UIWindow의 역할이 뭘까?
- 앱이 보여주는 콘텐츠들을 포함하는 역할 (컨테이너 역할)
- 뷰를 포함한 다른 앱 내 오브젝트들에게 이벤트를 전달해주는 핵심 역할
- 앱의 뷰 컨트롤러 화면 방향 전환을 용이하게 하기 위해 협업하는 역할
- 그러면 이제 다시 위에 코드를 보면 이해가 조금은 될 수 있다.
- 스토리보드를 지웠기 때문에, 메인 window의 대한 정보가 없기 때문에, 새로운 UIWindow 객체를 생성해서, 해당 window의 rootviewController를 원하는 ViewController로 바꿔주고, makeKeyAndVisible()은 해당 Window를 KeyWindow로 설정하고 보여지게 해라 이런 메서드이다.
오늘의 결과물
다음 계획
- Alamofire를 이용한 API 호출 (Model)
- SearchBar를 이용해서 검색하기 (데이터가 없는 관계로 API 호출로 대체) (SearchViewController)
- 앱 디테일 ViewController 구현
- 다른 ViewController 구현

개발자 (진)