CoreData
Core Data (FrameWork)
Persist or cache Data on a single device, or sync data to multiple devices with CloudKit
데이터를 유지하거나 캐시할 수 있으며, ClouldKit을 사용하면 여러 장치에서 데이터를 동기활 할 수 있다.
- CoreData는 데이터베이스가 아니라 프레임워크이다.
- Persistence는 CoreData에서 제공되는 하나의 기능일 뿐이다.
CoreData의 단점
Performance
- CoreData는 모든 과정을 메모리에 올라간 이후에 실행한다. 프레임워크이다 보니깐 데이터베이스랑 당연히 다르게 작동한다.
- 예를 들어서 데이터베이스 같은 경우에는 1000개의 데이터를 지운다고 한다면, 그냥 데이터베이스 자체에서 지운다면, CoreData는 우선 1000개의 데이터를 메모리에 올린 이후에, 삭제하는 방식으로 작동한다.
- 당연히 한 두개는 더욱 더 빠를 수 있지만, 데이터가 많아지면 Performance적으로는 문제가 생길 수 있다.
MultiThreading
- 물론 계속 발전을 하면서 MultiThreading에서도 잘 작동하게끔 설계가 변경되었지만, 초반에는 하나의 Thread에서만 작동하게 끔 프레임워크가 만들어졌다고 한다.
공식적인 단점은 아니지만 내가 느낀 단점
- 구조체를 정식으로 지원하는 Swift이지만, CoreData는 구조체를 지원하지 않는다.?
CoreData Stack
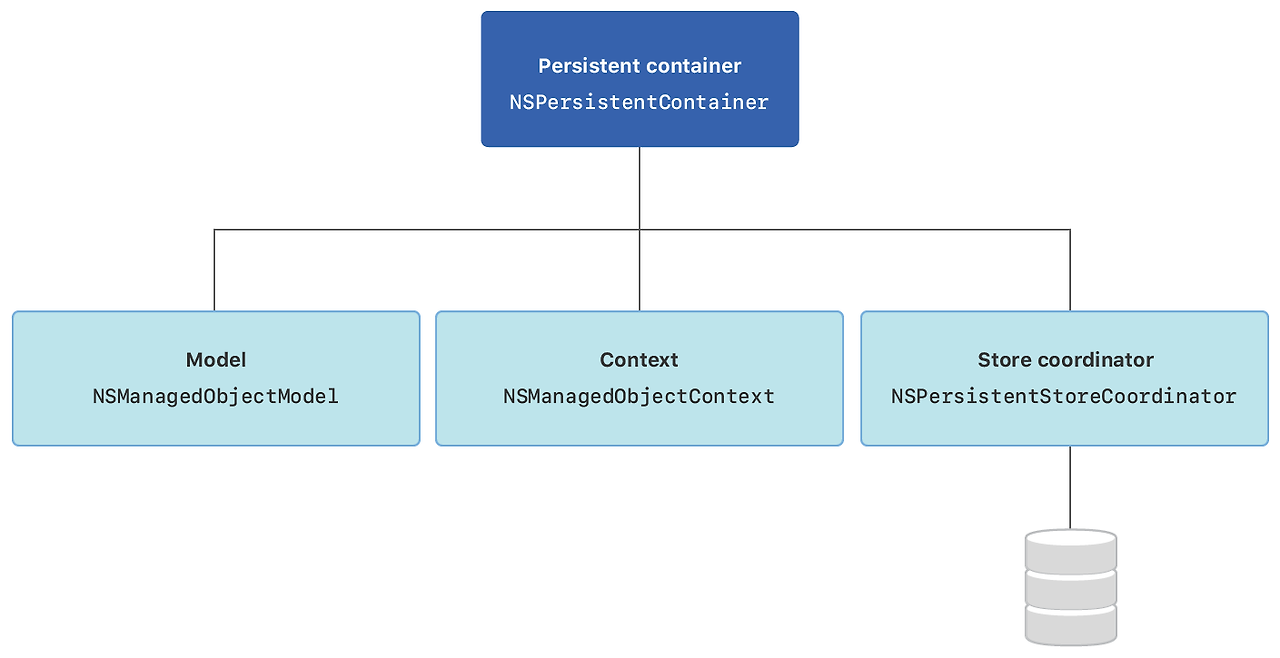
NSMangedObjectModel (Model)
- 애플리케이션의 데이터 모델을 정의하는 객체
- Entity와 그들의 속성들을 정의하고, 데이터베이스의 스키마 역할을 한다.
NSManagedObjectContext (Context)
- 애플리케이션의 데이터를 가져오거나 수정하는데 사용되는 객체
- 주로 메모리에서 데이터를 관리하고 데이터베이스와 상호 작용한다.
- Managed Object를 생성하고, 저장하고, 가져오는 작업 같은걸 제공한다.
NSPersistentStoreCoordinator (Store Coordinator)
- 영구 저장소를 관리하고 데이터베이스와의 통신을 담당하는 객체
- SQLite, XML, Binary 등 다양한 데이터 저장소과의 연결을 관리한다.
NSPersistentContainer (Persistent Container)
- 실제로 데이터를 영구적으로 저장하는데 사용되는 데이터베이스 파일이나 다른 형태의 저장소.
구현 방법
- 프로젝트 생성시 CoreData를 선택하면 아래 단계는 알아서 해준다! 하지만! 나중에 추가하는 경우도 무조건 알아야 한다.
데이터 모델 추가
프로젝트 새로운 파일 -> Data Model 파일을 생성한다.
Core Data Stack 설정
- AppDelegate 파일에서 Core Data Stack을 설정해줘야 한다.
- 우선 NSPersistentContainer를 생성해주고, Persistant container와 Model (NSManagedObjectModel)을 연결해주고, PersistStore과도 연결을 해준다.
- 그리고 NSmanagedObjectContext가 변화가 있다면 해당 정보들을 다시 Persistent Container에 저장을 하는 방식으로 설정한다.
// MARK: - Core Data stack
lazy var persistentContainer: NSPersistentContainer = {
/*
The persistent container for the application. This implementation
creates and returns a container, having loaded the store for the
application to it. This property is optional since there are legitimate
error conditions that could cause the creation of the store to fail.
*/
let container = NSPersistentContainer(name: "Model") // 생성한 Data Model 명
container.loadPersistentStores(completionHandler: {(storeDescription, error) in
if let error = error as NSError? {
fatalError("Unresolved error \(error), \(error.userInfo)")
/*
Typical reasons for an error here include:
* The parent directory does not exist, cannot be created, or disallows writing.
* The persistent store is not accessible, due to permissions or data protection when the device is locked.
* The device is out of space.
* The store could not be migrated to the current model version.
Check the error message to determine what the actual problem was.
*/
}
})
return container
}()
// MARK: - Core Data Saving Support
func saveContext() {
let context = persistentContainer.viewContext
if context.hasChanges {
do{
try context.save()
}catch{
let nserror = error as NSError
fatalError("Unresolved error \(nserror), \(nserror.userInfo)")
}
}
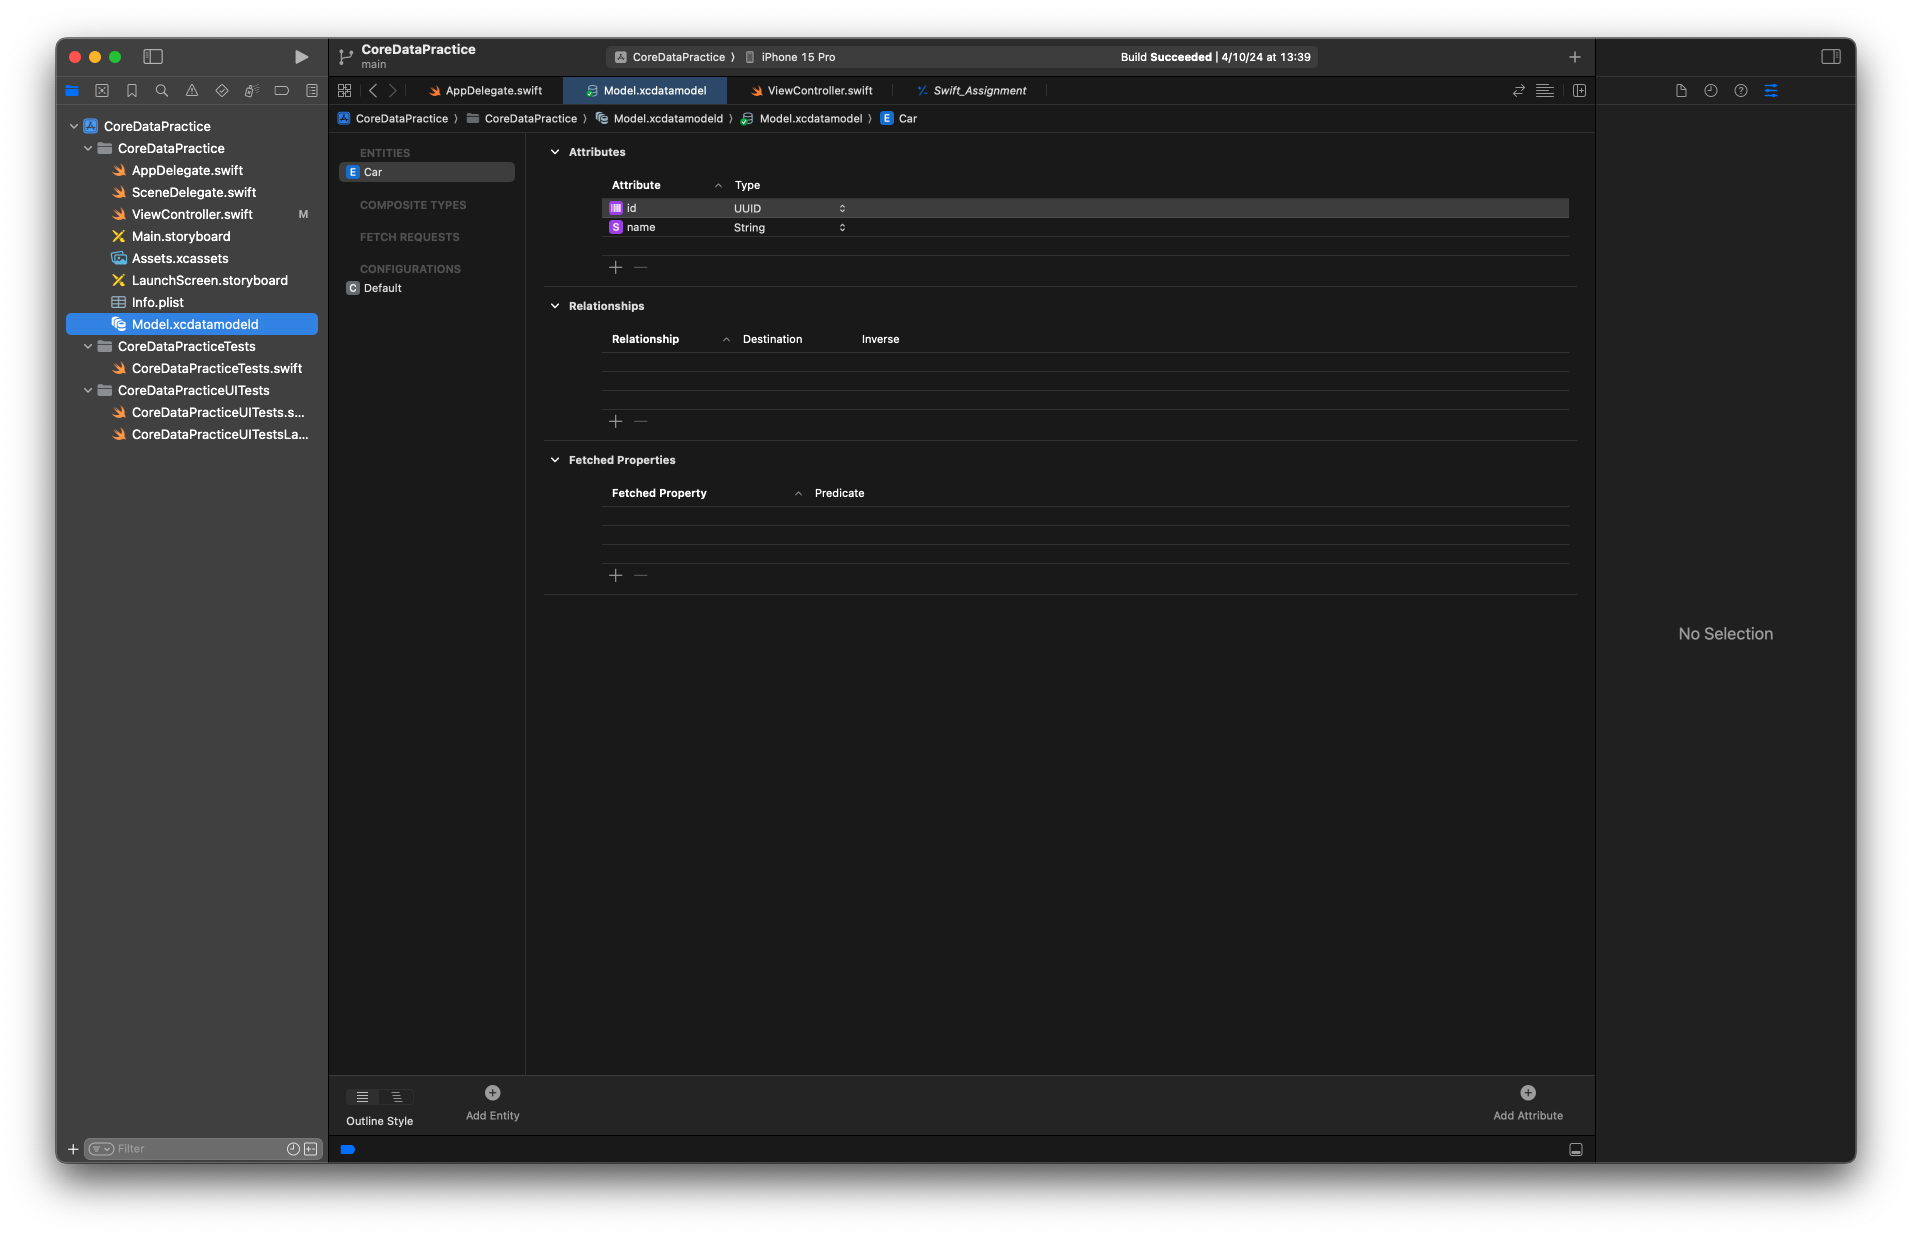
}Data Model 파일 구성하기 (데이터 모델링)
- Entitiy 생성
- Entity는 저장되고 관리되어야 하는 데이터의 집합이라고 생각하면 된다.
- 좌측 하단에 Add Entity 버튼을 통해 새로운 Entity을 추가할 수 있다.
- Class definition으로 생각하면 편하다.
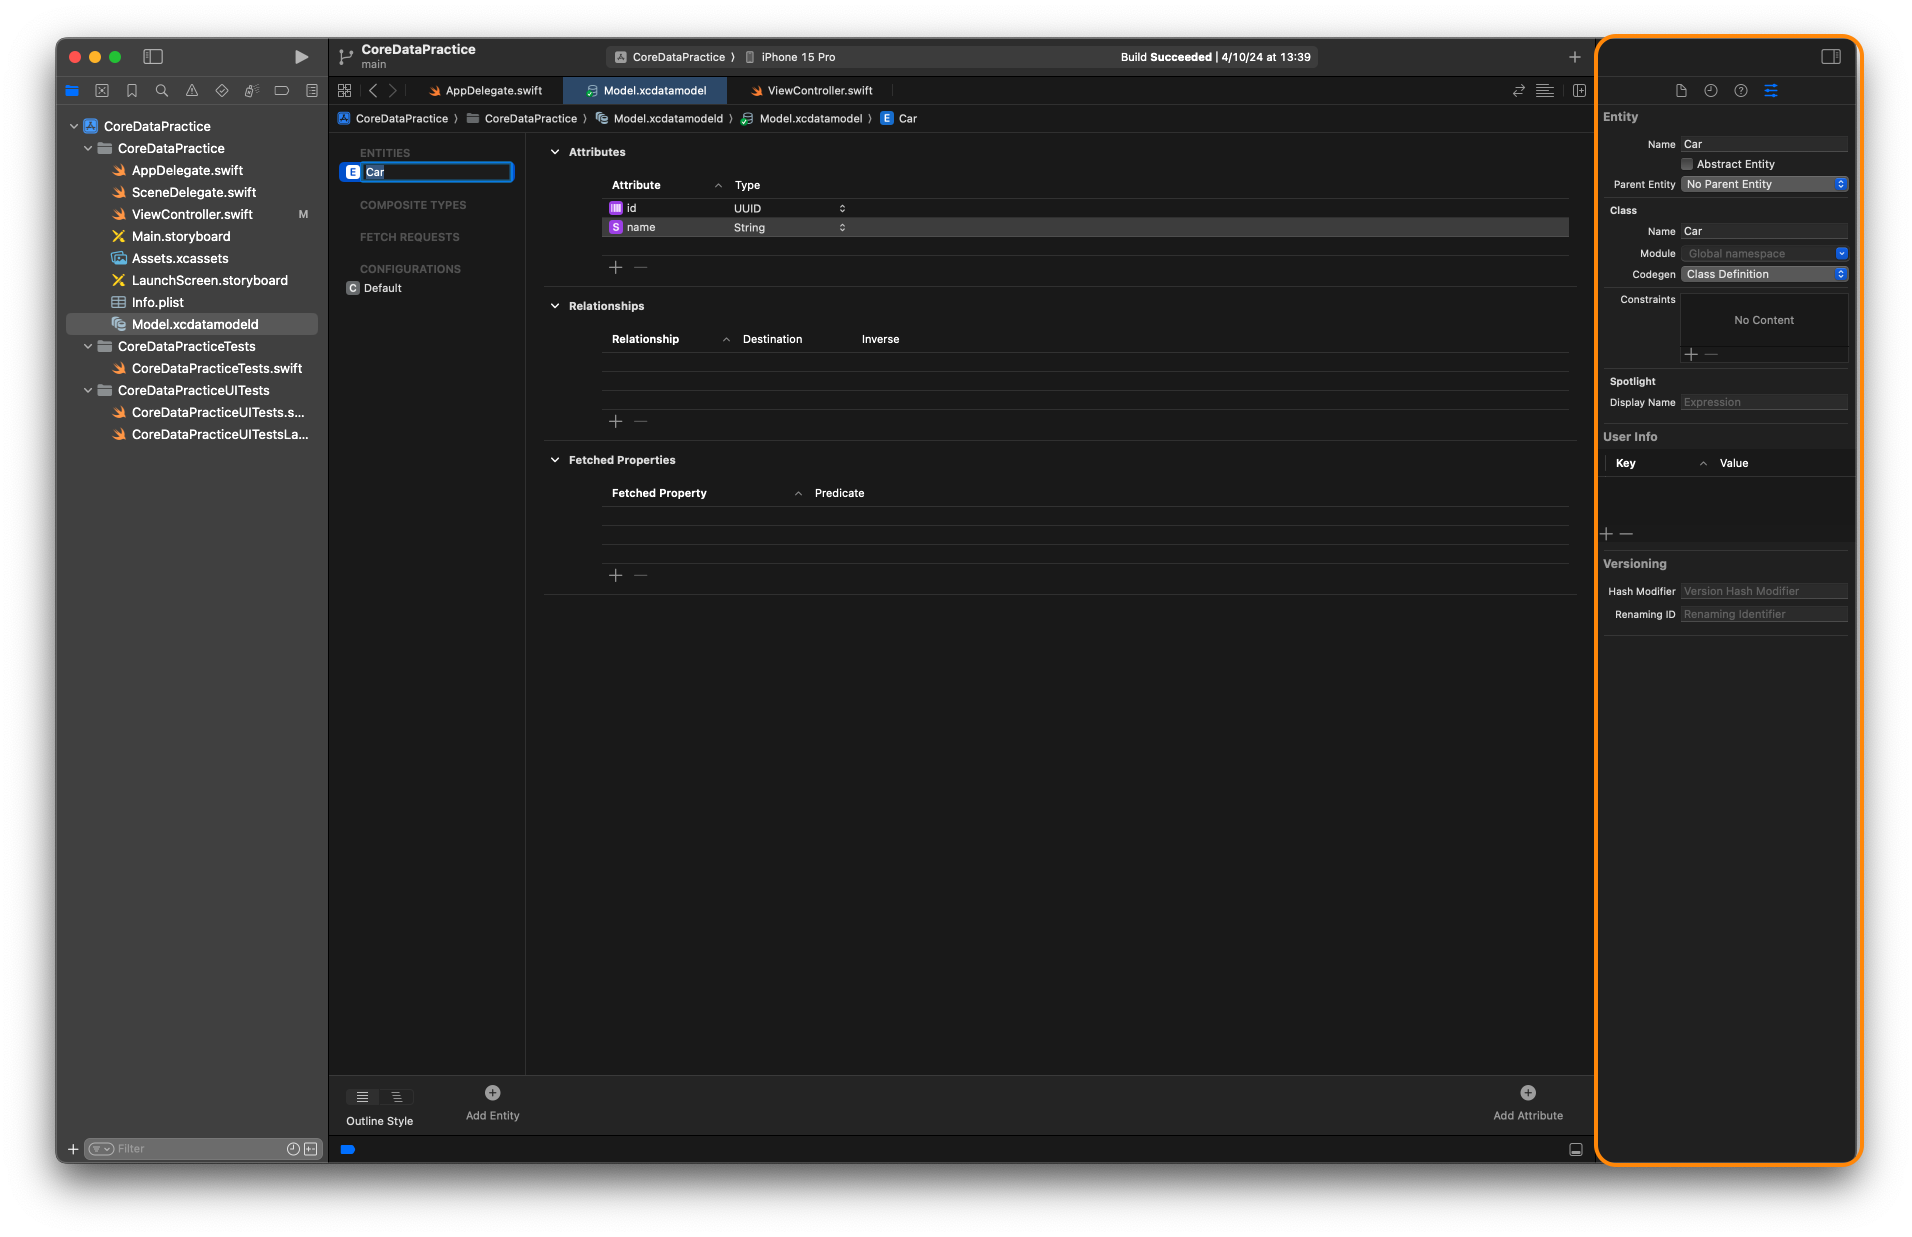
- 우측 인스펙터
- Entity 이름 변경을 할 수 있다.
- 제일 중요한거 Codegen!
- Codegen
- Manual/None
- 아무것도 자동으로 해주는것이 없다.
- Class Definition
- Core Data가 생성한 Managed Object Subclass 및 프로퍼티 또는 기능을 편집할 필요가 없는 경우,
- Data, Entities, Attributes들을 자동으로 Class 화 시켜주고 Property화 시켜주는 역할.
- 소스 코드가 프로젝트 소스 목록에 나타나지 않음
- 실제로는 Class 파일 과 Property파일을 자동으로 생성해주고, 관리함.
- 예시 :
let car = Car()이렇게 바로 사용할 수 있음
- Core Data가 생성한 Managed Object Subclass 및 프로퍼티 또는 기능을 편집할 필요가 없는 경우,
- Category/Extension
- Class 및 Property파일을 생성하고 연결은 해주되, 우리가 원하는 방향으로 수정할 수 있다.
- Manual/None
- Attribute 생성
- 클래스로 치면 프로퍼티라고 생각하면 된다.
- 각각의 Attribute마다 이름 및 타입을 설정해줄 수 있다.
- 화면 우측 하단 버튼을 통해 추가할 수 있다.
- 타입을 Tranformable로 선택하면 Custom Class로 설정할 수 있다.
- 우측 인스펙터
- 다양한 설정을 할 수 있다.
CRUD
func saveData(){
        guard let context = self.persistentContainer?.viewContext else {return}

        let newCar = Car(context : context)
        newCar.id = UUID()
        newCar.name = "Benz"

        try? context.save()
    }

    // 데이터 읽기 (Read)
    func readData(){
        guard let context = self.persistentContainer?.viewContext else {return}
        let request = Car.fetchRequest()
        guard let cars = try? context.fetch(request) else{
            return
        }
        print(cars)
    }


    // 데이터 수정 (Update)
    func updateData(){
        guard let context = self.persistentContainer?.viewContext else {return}

        let request = Car.fetchRequest()
        guard let cars = try? context.fetch(request) else {return}

        let filteredCars = cars.filter{$0.name == "Benz"}

        for car in filteredCars {
            car.name = "tesla"
        }

        try? context.save()
    }

    // 데이터 삭제 (Delete)

    func deleteData(){
        guard let context = self.persistentContainer?.viewContext else {return}
        let request = Car.fetchRequest()
        guard let cars = try? context.fetch(request) else {return}
        let filteredCars = cars.filter{$0.name == "tesla"}

        for car in filteredCars {
            context.delete(car)
        }
        try? context.save()
    }
개발자 (진)