앱 서비스를 사용하다 보면, 내 사진을 업로드 하는 경우가 굉장히 많다.
플러터 라이브러리와 기초적인 네이티브 설정 만으로 문제를 해결할 수 있다.
사전 작업
- 우선 아래 라이브러리를 모두 설치하자.
- permission_handler - 카메라, 라이브러리 등 사용 권한 지원
- image_picker - 카메라, 라이브러리 등 이미지 가져오기 지원
- image_cropper - 자르기, 비율변경, 회전 등 이미지 크롭 지원
- flutter_image_compress - 원하는 포맷으로 저장을 지원
- fluttertoast - 메세지 표기
- 모든 디바이스 기능을 사용하려면 네이티브 측에 권한 요청을 해야 한다.
Flutter로 디바이스 권한을 요청 할 때는 보통 permission_handler를 참조하면 된다. - 또, 네이티브 기능을 쓰려면 네이티브 설정을 먼저 마쳐야 한다. 자세히 알 수록 좋다.
안드로이드 설정코드
- 'uses-permission'으로 카메라와 갤러리를 추가하고 activity를 하나 더 추가, UCropActivity를 넣는다.
- 이 외에도 SDK Version을 안 만져주면 터지는 경우가 있는데, 디버그 콘솔을 잘 보고 설정해주자
 # android/app/src/main/AndroidManifest.xml
 <manifest ...>
 	<uses-permission android:name="android.permission.CAMERA" />
    <uses-permission android:name="android.permission.GALLERY" />
    <application
       ...
       ...
       <activity
           android:name="com.yalantis.ucrop.UCropActivity"
           android:screenOrientation="portrait"
           android:theme="@style/Theme.AppCompat.Light.NoActionBar"/>
     />
 </mainfest>
iOS설정 코드
- xcode에서 앱 기능 설정은 안 해도 될듯, Info.plist만 만져주자.
 # ios/Runner/Info.plist
 ...
     <dict>
	...
	<!-- 사진 촬영, 라이브러리 참조에 필요한 권한 요청, 괄호는 지우자 -->
	<key>NSPhotoLibraryUsageDescription</key>
	<string>We need access to your photo library to select pictures.(권한이 왜 필요한지 설명)</string>
	<key>NSCameraUsageDescription</key>
	<string>We need access to your camera to take pictures.(권한이 왜 필요한지 설명)</string>
	<key>NSMicrophoneUsageDescription</key>
	<string>We need access to your microphone to record audio.(권한이 왜 필요한지 설명)</string>
	<key>NSDocumentsFolderUsageDescription</key>
	<string>We need access to your documents folder to save files.(권한이 왜 필요한지 설명)</string>
 	    ...
     </dict>
...- 이후 터미널에서 pod을 꼭 설치해준다.
cd ios
pod install
구현
- 보통 강의 식으로 블로그 글을 쓰면, 한 페이지에 모두 코딩하는 경우가 있는데 조금 번거로워도 간단히 관심사 분리를 해서 써보자.
- 이번에는 view와 service로만 나눌거지만, 프로젝트에 적용되는 디자인 패턴에 따라서 정말 백이면 백 모두 다르게 구성될 수 있다.
지금은 완벽히 나눠지지 않았고 View에서 ViewModel같은 역할도 일부 하고있다.
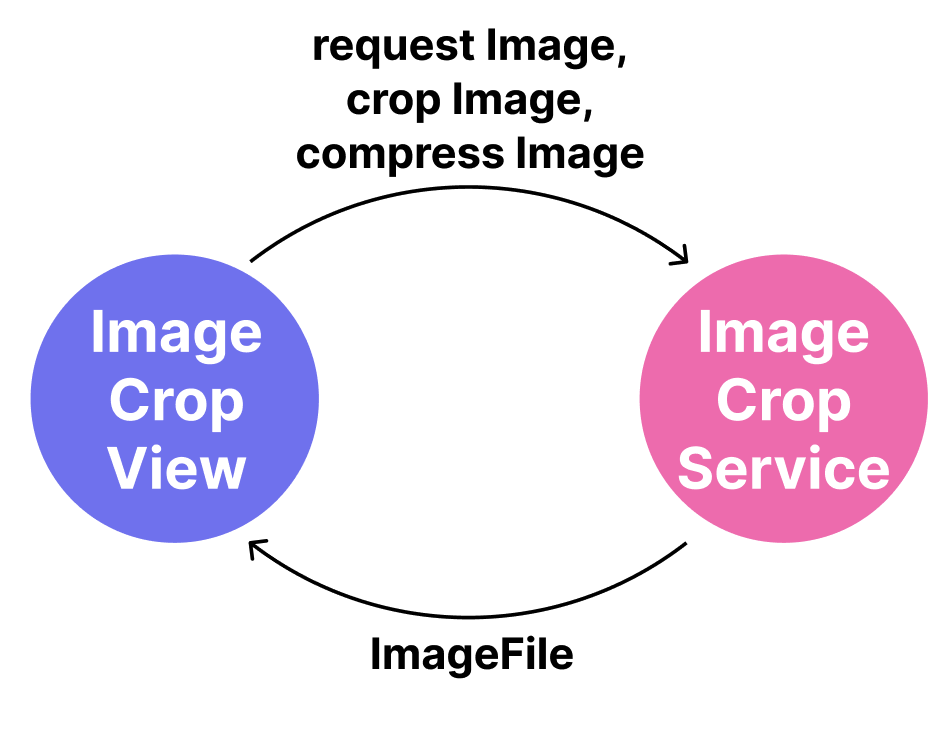
서비스 코드 구성
- 간결하게 권한요청, 사진찍기, 이미지 가져오기, 이미지 크롭하기, 이미지 압축하기 이 5개의 기능만 한다.
XFile은 플러터에서 주로 파일을 다룰 때 쓰는 클래스이고, CroppedFile은 ImageCropper로 가공한 이미지를 넣는 클래스 이다.
import 'package:permission_handler/permission_handler.dart';
import 'package:image_picker/image_picker.dart';
import 'package:image_cropper/image_cropper.dart';
import 'package:flutter_image_compress/flutter_image_compress.dart';

class ImageCropService {
  final ImagePicker _picker = ImagePicker();

  Future<bool> requestPermission() async {
    bool storage = await Permission.storage.request().isGranted;
    bool camera = await Permission.camera.request().isGranted;

    if (await Permission.storage.request().isDenied ||
        await Permission.camera.request().isDenied) {
      return false;
    }
    return true;
  }

  Future<XFile?> takePhoto() async {
    return await _picker.pickImage(source: ImageSource.camera);
  }

  Future<XFile?> pickImageFromGallery() async {
    return await _picker.pickImage(source: ImageSource.gallery);
  }

  Future<CroppedFile?> cropImage(String imagePath) async {
    return await ImageCropper().cropImage(
      sourcePath: imagePath,
      // 사진은 1:1비율로 가공
      aspectRatio: CropAspectRatio(ratioX: 1, ratioY: 1),
    );
  }

  Future<XFile?> compressImage(String imagePath) async {
    try {
      final String outputPath =
          imagePath.replaceAll('.jpg', '_compressed.webp');
      return await FlutterImageCompress.compressAndGetFile(
        imagePath, // 수정 할 파일 경로
        outputPath, // 수정 후 저장할 경로
        format: CompressFormat.webp, // 포맷, 용량이 적은 webp로 일단 지정
        quality: 88, // 라이브러리 샘플에 나온 퀄리티가 88, 자신에게 맞게 사용
      );
    } catch (e) {
      // 오류 처리
      print(e);
      return null;
    }
  }
}
UI구성
- 에러메세지 등 알림은 깔끔하게 toast를 사용하자. 그리고 미리 구성한 sevice도 페이지 로드와 함께 가져온다.
- 그리고 무엇보다 먼저 권한을 체크하자.이 부분은 앱 서비스 맨 처음에 요청할 수도 있다.
- 자잘한 컨테이너의 Decoration등은 블로그 글 특성에 맞지 않게 너무 길어지게 만드는 것 같아 생략하였다.
class ImageCropView extends StatefulWidget {
const ImageCropView({Key? key}) : super(key: key);
State<ImageCropView> createState() => _ImageCropViewState();
}
class _ImageCropViewState extends State<ImageCropView> {
late ImageCropService _imageCropService;
FToast fToast = FToast();
void initState() {
super.initState();
fToast.init(context); // toast메세지 초기화
_imageCropService = ImageCropService(); // 서비스 인스턴스
_requestPermission();
}
Future<void> _requestPermission() async {
bool permissionGranted = await _imageCropService.requestPermission();
if (permissionGranted == false) {
//! 권한이 안 넘어올 시 예외처리 추가 필요
fToast.showToast(child: Text('권한이 필요합니다.'));
}
}
...
}- 페이지 구성은 간단하게 가운데 사진 넣는 정사각형 박스를 넣고,
사진이 들어가면 수정/삭제 버튼을 아래에 추가해주자.
...
final String demoImage = "assets/demo.png"; // 사진 업로드 전 기본 예시 이미지
bool _isPictureUploaded = false; // 사진 업로드 여부 판단
XFile? _originalImage; // 업로드한 원본 사진
XFile? _cropedImage; // 크롭하고 수정한 사진
...
Widget build(BuildContext context) {
return Scaffold(
appBar: AppBar(...), // 각자 필요한 AppBar 넣기
body: Center(
child: Column(
mainAxisAlignment: MainAxisAlignment.center,
children: [
Container(
width: 250,
height: 250,
decoration: BoxDecoration(...),
child: GestureDetector(
onTap: () {
if (_isPictureUploaded) {
// 이미지 업로드시 -> 이미지를 크롭&압축
_cropAndCompressImage(_originalImage!.path);
}
// 이미지 미 업로드시 -> 이미지를 업로드
_showUploadPictureModal(context);
},
child: Stack(
children: [
Container(
width: 250,
height: 250,
clipBehavior: Clip.antiAlias,
decoration: BoxDecoration(
image: DecorationImage(
image: _centerImage(),
fit: BoxFit.cover,
),
... // 기타 Decoration
),
Align(
alignment: Alignment.center,
child: _isPictureUploaded
? null //이미지 업로드시 안보임
: Container(...// 이미지가 없을 시 사진을 추가해달라는 메세지 표시),
),
],
),
),
),
],
),
),
);기능 붙이기
// 디바이스 카메라로 사진 찍기
  Future<void> _takePhoto() async {
    _originalImage = await _imageCropService.takePhoto();
    if (_originalImage != null) {
      await _cropAndCompressImage(_originalImage!.path);
    } else {
      fToast.showToast(child: Text('오류! 다시 촬영해주세요!'));
    }
  }

// 디바이스 갤러리에서 사진 가져오기
  Future<void> _pickImageFromGallery(BuildContext context) async {
    _originalImage = await _imageCropService.pickImageFromGallery();
    if (_originalImage != null) {
      await _cropAndCompressImage(_originalImage!.path);
    } else {
      fToast.showToast(child: Text('사진 선택이 취소되었습니다.'));
    }
  }

// 찍거나 가져온 사진 편집
  Future<void> _cropAndCompressImage(String imagePath) async {
    final croppedFile = await _imageCropService.cropImage(imagePath);
    if (croppedFile != null) {
      _cropedImage = await _imageCropService.compressImage(croppedFile.path);
      setState(() {
        _isPictureUploaded = true;
      });
    }
  }

// 이미지 프로바이더
  ImageProvider _centerImage() {
    if (!_isPictureUploaded) {
      // 기본 이미지 (나는 플러터 로고를 표시했음)
      return AssetImage(demoImage);
    }
    // 가져온 이미지
    return FileImage(File(_cropedImage!.path));
  }


// 사진 업로드시 나오는 모달
  Future<dynamic> _showUploadPictureModal(BuildContext context) {
    return showModalBottomSheet(
        backgroundColor: Colors.transparent,
        context: context,
        builder: (BuildContext context) {
          return Material(
            color: Colors.transparent,
            child: Container(
              height: MediaQuery.of(context).size.height * 0.25,
              padding: EdgeInsets.all(24),
              decoration: BoxDecoration(...),
              child: Column(
                children: [
                  GestureDetector(
                    onTap: () {
                      await _takePhoto();
                      Navigator.pop(context);
                    },
                    child: Row(
                      children: [
                        Container(
                          width: 40,
                          height: 40,
                          decoration: BoxDecoration(...),
                          child: Icon(Icons.camera_alt, size: 24),
                        ),
                        SizedBox(width: 6),
                        Text("사진 촬영하기", style: TextStyle(fontSize: 16)),
                      ],
                    ),
                  ),
                  SizedBox(height: 12),
                  GestureDetector(
                    onTap: () async {
                      await _pickImageFromGallery(context);
                      Navigator.pop(context);
                    },
                    child: Row(
                      children: [
                        Container(
                          width: 40,
                          height: 40,
                          decoration: BoxDecoration(...),
                          child: Icon(Icons.image, size: 24),
                        ),
                        SizedBox(width: 6),
                        Text("내 사진첩에서 선택하기", style: TextStyle(fontSize: 16)),
                      ],
                    ),
                  ),
                ],
              ),
            ),
          );
        });
  }
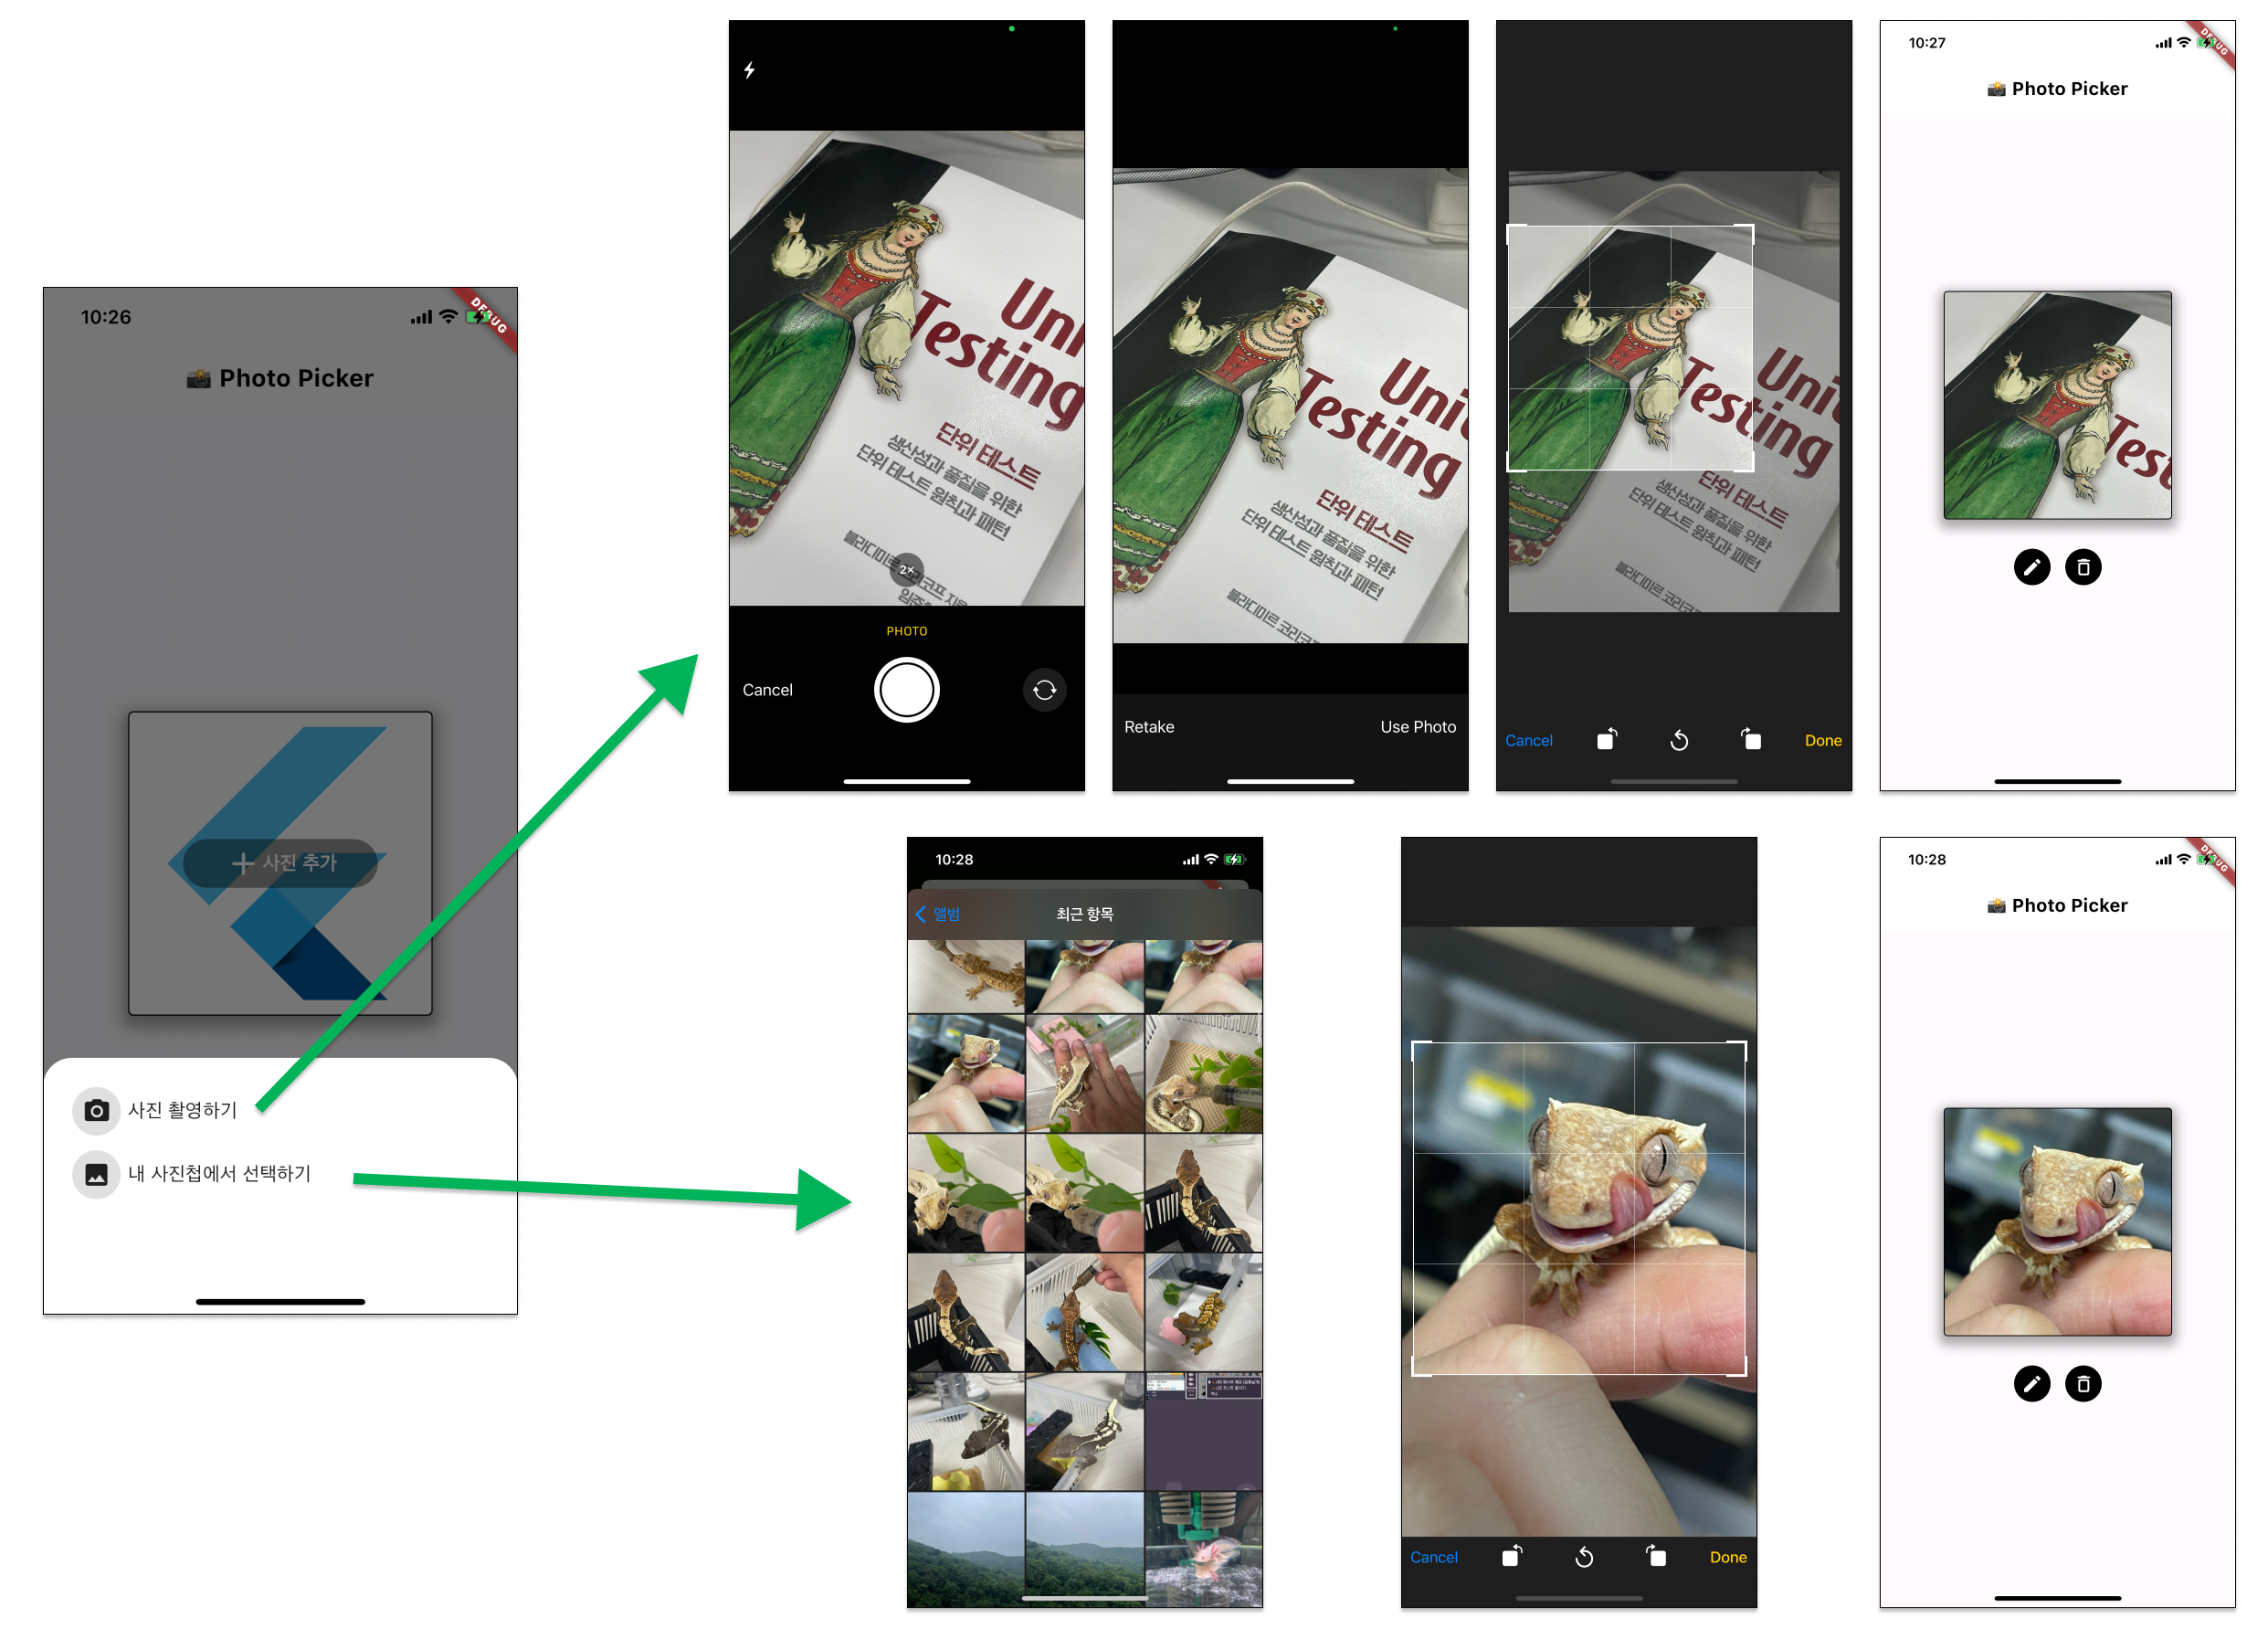
 - 이제 가운데 박스를 누르면 _showUploadPictureModal()이 사진찍기와 갤러리에서 선택하기를 결정하는 모달을 출력해주고,
그중 하나를 선택하면 원하는 기능을 사용할 수 있다.
- 실전 프로젝트에서 쓰기 전에 내 구현한 기능들과 권한을 체크해보고, 위 기능 위에 로딩을 덧붙이는 것을 연습으로 해보기 바란다.
- 이제 가운데 박스를 누르면 _showUploadPictureModal()이 사진찍기와 갤러리에서 선택하기를 결정하는 모달을 출력해주고,
그중 하나를 선택하면 원하는 기능을 사용할 수 있다.
- 실전 프로젝트에서 쓰기 전에 내 구현한 기능들과 권한을 체크해보고, 위 기능 위에 로딩을 덧붙이는 것을 연습으로 해보기 바란다.
Terra-AI