개인 스터디 겸 프로젝트를 진행 중에 있다. 여태까지 진행한 소스코드를 github에 올려놓으려 했는데 꽤 우여곡절을 겪었다. 그 과정을 통해 얻은 repository 생성부터 git 설정까지의 경험을 기록을 통해 남겨보려 한다.
github repository 만들기
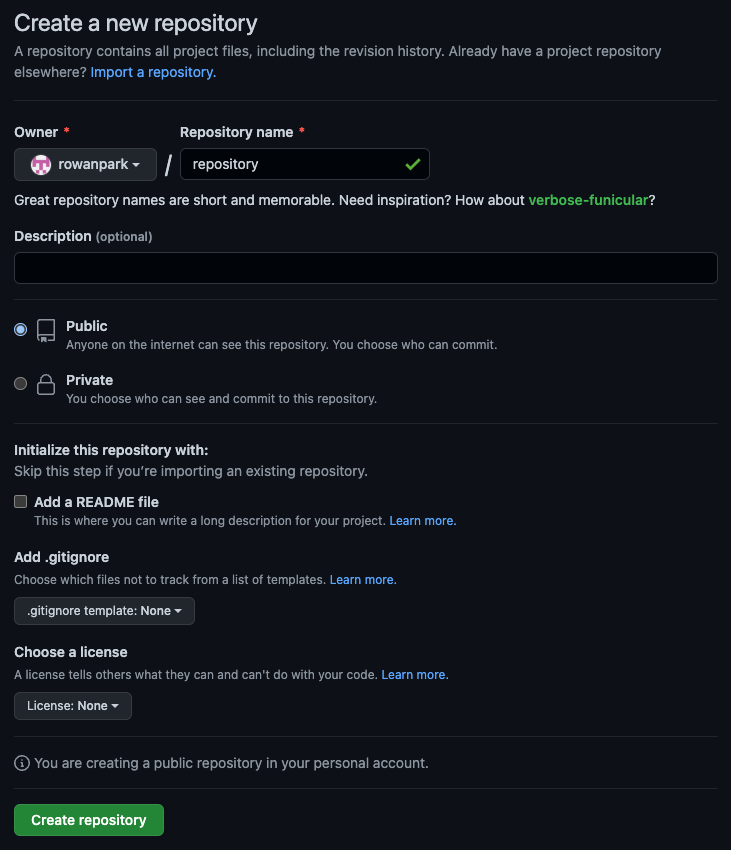
Repository name만 정해준다.
그 외 아무 설정도 건들지 않고 Create repository 버튼을 눌러준다.
위는 github에 원격 저장소(Remote repository)를 만들어 준 것이다.
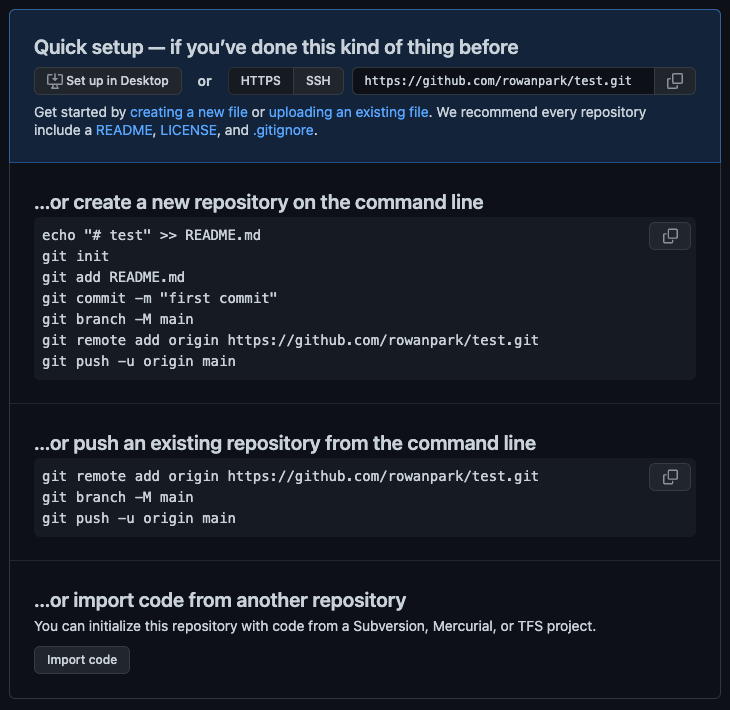
Create repository 버튼을 누르면 위와 같은 화면이 뜬다.
위 과정을 따르면 로컬 저장소(Local repository)에 있는 소스코드를 원격 저장소(Remote repository)에 업로드할 수 있다.
github upload 명령어 history
1. git config 명령어로 user.name & user.email (global) 설정
git statusgit config --listgit config --global user.name "username"git config --listgit config --global user.email "useremailid@gmail.com"git config --list2. 원격 저장소 초기화
git initgit status3. add & commit & branch & push
git add .git commit -m "first commit"git statusgit branchgit branch -M mastergit branchgit remote add origin https://github.com/username/repositoryname.gitgit push -u origin master
- fatal: unable to access 'https://github.com/username/repositoryname.git/': The requested URL returned error: 403
- 위와 같은 403 에러 발생
- git push 에러
4. git config 명령어로 user.name & user.email (local) 설정
git config --listgit config --local user.name "username"git config --local user.email "useremailid@gmail.com"git config --list이렇게 하면 repository별로 user.name과 user.email을 지정할 수 있다고 한다.
5. set-url로 위 403 에러 해결
git remote -vgit remote set-url origin https://username@github.com/username/repositoryname.gitgit remote -v6. push 성공
git push -u origin master
- set-url을 잘 설정해주니 원격 저장소에 소스코드 push가 성공적으로 이루어졌다.
- push 시 password를 입력하라는 창이 나올 때는 git token을 입력해주어야 한다.
- git token 생성 방법은 다음에 기회가 된다면 작성해 보겠다.

hi im rowan