사이드 프로젝트 세팅 가이드
🛠️ Git Hook, Husky, lint-staged
🔍 Git Hook이란?
Git Hook은 특정 Git 이벤트(예: commit, push, merge 등)가 발생할 때 자동으로 실행되는 스크립트입니다. 이를 통해 코드 검사, 테스트 실행, 코드 포맷팅 등을 자동화할 수 있습니다.
🔍 Husky를 사용하는 이유
Husky는 Git Hook을 쉽게 관리하고 설치할 수 있도록 돕는 도구입니다. 수동으로 .git/hooks/에 파일을 추가하지 않고도 간단한 명령으로 Hook을 설정할 수 있습니다.
🔍 lint-staged란?
lint-staged는 Git에 스테이징된 파일만 lint를 적용하는 도구입니다.
전체 파일에 Lint 규칙을 적용하는 방식은 속도가 느리지만, lint-staged는 커밋할 파일에만 규칙을 적용해 효율적입니다.
🛠️ Husky와 lint-staged 설정하기
- 패키지 설치
npm install --save-dev lint-staged
- Husky 설치
npx husky install- lint-staged package.json 설정
 "lint-staged": {
        "*.tsx": "eslint --fix",
        "*.{js,css,tsx,jsx,ts}": "prettier --write"
}- pre-commit Hook 추가
echo "🔍 commit 이전에 lint 규칙을 적용합니다..."
if npx lint-staged; then
  echo "✅ 모든 lint 규칙이 성공적으로 적용되었습니다."
  exit 0
else
  echo "❌ lint 규칙 검사에서 오류가 발생했습니다."
  exit 1
fi- commit-msg Hook 추가
npx --no-install commitlint --edit "$1"🔥 Commitlint 설정하기
- 패키지 설치
npm install --dev @commitlint/config-conventional @commitlint/cli
협업 프로젝트를 진행하다 보면 코드 스타일, 네이밍 규칙 등 다양한 개발 컨벤션을 정하게 됩니다. 그중에서도 커밋 컨벤션은 특히 중요하지만, 여러 가지 이유로 이를 지키지 못하는 경우가 종종 발생합니다. 이를 방지하기 위해 Commitlint를 도입했습니다. Commitlint를 사용하면 커밋 메시지가 특정 키워드로 시작하도록 강제할 수 있으며, 이를 통해 팀의 커밋 컨벤션을 일관성 있게 유지할 수 있습니다.
- .commitlintrc.json
{
    "extends": ["@commitlint/config-conventional"],
    "rules": {
        "type-case": [2, "always", "lower-case"],
        "type-empty": [2, "never"],
        "type-enum": [
            2,
            "always",
            [
                "feat",
                "fix",
                "docs",
                "design",
                "style",
                "refact",
                "test",
                "chore",
                "comment",
                "remove",
                "rename",
                "init"
            ]
        ],
        "subject-empty": [2, "never"],
        "subject-full-stop": [2, "never", "."]
    }
}
.commitlintrc.json 파일에 위와 같은 설정을 추가하였습니다.
반드시 소문자를 사용하고 type의 값이 비어있으면 안되고 type-enum을 통해 타입을 제한합니다.
✨ESLint, Airbnb 스타일 적용하기
airbnb 설치시 eslint나 기타 패키지를 설치하기전에 airbnb를 설치하면 종속성 패키지로써 같이 설치되기때문에 먼저 설치하면 에러가 발생하여 설치할 수 없고 airbnb를 통해 설치하는 것이 좋습니다.
npm run lint를 통해 검사하여 에러 발생 해결하기
0:0 error Parsing error: ESLint was configured to run on `<tsconfigRootDir>/vite.config.ts` using `parserOptions.project`: <tsconfigRootDir>/tsconfig.json 저의 경우에는 tsconfig.node.json과 tsconfig.app.json 둘다에서 "include": ["vite.config.ts"]를 중복으로 사용하여 발생하는 오류 였습니다.
이 경우에는 tsconfig.node.json에서만 사용해야 에러를 해결할 수 있습니다.
Using target="_blank" without rel="noreferrer" (which implies rel="noopener") is a security risk in older browsers: see https://mathiasbynens.github.io/rel-noopener/#recommendations react/jsx-no-target-blanktarget="_blank" 속성은 새로운 탭에서 링크를 열지만, 보안 취약점(중간자 공격)이 존재할 수 있습니다. 이를 해결하려면 rel="noreferrer noopener" 속성을 추가해야 합니다.
Button의 경우 Type을 지정해주지 않아서 에러가 발생하기 때문에 Button의 경우 타입을 꼭 지정해주어야 합니다.
 WARNING: You are currently running a version of TypeScript which is not officially supported by @typescript-eslint/typescript-estree.

You may find that it works just fine, or you may not.

SUPPORTED TYPESCRIPT VERSIONS: >=4.7.4 < 5.6.0 YOUR TYPESCRIPT VERSION: 5.7.2

Please only submit bug reports when using the officially supported version.
위 WARNING의 경우 문구에서 나오는 내용에 맞게 Typesript 버전을 다운그레이드해주면 더 이상 나오지 않습니다.
 1:1  error  'vite' should be listed in the project's dependencies, not devDependencies                  import/no-extraneous-dependencies
2:1 error '@vitejs/plugin-react' should be listed in the project's dependencies, not devDependencies import/no-extraneous-dependencies eslintrc.json"import/no-extraneous-dependencies": ["error", {"devDependencies": true}] 추가하여 해결할 수 있습니다.
🎉 Prettier 설정
eslint 9version 이후부터는 json 파일 아닌 js나 cjs 파일로 설정해야합니다.
.eslintrc.json파일에서 prettier 관련 설정을 extends와 plugins에서는 꼭 마지막에 명시해주어야 합니다.
⚡ React Query (TanStack Query) 설정
- 패키지 설치
npm i @tanstack/react-query
npm i -D @tanstack/eslint-plugin-query
2.eslint 설정
"extends": [
  "plugin:@tanstack/eslint-plugin-query/recommended"
]
ESLint 플러그인의 권장 규칙을 사용하면, 일반적인 실수를 피하는 데 도움이 됩니다.
extends 옵션의 배열 아이템으로 plugin:@tanstack/eslint-plugin-query/recommended를 추가합니다.
🌈 Tailwind CSS & Shadcn UI 설치
- 패키지 설치
npm i -D tailwindcss autoprefixer postcss

npx tailwindcss init
위 명령어를 실행하면 tailwind.config.js 파일이 루트 경로에 생성됩니다.
- tailwind.config.js 설정
/** @type {import('tailwindcss').Config} */
export default {
    content: ['./index.html', './src/**/*.{js,ts,jsx,tsx}'],
    theme: {
        extend: {},
    },
    plugins: [],
};
- postcss.config.cjs 파일 추가
module.exports = {
    plugins: {
        tailwindcss: {},
        autoprefixer: {},
    },
};
- index.css
@tailwind base;
@tailwind components;
@tailwind utilities;
최상단에 위에 코드를 적용해주어야 정상적으로 작동합니다.
shardcn 공식 문서
https://ui.shadcn.com/docs/installation/vite
✅ 테스트 환경 구성
🔥 React Testing Library && Vitest
- 패키지 설치
npm i -D vitest jsdom @testing-library/react @testing-library/dom @testing-library/user-event @testing-library/jest-dom @types/jesttypescript로 프로젝트 만들어져 있다면 위와 같이 패키지를 다운 받으시면 됩니다.
- package.json
{
  "scripts": {
    "test": "vitest"
  }
}- vite.config.ts 설정
/// <reference types="vitest" />

import { defineConfig } from 'vite';
import react from '@vitejs/plugin-react';
import path from 'path';

// https://vite.dev/config/
export default defineConfig({
    plugins: [react()],
    test: {
        globals: true,
        environment: 'jsdom',
        setupFiles: ['src/tests/setup.ts'],
    },
    resolve: {
        alias: {
            '@': path.resolve(__dirname, './src'),
            node_modules: path.resolve(__dirname, 'node_modules'),
        },
    },
}
맨위 최상단에 /// <reference types="vitest" /> 꼭 명시해주셔야 합니다.
- setup.ts 파일 추가
import { cleanup } from '@testing-library/react'

beforeEach(() => {
  cleanup()
})
setup.ts 파일에는 위와 같은 내용이 들어가야 합니다.
beforeEach 함수로 각 테스트 케이스(test 함수) 실행 전에 수행할 작업을 정의할 수 있습니다.
cleanup 함수는 React 컴포넌트를 정리하고 DOM을 초기화하는 역할을 합니다.
이를 통해 테스트 간의 독립성을 보장하고 이전 테스트가 다음 테스트에게 영향을 미치지 않도록 합니다.
🔥 Cypress
- 패키지 설치
npm i -D cypress- package.json 스크립트 추가
{
  "scripts": {
    "cy:open": "cypress open",
    "cy:run": "cypress run"
  }
}- cypress.config.js
import { defineConfig } from 'cypress';

export default defineConfig({
    e2e: {
        baseUrl: 'http://localhost:1234',
    },
});
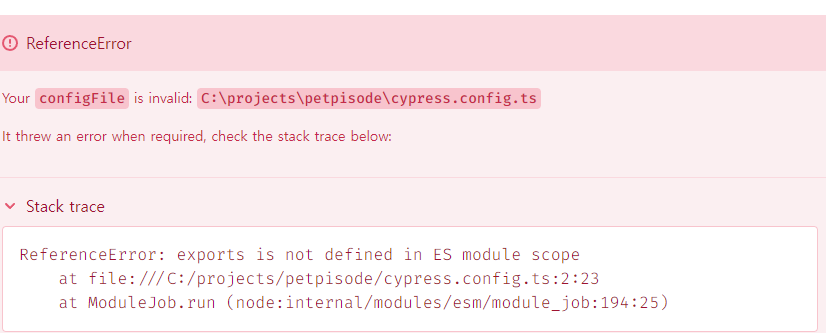
루트 경로에 cypress.config.ts 파일이 생성됩니다. 여기서 위와 같은 에러가 발생한다면 확장자를 .ts 가 아니라 .js를 사용하면 해결할 수 있습니다.