
공식문서 따라서 블로그 만들어보기
npx create-next-app@latest nextjs-blog --use-npm --example "https://github.com/vercel/next-learn/tree/master/basics/learn-starter"
프로젝트 생성
page
url = http://localhost:3000/posts/first-post
url로 갔을 때 first post를 확인할 수 있는 방법은
pages 폴더 안에 posts 폴더 생성 후 first-post.js파일을 생성하면 error 뜨지 않는 것을 알 수 있다.
export default function FirstPost() {
  return <h1>First Post!</h1>;
}
Link Component
Link component와 a 태그의 차이는 호출없이 스무스하게 이동하는 느낌이든다.
a 태그는 앱 자체를 전체 다시 불러온다.
Link 태크는 전체를 불러오는게 아니라 필요한 것만 불러온다.
  <h1 className="title">
          Read <Link href="/posts/first-post">this page!</Link>
        </h1>

        <h1 className="title">
          Read <a href="/posts/first-post">this page!</a>
        </h1>
Code splitting
서비스 하나에 굉장히 많은 코드를 가지게 된다.
코드를 유의미하게 분리한다.
사용자가 웹 페이지에 처음 진입했을 때 화면을 그리게 필요한 부분부분 코드를 받아오면 된다.
Css
imgage
public/image/img.jpg
<img src="/images/img.jpg" alt="Your Name" />
import Image from 'next/image';

const YourComponent = () => (
  <Image
    src="/images/profile.jpg" // Route of the image file
    height={144} // Desired size with correct aspect ratio
    width={144} // Desired size with correct aspect ratio
    alt="Your Name"
  />
);
사이즈와 폭도 자동적으로 작아진다.
next가 알아서 Optimization를 해주었다.
Metadata
html에서 제공하는 head 태그와 동일하다.
import Link from "next/link";
import Head from "next/head";

export default function FirstPost() {
  return (
    <>
      <Head>
        <title>First Post</title>
      </Head>
      <h1>First Post</h1>
      <h2>
        <Link href="/">Back to home</Link>
      </h2>
    </>
  );
}
style jsx
vercel에서 만든 style 라이브러리
_app.js
import "../styles/globals.css";

export default function App({ Component, pageProps }) {
  return <Component {...pageProps} />;
}
styles/globals.css는 이미 존재하기 때문에 따로 code를 넣을 필요가 없다.
_app.js는 무슨 의미인가?
pages안에 있는 라우팅이 된다.
모든 component들이 app으로 감싸진다.
alert를 통해 실험해 보면 모든 페이지에 alert가 뜬다.
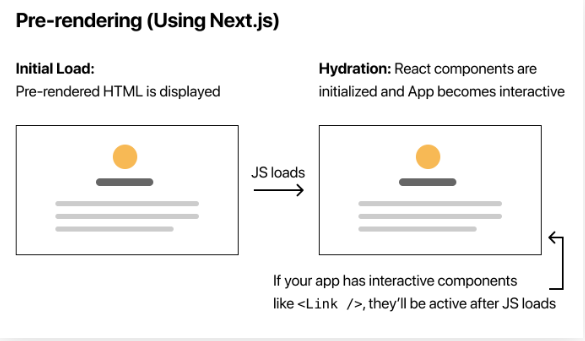
Pre-rendering
hydration:페이지가 브라우저에 로드되고 자바스크립트 코드가 실행되면서 페이지가 인터렉티브하게 동작할 상태가 되는 과정

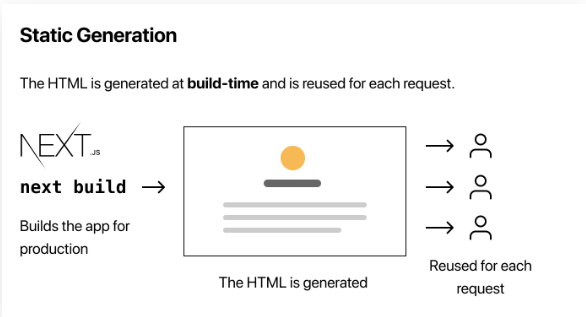
Static Generation
빌드 시 HTML을 생성하는 사전 렌더링 방법입니다 . 그러면 미리 렌더링된 HTML이각 요청에서 재사용 됩니다.
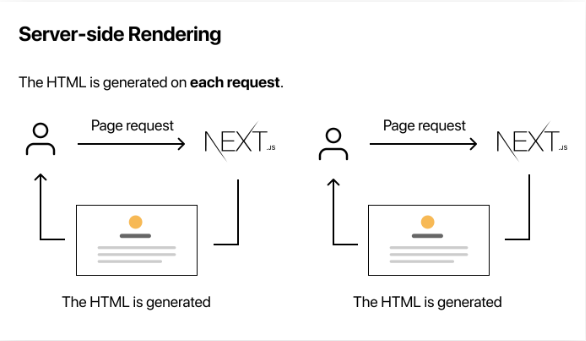
Server-side Rendering
각 요청 에서 HTML을 생성하는 사전 렌더링 방법입니다.
Data Fetching
posts/pre-rendering.md
---
title: "Two Forms of Pre-rendering"
date: "2020-01-01"
---

Next.js has two forms of pre-rendering: **Static Generation** and **Server-side Rendering**. The difference is in **when** it generates the HTML for a page.

- **Static Generation** is the pre-rendering method that generates the HTML at **build time**. The pre-rendered HTML is then _reused_ on each request.
- **Server-side Rendering** is the pre-rendering method that generates the HTML on **each request**.

Importantly, Next.js lets you **choose** which pre-rendering form to use for each page. You can create a "hybrid" Next.js app by using Static Generation for most pages and using Server-side Rendering for others.
posts/ssg-ssr.md
---
title: "When to Use Static Generation v.s. Server-side Rendering"
date: "2020-01-02"
---

We recommend using **Static Generation** (with and without data) whenever possible because your page can be built once and served by CDN, which makes it much faster than having a server render the page on every request.

You can use Static Generation for many types of pages, including:

- Marketing pages
- Blog posts
- E-commerce product listings
- Help and documentation

You should ask yourself: "Can I pre-render this page **ahead** of a user's request?" If the answer is yes, then you should choose Static Generation.

On the other hand, Static Generation is **not** a good idea if you cannot pre-render a page ahead of a user's request. Maybe your page shows frequently updated data, and the page content changes on every request.

In that case, you can use **Server-Side Rendering**. It will be slower, but the pre-rendered page will always be up-to-date. Or you can skip pre-rendering and use client-side JavaScript to populate data.
npm install gray-matter
root 경로에 lib/posts.js
import fs from "fs";
import path from "path";
import matter from "gray-matter";

const postsDirectory = path.join(process.cwd(), "posts");

export function getSortedPostsData() {
  // Get file names under /posts
  const fileNames = fs.readdirSync(postsDirectory);
  const allPostsData = fileNames.map((fileName) => {
    // Remove ".md" from file name to get id
    const id = fileName.replace(/\.md$/, "");

    // Read markdown file as string
    const fullPath = path.join(postsDirectory, fileName);
    const fileContents = fs.readFileSync(fullPath, "utf8");

    // Use gray-matter to parse the post metadata section
    const matterResult = matter(fileContents);

    // Combine the data with the id
    return {
      id,
      ...matterResult.data,
    };
  });
  // Sort posts by date
  return allPostsData.sort((a, b) => {
    if (a.date < b.date) {
      return 1;
    } else {
      return -1;
    }
  });
}
pages/index.js
import Head from "next/head";
import Layout, { siteTitle } from "../compoenents/layout";
import utilStyles from "../styles/utils.module.css";
import { getSortedPostsData } from "../lib/posts";
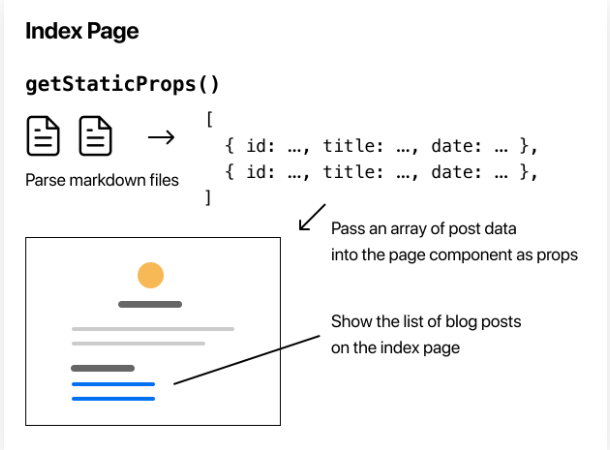
export async function getStaticProps() {
const allPostsData = getSortedPostsData();
return {
props: {
allPostsData,
},
};
}
export default function Home({ allPostsData }) {
return (
<Layout home>
<Head>
<title>{siteTitle}</title>
</Head>
<section className={utilStyles.headingMd}>
<p>안녕하세요 박진현입니다. 즐거운 하루 되세요</p>
<p>
(This is a sample website - you’ll be building a site like this on{" "}
<a href="https://nextjs.org/learn">our Next.js tutorial</a>.)
</p>
</section>
<section className={`${utilStyles.headingMd} ${utilStyles.padding1px}`}>
<h2 className={utilStyles.headingLg}>Blog</h2>
<ul className={utilStyles.list}>
{allPostsData.map(({ id, date, title }) => (
<li className={utilStyles.listItem} key={id}>
{title}
<br />
{id}
<br />
{date}
</li>
))}
</ul>
</section>
</Layout>
);
}
getStaticProps페이지 에서만 내보낼 수 있습니다 . 페이지가 아닌 파일에서는 내보낼 수 없습니다.
이 제한의 이유 중 하나는 페이지가 렌더링되기 전에 React에 필요한 모든 데이터가 있어야 하기 때문입니다.