
Servlet 정리하고 넘어가자!
스프링 부트를 쓰다보면 잘 모르고 넘어가는 Spring MVC Flow! 이번기회에 한번 정리해보려고 합니다~
먼저 용어부터 익히자
- JSP : HTML문서에서 내부적으로 Java문법을 사용할 수 있게 해주는 Java Server Page언어
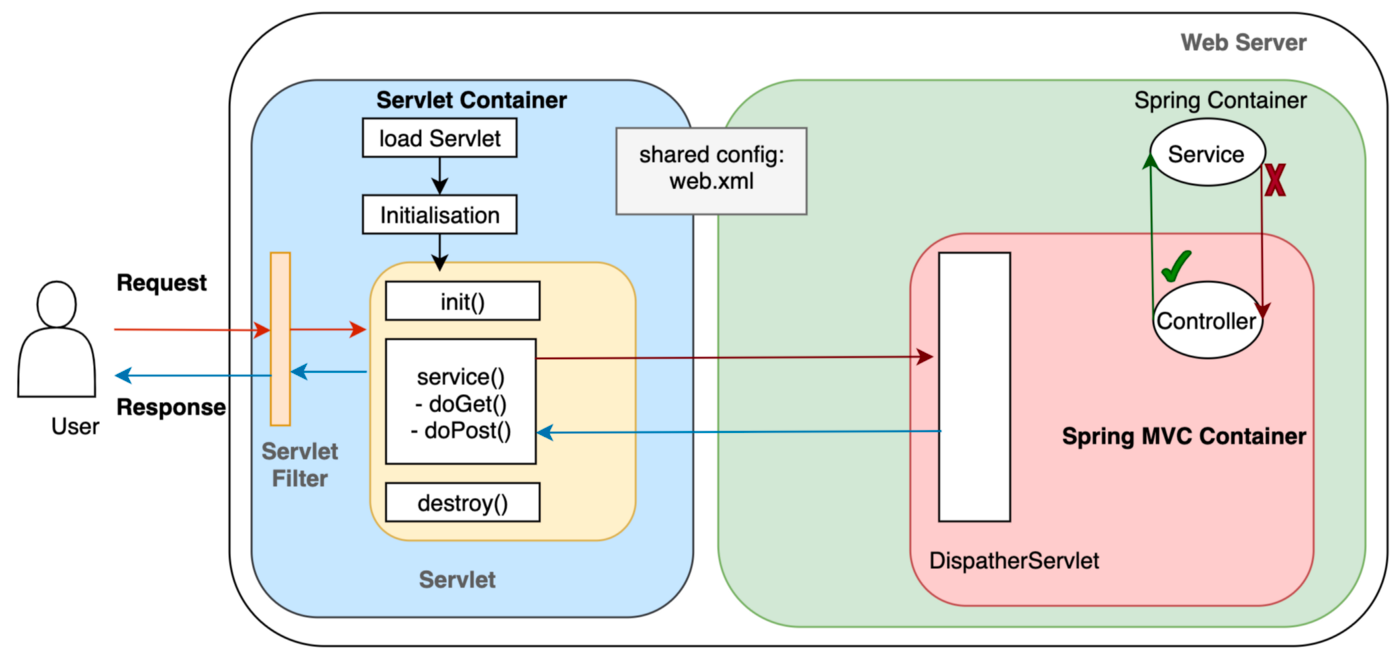
- Servlet : client 의 요청에 대한 결과를 response해주는 역할을 하는 자바 프로그램
- Servlet Container : 생성한 Servlet들을 관리해주는 컨테이너, Servlet을 보고 행동하는 수행자
ex) tomcat
- Dispatcher-servlet : Servlet Container에서 Http요청을 가장먼저 받고 처리하는 Front Controller , 공통된 작업을 처리해준 뒤에 적절한 세부 컨트롤러에 작업을 위임함
DispatcherServlet
등록방식
- Java configuration
public class MyWebApplicationInitializer implements WebApplicationInitializer {

    @Override
    public void onStartup(ServletContext servletContext) {

        // Load Spring web application configuration
        AnnotationConfigWebApplicationContext context = new AnnotationConfigWebApplicationContext();
        context.register(AppConfig.class);

        // Create and register the DispatcherServlet
        DispatcherServlet servlet = new DispatcherServlet(context);
        ServletRegistration.Dynamic registration = servletContext.addServlet("app", servlet);
        registration.setLoadOnStartup(1);
        registration.addMapping("/app/*");
    }
}- web.xml
<web-app>

    <listener>
        <listener-class>org.springframework.web.context.ContextLoaderListener</listener-class>
    </listener>

    <context-param>
        <param-name>contextConfigLocation</param-name>
        <param-value>/WEB-INF/app-context.xml</param-value>
    </context-param>

    <servlet>
        <servlet-name>app</servlet-name>
        <servlet-class>org.springframework.web.servlet.DispatcherServlet</servlet-class>
        <init-param>
            <param-name>contextConfigLocation</param-name>
            <param-value></param-value>
        </init-param>
        <load-on-startup>1</load-on-startup>
    </servlet>

    <servlet-mapping>
        <servlet-name>app</servlet-name>
        <url-pattern>/app/*</url-pattern>
    </servlet-mapping>

</web-app>
동작방식(Spring Mvc Flow)
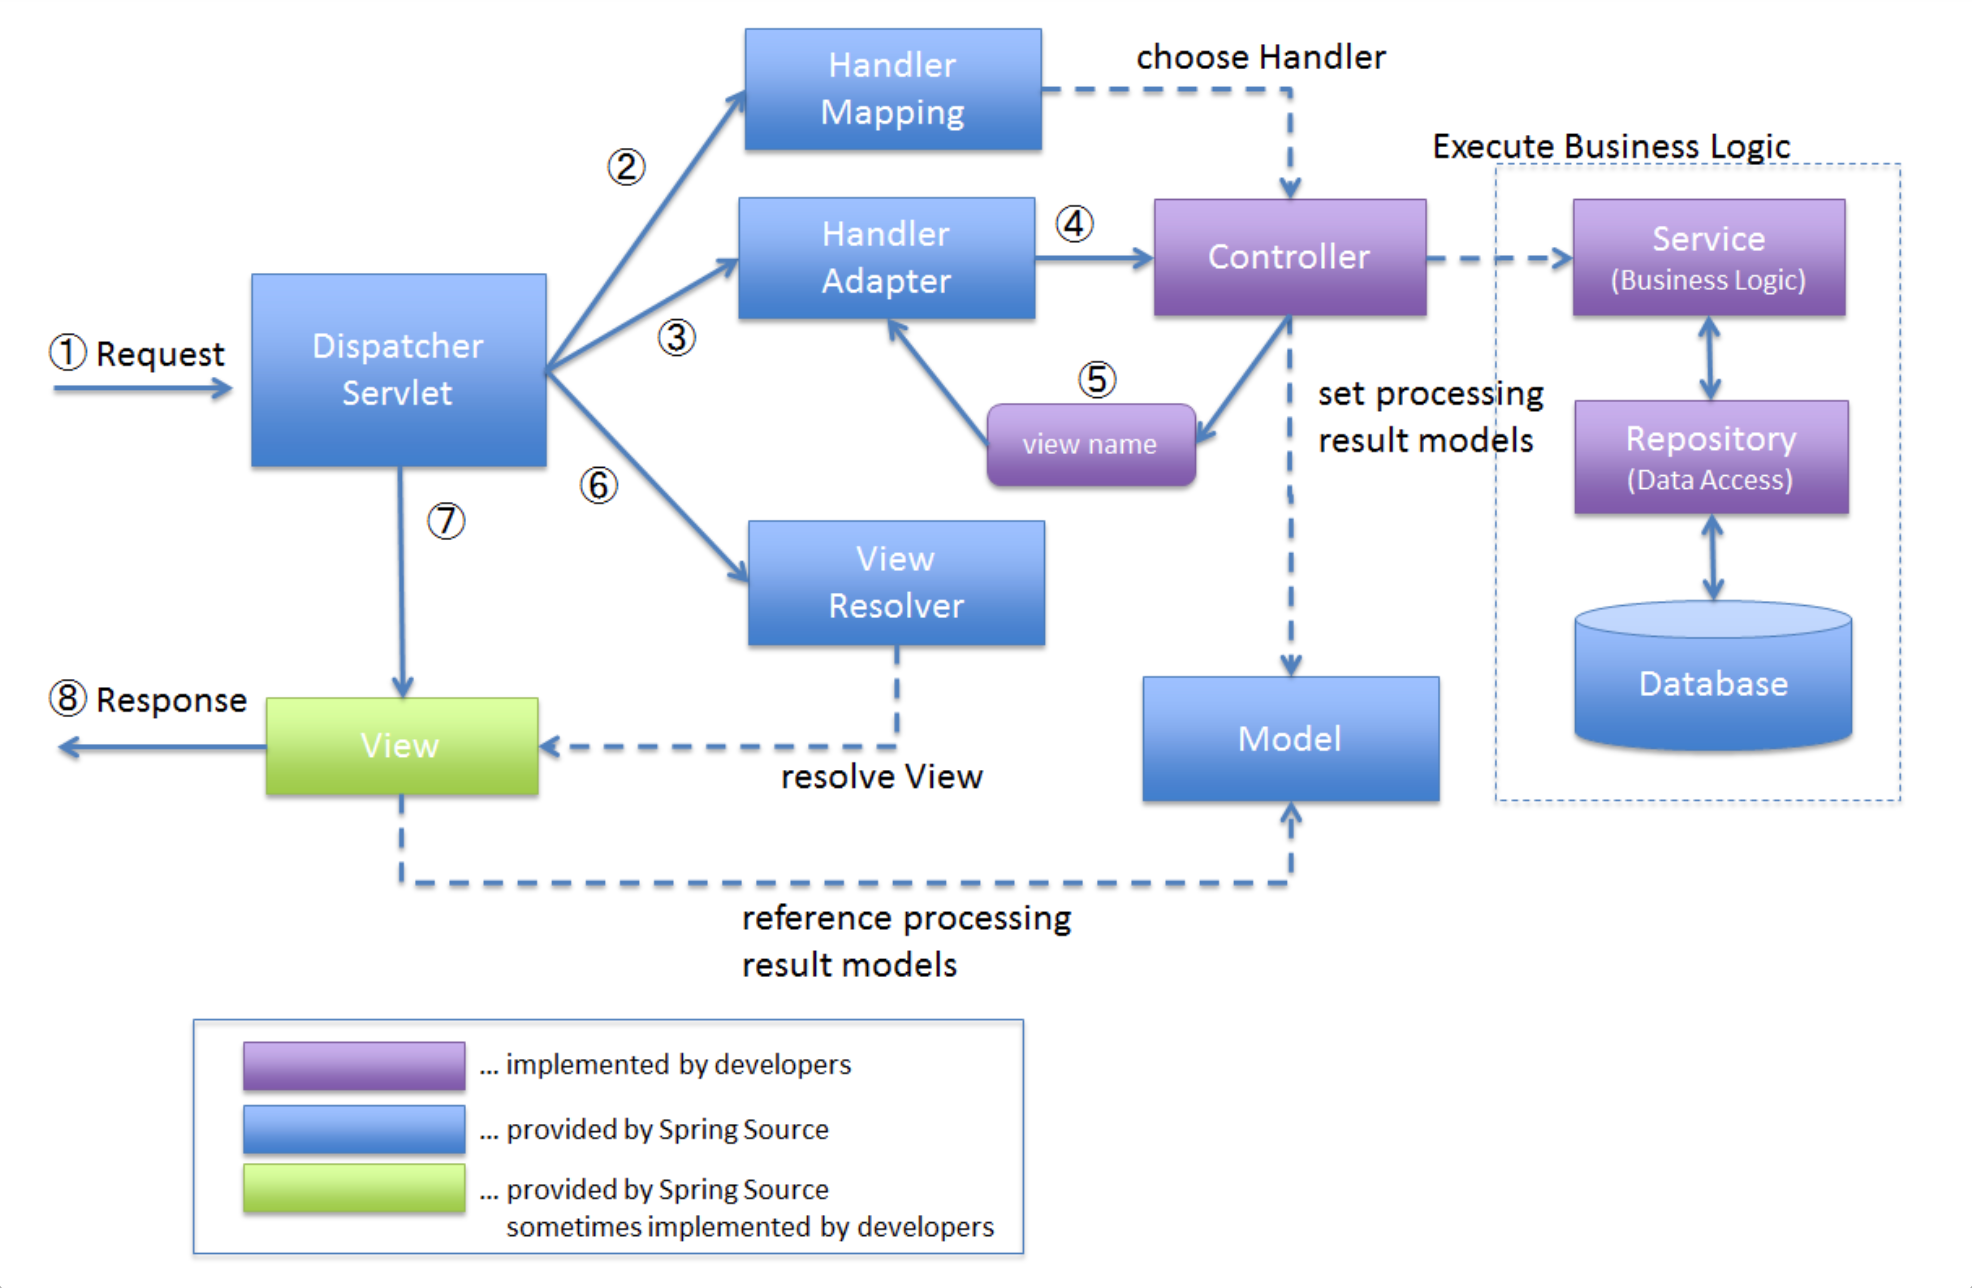
- Controller로 어떻게 매핑할까?
RequestMappingHandlerMapping이라는 Handler Mapping 사용 → Controller에@RequestMapping으로 사용가능 ( 우리가 사용하는 @GetMapping등은 다 포함하고 있는 것이다)
- clinet 요청으로 받아온 정보들을 Controller에 어떻게 적합하게 넘겨줄까?
RequestMappingHandlerAdapter이라는 Handler Adapter 사용 → 위와 같이@RequestMapping으로 사용가능
-
View name을 Controller가 넘겨주면 Dispatcher Servlet에 내장되어있는 여러
ViewResolver가 적절한 view를 찾아서 연결해준다.view Name반환해주면@GetMapping("/customers/{customerId}") public String findCustomer(@PathVariable("customerId") UUID customerId, Model model){ // Model로 Optional<Customer> customer = customerService.getACustomer(customerId); if(customer.isPresent()){ model.addAttribute("customer", customer.get()); return "views/customer-details"; // View Name } else { return "views/404"; } }configureViewResolvers에 여러가지 등록static class ServletConfig implements WebMvcConfigurer, ApplicationContextAware { ApplicationContext applicationContext; @Override public void configureViewResolvers(ViewResolverRegistry registry) { // jsp registry.jsp().viewNames("jsp/*"); // thymeleaf SpringResourceTemplateResolver springResourceTemplateResolver = new SpringResourceTemplateResolver(); springResourceTemplateResolver.setApplicationContext(applicationContext); springResourceTemplateResolver.setPrefix("/WEB-INF/"); springResourceTemplateResolver.setSuffix(".html"); SpringTemplateEngine springTemplateEngine = new SpringTemplateEngine(); springTemplateEngine.setTemplateResolver(springResourceTemplateResolver); ThymeleafViewResolver thymeleafViewResolver = new ThymeleafViewResolver(); thymeleafViewResolver.setTemplateEngine(springTemplateEngine); thymeleafViewResolver.setOrder(1); thymeleafViewResolver.setViewNames(new String[]{"views/*"}); // view하위에 모든 template는 thymeleaf사용 registry.viewResolver(thymeleafViewResolver); }
Root Application Context & Servlet Application Context
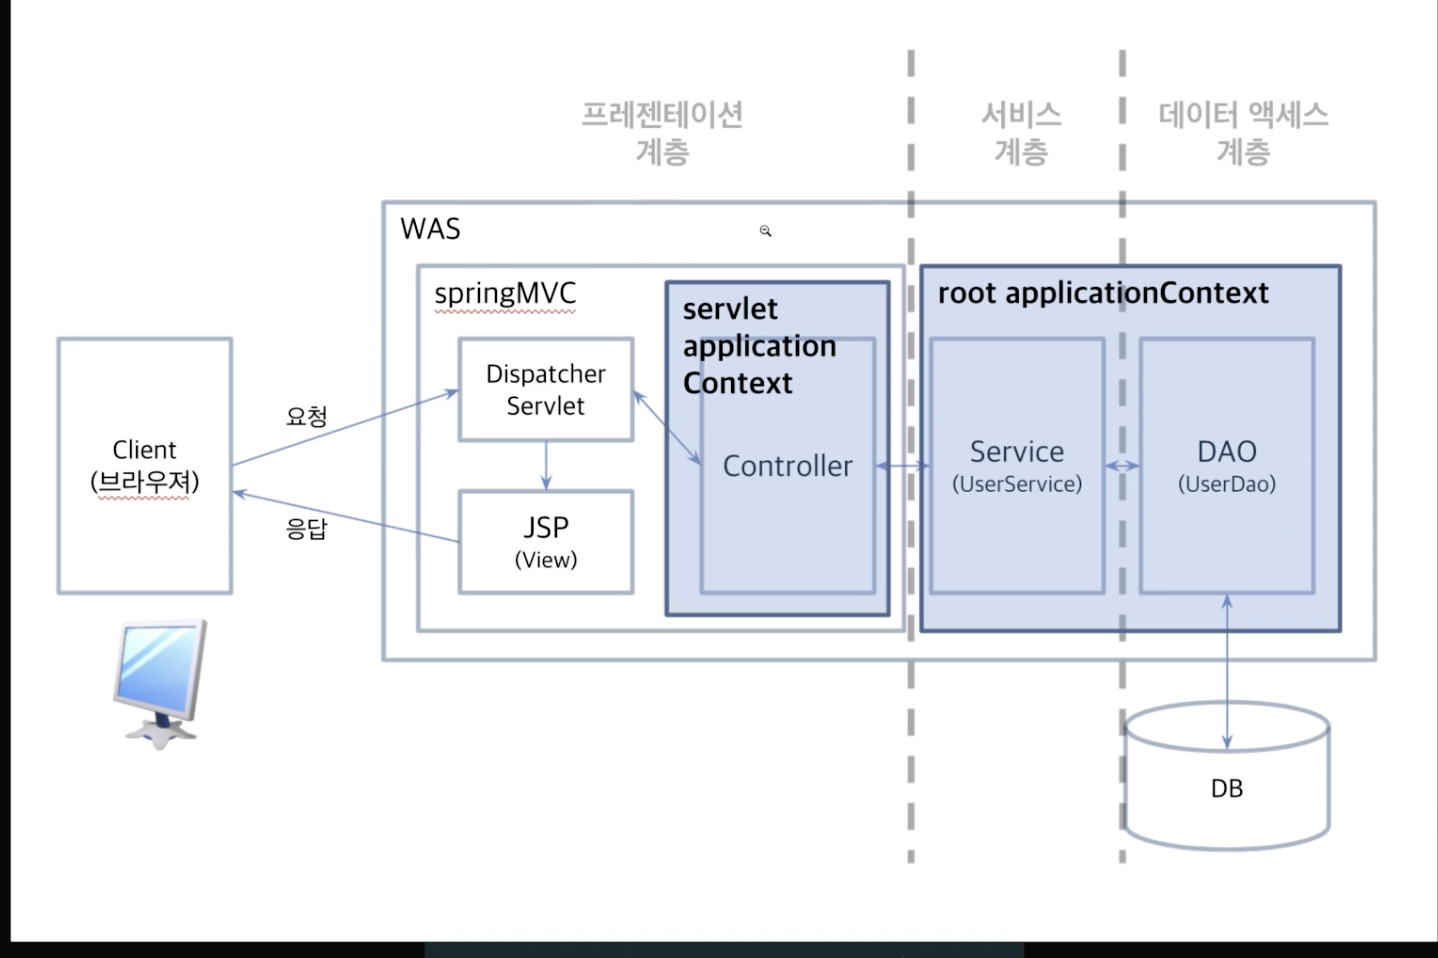
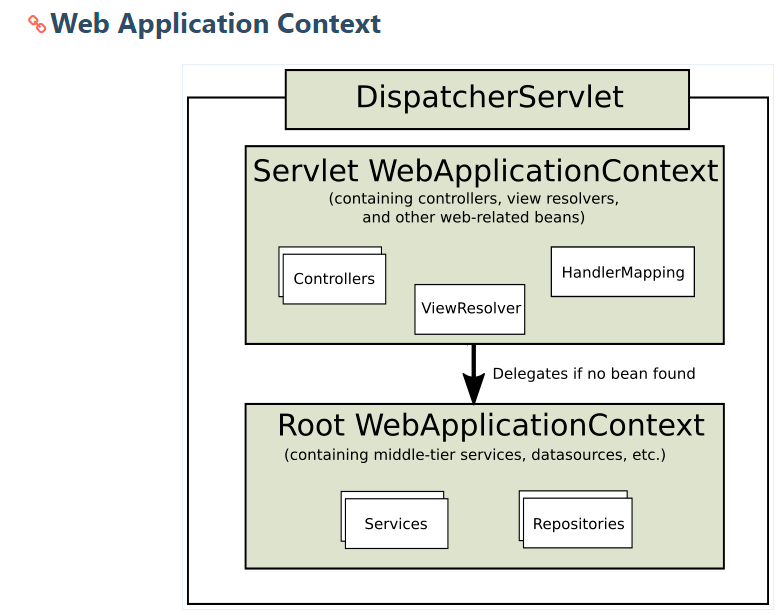
- ServletConfig (각각의 Dispatcher Servlet마다 개별적으로)
// Controller만
    @EnableWebMvc // spring mvc가 필요한 bean들 자동등록
    @Configuration
    @ComponentScan(basePackages = "com.programmers.demo.customer",
        includeFilters = @ComponentScan.Filter(type = FilterType.ASSIGNABLE_TYPE, value = CustomerController.class),
        useDefaultFilters = false)
    static class ServletConfig implements WebMvcConfigurer, ApplicationContextAware { // WebMvcConfigurer: MVC에 대해 특정한 설정을 해주기 위해
       ...
}- RootConfig ( 전체 ServletContext의 Servlet들이 root로 갖는)
// Service, Repository만
    @Configuration
    @EnableTransactionManagement
    @ComponentScan(basePackages = "com.programmers.demo.customer",
        excludeFilters = @ComponentScan.Filter(type = FilterType.ASSIGNABLE_TYPE, value = CustomerController.class)
    )
    static class RootConfig {
@Override
    public void onStartup(ServletContext servletContext) {

        // root applicationContext
        logger.info("Starting Server...");
        AnnotationConfigWebApplicationContext rootApplicationContext = new AnnotationConfigWebApplicationContext();
        rootApplicationContext.register(RootConfig.class);
        ContextLoaderListener loaderListener = new ContextLoaderListener(
            rootApplicationContext);
        servletContext.addListener(loaderListener);

        // servlet applicationContext
        AnnotationConfigWebApplicationContext webApplicationContext = new AnnotationConfigWebApplicationContext();
        webApplicationContext.register(ServletConfig.class);

        DispatcherServlet dispatcherServlet = new DispatcherServlet(webApplicationContext);
        Dynamic servletRegistration = servletContext.addServlet("test", dispatcherServlet); // 서블릿추가
        servletRegistration.addMapping("/"); // 모든 요청이 dispatcherServlet이 하게된다
        servletRegistration.setLoadOnStartup(-1); //default = -1 기다렸다가
    }
Web Server & WAS (Web Application Server)
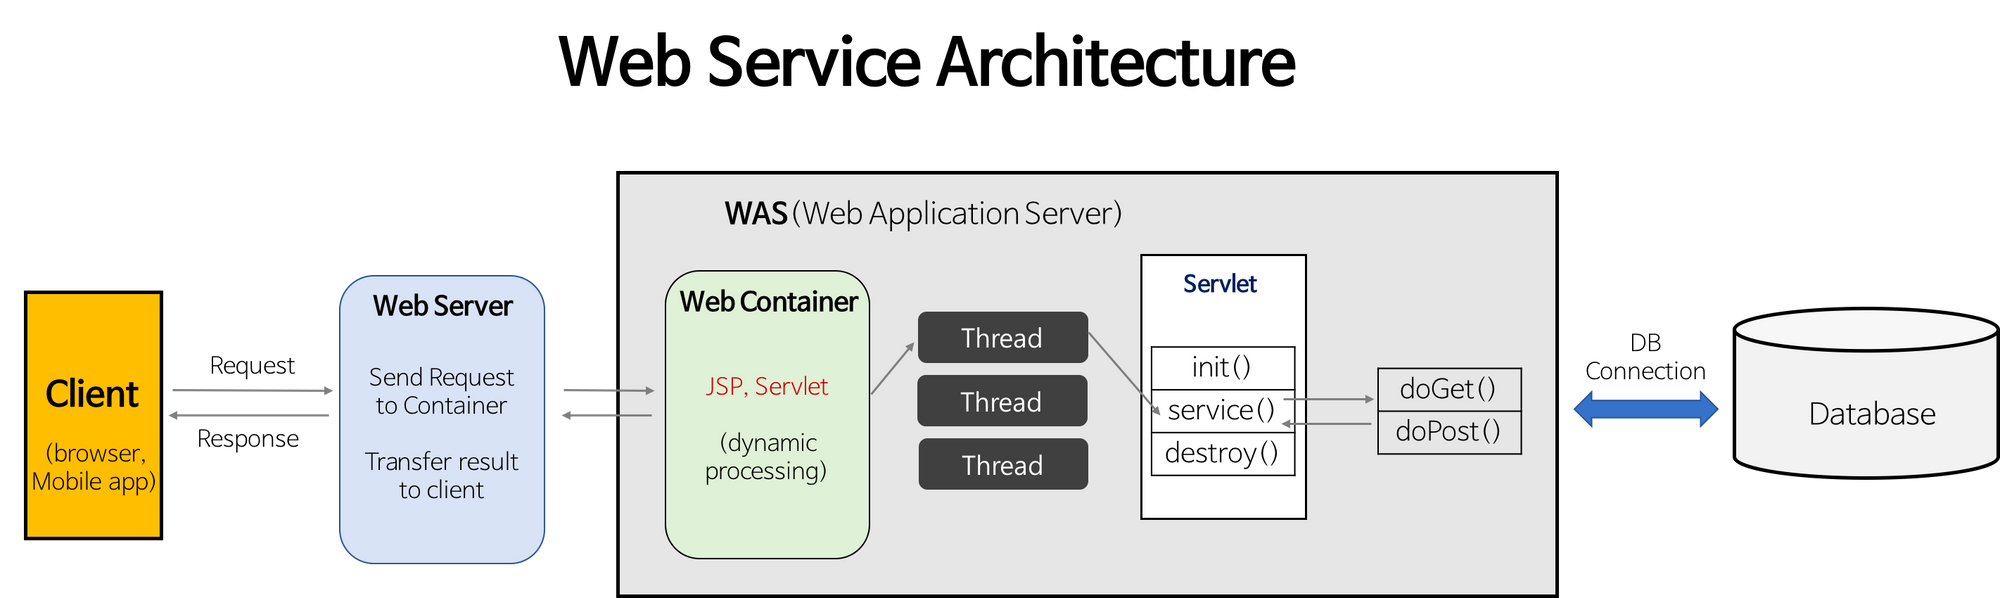
- Web Server : 정적(html, css..)인 요청 처리
- Nginx, Apache
- WAS : 동적(DB..)인 요청처리, JSP, Servlet구동환경 제공
- Tomcat, JBoss
→ 두 기능을 분리해서 WAS의 부담을 줄여준다 → 시용감이 좋아짐
전체적인 흐름
- Client에게 요청받기
- Web Server가 정적인 요청처리
- WAS가 web.xml을 참고해 Servlet에 대한 thread생성
- HttpServletRequest와 HttpServletResponse 객체를 생성해 Servlet에게 전달, Service()호출
protected void service(HttpServletRequest req, HttpServletResponse resp) throws ServletException, IOException {
        String method = req.getMethod();
        long lastModified;
        if (method.equals("GET")) {
            lastModified = this.getLastModified(req);
            if (lastModified == -1L) {
                this.doGet(req, resp);
            } else {
                long ifModifiedSince;
                try {
                    ifModifiedSince = req.getDateHeader("If-Modified-Since");
                } catch (IllegalArgumentException var9) {
                    ifModifiedSince = -1L;
                }

                if (ifModifiedSince < lastModified / 1000L * 1000L) {
                    this.maybeSetLastModified(resp, lastModified);
                    this.doGet(req, resp);
                } else {
                    resp.setStatus(304);
                }
            }
        } else if (method.equals("HEAD")) {
            lastModified = this.getLastModified(req);
            this.maybeSetLastModified(resp, lastModified);
            this.doHead(req, resp);
        } else if (method.equals("POST")) {
            this.doPost(req, resp);
        } else if (method.equals("PUT")) {
            this.doPut(req, resp);
        } else if (method.equals("DELETE")) {
            this.doDelete(req, resp);
        } else if (method.equals("OPTIONS")) {
            this.doOptions(req, resp);
        } else if (method.equals("TRACE")) {
            this.doTrace(req, resp);
        } else {
            String errMsg = lStrings.getString("http.method_not_implemented");
            Object[] errArgs = new Object[]{method};
            errMsg = MessageFormat.format(errMsg, errArgs);
            resp.sendError(501, errMsg);
        }

}- 요청에 맞게 doGet(), doPost()호출
- 완료된 동적 페이지를 Response객체에 담아 WAS에 전달
- WAS가 Response를 HttpResponse형태로 바꿔 Web Server로 전달
- 스레드 종료, HttpServletRequest와 HttpServletResponse 객체 제거

헷갈리던 개념이었는데 잘 정리하고 가요!