
🍀 useQuery
useQuery는 훅으로서 비동기 데이터를 가져오고 caching하는데 사용된다. useQuery를 이용하면 loading, error를 쉽게 관리할 수 있는 장점이 있다. useQuery에 대한 사용법은 너무 많아서 여기를 참고하는 것이 나아서 기본만 다르고 넘어가겠다.
useQuery는 무조건 넘겨줘야 하는 인자가 2가지가 있는데 바로 queryKey & queryFn이다.
<from tanstack docs>
queryKey는 이전 블로그에서 소개 했으니 queryFn에 대해서 다뤄보자
🏭 queryFn
queryFn은 query가 실행될 때 data를 fetching할 때 쓰는 함수이다.
- query가 실행될 때 가져오고자 하는 data를 fetching할 때 쓰이는 함수이다.
- queryFn의 return 값은
Promise 또는 Error여야 하며undefined가 되면 안 된다.
queryFn은 그냥 data fetching하는 함수를 넣어주면 된다. 아래 todo를 가져오는 예시를 보자
const fetchTodos = async (): Promise<Todo[]> => {
  const url = "todo url";
  const response = await fetch(url);
  if (!response.ok) throw new Error("에러 발생");

  return response.json();
};

const { data } = useQuery(['todos'], fetchTodos) // 👉🏻 query function = fetchTodos
queryFn은 queyClient에 defaultOption으로도 제공할 수 있는데 전역적으로 데이터가 1순위로 많이 쓰이는 데이터에 대해서 적합하다. 아마 todos 예제에 적합할 듯 하다.
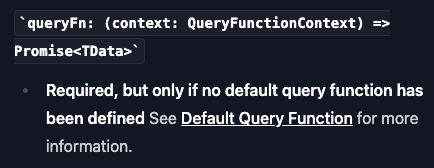
많이 쓰이는 todo에 대한 데이터를 기본 query function으로 지정하고 싶을 때는 default query function을 정의하면 app 전역에서 todos에 대한 데이터를 관리할 수 있다. 이 때 default query function은 QueryFunctionContext를 인자로 넘겨준다. 여기: QueryFunctionContext에서 확인할 수 있다.
// QueryFunctionContext type
interface QueryFunctionContext {
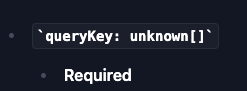
queryKey: QueryKey;
signal?: AbortSignal;
meta: Record<string, unknown> | undefined
}const fetchTodos = async ({ queryKey }: QueryFunctionContext): Promise<Todo[]> => {
console.log('queryKey', querykey); // 👉🏻 ['todos']
const url = "todo url";
const response = await fetch(url);
if (!response.ok) throw new Error("에러 발생");
return response.json();
};
const queryClient = new QueryClient({
defaultOptions: {
queries: {
// ⭐️ 기본 쿼리함수 지정
// queryFn = undefined(쿼리 함수를 지정하지 않을 시)일 때 queryFn = fetchTodos가 된다.
queryFn: fetchTodos,
},
},
})
function App() {
const { data } = useQuery(['todos']) // ✅ queryFn을 선언하지 않아 "기본 쿼리 함수"가 실행된다.
}⚠️ queryFn(query Function) 오류 처리
queryFn는 오류를 캐치할 수 있지만, fetch와 같은 함수는 4xx, 5xx의 상태코드에 대해서 오류를 발생시키지 않으며 이에 대해 undefined를 return한다. 그저 네트워크 에러였을 때만 오류를 던진다고 한다. (이거 땜에 무한 스크롤 구현할 때 삽질 많이 했다....)
한 마디로 fetch함수는 오류가 있어도 오류를 더지지 않으니 query function은 오류를 catch할 수 없다는 것이다.
Tanstack Query docs에서 발췌함
Usage with fetch and other clients that do not throw by default
While most utilities like axios or graphql-request automatically throw errors for unsuccessful HTTP calls, some utilities like fetch do not throw errors by default. If that's the case, you'll need to throw them on your own.
axios나 graphql-request는 자동으로 에러를 던지지만 fetch와 같이 기본적으로 에러를 던지지 않는 api 함수에 대해서는 직접 오류를 던져줘야 한다고 나와있다.
그럼 오류를 자동으로 던져주는 axios와 자동으로 던져주지 않는 fetch의 함수 구현이 다를 것이다. 이를 살펴보자
// using fetch api function
const fetchTodos = async (): Promise<Todo[]> => {
  const url = "todo url";
  const response = await fetch(url);

  if (!response.ok) throw new Error("에러 발생"); // ✅ 개발자가 직접 오류를 던져주어야 query function에서 오류를 캐치할 수 있음

  return response.json();
};
// using axios api function
const fetchTodos = async (): Promise<Todo[]> => {
const url = "todo url";
const { data } = await fetch(url);
return data;
};위의 axios코드를 보면 axios는 자동으로 오류를 던져주는 library이므로 오류에 관한 로직을 짤 필요가 없지만, fetch를 이용할 때는 오류를 직접 던져 주어야 한다.
지금까지 공부하면서 자주썼던 property는 isFetching, isLoading, refetch, status, error가 있으며, useQuery의 option으로는 gcTime, initialData, retry, select, throwOnError가 있다.
❗️❗️❗️ v3와 v5와 차이점 있는데
gcTime과 throwOnError이다.
- v3 cacheTime -> v5 gcTime으로 변경
- v3 useErrorBoundary -> v5 throwOnError으로 변경
- v3 suspense -> v5 useSuspensQuery 훅으로 따로 뺌
🔎 useQuery VS 일반적인 비동기 처리
useQuery에 대한 기본적인 내용을 배웠으니 react-query를 사용하지 않고 비동기 처리하는 것과 react-query를 이용해서 비동기 처리하는 것을 살펴보자.
// 일반적인 처리
import React, { useState, useEffect } from 'react';

const fetchTodos = async (): Promise<Todo[]> => {
  const url = "todo url";
  const response = await fetch(url);
  if (!response.ok) throw new Error("에러 발생");

  return response.json();
};

function TodoList() {
  const [todos, setTodos] = useState<Todo[]>([]);
  const [loading, setLoading] = useState(false);
  const [error, setError] = useState<null | Error>(null);

  useEffect(() => {
    (async () => {
      setLoading(true);
      try {
        const data = await fetchTodos();
        setTodos(data);
      } catch (err) {
        setError(err as Error);
      } finally {
        setLoading(false);
      }
    })();
  }, []);

  if (loading) return <div>Loading...</div>;
  if (error) return <div>Error: {error.message}</div>;

  return <>{todos.map(.../)}</>;
}
// react-query를 이용한 처리
const fetchTodos = async (): Promise<Todo[]> => {
const url = "todo url";
const response = await fetch(url);
if (!response.ok) throw new Error("에러 발생");
return response.json();
};
function TodoList() {
const { data: todos, isLoading, error } = useQuery('todos', fetchTodos);
if (isLoading) return <div>Loading...</div>;
if (error) return <div>Error: {error.message}</div>;
return <>{todos.map(.../)}</>;
}react-query를 이용하면 loading과 error에 대한 처리를 매우 쉽게할 수 있다는 것을 알 수 있다.
🍀 isLoading VS isFetching
staleTime과 cacheTime에 대해서 헷갈렸어서 이에 대한 개념을 이해하는데 시간이 좀 걸렸다.
isLoading과 isFetching에 대해서 매우 헷갈렸다. 나에게는 동일한 개념으로 다가왔기 때문이다. "UI에 loading이라고 표시할 때는 data를 fetching중이지 않나???" 라는 생각이었다.
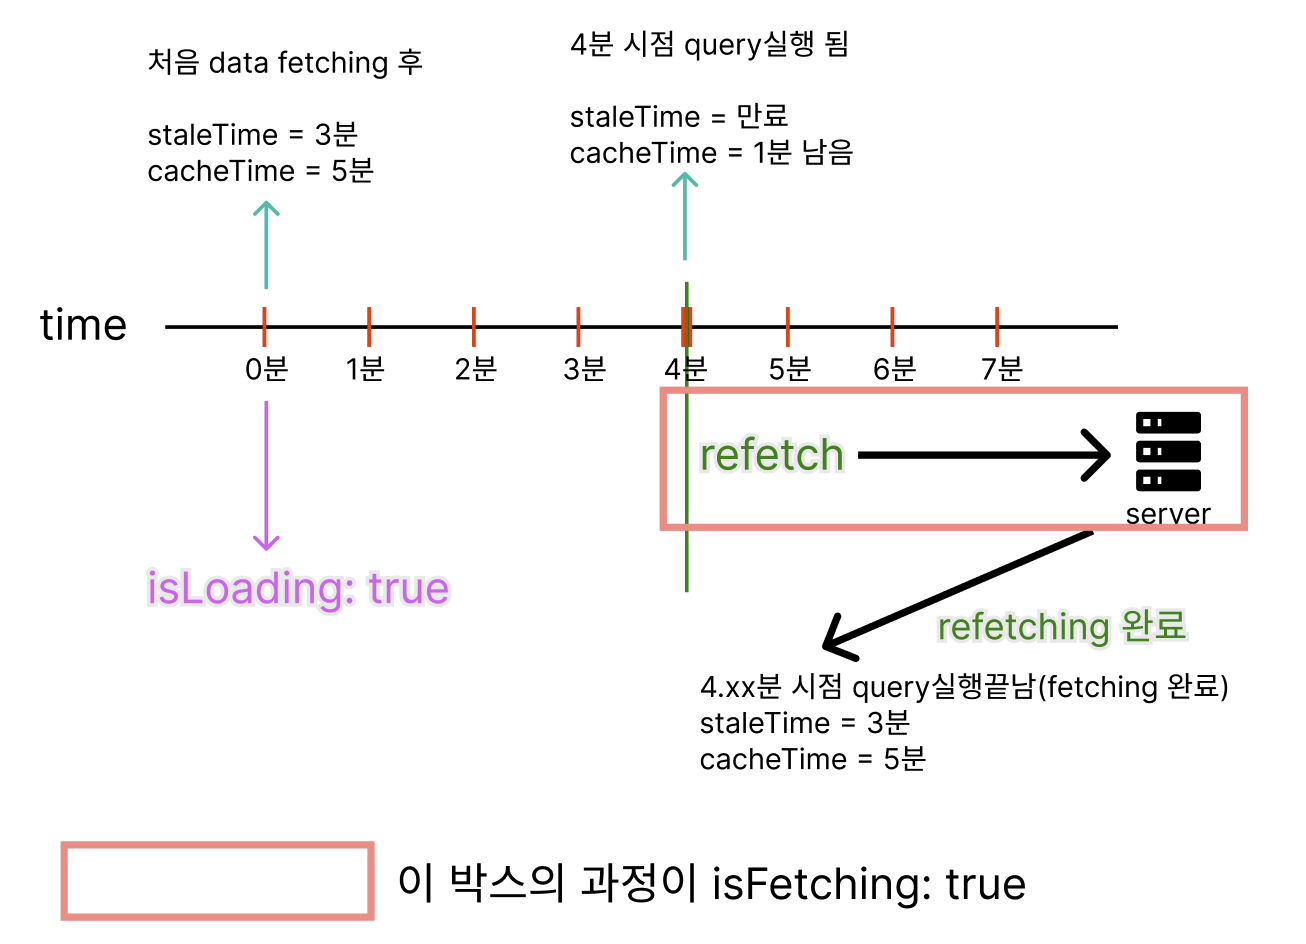
실험 끝에 staleTime, cacheTime과 연관이 있다는 것을 깨달았다. 이에 관해 설명하기 이전에 staleTime에 따른 중요 refetch 동작을 알아보자
- staleTime만료 시 -> data fetching이 시작되고
cacheTime을 초기화
staleTime이 만료됐다고 가정하고 useQuery를 이용하여 query를 실행하게 되면 data를 fetching한다. 이 시점이 isFetching: true가 되는 시점이며, fetching이 완료 된 후에는 cacheTime과 staleTime은 지정해준 값으로 초기화된다.
예를 들어 staleTime = 3분, cacheTime = 5분이라고 가정하자. query가 mount되면서 cache에 fetching한 data가 담길 것이다. 이 때 처음으로 data를 fetching할 때 걸리는 시간이 isLoading: true이다. isLoading에 대해서는 아래에서 부가설명을 하겠다. 그리고 시간이 지나서 어떤 것에 의해 4분인 시점에 query가 재 실행됐다고 하면 staileTime은 만료가 되며 refetching을 진행함으로 isFetching: true가 된다. 아래 그림을 참고하자.
isLoading에 대해 다시 말하자면, 엄연히 말해서 처음 데이터를 가져왔을 때가 isLoading이 true인 것은 조금 부정확하다.cache에 데이터가 존재하지 않을 때가 정확하다고 생각한다. 캐시에 데이터가 존재하지 않아 data를 fetching할 때 isLoading이 true가 된다.
이를 테스트하기 위해서 두 가지 시나리오를 만들었다.
첫 번째 시나리오: staleTime이 만료되고 cacheTime은 유효할 때 refetch 진행
두 번째 시나리오: staleTime과 cacheTime이 모두 만료됐을 때 refetch 진행
첫 번째 시나리오
테스트를 진행하기 위해 staleTime은 3초 cacheTime은 5초로 설정해두자. 그리고 refetch를 trigger할 button을 만들면 아래 코드와 같다.(v3의 코드가 아닌 v5로 테스트했기 때문에 cacheTime = gcTime이다)
/* eslint-disable @typescript-eslint/no-unused-vars */
import { useQuery } from "@tanstack/react-query";

interface Todo {
  userId: number;
  id: number;
  title: string;
  completed: boolean;
}

const headers = { "Content-Type": "application/json" };

const fetchTodos = async (): Promise<Todo[]> => {
  const url = "https://jsonplaceholder.typicode.com/todos?_page=1";
  const response = await fetch(url);
  if (!response.ok) throw new Error("에러 발생");

  return response.json();
};

function App() {
  const { isLoading, isFetching, refetch } = useQuery({
    queryKey: ["todos"],
    queryFn: () => fetchTodo("All"),
    staleTime: 5000,
    gcTime: 10000,
  });

  console.log("isLoading", isLoading);
  console.log("isFetching", isFetching);

  return (
      <button style={{ color: "white" }} onClick={() => refetch()}>
        click button to refetch
      </button>
  );
}

export default App;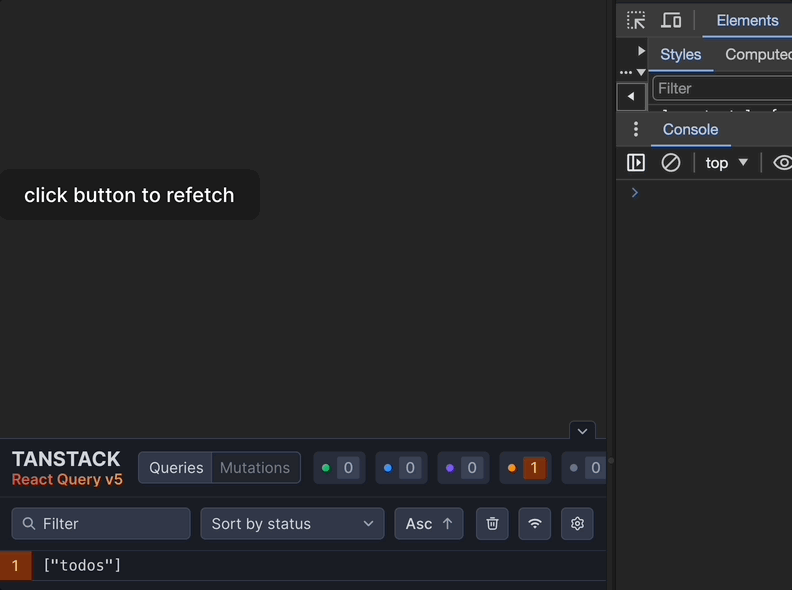
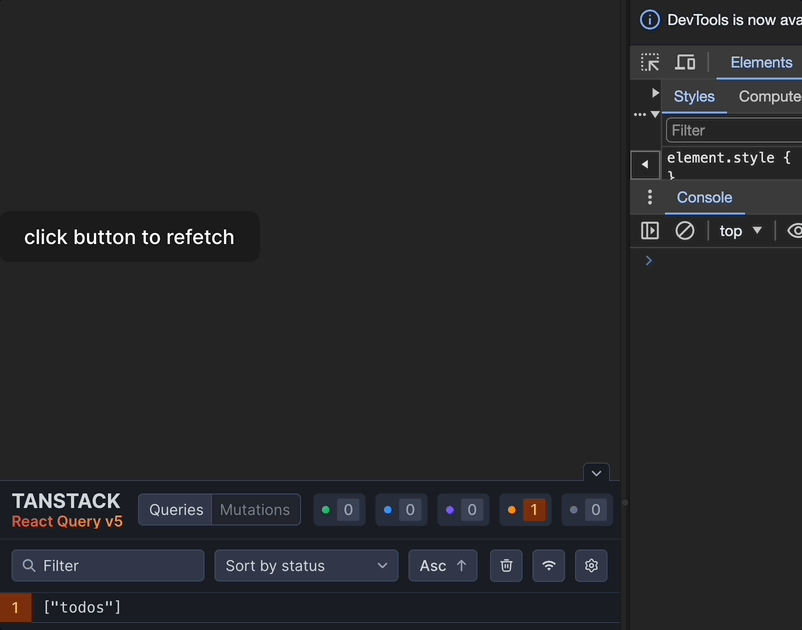
위의 gif는 staleTime이 만료되고 cacheTime은 유효할 때 refetch 진행한 것이다. console에서 볼 수 있다시피 cacheTime이 유효해서 GC(garbage-collector)에 의해 캐시가 비워지지 않는 한 계속 isLoading: false가 된다.
그리고 button click은 사용자에 의한 명시적 재요청에 해당한다. 이는 refetching 조건에서 확인할 수 있다. 따라서 fetching이 진행됨으로 isFetching: true가 된다.
두 번째 시나리오
첫 번째 시나리오와 달리 cacheTime이 유효하지 않을 때 refetch를 시켜보자.
❗️❗️❗️
저 App 컴포넌트 자체에서 query를 참조하고 있기 때문에 cacheTime이 지나더라도 GC에 의해 캐시가 비워지지 않는다.
이렇게 cacheTime이 지나더라도 캐시가 비워지지 않는 현상이 있다. 이는활성된 쿼리에 의한 참조 때문에 발생하는 현상이다.
활성 참조: react-query는 쿼리가 활성화 되어 있는상태에서는 cacheTime이 지나도 캐시를 비우지 않는다.
위의 활성 참조로 인해 캐시가 비워지지 않으니 devtool을 이용하여 cache에서 강제로 삭제시킨 후 refetch를 진행하자.
캐시를 비우고나서 refect를 하였더니 isLoading: true가 된다.
💡 isLoading은 cache가 비워진 상태에서 데이터를 fetching할 때 true값을 가진다.
isFetching
isLoading은 첫 번째, 두 번째 시나리오를 통해서 무엇인지 알았다. 그럼 isFetching이 true가 되는 건 어떤 상황일 때일까?🤔
결론 부터 말하자면 refetch를 일으키는 조건은 모두와 staleTime이 만료되었을 때 isFetching: true가 된다. 즉 staleTime이 만료되지 않아 fresh data라고 판단하면 서버로부터 data를 fetch하는 요청을 보내지 않기 때문에 이 경우는 false값을 가진다.
- staleTime 만료 시: 서버로부터 data fetch요청 -> isFetching: true
- staleTime 유효 시: 서버로 요청을 보내지 않고
바로 cache에서 data를 가져옴-> isFetching: false- cacheTime 만료 시: 무조건 isFetching: true. 이는 당연한 얘기다.
- refetch를 일으키는 조건: refetch자체가 다시 data를 fetching한다는 것이므로 이 또한 isFetching: true인 것은 당연하다.
🚀 마치며
isLoading과 isFetching이 너무 헷갈려서 블로그 여기 저기를 뒤지던 중 isLoading을 거의 모두 처음 로딩될 때라고 설명하여 초반에 이해 가는 것에는 도움이 됐지만, 이후 토이 프로젝트를 진행하면서 혼돈 카오스가 발생했다.... 이러한 계기를 통해 이런 저런 실험을 통해 정확히 짚고 넘어갈 수 있어서 좋다. 다음은 react-query를 이용한 filter기능에 대해서 다룰 것이다.
📚 참고