1. 기본
STS내에서 작업한 파일의 결과물을 웹 페이지에서 보기 위해서는 서버를 실행시켜주어야한다.

html 파일의 수정의 경우 서버를 재실행 할 필요는 없지만,
java 파일등 내부적인 파일의 수정이 일어나면 서버를 재실행 해야한다.
1. 기본 페이지 로드
index.html
	Hello
<a href="/hello">Hello</a>- 출력

2. Controller 이용
클래스 위에 @Controller 어노테이션을 붙여주어 front에서 넘어온 URL 매핑을 여기서 해준다.
- @Controller : 해당 mapping url을 찾는다
.core.controller > HelloController 생성
resource.templates > hello.html 생성
- @GetMapping("") : get 방식의 요청을 "" 안의 경로로 받아왔을때 실행
- return "" : 메서드가 String return값을 받을 경우 "" 안의 url 경로로 페이지 이동
- 스프링부트 템플릿엔진 기본 viewName 매핑
- resource:templates/ + { veiwName } + .html
- HelloController.java
@Controller
public class HelloController {

	@GetMapping("hello")
	public String hello() {
		System.out.println("controller 도착");
		return "hello";
	}
}- hello.html
<!DOCTYPE html>
<html>
<head>
<meta charset="UTF-8">
<title>Insert title here</title>
</head>
<body>
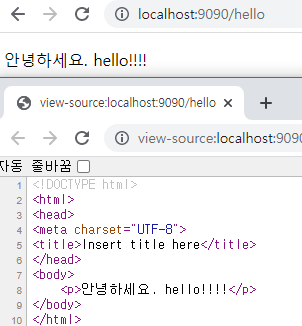
안녕하세요.
</body>
</html>- 출력 ( index.html에서 hello 클릭 시)

3. Model 객체 이용
// Model이란
- Controller에서의 데이터를 Model에 담고, view는 Model에 담겨있는 데이터만 골라서 화면에 바인딩 해준다.
- HashMap 형태를 갖고 있고, key, value 값을 저장한다.
- request.setAttribute()와 비슷한 역할을 한다.
// ModelAndView
- Model에서 view 영역이 조금 더 확장된 형태
- Model과 view를 동시에 설정이 가능하며, Controller는 ModelAndView객체만 리턴하지만, Model과 View가 모두 리턴 가능하다.
- HelloController.java 수정
- Model.addAttribute를 이용해 data 키값에 Hello!!!라는 벨류값을 담아서 hello.html보낼 수 있다.
@Controller
public class HelloController {

    @GetMapping("hello")
	public String hello(Model model) {
		System.out.println("controller 도착");
		model.addAttribute("data", "hello!!!!");
		return "hello";
	}
}- hello.html 수정
- thymeleaf 사용 선언을 html태그에 해준뒤
${data}로 model.addAttribute의 키값을 불러오면 해당하는 value값이 출력된다.
태그 안의 내용은 속성 th:text="" 의 내용으로 대체된다.
<html xmlns:th="http://www.thymeleaf.org">

  ...

<body>
	<p th:text="'안녕하세요. ' + ${data} ">안녕하세요 test</p>
</body>
- 출력
4. 파라미터 이용
4-1. 기본
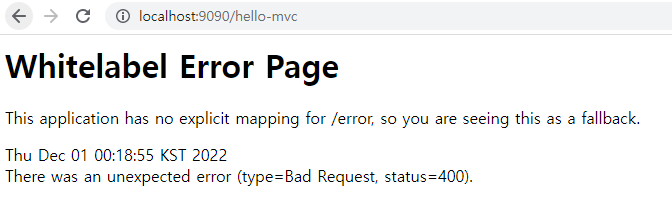
사용할 url 주소 : http://localhost:9090/hello-mvc?name=SpringMVC
resources>templates> hello-template.html 생성
HelloController.java
- @RequestParam : url 주소에 있는 파라미터 값을 받아옴
@Controller
public class HelloController {

	@GetMapping("hello-mvc")
	public String helloMvc(@RequestParam("name") String param, Model model) {
		model.addAttribute("name", param);
		return "hello-template";
	}
}- hello-template.html 생성
<!DOCTYPE html>
<html xmlns:th="http://www.thymeleaf.org">
<head>
<meta charset="UTF-8">
<title>Insert title here</title>
</head>
<body>
	<p th:text="'hello ' + ${name}">hello! empty</p>
</body>
</html>
- 출력 1. 파라미터가 없는 경우
- 출력 2. 파라미터가 있는 경우

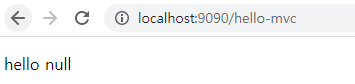
4-2. required 사용
- HelloController.java 수정
- 첫번째 @GetMapping("hello-mvc") 를 주석 처리함으로써 읽어오지 않게 변경
- value : 파라미터로 받을 값
- required : 파라미터 값 필수 여부, true -> 필수 ( default ) , false -> 필수 아님
@Controller
public class HelloController {

	//@GetMapping("hello-mvc")
	public String helloMvc(@RequestParam("name") String param, Model model) {
		model.addAttribute("name", param);
		return "hello-template";
	}

    	@GetMapping("hello-mvc")
	public String helloMvc2(@RequestParam(value="name", required = false) String param, Model model) {
		model.addAttribute("name", param);
		return "hello-template";
	}

}- 출력 1. 파라미터가 없는 경우
- 출력 2. 파라미터가 있는 경우
4-3. defaultValue 사용
- HelloController.java 수정
- defaultValue : 파라미터 값이 없을 경우 기본으로 들어갈 값
@Controller
public class HelloController {

	...

	@GetMapping("hello-mvc")
	public String helloMvc3(@RequestParam(value="name", required = false, defaultValue = "required test") String param, Model model) {
		model.addAttribute("name", param);
		return "hello-template";
	}
}- 출력 1. 파라미터가 없는 경우
- 출력 2. 파라미터가 있는 경우
2. 응용
cotroller에서 DTO 객체에 데이터 선언 후, Model 객체에 담아준 뒤 html에서 Model 객체에 담긴 내용을 출력하기
core.dto 패키지, > MemberDTO.java 생성
core.controller > MemberController.java 생성
resource>templates > member.html 생성
- MemberDTO.java
- 파일엔 파라미터를 받는 생성자, getter, setter 생성
public class MemberDTO {

	private int no;
	private String name;
	private String phone;
}- MemberController.java
- @RequestMapping : get 방식 post 방식 모두 받는 방식
- DTO member객체를 model 객체에 그대로 넣어주기
@Controller
public class MemberController {

	@RequestMapping("member")
	public String getMember(Model model) {
		MemberDTO member = new MemberDTO(1, "자바학생", "0101234567");
		model.addAttribute("member", member);
		return "member";
	}
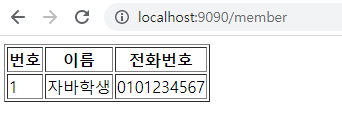
}- member.html
- th:object : model의 키값을 찾아주어 이후 *{} 을 이용하여 value 값을 편하게 가져올 수 있도록 도와준다. 굳이 사용하지 않으려면 th:text=${member.no} 등으로 사용하면 된다.
- th:text= +{ 내용 } : 내용은 DTO에 선언되어 controller에서 Model 객체에 담긴 값을 출력한다.
<!DOCTYPE html>
<html xmlns:th="http://www.thymeleaf.org">
<head>
<meta charset="UTF-8">
<title>Insert title here</title>
</head>
<body>
	<table border="1">
		<tr>
			<th>번호</th>
			<th>이름</th>
			<th>전화번호</th>
		</tr>
		<tr th:object=${member}>
			<td><span th:text=*{no}></span></td>
			<td><span th:text=*{name}></span></td>
			<td><span th:text=*{phone}></span></td>
		</tr>
	</table>
</body>
</html>- 출력