설명
- 기본 매핑된 경로를 따라 HttpServletRequest를 통해 받은 파라미터 값을 변수에 저장해주고
이를 별도의 HTML로 보내지 않고 HTTP BODY에 바로 보여주기 위해 response.getWriter().write 를 사용해서 띄워주게 되면
다음과 같은 결과를 확인 할 수 있다.
시작
1. @Resquest
core2.controller > request 패키지 생성
1. 기본
- request 패키지 > RequestParamController.java 생성
@Controller
public class RequestParamController {

	@RequestMapping("/request-param-v1")
	public void requestParamV1(HttpServletRequest request, HttpServletResponse response) throws IOException {
		String username = request.getParameter("username");
		int age = Integer.parseInt(request.getParameter("age"));

		response.getWriter().write("username : " + username);
		response.getWriter().write("age : " + age);
	}
} - 결과

2. @ResponseBody, @RequestParam 사용
설명
-
@ResponseBody를 사용하면 return값이 스트링 값일 경우, view 조회를 무시하고
HTTP BODY에 바로 내용을 출력 할 수 있다
-> response.getWriter().write 대용으로 사용 가능 -
@RequestParam을 사용해 파라미터 이름을 바인딩 할 수 있는데, 이때 ( ) 안의 값은 form 태그의 경우 name속성 값이 파라미터 이름으로 사용된다.
-
따라서 메서드 파라미터 안에서만 정의해주고 나면 return을 이용해 HTTP BODY에 바로 표현해주면 다음과 같은 결과가 출력된다.
-
RequestParamController 수정
...
	@ResponseBody
	@RequestMapping("/request-param-v2")
	public String requestParamV2(@RequestParam("username") String username , @RequestParam("age") int age)
			throws IOException {

		return "username : " + username + "<br>" + "age : " + age;
	}
}
출력

3. @RequestParam("변수이름") 생략
설명
- HTTP 파라미터 이름이 변수 이름과 같으면 즉, RequestParam("변수이름") 이라면 ( ) 내용을 생략 할 수 있다.
- RequestParamController 수정
...
	@ResponseBody
	@RequestMapping("/request-param-v3")
	public String requestParamV3(@RequestParam String username , @RequestParam int age) throws IOException {

		return "username : " + username + "<br>" + "age : " + age;
	}
}
출력

4. @RequestParam 생략
설명
- 만약 변수가 String, int 등 단순 타입이면 @RequestParam을 생략해서 사용 할 수 있다. 이때 MVC내부에서 required=false 를 적용하는데 다음 5번에서 확인가능하다.
- RequestParamController 수정
...
	@ResponseBody
	@RequestMapping("/request-param-v4")
	public String requestParamV4(String username , int age) throws IOException {
		return "username : " + username + "<br>" + "age : " + age;
	}
}
출력

5. requred 조건
설명
-
required = true을 파라미터 안에 넣어준다면 반드시 파라미터 값이 들어와야 한다.
-
uri 예시)
- request-param-required -> username이 없을므로 에러
- request-param-required?username= -> 빈 문자로 통과
- request-param-required?username=test -> null을 int에 입력하는 것이 불가능, 따라서 Integer로변경해야함
- RequestParamController 수정
...
	@ResponseBody
	@RequestMapping("/request-param-required")
	public String requestParamRequired(@RequestParam(required=true) String username , @RequestParam(required=false) Integer age)
			throws IOException {

		return "username : " + username + "<br>" + "age : " + age;
	}
}
출력

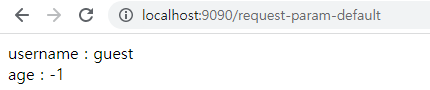
6. requred 조건 - default
설명
defaultBalue
- 파라미터 값이 없는 경우 defaultValue를 사용하면 기본 값을 적용 할 수 있다.
- 기본값이 있기 때문에 required는 의미가 없다.
- 빈 문자열에도 적용
- RequestParamController 수정
...
	@ResponseBody
	@RequestMapping("/request-param-default")
	public String requestParamDefault(@RequestParam(required=true , defaultValue = "guest") String username,
			@RequestParam(required=false, defaultValue = "-1") Integer age)
			throws IOException {

		return "username : " + username + "<br>" + "age : " + age;
	}
}
출력
7. Map으로 조회하기
설명
- Map형식을 파라미터로 받더라도 paramMap.get()를 사용해서 값을 받을 수 있다.
- RequestParamController 수정
...
	@ResponseBody
	@RequestMapping("/request-param-map")
	public String requestParamMap(@RequestParam Map<String, Object> paramMap)
			throws IOException {

		return "username : " + paramMap.get("username") + "<br>" + "age : " + paramMap.get("age");
	}
}
출력

2. @ModelAttribute
- request 패키지 > HelloData.java 생성
- 파라미터로 받은 값을 DTO에 저장해 준 뒤 사용 할 수 있다.
@Getter @Setter @ToString
public class HelloData {

		private String username;
		private int age;
}
1. 기본
설명
- RequestParamController 수정
...
	@ResponseBody
	@RequestMapping("/model-attribute-v1")
	public String modelAttributeV1(@RequestParam String username, @RequestParam int age){

		HelloData hello = new HelloData();
		hello.setUsername(username);
		hello.setAge(age);

		return hello.toString();
	}
}
출력

2. @ModelAttribute 사용
설명
- 기존에 값을 일일이 받아서 저장해주고 값을 불러왔어야 했지만 @ModleAttribute를 이용하면 파라미터를 받아서 필요한 객체를 만들고 그 객체에 값을 넣어주는 과정을자동화 시켜주어 코드를 줄일 수 있다.
- RequestParamController 수정
...
	@ResponseBody
	@RequestMapping("/model-attribute-v2")
	public String modelAttributeV2(@ModelAttribute HelloData hellodata){

		return hellodata.toString();
	}
}
출력

3. @ModelAttribute 생략
설명
-
@ModelAttribute도 생략이 가능하다
-
@RequestParam은 String, int와 같은 단순 타입일 경우 생략가능하고
-
@ModelAttribute는 객체 타입일 경우 생략 가능하다.
- RequestParamController 수정
	@ResponseBody
	@RequestMapping("/model-attribute-v3")
	public String modelAttributeV3( HelloData hellodata){

		return hellodata.toString();
	}
출력

3. ResponseView
core2.controller > response 패키지 생성
resources.templates > response 폴더 생성
- response > hello.html 생성
<!DOCTYPE html>
<html xmlns:th="http://www.thymeleaf.org">
<head>
<meta charset="UTF-8">
<title>Insert title here</title>
</head>
<body>
<p th:text="${data}">empty</p>
</body>
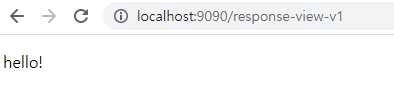
</html>1. 기본
- response 패키지 > ResponseViewController.java 생성
- ModelAndView : Controller 처리 결과 후 응답할 view 와 view에 전달할 값을 저장
@Controller
public class ResponseViewController {

	@RequestMapping("/response-view-v1")
	public ModelAndView responseViewV1() {
		ModelAndView mav = new ModelAndView("response/hello").addObject("data","hello!");
	return mav;
	}
}
출력
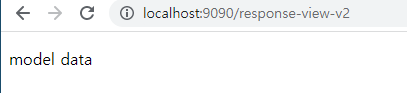
2. Model 객체 이용
- ResponseViewController.java 수정
- @Controller 에서 return이 String이면 view의 논리적인 이름이 된다.
- @ResponseBody를 넣지 않도록 주의 ( 넣을 경우 return에 있는 String 값만 출력됨)
...
	@RequestMapping("/response-view-v2")
	public String responseViewV2(Model model) {
		model.addAttribute("data", "model data");
		return "response/hello";
	}
}
출력
전체 코드

코딩공부