JavaScript 실습예제 - 여행준비물 점검 프로그램 만들기

✈️여행준비물 점검 프로그램
1. 여행 준비물 점검 프로그램 설계 순서 짜기
1) 여행에 필요한 준비물을 저장할 빈 배열 만들기
2) 빈 배열에 내용을 추가할 addList()함수 만들기
3) [추가] 버튼의 click이벤트와 addList()함수를 실행 연결하기
4) itemList 배열의 내용을 화면에 보여줄 showList() 함수 만들기
4-1) HTML 태그 문자열을 저장할 list 변수 만들기
4-2) for문을 사용해 itemList 배열의 요소를 차례로 가져온 후 li 태그로 묶어 list 변수에 저장하기
5) 준비한 항목을 화면에서 삭제하는 removeList() 함수 만들기
5-1) showList() 함수에서 각 항목을 표시하는 소스에 x버튼을 함께 표시하기
5-2) 삭제 버튼의 click 이벤트와 removeList() 함수 실행 연결하기
5-3) 이벤트가 발생한 삭제 버튼의 id 값 알아내기
5-4) splice() 함수를 사용해 해당 id 값이 가리키는 itemList() 배열의 요소 삭제하기
5-5) showList() 함수를 사용해 변경된 배열을 화면에 표시하기
👿 순서도를 설계할 때 몇가지 주의사항
- 프로그램은 고정된 절차로 돌아가야 한다.
- 각 절차는 항상 같은 내용이어야 한다.
- 모든 가능성을 고려해야 한다.
- 예시는 절차를 검증하는데 사용한다.
💫 코드
<body>
<div id="wrapper">
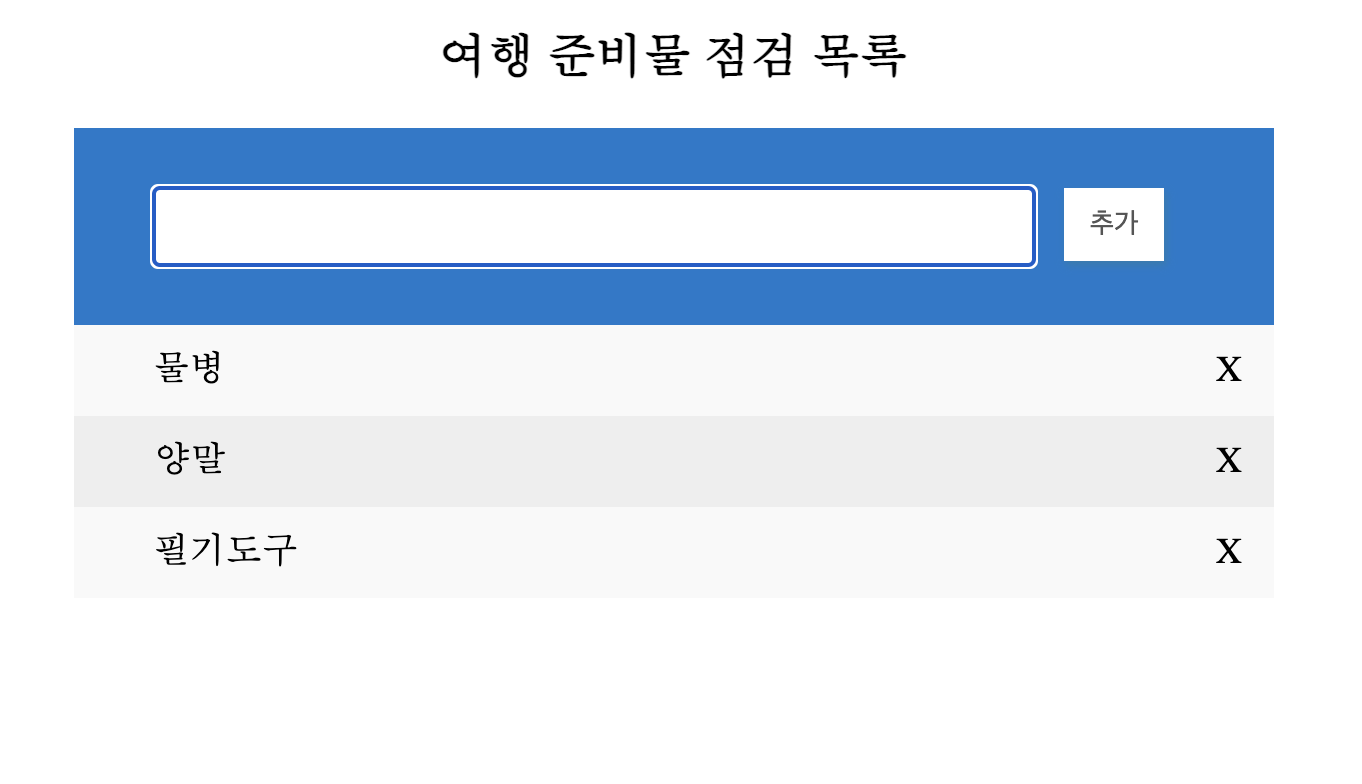
<h2>여행 준비물 점검 목록</h2>
<form>
<input type="text" id="item" autofocus="true">
<button type="button" id="add" class="addBtn">추가</button>
</form>
<div id="itemList"></div>
</div>
<script>
var itemList = [];
var addBtn = document.querySelector("#add");
addBtn.addEventListener("click", addList);
function addList() {
var item = document.querySelector("#item").value; //텍스트필드 내용을 가져옴
if (item != null) {
itemList.push(item);
document.querySelector("#item").value = ""; //입력된 텍스트 저장후에 빈 문자열로 초기화
document.querySelector("#item").focus();
}
showList(); // 목록을 표시하는 showList( ) 함수 실행
}
function showList() {
var list = "<ul>"; // 목록을 시작하는 <ul> 태그 저장
for(var i = 0; i<itemList.length; i++){ // 배열 요소마다 반복
list += "<li>" + itemList[i] +"<span class='close' id=" + i + ">X</span></li>"
}
list += "</ul>" // 목록을 끝내는 </ul> 태그 저장
document.querySelector("#itemList").innerHTML = list;
var remove = document.querySelectorAll('.close'); //remove변수를 생성하여 삭제버튼(class = "close"요소)를 모두 가져와 저장
for(var i = 0; i<remove.length; i++){
remove[i].addEventListener("click",removeList);
}
}
function removeList(){
// console.log(this);
var id= this.getAttribute("id"); //삭제버튼 클릭시 그 버튼의 id 값(인덱스 번호)를 가져오기 위해
itemList.splice(id,1); //itemList 배열에서 인덱스 값이 id인 요소 1개 삭제
showList(); //변경된 itemList 배열을 다시 화면에 표시
}
</script>
</body>
💫 CSS 코드 - input부분
* {
  box-sizing:border-box;
}
#wrapper {
  width:600px;
  margin:0 auto;
}
h2 {
  text-align:center;
}
form {
  background-color:#007acc;
  padding:30px 40px;
  color:white;
  text-align:center;
}
input {
  border:none;
  width:440px;
  padding:10px;
  float:left;
  font-size:16px;
}
.addBtn {
  padding:10px;
  width:50px;
  border:none;
  background-color:#fff;
  box-shadow:1px 2px 4px #167dae;
  color:#555;
  text-align:center;
  font-size:14px;
  cursor:pointer;
  transition:0.3;
}
form::after {
  content:"";
  display:table;
  clear:both;
}
💫 CSS 코드 - list부분
form::after {
  content:"";
  display:table;
  clear:both;
}
ul{
  margin:0;
  padding:0;
  list-style: none;
}
ul li{
  cursor:pointer;
  position:relative;
  padding:12px 8px 12px 40px;
  background: #eee;
  font-size:18px;
  transition: 0.2s;
}
ul li:nth-child(odd) {
  background-color:#f9f9f9;
}
ul li:hover {
  background-color:#ddd;
}
.close {
  position:absolute;
  right:0;
  top:0;
  padding:12px 16px;
  border:none;
  background:rgba(255,255,255,0)
}
.close:hover {
  background-color:#007acc;
  color:white;
}
connecting the dots 💫
ui 수정부탁해요!