
Scrollspy
스크롤이 링크를 지나가면 링크가 자동으로 바뀜
Body전체에 걸어주는게 일반적
<%@ page language="java" contentType="text/html; charset=UTF-8"
pageEncoding="UTF-8"%>
<!DOCTYPE html>
<html>
<head>
<meta charset="UTF-8">
<!-- ...-scale=1.0으로 맞춰줌 -->
<meta name="viewport" content="width=device-width, initial-scale=1.0, minimum-scale=1.0,maximum-scale=1.0" />
<title>Insert title here</title>
<link href="https://cdn.jsdelivr.net/npm/bootstrap@5.2.3/dist/css/bootstrap.min.css" rel="stylesheet" integrity="sha384-rbsA2VBKQhggwzxH7pPCaAqO46MgnOM80zW1RWuH61DGLwZJEdK2Kadq2F9CUG65" crossorigin="anonymous">
<style>
body {
<!-- 레이어를 사용하겠단 얘기 -->
position: relative;
}
</style>
<script src="https://cdn.jsdelivr.net/npm/bootstrap@5.2.3/dist/js/bootstrap.bundle.min.js" integrity="sha384-kenU1KFdBIe4zVF0s0G1M5b4hcpxyD9F7jL+jjXkk+Q2h455rYXK/7HAuoJl+0I4" crossorigin="anonymous"></script>
</head>
<!-- data-bs-target=".navbar"는 밑에 <nav class="navbar를 가리킴 / nav는 div같은 것 네이게이션에 쓰는거라 이름을 nav로 해준 것 -->
<body data-bs-spy="scroll" data-bs-target=".navbar" data-bs-offset="50">
<nav class="navbar navbar-expand-sm bg-dark navbar-dark fixed-top">
<div class="container-fluid">
<ul class="navbar-nav">
<li class="nav-item">
<a class="nav-link" href="#section1">Section 1</a>
</li>
<li class="nav-item">
<a class="nav-link" href="#section2">Section 2</a>
</li>
<li class="nav-item">
<!-- 클릭하면 밑에 <div id="section3"로 넘어감 -->
<a class="nav-link" href="#section3">Section 3</a>
</li>
</ul>
</div>
</nav>
<div id="section1" class="container-fluid bg-success text-white" style="padding:100px 20px;">
<h1>Section 1</h1>
<p>Try to scroll this section and look at the navigation bar while scrolling! Try to scroll this section and look at the navigation bar while scrolling!</p>
<p>Try to scroll this section and look at the navigation bar while scrolling! Try to scroll this section and look at the navigation bar while scrolling!</p>
</div>
<div id="section2" class="container-fluid bg-warning" style="padding:100px 20px;">
<h1>Section 2</h1>
<p>Try to scroll this section and look at the navigation bar while scrolling! Try to scroll this section and look at the navigation bar while scrolling!</p>
<p>Try to scroll this section and look at the navigation bar while scrolling! Try to scroll this section and look at the navigation bar while scrolling!</p>
</div>
<div id="section3" class="container-fluid bg-secondary text-white" style="padding:100px 20px;">
<h1>Section 3</h1>
<p>Try to scroll this section and look at the navigation bar while scrolling! Try to scroll this section and look at the navigation bar while scrolling!</p>
<p>Try to scroll this section and look at the navigation bar while scrolling! Try to scroll this section and look at the navigation bar while scrolling!</p>
</div>
</body>
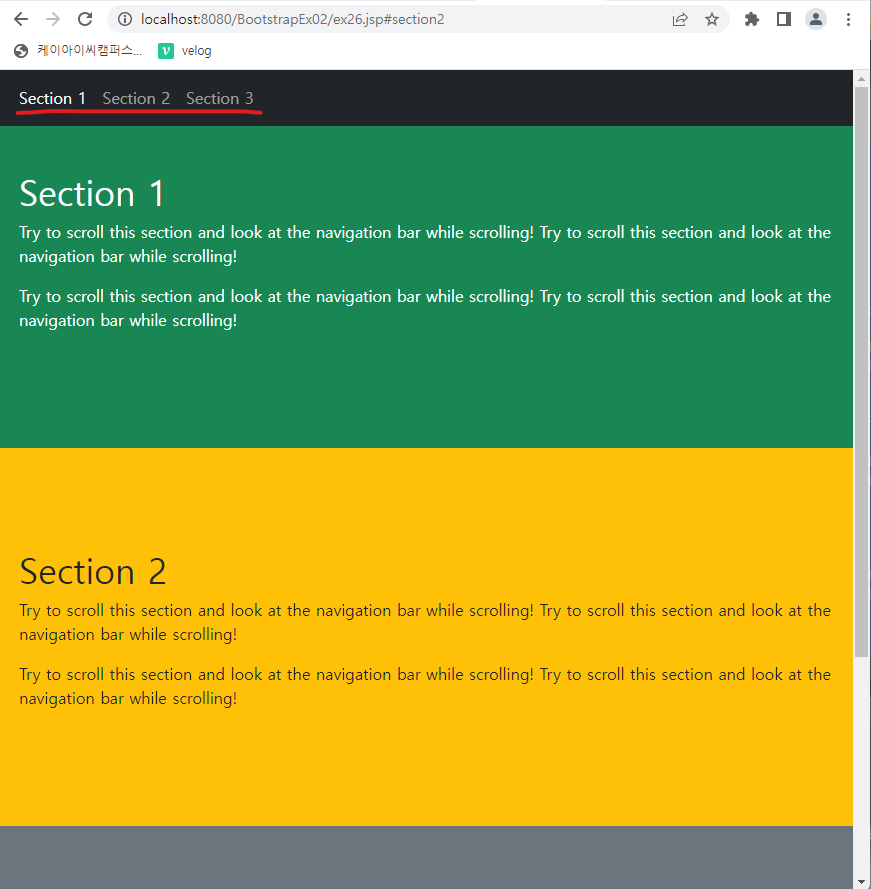
</html>스크롤을 움직일 때 화면에 보이는 것과 네비게이션바가 같은 section으로 선택이 된다.
Section1 보고있으면 네비게이션바 Section1 선택됨
Section2, 3으로 넘어가면 네비게이션바도 같이 바뀐다.
Offcanvas
설정한 위치에서 튀어나오는 창
1번은 target이 어떤건지 알려준 것
2번은 버튼을 눌렀을시 실행되는 것을 가리킴
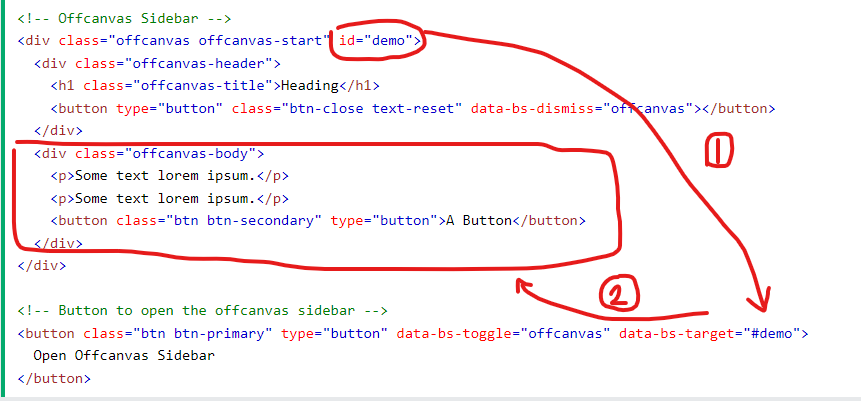
<!-- start는 왼쪽 end는 오른쪽, bottom은 밑에서, top은 위에서 나온다는 의미 -->
<div class="offcanvas offcanvas-end" id="demo">
<div class="offcanvas-header">
<h1 class="offcanvas-title">Heading</h1>
<button type="button" class="btn-close" data-bs-dismiss="offcanvas"></button>
</div>
<div class="offcanvas-body">
<p>Some text lorem ipsum.</p>
<p>Some text lorem ipsum.</p>
<p>Some text lorem ipsum.</p>
<button class="btn btn-secondary" type="button">A Button</button>
</div>
</div>
<div class="container-fluid mt-3">
<h3>Offcanvas Sidebar</h3>
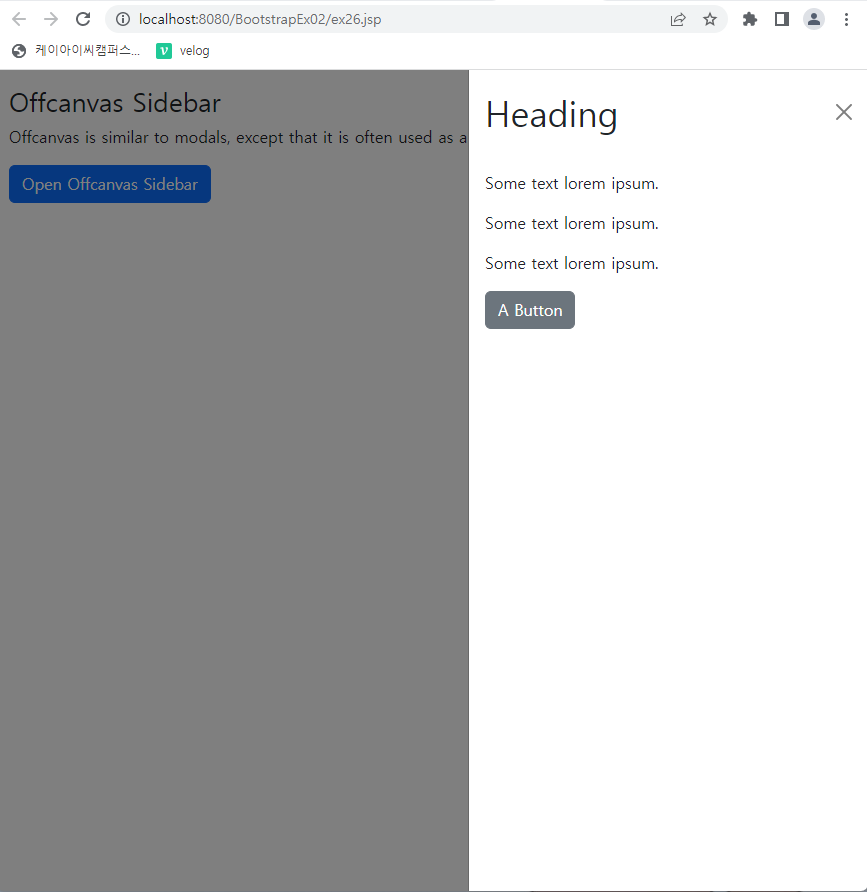
<p>Offcanvas is similar to modals, except that it is often used as a sidebar.</p>
<button class="btn btn-primary" type="button" data-bs-toggle="offcanvas" data-bs-target="#demo">
Open Offcanvas Sidebar
</button>
</div>start는 왼쪽 end는 오른쪽, bottom은 밑에서, top은 위에서 나온다는 의미
end로 설정하여 버튼 클릭시 브라우저 오른쪽에서 나온다.
Forms
Stacked Form
<%@ page language="java" contentType="text/html; charset=UTF-8"
    pageEncoding="UTF-8"%>
<!DOCTYPE html>
<html>
<head>
<meta charset="UTF-8">

<!-- ...-scale=1.0으로 맞춰줌 -->
<meta name="viewport" content="width=device-width, initial-scale=1.0, minimum-scale=1.0,maximum-scale=1.0" />

<title>Insert title here</title>
<link href="https://cdn.jsdelivr.net/npm/bootstrap@5.2.3/dist/css/bootstrap.min.css" rel="stylesheet" integrity="sha384-rbsA2VBKQhggwzxH7pPCaAqO46MgnOM80zW1RWuH61DGLwZJEdK2Kadq2F9CUG65" crossorigin="anonymous">
<script src="https://cdn.jsdelivr.net/npm/bootstrap@5.2.3/dist/js/bootstrap.bundle.min.js" integrity="sha384-kenU1KFdBIe4zVF0s0G1M5b4hcpxyD9F7jL+jjXkk+Q2h455rYXK/7HAuoJl+0I4" crossorigin="anonymous"></script>
</head>
<body>

<div class="container">
	<form action="">
		<!-- class="mb-5" : 여백조정(bottom) - email부분의 bottom을 여백줘서 password창이랑 벌어짐/ mt-3 : 여백조정(top) -->
		<div class="mb-5 mt-3">
			<label for="email" class="form-label">Email :</label>

			<!-- placeholder="enter email" 입력창에 안내문구 만들어준 것, 입력하면 지워짐 -->
			<input type="email" id="email" class="form-control" placeholder="enter email"/>
		</div>
		<div class="mb-3">
			<label for="password" class="form-label">Password :</label>
			<input type="password" id="password" class="form-control" placeholder="enter password"/>
		</div>

		<button class="btn btn-primary">Submit</button>
	</form>
</div>

</body>
</html>
Textarea + 컬러피커 활용 / plaintext
위의 코드에서 추가
<div class="mb-3">
	<label for="comment" class="form-label">Comment :</label>
	<textarea rows="5" id="comment" class="form-control"></textarea>
</div>

<!-- Color화 시키기 -->
<div class="mb-3">
	<label for="color" class="form-label">Color</label>
	<!-- form-control-color 없으면 크기가 커짐? / title="Choose Color" 하면 마우스 올렸을때 title로 정해준 문구 뜸 -->
	<input type="color" id="color" class="form-control form-control-color" value="#CCCCCC" title="Choose Color">
</div>

<!-- plaintext : 라인 없이 입력창 생성 -->
<div class="mb-3">
	<label for="name" class="form-label">name :</label>
	<input type="text" id="name" class="form-control-plaintext" placeholder="enter name">
</div>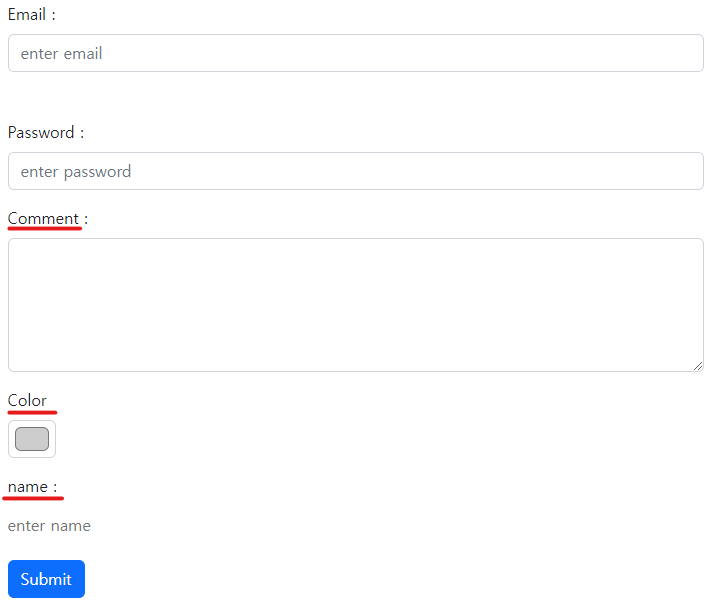
Select Menus
Select Menu
<%@ page language="java" contentType="text/html; charset=UTF-8"
    pageEncoding="UTF-8"%>
<!DOCTYPE html>
<html>
<head>
<meta charset="UTF-8">

<!-- ...-scale=1.0으로 맞춰줌 -->
<meta name="viewport" content="width=device-width, initial-scale=1.0, minimum-scale=1.0,maximum-scale=1.0" />

<title>Insert title here</title>
<link href="https://cdn.jsdelivr.net/npm/bootstrap@5.2.3/dist/css/bootstrap.min.css" rel="stylesheet" integrity="sha384-rbsA2VBKQhggwzxH7pPCaAqO46MgnOM80zW1RWuH61DGLwZJEdK2Kadq2F9CUG65" crossorigin="anonymous">
<script src="https://cdn.jsdelivr.net/npm/bootstrap@5.2.3/dist/js/bootstrap.bundle.min.js" integrity="sha384-kenU1KFdBIe4zVF0s0G1M5b4hcpxyD9F7jL+jjXkk+Q2h455rYXK/7HAuoJl+0I4" crossorigin="anonymous"></script>
</head>
<body>

<div class="container">
	<form action="">
		<div class="mb-5 mt-3">
		<label for="select1" class="form-label">Select :</label>
		<select id="select1" class="form-select">
			<option>1</option>
			<option>2</option>
			<option>3</option>
			<option>4</option>
		</select>
		</div>

		<!-- multiple: 다중선택 -->
		<div class="mb-5">
		<label for="select2" class="form-label">Select :</label>
		<select id="select2" class="form-select" multiple>
			<option>1</option>
			<option>2</option>
			<option>3</option>
			<option>4</option>
		</select>
		</div>

		<button class="btn btn-primary">Submit</button>
	</form>
</div>

</body>
</html>
멀티플은 컨트롤 or 쉬프트 or 드래그로 다중선택 가능

Data Lists
<div class="container mt-3">
  <h2>Data List</h2>
  <form action="/action_page.php">
    <label for="browser" class="form-label">Choose your browser from the list:</label>
    <input class="form-control" list="browsers" name="browser" id="browser">
    <datalist id="browsers">
      <option value="Edge">
      <option value="Firefox">
      <option value="Chrome">
      <option value="Opera">
      <option value="Safari">
    </datalist>
    <button type="submit" class="btn btn-primary mt-3">Submit</button>
  </form>
</div>

Checkboxes and Radios
Checkboxes
<%@ page language="java" contentType="text/html; charset=UTF-8"
    pageEncoding="UTF-8"%>
<!DOCTYPE html>
<html>
<head>
<meta charset="UTF-8">

<!-- ...-scale=1.0으로 맞춰줌 -->
<meta name="viewport" content="width=device-width, initial-scale=1.0, minimum-scale=1.0,maximum-scale=1.0" />

<title>Insert title here</title>
<link href="https://cdn.jsdelivr.net/npm/bootstrap@5.2.3/dist/css/bootstrap.min.css" rel="stylesheet" integrity="sha384-rbsA2VBKQhggwzxH7pPCaAqO46MgnOM80zW1RWuH61DGLwZJEdK2Kadq2F9CUG65" crossorigin="anonymous">
<script src="https://cdn.jsdelivr.net/npm/bootstrap@5.2.3/dist/js/bootstrap.bundle.min.js" integrity="sha384-kenU1KFdBIe4zVF0s0G1M5b4hcpxyD9F7jL+jjXkk+Q2h455rYXK/7HAuoJl+0I4" crossorigin="anonymous"></script>
</head>
<body>

<div class="container">
	<form action="">
		<div class="form-check">
			<!-- checked 체크설정 -->
			<input type="checkbox" id="check1" class="form-check-input" checked/>
			<label for="check1" class="form-check-label">Option 1</label>
		</div>

		<div class="form-check">
			<!-- checked 체크설정 -->
			<input type="checkbox" id="check2" class="form-check-input" checked/>
			<label for="check2" class="form-check-label">Option 2</label>
		</div>

		<!-- disabled: 비활성화 상태로 만듦 -->
		<div class="form-check mb-3">
			<input type="checkbox" id="check3" class="form-check-input" disabled/>
			<label for="check3" class="form-check-label">Option 3</label>
		</div>
		<button class="btn btn-primary">Submit</button>
	</form>
</div>

</body>
</html>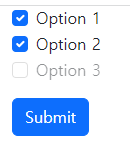
Radio buttons
<div class="container mt-3">
  <h2>Radio buttons</h2>
  <p>The form below contains three radio buttons. The first option is checked by default, and the last option is disabled:</p>
  <form action="/action_page.php">
    <div class="form-check">
      <input type="radio" class="form-check-input" id="radio1" name="optradio" value="option1" checked>
      <label class="form-check-label" for="radio1">Option 1</label>
    </div>
    <div class="form-check">
      <input type="radio" class="form-check-input" id="radio2" name="optradio" value="option2">
      <label class="form-check-label" for="radio2">Option 2</label>
    </div>
    <div class="form-check">
      <input type="radio" class="form-check-input" disabled>
      <label class="form-check-label">Option 3</label>
    </div>
    <button type="submit" class="btn btn-primary mt-3">Submit</button>
  </form>
</div>
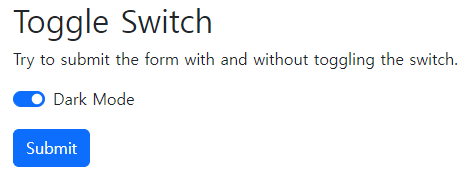
Toggle Switches
on / off 스위치를 만들 수 있다.
<div class="container mt-3">
  <h2>Toggle Switch</h2>
  <p>Try to submit the form with and without toggling the switch.</p>
  <form action="/action_page.php">
  	<!-- form-switch로 만들어 줄 수 있다. -->
    <div class="form-check form-switch">
      <input class="form-check-input" type="checkbox" id="mySwitch" name="darkmode" value="yes" checked>
      <label class="form-check-label" for="mySwitch">Dark Mode</label>
    </div>
    <button type="submit" class="btn btn-primary mt-3">Submit</button>
  </form>
</div>
클릭마다 작동
Range
이런게 Range

<div class="container mt-3">
  <h2>Custom Range</h2>
  <p>To create a custom range menu, add the .form-range class to the input element with type="range":</p>
  <form action="/action_page.php">
    <label for="customRange" class="form-label">Custom range</label>
    <input type="range" class="form-range" id="customRange" name="points">

    <button type="submit" class="btn btn-primary mt-3">Submit</button>
  </form>
</div>
Steps - 증가치 정하기
<div class="container mt-3">
  <h2>Steps in a Range</h2>
  <p>By default, the interval between the range numbers is 1. You can change it by using the step attribute:</p>
  <form action="/action_page.php">
    <label for="customRange" class="form-label">Custom range</label>
    <input type="range" class="form-range" id="customRange" step="10" name="points">

    <button type="submit" class="btn btn-primary mt-3">Submit</button>
  </form>
</div>
정해준 증가치만큼 이동함.

Min and Max - 최대 / 최소 정하기
<div class="container mt-3">
  <h2>Min and Max Range</h2>
  <p>Use the min and/or max attribute to specify the minimum/maximum value of a range:</p>
  <form action="/action_page.php">
    <label for="customRange" class="form-label">Custom range</label>
    <input type="range" class="form-range" id="customRange" name="points" min="0" max="4">

    <button type="submit" class="btn btn-primary mt-3">Submit</button>
  </form>
</div>
min을 0, max를 4로 설정해서 4칸 움직일 수 있음

Input Groups
Input Group with Checkboxes and Radios
<div class="container mt-3">
  <h3>Input Group with Checkboxes and Radios</h3>
  <p>You can also use checkboxes or radio buttons instead of text:</p>

  <!-- Multiple inputs -->
  <div class="input-group mb-3">
    <div class="input-group-text">
      <input type="checkbox">
    </div>
    <input type="text" class="form-control" placeholder="Some text">
  </div>

  <div class="input-group mb-3">
    <div class="input-group-text">
      <input type="radio">
    </div>
    <input type="text" class="form-control" placeholder="Some text">
  </div>
</div>
위에는 체크박스 / 밑에는 라디오

Input Group with Dropdown Button
<div class="container mt-3">
  <h3>Input Groups with Dropdown Button</h3>
  <p>Add a dropdown button in the input group. Note that you don't need the .dropdown wrapper, as you normally would.</p>

  <div class="input-group mt-3 mb-3">
    <button type="button" class="btn btn-primary dropdown-toggle" data-bs-toggle="dropdown">
      Dropdown button
    </button>
    <ul class="dropdown-menu">
      <li><a class="dropdown-item" href="#">Link 1</a></li>
      <li><a class="dropdown-item" href="#">Link 2</a></li>
      <li><a class="dropdown-item" href="#">Link 3</a></li>
    </ul>
    <input type="text" class="form-control" placeholder="Username">
  </div>
</div>
Floating Labels
라벨이 클릭시 라벨 위치가 올라간다.
Floating Labels / Animated Labels
<div class="container">
	<form action="">
		<div class="form-floating mb-3 mt-3">
			<input type="text" id="email" class="form-control" placeholder="Enter Email"/>
			<label for="email">Email</label>
		</div>
		<button class="btn btn-primary">Submit</button>
	</form>
</div>
라벨이 이렇게 떠있다가 클릭하면

이런식으로 라벨이 올라간다.
Textarea
<div class="container mt-3">
  <h2>Floating Labels - Textarea</h2>
  <p>Click inside the textarea to see the floating label effect:</p>
  <form action="/action_page.php">
    <div class="form-floating mb-3 mt-3">
      <textarea class="form-control" id="comment" name="text" placeholder="Comment goes here"></textarea>
      <label for="comment">Comments</label>
    </div>
    <button type="submit" class="btn btn-primary">Submit</button>
  </form>
</div>>
클릭 전

클릭 후

우편번호 만들기
UI 참고
UI
	jQuery
    		jQuery UI
            		w3ui...
                    		=> 관리자에 사용하는게 좋음
            BootStrap
            		template
                    			공부(백업하면서 하는게 좋음)

    발전된 형태 => Vew
    			 React
Spring Framework
자바 프로그램을 쉽게 적응할 수 있게 만들어준다.
Spring은 자바만 가능 / 코틀린도 자바를통해 만들어서 가능
굉장히 다양한 기능을 한다 - 객체 다루는 기능
https://spring.io/ <- 공식사이트
스프링이 중요한 이유
전자정부프레임워크 핵심이 Spring이다.
일반적인 대기업보다는 유니콘 기업에서 많이 사용(배민, 네이버 등)
스프링으로 만들 수 있는 것
spring - application 	<= back-end + server
		web
        app(많지는 않음)
스프링 프레임워크의 핵심
sping	-	di		=> mvc구조를 만들어 준다.
		-	aop
di / ioc
Dependency Injection (의존성 주입)
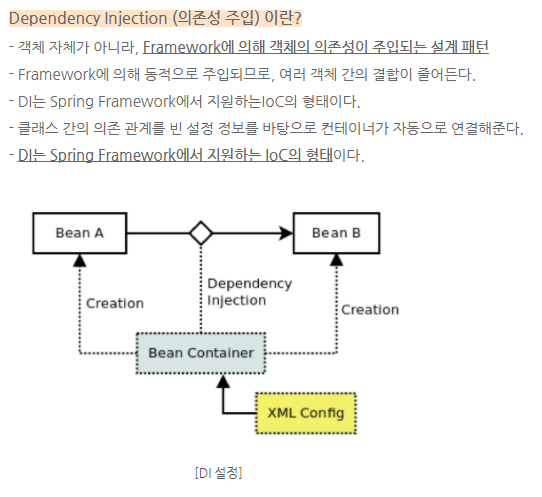
https://blog.naver.com/mindalpong_/222280700011 참고
Sping 해보기
세팅 / 라이브러리 불러오기
sping-workspace 로 이클립스 실행하고 css, jsp, html utf-8로 바꾸기
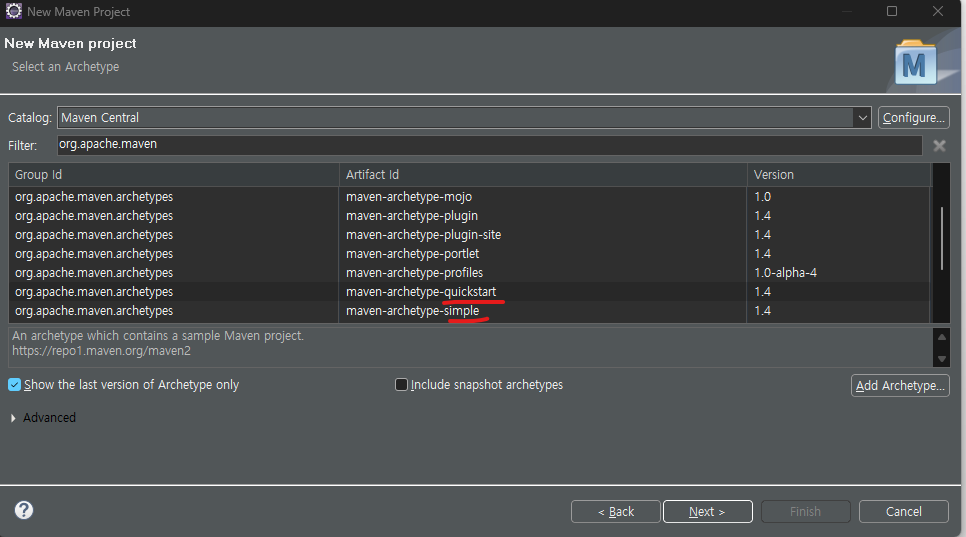
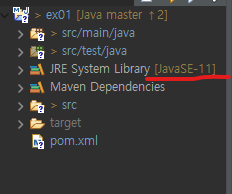
메이븐 프로젝트 생성 / 퀵스타트나 심플 둘 중에 하나
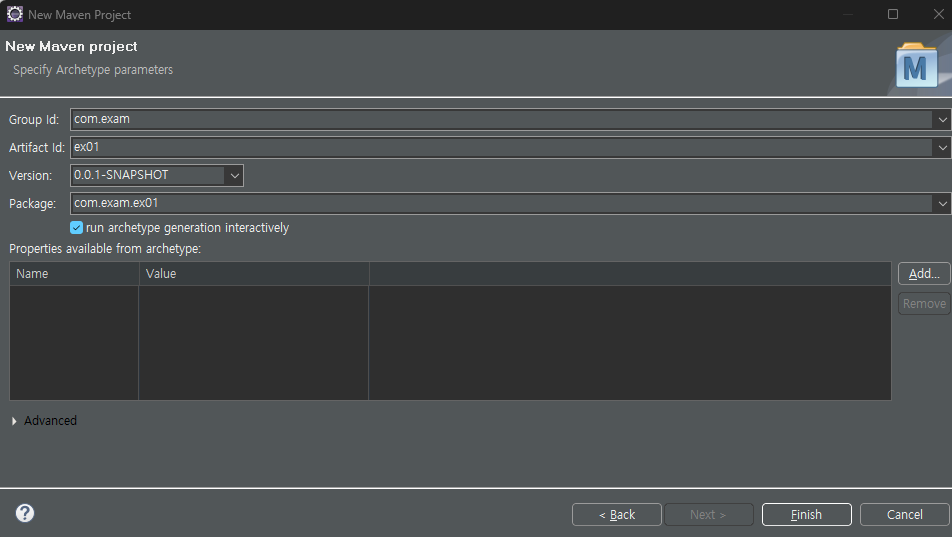
생성 후 11버전으로 맞춰주기
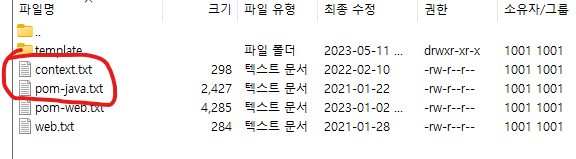
파일질라에서 pom_java.txt / context.txt파일 다운로드
java -> spring -> 자료
pom_java.txt파일을 전체내용을 복사해서 maven프로젝트에 pom.xml에 붙여넣기함 -> 버전이 다시 변경돼서 다시 11버전으로 변경도 해줘야한다.

Spring 해보기
프로젝트 생성 후 패키지 생성
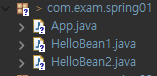
HelloBean1 클래스 생성
package com.exam.spring01;

public class HelloBean1 {
	public void sayHello(String name) {
		System.out.println(name + "님 안녕하세요");
	}
}
HelloBean2 클래스 생성
package com.exam.spring01;

public class HelloBean2 {
	public void sayHello(String name) {
		System.out.println("Hello" + name);
	}
}
위에 두 클래스를 실행시킬 클래스 App클래스
package com.exam.spring01;
public class App {
public static void main(String[] args) {
// TODO Auto-generated method stub
// 객체의 생성을 프로그래머가 담당
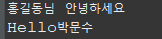
HelloBean1 helloBean1 = new HelloBean1();
helloBean1.sayHello("홍길동");
HelloBean2 helloBean2 = new HelloBean2();
helloBean2.sayHello("박문수");
}
}
인터페이스로 하기 / 다형성
새로운 패키지 생성

Hello클래스
package com.exam.spring02;

public interface Hello {
	void sayHello(String name);
}
Hello를 implements한 HelloBean1 클래스 생성

package com.exam.spring02;

public class HelloBean1 implements Hello {

	@Override
	public void sayHello(String name) {
		// TODO Auto-generated method stub
		System.out.println(name + "님 안녕하세요");
	}

}
Hello를 implements한 HelloBean2 클래스 생성
package com.exam.spring02;

public class HelloBean2 implements Hello {

	@Override
	public void sayHello(String name) {
		// TODO Auto-generated method stub
		System.out.println("Hello" + name);
	}

}
실행시킬 App 클래스 생성
package com.exam.spring02;

public class App {

	public static void main(String[] args) {
		// TODO Auto-generated method stub
		// 일반적인 방법
		// HelloBean1 helloBean1 = new HelloBean1();

		// 다형성
		Hello hello = new HelloBean1();
		hello.sayHello("홍길동");
		System.out.println(hello);

		hello = new HelloBean2();
		hello.sayHello("홍길동");
		System.out.println(hello);
	}

}
두 개의 주소가 다른것을 볼 수 있음.

Spring으로 사용
Spring Bean Configuration File(Assembler - 조작기) 설정
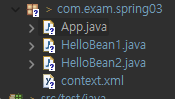
사용한 클래스 파일들
new -> file 해서 context.xml(보통 xml파일 이름을 context라고 함) 만들어주고 아까 다운받은 context.txt 파일 복사 붙히기
context.xml 파일
<!-- 해당 클래스를 통해 인스턴스를 생성하고 id를 붙여서 관리한다. -->
<bean id or name="bean객체 아이디" class="클래스 경로" />
추가해준 것
<!-- HelloBean1 helloBean1 = new HelloBean1()과 같다 / 그럼 name에 있는 것이 객체변수가 되는 것 -->
<bean name="helloBean1" class="com.exam.spring03.HelloBean1" />
<bean name="helloBean2" class="com.exam.spring03.HelloBean2" />
HelloBean1 클래스
package com.exam.spring03;

public class HelloBean1 {
	public void sayHello(String name) {
		System.out.println(name + "님 안녕하세요");
	}
}
HelloBean2 클래스
package com.exam.spring03;

public class HelloBean2 {
	public void sayHello(String name) {
		System.out.println("Hello" + name);
	}
}
실행할 클래스 App클래스
GenericXmlApplicationContext class : XML 파일로부터 정보를 읽어와 객체를 생성하고 초기화.

스프링 설정 파일을 읽어와 로딩이 시키고, 객체를 생성하며, 초기화하는 역할을 한다.
또한 getBean 메소드를 이용하여 스프링 컨테이너에 생성된 객체에 접근 가능할 수 있게 된다.

GenericXmlApplicationContext 객체를 생성할 때 스프링 컨테이너가 생성되고, 내부에 bean 객체들이 생성된다.
(스프링 컨테이너의 생성 시점 = bean 객체의 생성 시점)

GenericXmlApplicationContext 객체의 close() 메서드 호출시 스프링 컨테이너와 bean 객체들이 소멸된다.
(스프링 컨테이너의 소멸 시점 = bean 객체의 소멸 시점)
package com.exam.spring03;
import org.springframework.context.support.GenericXmlApplicationContext;
public class App {
public static void main(String[] args) {
// TODO Auto-generated method stub
// ()안에 설정파일 읽어달라는 것
GenericXmlApplicationContext ctx = new GenericXmlApplicationContext("classpath:com/exam/spring03/context.xml");
// new가 없음
HelloBean1 helloBean1 = (HelloBean1)ctx.getBean("helloBean1");
helloBean1.sayHello("홍길동");
ctx.close();
}
}
실행화면

id값으로 가져오기
context.xml에 추가

App 클래스
HelloBean1()이 한번 더 호출되는 이유는 context.xml에서 helloBean1과 helloBean3 두 개의 빈(Bean) 객체를 정의했기 때문
helloBean1과 helloBean3는 동일한 HelloBean1 클래스의 인스턴스를 참조하기때문에 동일한 생성자인 HelloBean1()이 두 번 호출되는 것.

인터페이스를 통해 가져오기
context.xml
<?xml version="1.0" encoding= "UTF-8"?>
<beans xmlns="http://www.springframework.org/schema/beans"
	xmlns:xsi="http://www.w3.org/2001/XMLSchema-instance"
	xsi:schemaLocation="http://www.springframework.org/schema/beans http://www.springframework.org/schema/beans/spring-beans-4.3.xsd">

	<!-- HelloBean1 helloBean1 = new HelloBean1()과 같다 / 그럼 name에 있는 것이 객체변수가 되는 것 -->
	<bean name="helloBean1" class="com.exam.spring04.HelloBean1" />
	<bean name="helloBean2" class="com.exam.spring04.HelloBean2" />

</beans>
Hello 인터페이스 클래스
package com.exam.spring04;

public interface Hello {
	void sayHello(String name);
}
Hello를 구현하는 HelloBean1 클래스
package com.exam.spring04;

import com.exam.spring04.Hello;

public class HelloBean1 implements Hello {

	@Override
	public void sayHello(String name) {
		// TODO Auto-generated method stub
		System.out.println(name + "님 안녕하세요");
	}

}
Hello를 구현하는 HellBean2 클래스
package com.exam.spring04;

import com.exam.spring04.Hello;


public class HelloBean2 implements Hello {

	@Override
	public void sayHello(String name) {
		// TODO Auto-generated method stub
		System.out.println("Hello" + name);
	}

}
App 클래스( 실행 )
package com.exam.spring04;

import org.springframework.context.support.GenericXmlApplicationContext;

public class App {

	public static void main(String[] args) {
		// TODO Auto-generated method stub
		// xml 데이터 읽을 객체
		GenericXmlApplicationContext ctx = new GenericXmlApplicationContext("classpath:com/exam/spring04/context.xml");

		// xml에서 객체 가져오기
		// HelloBean1 hello = (HelloBean1)ctx.getBean("helloBean1");

		// 인터페이스를 통해 가져오기 / getBean()에 helloBean1은 그냥 이름값
		Hello hello = (Hello)ctx.getBean("helloBean1");

		hello = (Hello)ctx.getBean("helloBean2");
		hello.sayHello("홍길동");

		ctx.close();
	}

}

객체 생성 시점
클래스(스태틱) 멤버필드 - 프로그램 실행시
인스턴스 멤버필드 - 인스턴스화 할때
singleton - 실행시 바로
prototype - 필요할때 그때그때마다
해보기 - scope="prototype"
Prototype
스프링 설정 파일의 <bean> 태그에 scope="prototype" 속성을 넣어주면,
해당 bean객체를 getBean() 메소드로 호출할때마다 새로운 객체가 반환된다.
context.xml
패키지 이름 바꿔주고 scope 추가
<bean name="helloBean1" class="com.exam.spring05.HelloBean1" scope="prototype" />
<bean name="helloBean2" class="com.exam.spring05.HelloBean2" scope="prototype" />
HellBean1, HelloBean2는 전과 동일
App 클래스
package com.exam.spring05;
import org.springframework.context.support.GenericXmlApplicationContext;
public class App {
public static void main(String[] args) {
// TODO Auto-generated method stub
GenericXmlApplicationContext ctx = new GenericXmlApplicationContext("classpath:com/exam/spring05/context.xml");
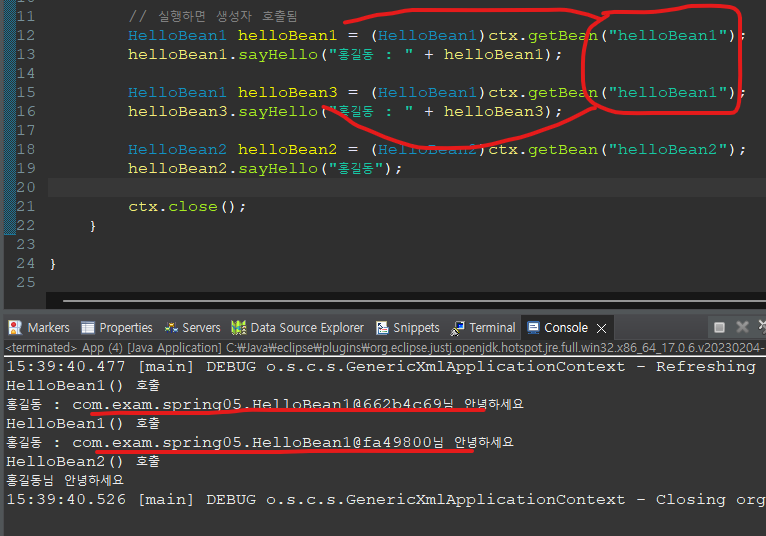
// 실행하면 생성자 호출됨
HelloBean1 helloBean1 = (HelloBean1)ctx.getBean("helloBean1");
helloBean1.sayHello("홍길동");
HelloBean2 helloBean2 = (HelloBean2)ctx.getBean("helloBean2");
helloBean2.sayHello("홍길동");
ctx.close();
}
}
생성자들이 먼저 출력되지않은 이유는 prototype때문이다.
요청한 객체에 대해서만 먼저 출력이 되기때문에 아직 요청되지않은 객체는 실행이 안된 것 그래서 해당 객체의 생성자,메서드 호출후 다음 객체의 생성자,메서드 호출됨. / 맞나?

prototype / singleton
prototype일때
context.xml
<bean name="helloBean1" class="com.exam.spring05.HelloBean1" scope="prototype" />
<bean name="helloBean2" class="com.exam.spring05.HelloBean2" scope="prototype" />
App 클래스
HelloBean1 helloBean1 = (HelloBean1)ctx.getBean("helloBean1");
helloBean1.sayHello("홍길동 : " + helloBean1);

HelloBean1 helloBean3 = (HelloBean1)ctx.getBean("helloBean1");
helloBean3.sayHello("홍길동 : " + helloBean3);
객체는 같아도 메모리는 달라서 주소값이 다르다
singleton일때
context.xml
<bean name="helloBean1" class="com.exam.spring05.HelloBean1" scope="singleton" />
<bean name="helloBean2" class="com.exam.spring05.HelloBean2" />
singleton일때는 주소가 같다.

생성자를 통한 주입

context.xml
<constructor-arg> 태그는 Spring Framework에서 빈을 생성할 때 생성자에 전달할 인수(argument)를 설정하는 데 사용

<value> 태그는 간단한 값(리터럴)을 지정하는 데 사용.
<value> 태그 내부에는 실제 전달할 값인 "박문수"가 지정되어 있음.
<bean name="helloBean1" class="com.exam.spring06.HelloBean" scope="prototype" />

<bean name = "helloBean2" class="com.exam.spring06.HelloBean" scope="prototype">
	<constructor-arg>
		<value>박문수</value>
	</constructor-arg>

    <!-- <constructor-arg value="이몽룡" /> 이렇게도 가능 -->
</bean>
HelloBean클래스
package com.exam.spring06;

public class HelloBean {
	private String name;

	public HelloBean() {
		// TODO Auto-generated constructor stub
		System.out.println("HelloBean() 호출");
		this.name = "홍길동";
	}

	public HelloBean(String name) {
		System.out.println("HelloBean(String name) 호출");
		this.name = name;
	}

	public void sayHello() {
		System.out.println(this.name + "님 안녕하세요");
	}
}
App 클래스
package com.exam.spring06;

import org.springframework.context.support.GenericXmlApplicationContext;

public class App {

	public static void main(String[] args) {
		// TODO Auto-generated method stub
		GenericXmlApplicationContext ctx = new GenericXmlApplicationContext("classpath:com/exam/spring06/context.xml");

		// 생성자 호출
		HelloBean helloBean1 = (HelloBean)ctx.getBean("helloBean1");
		helloBean1.sayHello();

		// 생성자 호출
		HelloBean helloBean2 = (HelloBean)ctx.getBean("helloBean2");
		helloBean2.sayHello();
	}

}
helloBean1 실행시
HelloBean 클래스에 HelloBean()생성자 호출하여 생성자 안에있는 sysout과 this.name으로 변수에 "홍길동"값 넣어주고 -> helloBean1.sayHello() 호출하여 실행
helloBean2 실행시
context.xml 파일을 보면 박문수라는 값을 생성자로 넘겨주게 설정이 돼어있다.

인자가 2개일때
Hellobean 클래스
package com.exam.spring06;

public class HelloBean {
	private String name;

	public HelloBean() {
		// TODO Auto-generated constructor stub
		System.out.println("HelloBean() 호출");
		this.name = "홍길동";
	}

	public HelloBean(String name) {
		System.out.println("HelloBean(String name) 호출");
		this.name = name;
	}

    // 인자가 2개
	public HelloBean(String firstName, String lastName) {
		System.out.println("HelloBean(String firstName, String lastName) 호출");
		this.name = lastName + " " + firstName;
	}

	public void sayHello() {
		System.out.println(this.name + "님 안녕하세요");
	}
}
context.xml
<?xml version="1.0" encoding= "UTF-8"?>
<beans xmlns="http://www.springframework.org/schema/beans"
	xmlns:xsi="http://www.w3.org/2001/XMLSchema-instance"
	xsi:schemaLocation="http://www.springframework.org/schema/beans http://www.springframework.org/schema/beans/spring-beans-4.3.xsd">

	<bean name="helloBean1" class="com.exam.spring06.HelloBean" scope="prototype" />

	<bean name = "helloBean2" class="com.exam.spring06.HelloBean" scope="prototype">
		<!--
		<constructor-arg>
			<value>박문수</value>
		</constructor-arg>
		 -->
		<constructor-arg value="이몽룡" />
	</bean>

	<bean name="helloBean3" class="com.exam.spring06.HelloBean" scope="prototype">
		<constructor-arg>
			<value>문수</value>
		</constructor-arg>
		<constructor-arg>
			<value>박</value>
		</constructor-arg>

        <!-- 이렇게도 사용할 수 있다
        <constructor-arg value="문수" />
		<constructor-arg value="박" />
        -->
	</bean>
</beans>
App 클래스
package com.exam.spring06;

import org.springframework.context.support.GenericXmlApplicationContext;

public class App {

	public static void main(String[] args) {
		// TODO Auto-generated method stub
		GenericXmlApplicationContext ctx = new GenericXmlApplicationContext("classpath:com/exam/spring06/context.xml");

		// 생성자 호출
		HelloBean helloBean1 = (HelloBean)ctx.getBean("helloBean1");
		helloBean1.sayHello();

		// 생성자 호출
		HelloBean helloBean2 = (HelloBean)ctx.getBean("helloBean2");
		helloBean2.sayHello();

		HelloBean helloBean3 = (HelloBean)ctx.getBean("helloBean3");
		helloBean3.sayHello();

		ctx.close();
	}

}

사용자정의 객체로 초기화될때
BoardTO
package com.exam.spring07;

public class BoardTO {
	public BoardTO() {
		// TODO Auto-generated constructor stub
		System.out.println("BoardTO() 호출");
	}
}
BoardTO를 사용하는 WriteAction 클래스
package com.exam.spring07;

public class WriteAction {
	private BoardTO to;

	public WriteAction() {
		System.out.println("WriteAction() 호출");
		this.to = new BoardTO();
	}

	public WriteAction(BoardTO to) {
		System.out.println("WriteAction(BoardTO to) 호출");
		this.to = to;
	}

	public void execute() {
		System.out.println("execute() 호출 : " + to);
	}

}
execute를 실행하는 App 클래스
package com.exam.spring07;

public class App {

	public static void main(String[] args) {
		// TODO Auto-generated method stub
		WriteAction writeAction1 = new WriteAction();
		writeAction1.execute();

		// WriteAction(BoardTO to) 호출하는 법
		BoardTO to = new BoardTO();
		WriteAction writeAction2 = new WriteAction(to);
		writeAction2.execute();
	}

}

spring화 시키기
context.xml
<?xml version="1.0" encoding= "UTF-8"?>
<beans xmlns="http://www.springframework.org/schema/beans"
	xmlns:xsi="http://www.w3.org/2001/XMLSchema-instance"
	xsi:schemaLocation="http://www.springframework.org/schema/beans http://www.springframework.org/schema/beans/spring-beans-4.3.xsd">

	<bean name="writeAction1" class="com.exam.spring07.WriteAction" scope="prototype" />

</beans>
App2 클래스
package com.exam.spring07;
import org.springframework.context.support.GenericXmlApplicationContext;
public class App2 {
public static void main(String[] args) {
// TODO Auto-generated method stub
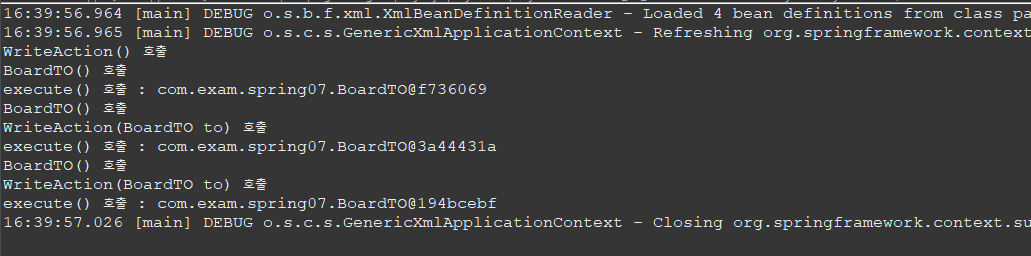
GenericXmlApplicationContext ctx = new GenericXmlApplicationContext("classpath:com/exam/spring07/context.xml");
WriteAction writeAction1 = (WriteAction)ctx.getBean("writeAction1");
writeAction1.execute();
ctx.close();
}
}

writeAction2 가져오기
context.xml
<?xml version="1.0" encoding= "UTF-8"?>
<beans xmlns="http://www.springframework.org/schema/beans"
	xmlns:xsi="http://www.w3.org/2001/XMLSchema-instance"
	xsi:schemaLocation="http://www.springframework.org/schema/beans http://www.springframework.org/schema/beans/spring-beans-4.3.xsd">

	<bean name="writeAction1" class="com.exam.spring07.WriteAction" scope="prototype" />

	<bean name="writeAction2" class="com.exam.spring07.WriteAction" scope="prototype">
		<constructor-arg>
			<bean class="com.exam.spring07.BoardTO" />
		</constructor-arg>
	</bean>

</beans>
App2클래스
package com.exam.spring07;

import org.springframework.context.support.GenericXmlApplicationContext;

public class App2 {

	public static void main(String[] args) {
		// TODO Auto-generated method stub
		GenericXmlApplicationContext ctx = new GenericXmlApplicationContext("classpath:com/exam/spring07/context.xml");

		WriteAction writeAction1 = (WriteAction)ctx.getBean("writeAction1");
		writeAction1.execute();

		WriteAction writeAction2 = (WriteAction)ctx.getBean("writeAction2");
		writeAction2.execute();


		ctx.close();
	}

}

context.xml에 to를 선언해놓고 사용하기
context.xml
<ref bean="빈이름" />

<ref>는 Spring Framework에서 다른 빈을 참조할 때 사용하는 XML 태그.
<ref> 태그를 사용하여 빈 간의 의존성을 설정할 수 있다.

bean 속성은 참조할 대상 빈의 이름을 지정.
즉, bean 속성은 다른 빈의 이름을 가리키는 역할.
<ref> 태그를 사용하면 해당 빈이 다른 빈을 참조하도록 설정할 수 있다.
<?xml version="1.0" encoding= "UTF-8"?>
<beans xmlns="http://www.springframework.org/schema/beans"
xmlns:xsi="http://www.w3.org/2001/XMLSchema-instance"
xsi:schemaLocation="http://www.springframework.org/schema/beans http://www.springframework.org/schema/beans/spring-beans-4.3.xsd">
<bean name="writeAction1" class="com.exam.spring07.WriteAction" scope="prototype" />
<bean name="writeAction2" class="com.exam.spring07.WriteAction" scope="prototype">
<constructor-arg>
<!-- to를 내부에서 임시적으로 한 번만 사용 / 생성할때마다 새로운 것이 생성-->
<bean class="com.exam.spring07.BoardTO" />
</constructor-arg>
</bean>
<!-- to를 선언하기 / 임시적으로 사용하는 것이 아닌 기존에 선언된 것을 재사용 하는 것 -->
<bean name="to" class="com.exam.spring07.BoardTO" scope="prototype"/>
<bean name="writeAction3" class="com.exam.spring07.WriteAction" scope="prototype">
<!-- to라는 이름으로 선언된 BoardTO 빈을 참조하여 WriteAction의 생성자에 전달 -->
<constructor-arg>
<ref bean="to" />
</constructor-arg>
</bean>
</beans>App2 클래스
package com.exam.spring07;

import org.springframework.context.support.GenericXmlApplicationContext;

public class App2 {

	public static void main(String[] args) {
		// TODO Auto-generated method stub
		GenericXmlApplicationContext ctx = new GenericXmlApplicationContext("classpath:com/exam/spring07/context.xml");

		WriteAction writeAction1 = (WriteAction)ctx.getBean("writeAction1");
		writeAction1.execute();

		WriteAction writeAction2 = (WriteAction)ctx.getBean("writeAction2");
		writeAction2.execute();

        // 출력값은 writeAction2와 같지만 주소값은 다른 것을 볼 수 있다.
		WriteAction writeAction3 = (WriteAction)ctx.getBean("writeAction3");
		writeAction3.execute();


		ctx.close();
	}

}
빈 참조하여 출력하기
context.xml
<?xml version="1.0" encoding= "UTF-8"?>
<beans xmlns="http://www.springframework.org/schema/beans"
	xmlns:xsi="http://www.w3.org/2001/XMLSchema-instance"
	xsi:schemaLocation="http://www.springframework.org/schema/beans http://www.springframework.org/schema/beans/spring-beans-4.3.xsd">

	<bean name="to" class="com.exam.spring08.BoardTO" scope="prototype">
		<constructor-arg value="1" />
		<constructor-arg value="제목 1" />
	</bean>

	<bean name="listAction" class="com.exam.spring08.ListAction" scope="prototype" >
		<constructor-arg>
			<ref bean="to" />
		</constructor-arg>
	</bean>
</beans>
BoardTO
package com.exam.spring08;

public class BoardTO {
	private String seq;
	private String subject;

	public BoardTO(String seq, String subject) {
		// TODO Auto-generated constructor stub
		System.out.println("BoardTO(String seq, String subject) 호출");
		this.seq = seq;
		this.subject = subject;
	}

	public String getSeq() {
		return seq;
	}

	public String getSubject() {
		return subject;
	}


}
ListAction
package com.exam.spring08;

public class ListAction {
	private BoardTO to;

	public ListAction(BoardTO to) {
		// TODO Auto-generated constructor stub
		System.out.println("ListAction(BoardTO to) 호출");
		this.to = to;
	}

	public void execute() {
		System.out.println(to.getSeq());
		System.out.println(to.getSubject());
	}
}
App
package com.exam.spring08;

import org.springframework.context.support.GenericXmlApplicationContext;

public class App {

	public static void main(String[] args) {
		// TODO Auto-generated method stub
		GenericXmlApplicationContext ctx = new GenericXmlApplicationContext("classpath:com/exam/spring08/context.xml");
		ListAction listAction1 = (ListAction)ctx.getBean("listAction");
		listAction1.execute();
	}

}

