모델의 성능평가
하나의 데이터셋에서 Training과 Test를 수행하게 되면, 그 모델은 오버피팅 이슈에 빠질 수 있다.
오버피팅
학습이 과도하게 진행 되었을 때, 학습 데이터에 대해서는 오차가 감소, 외부 데이터에 대해서는 오차가 커지는 이슈.
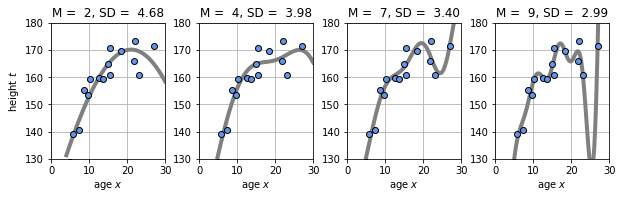
아래는 Gaussian Linear Basis를 사용하여, 학습 데이터에 대한 예측을 추정한 결과이다. 그래프가 오른쪽으로 갈 수록, 그래프가 학습 데이터를 과도하게 따라가는 것(오버피팅)을 볼 수 있다.
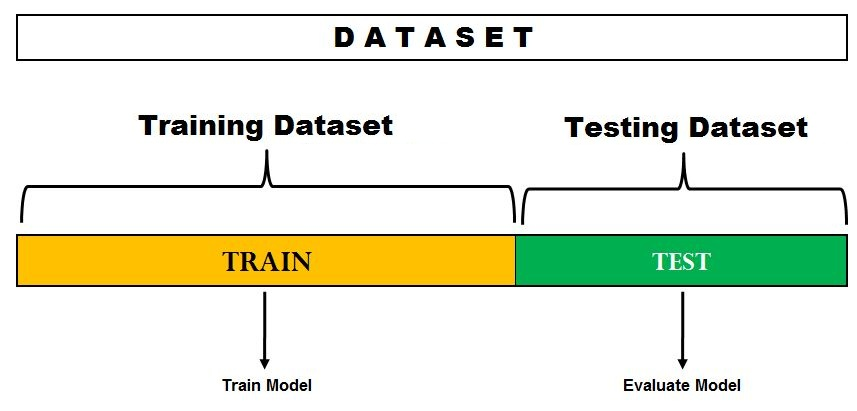
주어진 데이터셋에 오버피팅을 방지하고 모델의 성능 평가를 수행하기 위해서는, 데이터셋에 Training과 Test 데이터로 나누어 학습과 성능평가를 분리하여 수행하는 것이 권장 된다.
학습과 성능평가를 분리한다는 것은 용어가 어려울 뿐이지, 개념은 어렵지 않다.
Hold-Out Validation
Training과 Test Dataset으로 분리하여 모델의 성능평가.
Holdout은 데이터를 Traing / Test로 한번만 나누기 때문에 다른 검증 솔루션에 비해 간편하며 속도가 빠르다.

데이터셋을 임시로 생성하여, Test / Training 으로 나누어 보자.
-
sklearn에서 데이터셋을 조건에따라 Training과 Test 서브셋으로 나누는
train_test_split라이브러리를 제공한다.import numpy as np from sklearn.model_selection import train_test_split # Holdout을 위한 라이브러리 -
x와 y에
20x5Matrix의 행렬을 만들고 y(Target) 벡터 생성x, y = np.arange(100).reshape((20,5)), range(20) print(data_x) # (20*5)x = y (20*1) -
Training / Test 셋 분리
x_train, x_test, y_train, y_test = train_test_split(x, y, random_state=1,test_size=0.2) print("The size of x_train: {},".format(x_train.shape), "The size of x_test: {}".format(x_test.shape)) print("The size of y_train: {},".format(len(y_train)), "The size of y_test: {}".format(len(y_test)))test_size은 학습 / 훈련 비율을 결정한다.
-
분리 결과: Training과 Test 의 비율이 8:2로 나누어 졌다.
The size of x_train: (16, 5), The size of x_test: (4, 5)
The size of y_train: 16, The size of y_test: 4
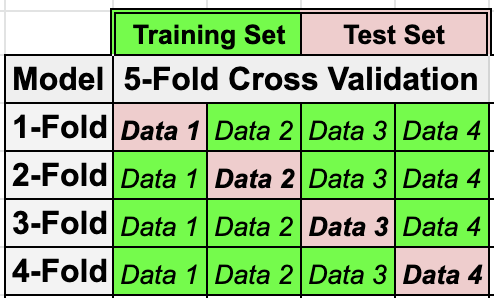
K-Fold Cross Validation
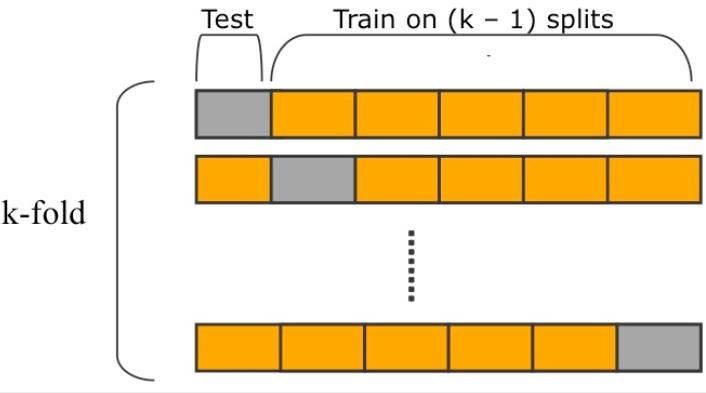
출처: ResearchGate
데이터셋을 K개 그룹으로 분리 후, K 번 Training (Dataset: K-1개 서브셋) / Test (1개 서브셋) 를 진행한다(K-Fold, 세로축 참고).
Test / Training 그룹은 모델 학습/평가를 수행할때 변경되기 때문에, Test를 위해 사용되는 데이터들도 Training에 사용될수 있다는 점이 장점이다.
K=5일때 20개의 데이터에 대해 Training / Test를 수행한다면, 다음처럼 모델의 평가가 이루어질 수 있다.

KFold를 코드로 간단히 구현해보자.
-
KFold라이브러리 호출 및 x,y 데이터 생성import numpy as np from sklearn.model_selection import KFold x = np.arange(20).reshape(10,2) y = np.arange(20,40) -
KFold 인스턴스화
# Instance Kfold object
kf = KFold(n_splits=5) # Default n_splits = 5. You can define the number of splits
kf.get_n_splits(x) # get_n_splits reutrns the number of iterator by the set number of parameters K
print(kf)
KFold(n_splits=5, random_state=None, shuffle=False) -
결과 호출
for train_index, test_index in kf.split(x): x_train, y_train = x[train_index], y[train_index] x_test, y_train = x[test_index], y[train_index] print("[x] Training Set:", train_index, "TEST Set:", test_index)n_splits에 따라, 그룹으로 나눌 K-파라미터가 정해진다. 5번을 지정했으니, 모델이 5번 생성이 되고 4(k-1)개의 그룹은 Trainig에, 1개의 그룹은 Test 셋으로 사용된다.[x] Training Set: [2 3 4 5 6 7 8 9] TEST Set: [0 1] [x] Training Set: [0 1 4 5 6 7 8 9] TEST Set: [2 3] [x] Training Set: [0 1 2 3 6 7 8 9] TEST Set: [4 5] [x] Training Set: [0 1 2 3 4 5 8 9] TEST Set: [6 7] [x] Training Set: [0 1 2 3 4 5 6 7] TEST Set: [8 9]
LOOCV, Leave One Out Cross Validation
LOOCV는 K-Fold Cross Validation과 동일 하지만, Test에서 사용되는 데이터 샘플을 1개만 사용한다. 데이터 개수가 적다면 LOOCV를 사용하여 모델의 성능평가를 수행하면 좋다.
다음과 같이 주어진 데이터셋이 4개의 데이터만을 가지고 있을 경우 일반적인 K-Fold 검증을 사용하면 할당 가능한 K 파라미터가 제한적이다.
대신, 하나의 데이터만으로 검증하는 K-Fold를 수행하게되면, 다음과 같이 4개의 K 파라미터를 사용가능하여, 모델 평가시 4번의 학습을 수행하게된다.
이를 코드로 구현하자.
-
LeaveOneOut라이브러리 호출 및 데이터 생성import numpy as np from sklearn.model_selection import LeaveOneOut x = np.array([[1,2],[6,7],[8,9],[11,14]]) y = np.array([8,10,11,14]) -
LeaveOneOut 인스턴스화 및
.get_n_splits로 분할개수 확인(K=4)loo = LeaveOneOut() loo.get_n_splits(x) -
Training / Test 로 분할된 서브셋을 확인해보자.
split 메소드는, 인덱스 정보를 포함하는 generator를 반환한다.for train_index, test_index in loo.split(x): print("----"*10) print("Train Index{},".format(train_index), "Test Index{}".format(test_index)) print("----"*10) x_train, x_test = x[train_index], x[test_index] y_train, y_test = y[train_index], y[test_index] print("X_Train: \n", x_train, "\nX_Test:", x_test, "\nY_Train:", y_train, "\nY_Test:", y_test) ---------------------------------------- Train Index[1 2 3], Test Index[0] ---------------------------------------- X_Train: [[ 6 7] [ 8 9] [11 14]] X_Test: [[1 2]] Y_Train: [10 11 14] Y_Test: [8] ---------------------------------------- Train Index[0 2 3], Test Index[1] ---------------------------------------- X_Train: [[ 1 2] [ 8 9] [11 14]] X_Test: [[6 7]] Y_Train: [ 8 11 14] Y_Test: [10] ---------------------------------------- Train Index[0 1 3], Test Index[2] ---------------------------------------- X_Train: [[ 1 2] [ 6 7] [11 14]] X_Test: [[8 9]] Y_Train: [ 8 10 14] Y_Test: [11] ---------------------------------------- Train Index[0 1 2], Test Index[3] ---------------------------------------- X_Train: [[1 2] [6 7] [8 9]] X_Test: [[11 14]] Y_Train: [ 8 10 11] Y_Test: [14]---------------------------------------- Train Index[1 2 3], Test Index[0] ---------------------------------------- X_Train: [[ 6 7] [ 8 9] [11 14]] X_Test: [[1 2]] Y_Train: [10 11 14] Y_Test: [8] ---------------------------------------- Train Index[0 2 3], Test Index[1] ---------------------------------------- X_Train: [[ 1 2] [ 8 9] [11 14]] X_Test: [[6 7]] Y_Train: [ 8 11 14] Y_Test: [10] ---------------------------------------- Train Index[0 1 3], Test Index[2] ---------------------------------------- X_Train: [[ 1 2] [ 6 7] [11 14]] X_Test: [[8 9]] Y_Train: [ 8 10 14] Y_Test: [11] ---------------------------------------- Train Index[0 1 2], Test Index[3] ---------------------------------------- X_Train: [[1 2] [6 7] [8 9]] X_Test: [[11 14]] Y_Train: [ 8 10 11] Y_Test: [14]
다음 포스팅은, LOOCV 평가 방식을 활용하여 Regression 코드에 적용 후 리뷰하도록 하자 !