서론
일전에 런칭하기 전에 내용들을 올리겠다고 했었는데
포스팅을 올려놓고 생각해보니 아닌 것 같아 런칭하고 포스팅을 하기로 하였다.
앱 소개 및 개인 회고(?)
서론의 말인 즉슨, 앱 재런칭을 완료했다.
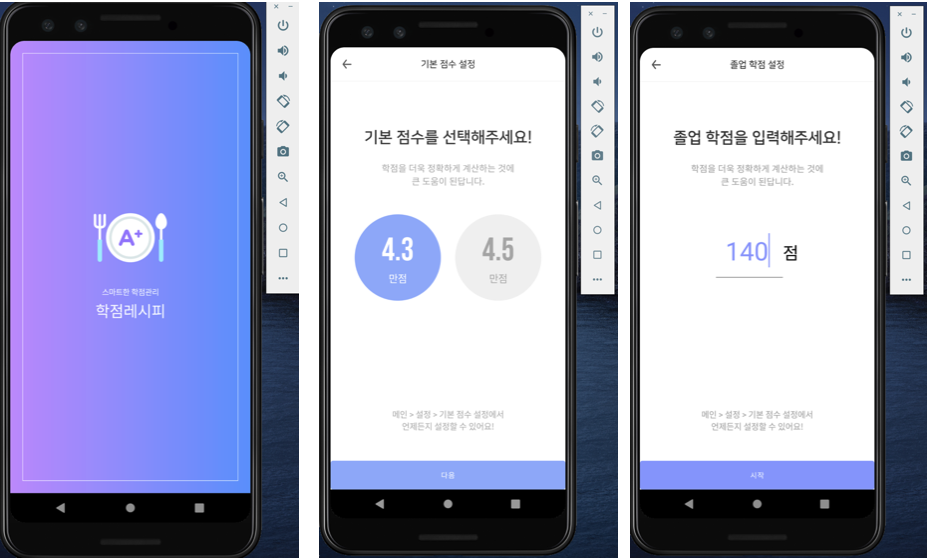
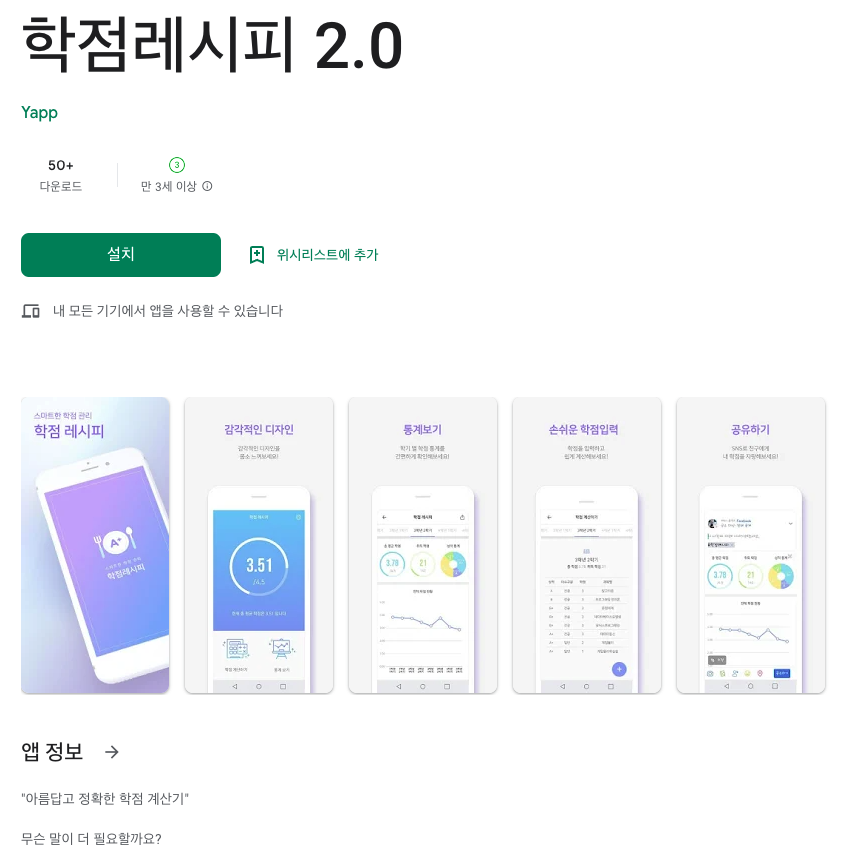
내가 리펙터링하여 재런칭한 앱은 학점 레시피 라는 아름답게 내 학점을 보여주는 어플이다.
리펙터링하면서 개선하고 싶은 게 계속 나오면서 조금 지지부진해지고 있었는데
1월 말에 코로나에 걸리면서 (...) 중간 터닝 포인트를 찍지 않으면 안되겠다는 생각이 들었다.
그래서 일부 개선 작업은 뒤로 미루고 런칭부터 완료했다.
내가 세웠던 개발 목표를 기준으로 평가 및 회고(?) 해보면 아래와 같다.
목표 1. 다각도로 Compose 사용해보기 ⭕
이 목표는 일단 성공했다. 참고로 이 프로젝트는 100% Compose 는 아니다.
다양한 시나리오 경험을 위해, 처음부터 100% Compose 생각은 없었다.
일부 화면(크롭화면, 통계 Fragment, Main 화면 전체 틀) 은
기존 View 와 혼합해 사용하는 시나리오 경험을 위해 일부만 Compose 로 전환했고
그 이외에는 전부 Compose 를 활용했어서 이에 대해 아쉬움은 없다.
목표 2. 개인적으로 공부한 클린아키텍처 적용 ⭕
멀티 모듈을 적용하는 클린 아키텍처를 적용해보았다.
data, presentation, domain, app 으로 구성했으며
로컬 DB (Room) 만 사용하기 때문에 그렇게 복잡하지는 않았다.
목표 3. DI, 테스트 코드 적용 ❌
DI 와 테스트 코드는 적용하지 못했다.
Compose 와 연계한 DI 연동 및 테스트 환경 구성을 생각했었는데 이는 아쉬움이 남는다.
초기설정
2018년에 코틀린과 친해진다고 이것저것 실험했던 것들이 많았고
일정도 조금 급했어서 빠르게 런칭하고 간간히 유지보수만 했던 앱이었다보니 코드가 난장판이었다.
일련의 예로 의존성 관리를 이야기해보면..
gradle 이나 라이브러리들도 옛날 것이었고 사용하지 않는 라이브러리도 있어
의존성 삭제, 버전 업데이트 등 정리가 필요했다.
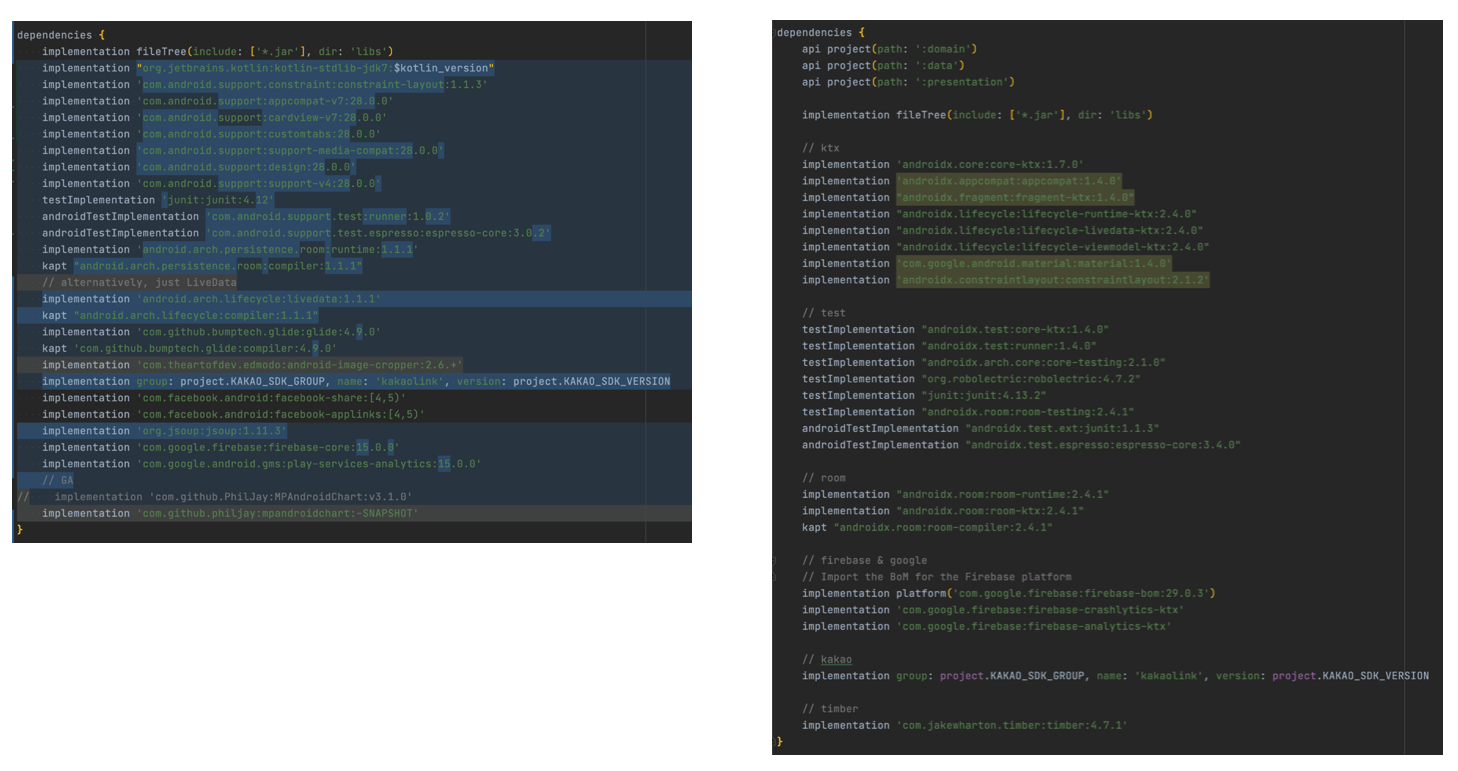
왼쪽은 과거이고, 오른쪽 것이 현재(최종)이다. 이런 식으로 gradle 부터 차근차근 정리해나갔다.
이후 코드 수정 작업도 진행했다.
Compose 를 위해 MVVM 을 써야 했기에 이에 대한 초기 base 작업도 newBase 로 따로 두어 정리했다.
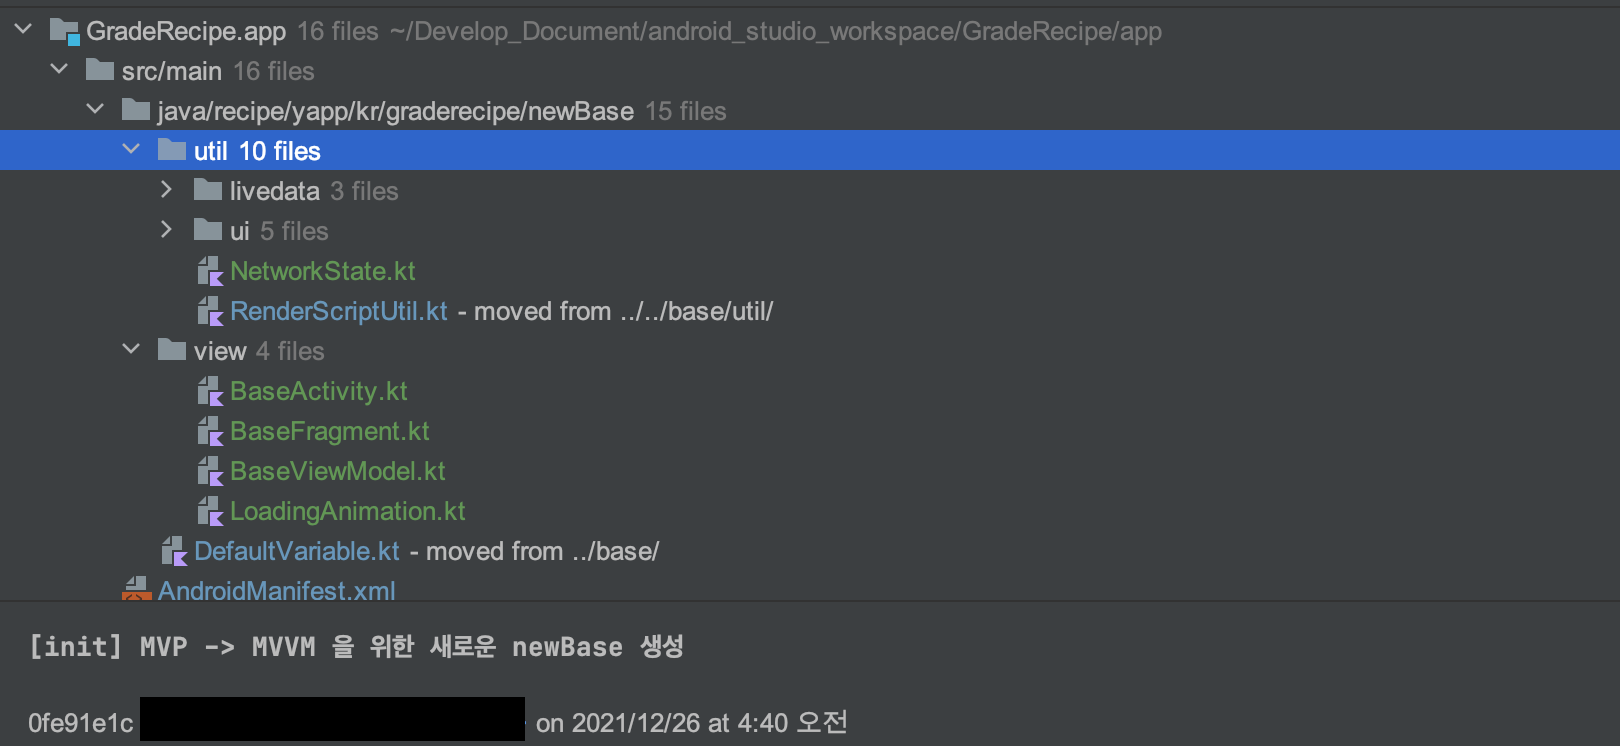
이런 식으로 기존 base 를 그대로 두고 newBase 를 따로 만들어 작업을 했다.
저 구조가 최종은 아니다. 지금은 저 패키지 구조에서도 변경 및 데이터를 추가한 상태이고
저 사진의 newBase 자체도, 지금은 이름을 base 로 바꾸고 presentation 모듈로 옮긴 상태이다.
Compose 적용 및 BaseComposeActivity 구축
이윽고 Compose 라이브러리 적용을 위한 초기 작업을 시작했다.
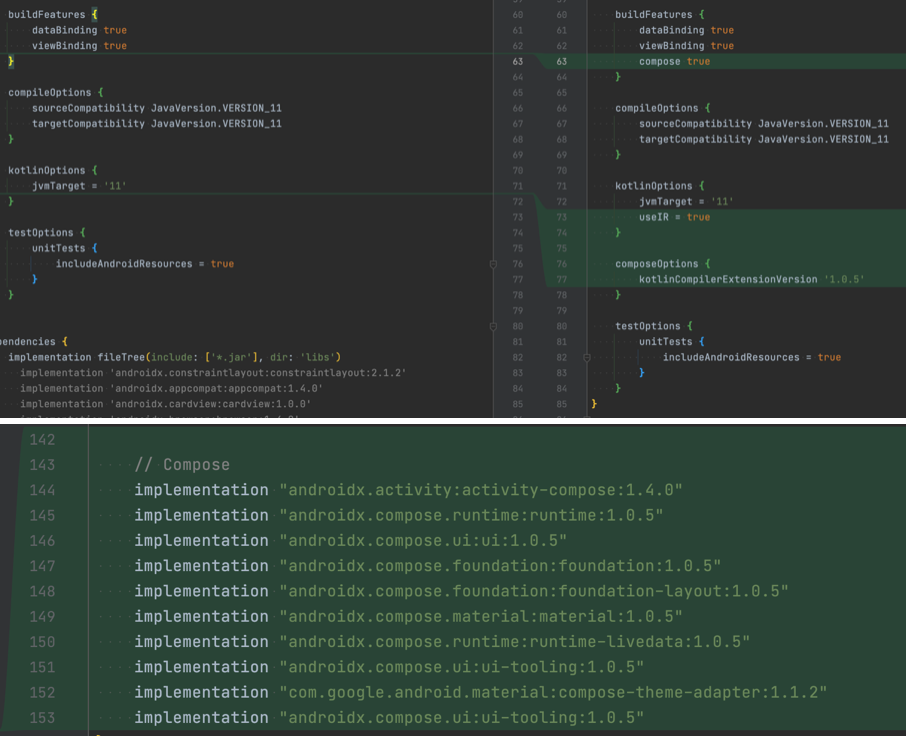
먼저 Compose 관련 gradle 설정을 해주었는데 의외로 간단했다.
buildFeatures 코드 수정, 일부 설정 추가, 라이브러리만 일부 추가하여 설정을 완료했다.
중간에 kotlin 도 1.6.0 을 못쓴다고 해서 다시 버전을 낮추기도 했다.
Compose 의존성 라이브러리의 경우 Compose Migration 코드랩 내용을 보고 가져왔다.
이윽고 Compose 를 사용하는 BaseComposeActivity 도 따로 만들게 되었다.
나머지 코드는 제외하고 핵심 코드만 언급해보려 한다.
abstract class BaseComposeActivity : AppCompatActivity() {
    abstract var composable: @Composable () -> Unit

    abstract val viewModel: BaseViewModel?

    // ...


    override fun onCreate(savedInstanceState: Bundle?) {
        super.onCreate(savedInstanceState)
        setContent { composable() }
        subscribeUI()
    }

    // ...
}
Compose 관련하여 이런 식으로 구현하였다.
subscribeUI() 는 ViewModel observe 로직을 모아둔 함수이다.
BaseComposeActivity 를 상속 받는 함수는 아래와 같이 사용하게 만들었다.
class ComposeActivity : BaseComposeActivity() {
    override var composable: @Composable () -> Unit = { ComposeView(viewModel)

    override val viewModel: ComposeViewModel by lazy {
        ViewModelProvider(this)[ComposeViewModel::class.java]
    }

    // ...
}
ComposeViewModel 은 MainViewModel 을 상속받는 클래스이며,
MVVM 의 ViewModel 로 생각하면 된다.
InitActivity 리펙터링
먼저 이 화면을 리펙터링했다.

비교적 간단한 화면이었고 이 Activity 가 스플래시 역할도 같이하고 있어 그걸 분리 작업도 같이 했다.
1. 스플래시 화면 코드 작성
먼저 Compose 연습 겸 스플래시를 분리하여 코드를 작성하였다.
여기서는 비교적 코드가 짧아 전체 코드를 언급하려 한다.
LaunchActivity.kt
아래는 최종 코드이며 패키지 및 기능 개선으로 몇 번의 commit 을 거쳐 만들어졌다.
class LaunchActivity : BaseComposeActivity() {
    override var composable: @Composable () -> Unit = { LaunchView(viewModel) }

    override val viewModel: LaunchViewModel by lazy {
        ViewModelProvider(this, viewModelFactory)[LaunchViewModel::class.java]
    }

    /** [UserRepository] 를 ViewModel 에 넘겨주어야 하여 만들게 된 [ViewModelProvider.Factory] */
    private val viewModelFactory: LaunchViewModelFactory by lazy {
        LaunchViewModelFactory(Modules.userRepository)
    }

    override fun onCreate(savedInstanceState: Bundle?) {
        super.onCreate(savedInstanceState)
        lifecycleScope.launch {
            delay(3000)
            viewModel.checkValueSaved()  // 1
        }

        // 3
        viewModel.activityAction.removeObservers(this)
        viewModel.activityAction.observe(this, {
            val intent = Intent(this, it.activityClass)
            intent.addFlags(Intent.FLAG_ACTIVITY_CLEAR_TOP)
            intent.addFlags(Intent.FLAG_ACTIVITY_SINGLE_TOP)
            intent.putExtra(Const.EXTRA_FROM_LAUNCH, true)
            startActivity(intent)
            finish()
        })
    }
    // ...
}

/** 스플래시 화면 ViewModelFactory */
class LaunchViewModelFactory(
    private val userRepository: UserRepository
) : ViewModelProvider.Factory {
    override fun <T : ViewModel> create(modelClass: Class<T>): T {
        return if (modelClass.isAssignableFrom(LaunchViewModel::class.java)) {
            LaunchViewModel(userRepository) as T
        } else {
            throw IllegalArgumentException()
        }
    }
}

// ...

// 2
sealed class ActivityAction(val activityClass: Class<out AppCompatActivity>?) {
    /** 백 버튼 액션 */
    object BackPress : ActivityAction(null)

    /** 현재 화면 종료 액션 */
    object Finish : ActivityAction(null)

    /** 액티비티 이동 액션 */
    class GoActivity(activityClass: Class<out AppCompatActivity>?) :
        ActivityAction(activityClass = activityClass)

    /** 액티비티 이동 후 이전 화면 종료 액션 */
    class GoActivityAndFinish(activityClass: Class<out AppCompatActivity>?) :
        ActivityAction(activityClass = activityClass)
}-
기본 점수를 설정했는지를 ViewModel 에서 확인(
viewModel.checkValueSaved()) 하여
설정 했을 경우 2번 로직의observe { ... }코드가 실행된다. -
Class 타입 변수를 가지는 ActivityAction sealed class 를 두어
간단한 액션만 있을 경우 BaseComposeActivity 의observe { ... }를 따르게 두었다. -
이 화면에서는 flag 를 걸어주어야 하는 액션이 있어 기존 observe 를 무효화한 후 새로 등록하였다.
LaunchView.kt
이제 Compose 로 만든 View 를 확인해보려 한다.
스플래시만 있어 비교적 간단한 작업이었다.
package ...

import androidx.compose.ui.Modifier
import androidx.compose.ui.draw.drawBehind
import androidx.compose.ui.geometry.Offset
import androidx.compose.ui.graphics.Brush
import androidx.compose.ui.graphics.Color
import androidx.compose.ui.text.font.Font
import androidx.compose.ui.text.font.FontFamily
import androidx.compose.ui.text.font.FontWeight
import recipe.yapp.kr.graderecipe.presentation.R
import kotlin.math.*

@Composable
fun LaunchView(vm: LaunchViewModel? = null) {
    Column(
        modifier = Modifier    // 1
            .fillMaxSize()
            .gradientBackground(
                listOf(
                    // 2
                    colorResource(id = R.color.launch_gradient_start_color),
                    colorResource(id = R.color.launch_gradient_end_color)
                ), 180f
            )
            .padding(20.dp),
        horizontalAlignment = Alignment.CenterHorizontally,    // 3
        verticalArrangement = Arrangement.Center               // 4
    ) {
        // 5
        Column(
            modifier = Modifier
                .fillMaxSize()
                .border(0.4.dp, colorResource(id = R.color.white)),
            horizontalAlignment = Alignment.CenterHorizontally,
            verticalArrangement = Arrangement.Center
        ) {
            Image(
                painter = painterResource(R.drawable.splash_image),
                contentDescription = stringResource(id = R.string.iv_launch_image_content_description),
            )

            Spacer(modifier = Modifier.height(40.dp))

            Text(
                text = stringResource(id = R.string.tv_launch_title),
                color = colorResource(id = R.color.white),
                letterSpacing = 0.16.sp,
                fontSize = 12.7.sp
            )

            Spacer(modifier = Modifier.height(5.dp))

            Text(
                text = stringResource(id = R.string.tv_launch_sub_title),
                color = colorResource(id = R.color.white),
                fontSize = 25.3.sp
            )
        }
    }
}

// 6
@Preview
@Composable
fun LaunchViewPreview() {
    LaunchView()
}-
Modifier라는 것을 활용해서 xml 에서 쓰던 왠만한 기능들을 적용할 수 있었다.
background,padding,border,WRAP_CONTENT,MATCH_PARENT등의 설정 등을 할 수 있었다.
gradientBackground은 내가 임의로 만든 Modifier 기반 커스텀 확장함수이다.
그라데이션 배경 적용이 필요하여 만들어 작업하였다. -
계속 보이겠지만
color,drawable,string등xml resource를 이런 패턴으로 가져올 수 있다. -
horizontalAlignment: 자식 레이아웃의 수평 gravity 설정 -
verticalArrangement: 자식 레이아웃의 수직 gravity 설정 -
orientation 이
vertical 인 LinearLayout을 생각하면 된다.
(Flutter 의Column Widget과 똑같다.)
이 중괄호 안에 언급된 Composable 들이수직 정렬된다. -
Compose 에서는 이
PreView어노테이션을 가진 Composable 를 따로 선언해주어야
xml 에서 흔히 볼 수 있었던preview 형태를 볼 수 있다.
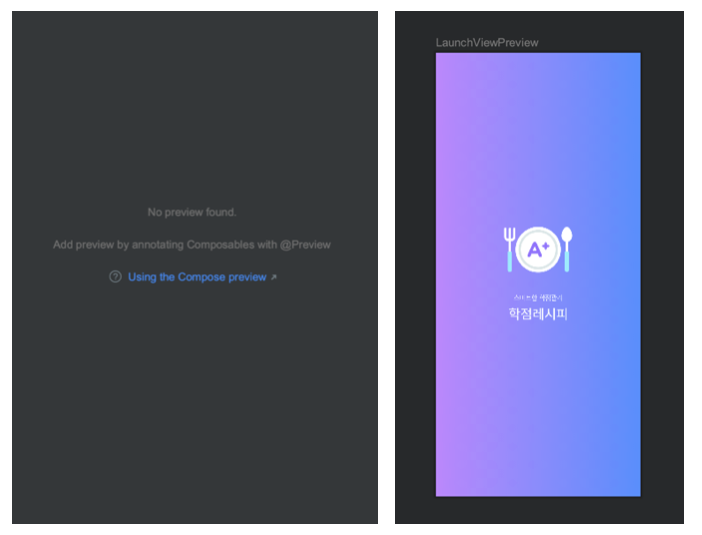
왼쪽은
___View.kt파일에서 PreView 가 없을 때 나오는 화면이며
6번과 같이 PreView 를 구현해놓은 경우 우측과 같은 화면을 볼 수 있다.
2. InitActivity 리펙터링
스플래시를 제외한 화면에서 리펙터링을 진행했다.
InitActivity.kt
대략적인 구조는 위의 LaunchActivity.kt 와 비슷하다.
InitView.kt
여기에서는 ConstraintLayout 와 비슷한 기능 활용이 필요하여 아래 라이브러리를 추가하였다.
implementation "androidx.constraintlayout:constraintlayout-compose:1.0.0-rc02"전체 코드는 아래와 같다.
// 1
private const val ll_init_bottom = "ll_init_bottom"
private const val ll_init_top = "ll_init_top"

private const val tv_init_bottom_description = "tv_init_bottom_description"

/** 기본 점수 설정 화면 View */
@Composable
fun InitView(vm: InitViewModel? = null) {
    BoxWithConstraints() {
        // 2
        val constraints = getInitConstraints()

        ConstraintLayout(constraints) {
            InitTopView(vm)
            InitBottomView(vm)
        }
    }
}

// 2
/** 기본 점수 설정 화면 View 의 ConstraintSet */
private fun getInitConstraints(): ConstraintSet {
    return ConstraintSet {
        val topLayout = createRefFor(ll_init_top)
        val bottomLayout = createRefFor(ll_init_bottom)
        constrain(bottomLayout) {
            bottom.linkTo(parent.bottom)
        }
        constrain(topLayout) { top.linkTo(parent.top) }
    }
}

// 3
/** 기본 점수 설정 화면 상단 View */
@Composable
fun InitTopView(vm: InitViewModel? = null) {
    // val scoreInfo = vm?.score?.observeAsState()
    // 6
    val enablePosition = vm?.enablePosition?.observeAsState()

    Column(
        modifier = Modifier
            .layoutId(ll_init_top)
            .fillMaxSize()
            .background(color = colorResource(id = R.color.white)),
        horizontalAlignment = Alignment.CenterHorizontally,
    ) {
        Toolbar(
            { vm?.let { BackButton(it) } },
            R.string.tv_init_toolbar_title
        )
        Spacer(modifier = Modifier.height(80.dp))
        Text(
            text = stringResource(id = R.string.tv_init_title),
            fontFamily = nanumSquareFamily,
            color = colorResource(id = R.color.inputTextColor),
            fontWeight = FontWeight.Bold,
            fontSize = 26.sp,
        )
        Spacer(modifier = Modifier.height(26.dp))
        Text(
            textAlign = TextAlign.Center,
            text = stringResource(id = R.string.tv_init_description),
            color = colorResource(id = R.color.grayTextColor),
            fontWeight = FontWeight.Normal,
            fontSize = 15.sp,
        )
        Spacer(modifier = Modifier.height(45.dp))
        Row(
            modifier = Modifier.fillMaxWidth(),
            horizontalArrangement = Arrangement.Center
        ) {
            GetScoreButton(
                vm, ScoreInfo.SCORE_4_3, enablePosition?.value == 0
            )

            Spacer(modifier = Modifier.width(24.dp))

            GetScoreButton(
                vm, ScoreInfo.SCORE_4_5, enablePosition?.value == 1
            )
        }
    }
}

// 7
/** 기본 점수 설정 화면 하단 View */
@Composable
fun InitBottomView(vm: InitViewModel? = null) {
    Column(
        modifier = Modifier.layoutId(ll_init_bottom),
        horizontalAlignment = Alignment.CenterHorizontally
    ) {
        Text(
            modifier = Modifier
                .layoutId(tv_init_bottom_description),
            text = stringResource(id = R.string.tv_init_bottom_description),
            color = colorResource(id = R.color.grayTextColor),
            textAlign = TextAlign.Center
        )
        Spacer(modifier = Modifier.height(48.dp))
        TextButton(
            modifier = Modifier
                .fillMaxWidth()
                .height(48.dp),
            onClick = { vm?.clickNextButton() },
            colors = ButtonDefaults.buttonColors(
                backgroundColor = colorResource(id = R.color.colorTheme)
            )
        ) {
            Text(
                text = stringResource(id = R.string.btn_init_next),
                color = colorResource(id = R.color.white),
                fontSize = 12.sp,
            )
        }
    }
}

// 4
/** 기본 점수 설정 화면 버튼 아이템 View */
@Composable
fun GetScoreButton(vm: InitViewModel?, scoreInfo: ScoreInfo, enabled: Boolean) = Column(
    modifier = Modifier
        .width(144.dp)
        .height(144.dp)
        .background(
            colorResource(
                id = if (enabled) R.color.colorTheme
                else R.color.grayBrightColor
            ),
            CircleShape
        )
        // 5
        .clickable(
            interactionSource = remember { MutableInteractionSource() },
            indication = null
        ) { vm?.clickScoreButton(scoreInfo) },
    horizontalAlignment = Alignment.CenterHorizontally,
    verticalArrangement = Arrangement.Center
) {
    Text(
        text = "${scoreInfo.score}",
        color = colorResource(
            id = if (enabled) R.color.white
            else R.color.grayTextColor
        ),
        fontWeight = FontWeight.Normal,
        fontFamily = bebasneueFamily,
        fontSize = 54.4.sp,
    )

    Spacer(modifier = Modifier.height(10.dp))

    Text(
        text = stringResource(id = R.string.tv_init_score_item_sub_title),
        color = colorResource(
            id = if (enabled) R.color.white
            else R.color.grayTextColor
        ),
        fontWeight = FontWeight.Normal,
        fontFamily = bebasneueFamily,
        fontSize = 16.9.sp,
    )
}

@Preview
@Composable
fun InitViewPreview() {
    InitView()
}-
레이아웃 id 를 한 곳에 모아 전역 상수 형태로 두었다.
레이아웃 id 설정 역시Modifier.layoutId(___)형태로 사용이 가능하다. -
InitTopView(
ll_init_top), InitBottomView(ll_init_bottom) 을
ConstraintSet 을 통해 연결하고, ConstraintLayout 내에 각 Composable 들을 선언하였다.
기존 kt 코드에서 ConstraintSet 을 설정하던 것과 비슷했던 것 같고, id 를 generate 해주는 작업은 없어서 편했던 것 같다.
id 위치를 이상하게 두면 어떻게 될지 (크래시가 날지, 이상하게 보여질지 등) 는 해보지 않았다.
참고로
InitTopView는 위 사진에서 빨간색,InitBottomView는 위 사진에서 녹색이다. -
상단 View 에 대한 코드이다
BackButton(백버튼) 과ToolBar(상단 ActionBar) 의 경우 구글링을 통해 커스텀하여 만들었다.
4.3, 4.5 동그라미 버튼이 동일한 기능이어서GetScoreButton으로 커스텀하였고
이는 4번 로직을 보면 확인할 수 있다. -
위에서 언급했다시피 동그라미 모양의 선택 버튼 Composable 이다.
background 의 경우 두번째 인자로 모양을 받는다.
그래서 예전과 다르게 모양 설정이 매우 쉽다.fun Modifier.background( color: Color, shape: Shape = RectangleShape )위와 같이 구현되어 있으며 이는 compose 의존성(이하 라이브러리)에서 지원해주는 함수이다.
-
clickable 설정 코드이며 ripple 등도 설정이 가능하다 (여기선 ripple 을 없앴다.)
ripple 과 더불어remember이라는 것도 있는데 이는 상태와 관련하여 중요한 내용이다.
여기서는 state 를 크게 다루는 내용이 없고 이 내용으로 한 포스트 분량이 나오기 때문에
다음 포스트에서 설명 에정이다. -
이 코드는 ViewModel 의 LiveData 를 state 형태로 변환하여 저장하고 있으면서
LiveData 내 값이 변할 시 인지하고 바뀐 상태 값을 기반으로
Composable 를 새로 그려주는 작업(이하 ReComposition) 을 할 수 있게 된다.vm?.enablePosition은 각 4.3, 4.5 동그라미 버튼 중
어떤 걸 선택했는지를 나타내는 LiveData 이며 클릭 시 버튼색을 바꿔주어야 하기에
state 형태로 변환하여 ReComposition 을 할 수 있도록 하였다.ReComposition 은 Compose LifeCycle 와도 관련이 있는데
이 내용도 State 와 연결하여 다음 포스트에서 다루려 한다. -
하단 View 에 대한 코드이다.
별다른 큰 특징은 없고 TextButton 에 onClick 을 통해 클릭 이벤트를 넣었다.
난 여기까지 해서 InitActivity 의 Compose 변환 작업을 끝냈다.
GraduationActivity 리펙터링
다음으로 이 화면을 리펙터링했다.

일부 텍스트 내용이 바뀌고, 입력 텍스트가 생긴 것 이외에는 별다른 작업이 없었다.
GraduationActivity.kt
대략적인 구조와 로직이 위의 InitActivity.kt 와 흡사하다.
GraduationView.kt
위에서 말했다시피 대략적인 구조는 InitView.kt 와 비슷했다.
TextField 부분만 언급하려 한다.
// 4
val graduationInput = vm?.graduationInput?.observeAsState()
    ?: remember { mutableStateOf("") }

...

Row(
    horizontalArrangement = Arrangement.Center,
    verticalAlignment = Alignment.CenterVertically
) {
    // 1
    Column(modifier = Modifier.width(112.dp)) {
        TextField(
            // 2
            label = null,
            // 3
            colors = TextFieldDefaults.textFieldColors(
                backgroundColor = colorResource(id = R.color.transparent),
                textColor = colorResource(id = R.color.themeTextColor),
                focusedIndicatorColor = colorResource(id = R.color.transparent),
                unfocusedIndicatorColor = colorResource(id = R.color.transparent),
                cursorColor = colorResource(id = R.color.themeTextColor),
            ),
            // 4
            value = graduationInput.value!!,
            textStyle = TextStyle(fontSize = 42.7.sp),
            // 5
            placeholder = {
                Text(
                    text = "140",
                    fontSize = 42.7.sp,
                    color = colorResource(id = R.color.inputHintColor)
                )
            },
            // 6
            onValueChange = {
                if (it.length in 0..3) vm?.inputText(it)
            },
        )
        Spacer(
            modifier = Modifier
                .fillMaxWidth()
                .height(1.dp)
                .background(color = colorResource(id = R.color.inputHintColor))
        )
    }
    Text(
        modifier = Modifier.padding(top = 6.dp),
        text = stringResource(id = R.string.tv_graduation_input_suffix),
        fontSize = 28.7.sp,
    )
}-
해당 입력 뷰는 먼저
Row을 활용해140+밑줄,점을 수평 정렬 한다.
140+밑줄은Column을 활용해 수직 정렬 한다. -
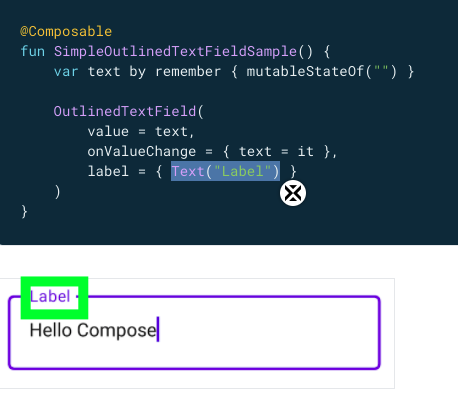
사진을 통해 이야기하는 게 좋을 것 같다. 난 label 이 필요 없어 null 로 두었다.
-
colors 를 통해 다양한 시나리오의 색을 설정할 수 있었다.
배경색,텍스트색,커서색등을 설정할 수 있었다. -
이 역시 입력된 텍스트 값을 LiveData 로 기억하고 있어서 이렇게 처리했었다.
이 코드에서remember { mutableStateOf("") }가 활용될 일은 없다.
vm 이 null 일 때, PreView 에서 일부 Composable 만 그려지는 걸 피하기 위해 추가한 코드이다. -
기존 xml 에서 hint 를 생각하면 된다.
Compose 에서는 hint 텍스트 하나의 Composable 로 처리한다. -
외부 입력 (키보드 등) 으로 텍스트가 바뀔 때의 동작을 명세하는 곳이다.
여기에서는 입력된 텍스트 값(vm?.graduationInput)을
갱신해주는 작업 (vm?.inputText()) 을 실행한다.4번에서 보다시피
vm?.graduationInput이 state 형태로 변환되어 있으므로
vm?.inputText()로 인해 값의 상태가 바뀐 것을 인지하고 Composable 를 새로 그려주게 된다.
새로 그려준다는 말이 거창해보이지만 여기서는 텍스트 값만 새로 그려준다.
마무리
여기까지 하여 초기 설정을 완료하고, 2개의 화면에 Compose 를 적용하고 리펙터링을 할 수 있었다.
여기까지 작업하면서 Compose 에 대해 느꼈던 점은
정말 Flutter 같다는 것과, 기존에 라이브러리를 활용하거나 커스텀 함수를 만들며 힘들게 한 것들을 쉽게 작업한다 는 느낌이 들었다. 그것도 Kotlin 언어를 사용해서 말이다.
신비하면서도 Compose 의 장점을 확실히 느낄 수 있었다.
하지만 Compose 도 러닝 커브가 없는 건 아니었다.
TextField 에서는 Hint 의 차이점에 대해서 쉽게 이야기했지만, 개발 처음에는 xml 과 상이하다보니 헤멘 영역이었다. 심지어 TextField 는 일부 한계점이 있는데, 이는 학점 입력 화면(InputActivity)에서 다뤄볼 예정이다.
그리고 State 또한 한 없이 어렵게 들어가면 정말 어려워지는 영역이었다.
이에 대해서도 뒤 리펙터링 포스트에서 차차 다뤄볼 예정이다.
본래 MainActivity 리펙터링을 바로 이야기하려 했으나
일전에 State 와 Composable 의 LifeCycle 이야기가 일부 나왔어서
그 내용을 먼저 정리하여 포스팅하고, 리펙터링에 대한 이야기를 다시 진행해보려 한다.