0. 순서
- 프로젝트 생성
- 라이브러리 살펴보기
- view 환경설정
- 빌드하고 실행하기
1. 프로젝트 생성
Init
- 사전 준비물
- JAVA 17 설치
- IDE : IntelliJ 또는 Eclipse 설치
- 스프링 부트 스타터 사이트로 이동해서 스프링 프로젝트 생성
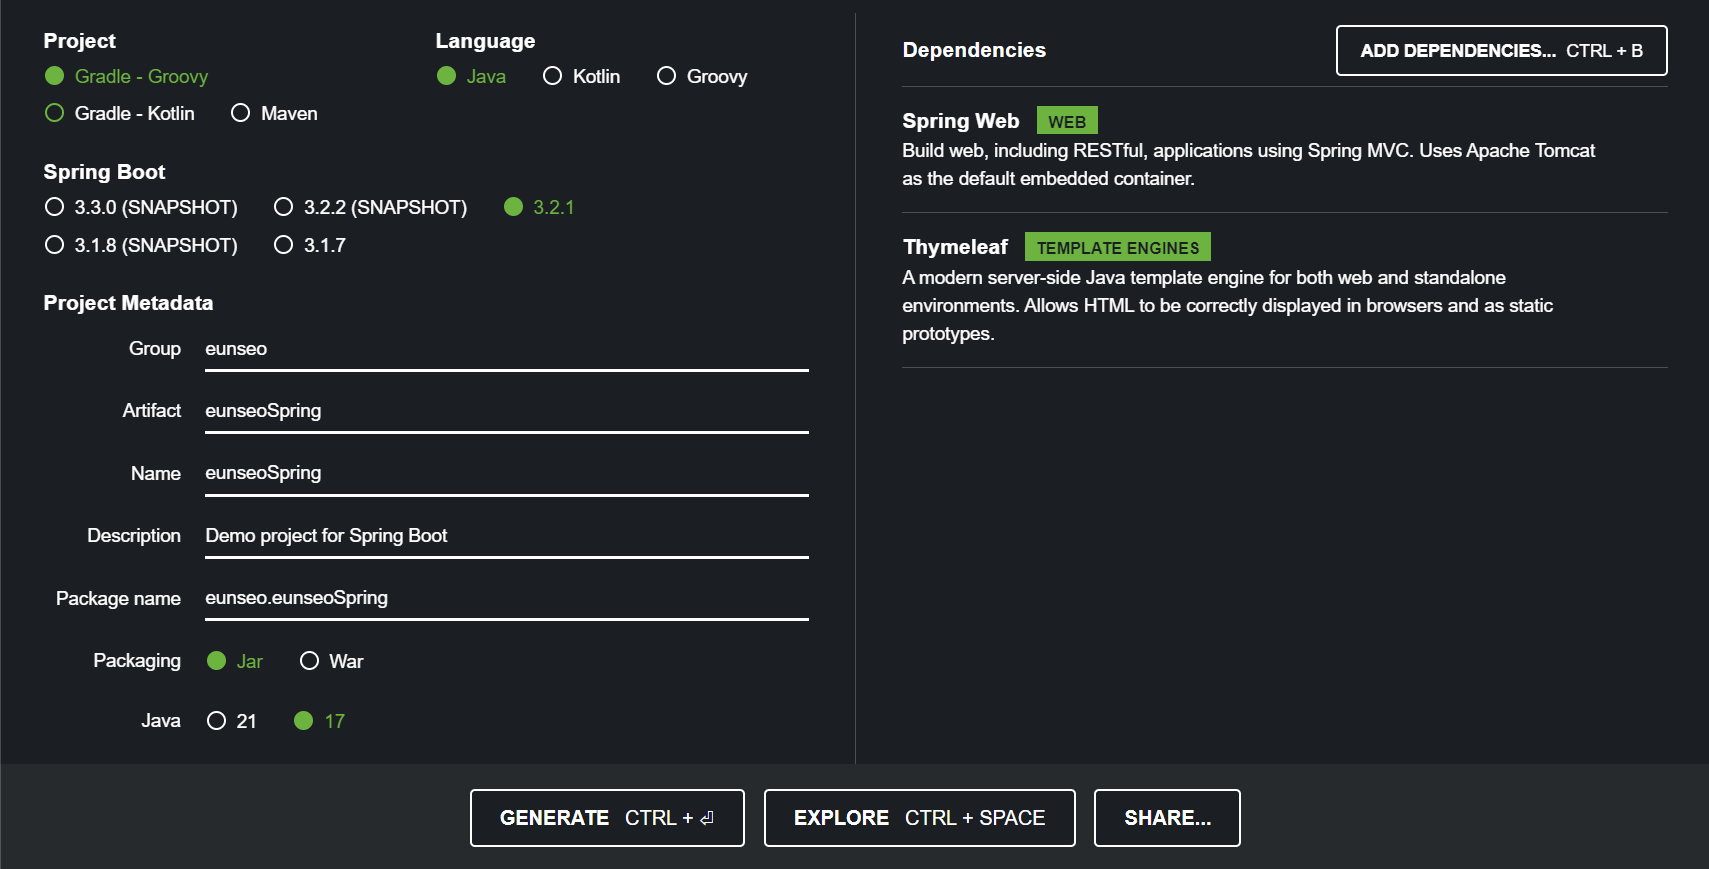
- 프로젝트 선택
- project: Gradle Project
- Spring Boot: 3.2.1
- Language : Java
- Packaging : Jar
- Java : 17
- Project Metadata
- groupId: eunseo
- artifactId: eunseoSpring
- Dependencies: Spring Web, Thymeleaf
- 프로젝트 선택
- 프로젝트 생성(generate) 후 프로젝트 폴더 압축 풀기
- IDE(intelliJ/eclipse)를 통해 폴더 open
- 폴더 하위 build.gradle open
🔔 주의할 점
프로젝트 처음 download 시 외부에서 라이브러리 약 90MB를 다운로드 받기 때문에 네트워크 연결 필수 & 로딩 시간 김
폴더 구조 및 build.gradle
eunseoSpring
├─.gradle
│ ├─8.5
│ │ ├─checksums
│ │ ├─dependencies-accessors
│ │ ├─executionHistory
│ │ ├─fileChanges
│ │ ├─fileHashes
│ │ └─vcsMetadata
│ ├─buildOutputCleanup
│ └─vcs-1
├─.idea // 인텔리제이가 사용하는 설정파일
├─gradle
│ └─wrapper
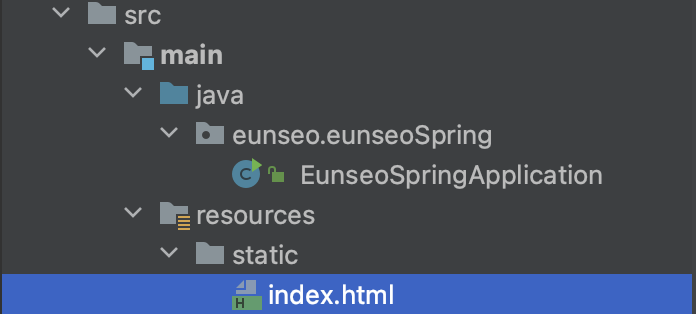
└─src
│ ├─main
│ │ ├─java
│ │ │ └─eunseo
│ │ │ └─eunseospring
│ │ │ └─eunseospringApplication.java //여기가 메인
│ │ └─resources // 자바 파일을 제외한 나머지것들
│ │ ├─static
│ │ └─templates
│ └─test
│ └─java
│ └─eunseo
│ └─eunseospring
└─ build.gradle
└─ gradlew
└─ gradlew.bat
└─ settings.gradle
└─ .gitignore // build된 결과물들 형상 관리에 올리지 X
...
외부 External Libraries 존재-
build.gradleplugins { id 'java' id 'org.springframework.boot' version '3.2.2' id 'io.spring.dependency-management' version '1.1.4' } group = 'eunseo' version = '0.0.1-SNAPSHOT' java { sourceCompatibility = '17' // 17버전 } repositories { mavenCentral() // dependencies 등에서 명시한 라이브러리들 실제 다운로드 } dependencies { implementation 'org.springframework.boot:spring-boot-starter-thymeleaf' implementation 'org.springframework.boot:spring-boot-starter-web' testImplementation 'org.springframework.boot:spring-boot-starter-test' // 테스트 관련 라이브러리 } tasks.named('test') { useJUnitPlatform() }
실제 실행
✅ 실행 전 체크
jdk 버전 및 gradle 버전이 intellig Preference 설정과 동일한 지 확인하기 이후 main 함수 존재하는 자바 파일에서 run
잘 뜬다 😁
2. 라이브러리 살펴보기
외부 라이브러리를 보면 build.gradle 파일 내 dependencies에 입력된 라이브러리 외에도 매우 많은 라이브러리가 이미 내장되어있다.
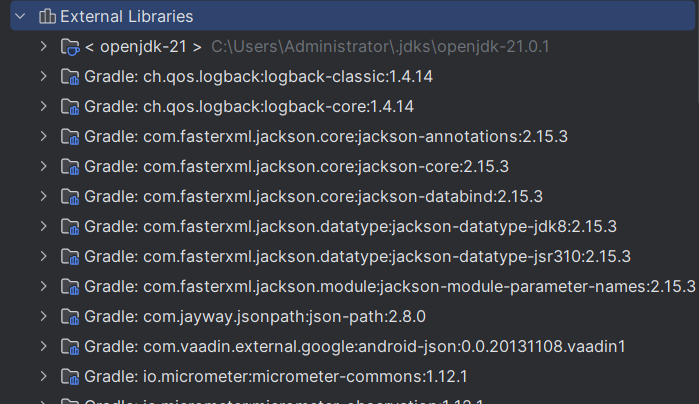
intellij 좌측 프로젝트 탭의 External Libraries들이다.
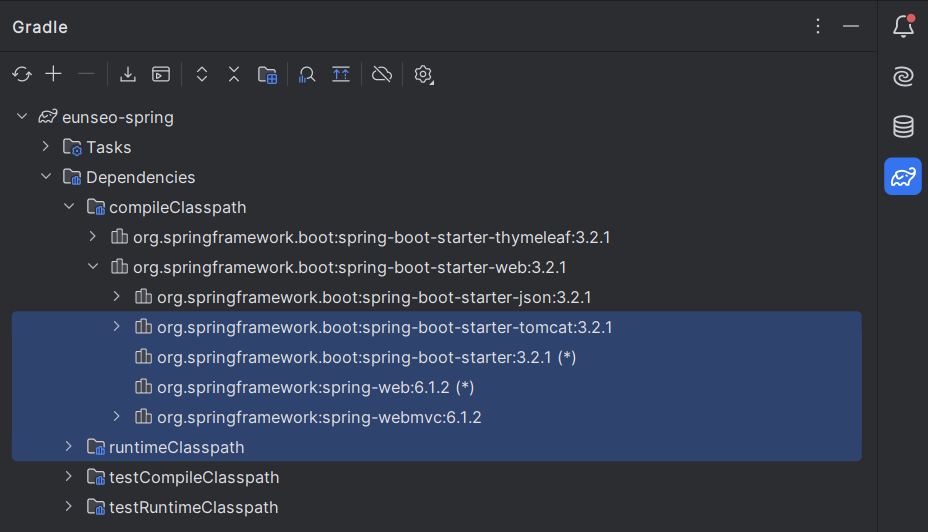
intellij 우측 gradle 탭에서도 볼 수 있다.
dependencies에 작성된 라이브러리도 의존 관계가 있는 라이브러리를 함께 다운로드하기 때문에 훨씬 많은 외부 라이브러리가 땡겨져 있다.
살펴볼만한 라이브러리
1. 스프링부트 라이브러리
- spring-boot-starter-web
- 스프링부트 스타터 사이트에서 gui로 선택했던 라이브러리
- spring-boot-start-tomcat : 톰캣 (웹서버)
- spring-webmvc : 스픵 웹 MVC
- spring-boot-starter-thymeleaf
- 스프링부트 스타터 사이트에서 gui로 선택했던 라이브러리
- 타임리프 템플릿 엔진 (View)
- spring-boot-start(공통) : 스프링 부트 + 스프링 코어 + 로깅
- spring-boot
- spring-core
- spring-boot-starter-logging
- logback, slf4j
- spring-boot
2. test 관련 라이브러리
- spring-boot-start-test
- junit : 테스트 프레임워크 (버전5)
- mockito : mock 라이브러리
- assertj : 테스트 코드를 좀 더 편하게 작성하게 도와주는 라이브러리
- spring-test: 스프링 통합 테스트 지원
3. View 환경설정
welcome 페이지 만들기
resources > statics > index.html 을 생성한다. spring docs에 따르면 스프링부트는 index.html 파일을 먼저 찾고, 발견되지 않으면 index 템플릿을 찾아보는 식으로 동작한다. 결국 index 파일은 애플리케이션의 welcome page가 된다. 보통은 html 코드만으로 정적 페이지를 구현하진 않고, 템플릿 엔진을 많이 활용한다 docs.spring 참고
🎏 template engine?
지정된 템플릿 양식과 데이터가 합쳐서 html 문서를 출력하는 sw이다. 즉, view code인 html과 data logic code인 db connection을 분리해주는 기능을 한다. 템플릿 엔진은 data를 서버쪽에서 끼울지 클라이언트쪽에서 끼울지에 따라 서버 사이드 / 클라이언트 사이드로 나뉘게 된다.ex. 서버 사이드 템플릿 종류 : JSP, Freemarker, Thymeleaf
ex. 클라이언트 사이트 템플릿 종류 : React, Vue.js템플릿 엔진을 사용하게 되면 기존 html에 비해 간단한 문법을 사용하게 되어 코드양이 줄고 재사용성을 높일 수 있다는 이점이 있다.
<!DOCTYPE html>
<html lang="en">
<head>
    <meta charset="UTF-8">
    <title>main</title>
</head>
<body>
<a href="/hello">hello1</a>
</body>
</html>
이렇게 추가하면,
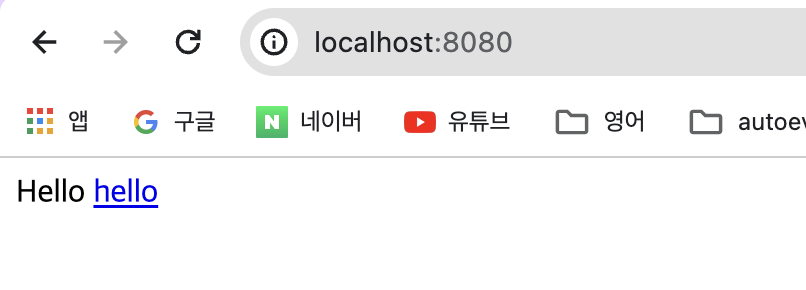
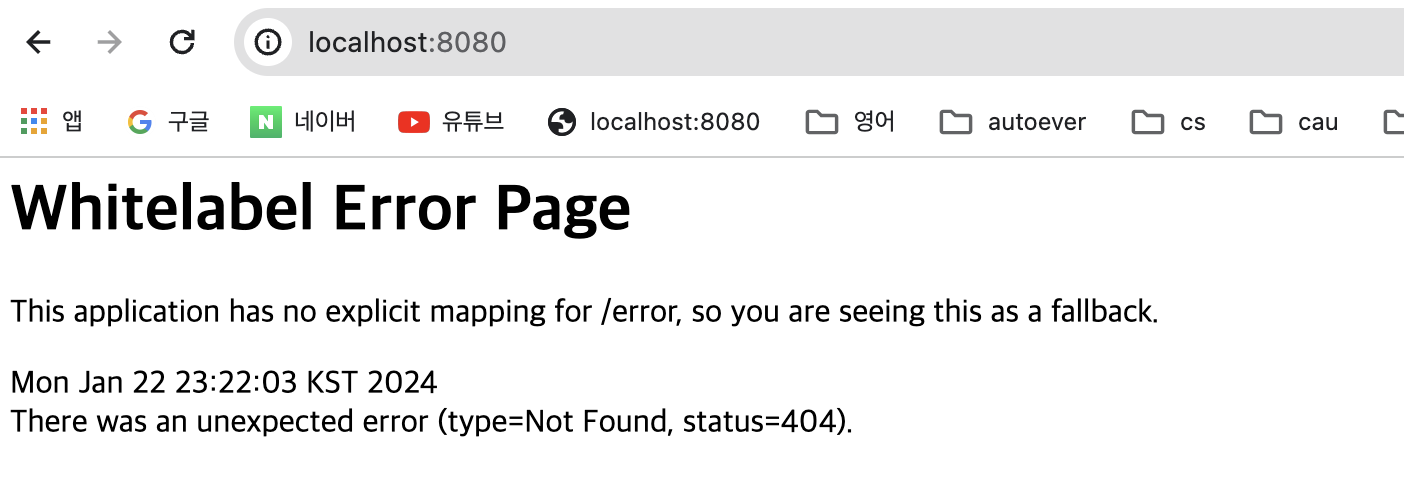
이전의 WhiteLabel Error Page가 아닌 html 파일이 잘 뜬다.
🎵 재빌드 하지 않고 정적 리소스 업데이트 하는 법
intellij에서 로컬 서버를 재시작(재빌드) 하지 않고 변경사항을 새로고침만으로 업데이트하는 방법은 아래와 같다
- build.gradle 파일 내 dependencies 항목에
complieOnly("org.springframework.boot:spring-boot-devtools")추가- File-Settings 접속 (3-5는 모두 Settings 내에서 진행)
- Build, Execution, Deployment-Compiler-Build prohect autimatibally 옵션 활성화
- Advanced Settings-Allow auto-make to start even if developed application is currently running 옵션 활성화
- Build, Execution, Deployment-Gradle-Build and run using 드롭박스에서 IntelliJ IDEA 로 변경
- Apply 후 서버 재시작 !
컨트롤러 만들기
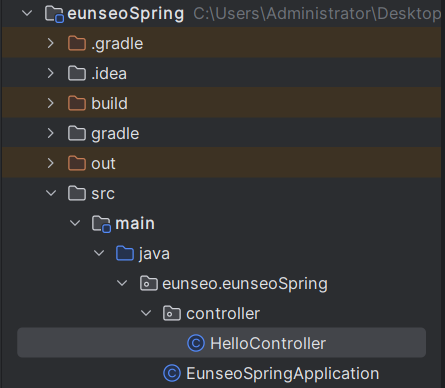
main > java > .. > controller 패키지를 생성하고 하위에 HelloController.java 파일을 생성하여 아래와 같이 작성한다
package eunseo.eunseoSpring.controller;

import org.springframework.stereotype.Controller;
import org.springframework.ui.Model;
import org.springframework.web.bind.annotation.GetMapping;

@Controller
public class HelloController {
    @GetMapping("hello")
    public String hello(Model model){
        model.addAttribute("data","hello!");
        return "hello";
    }
}
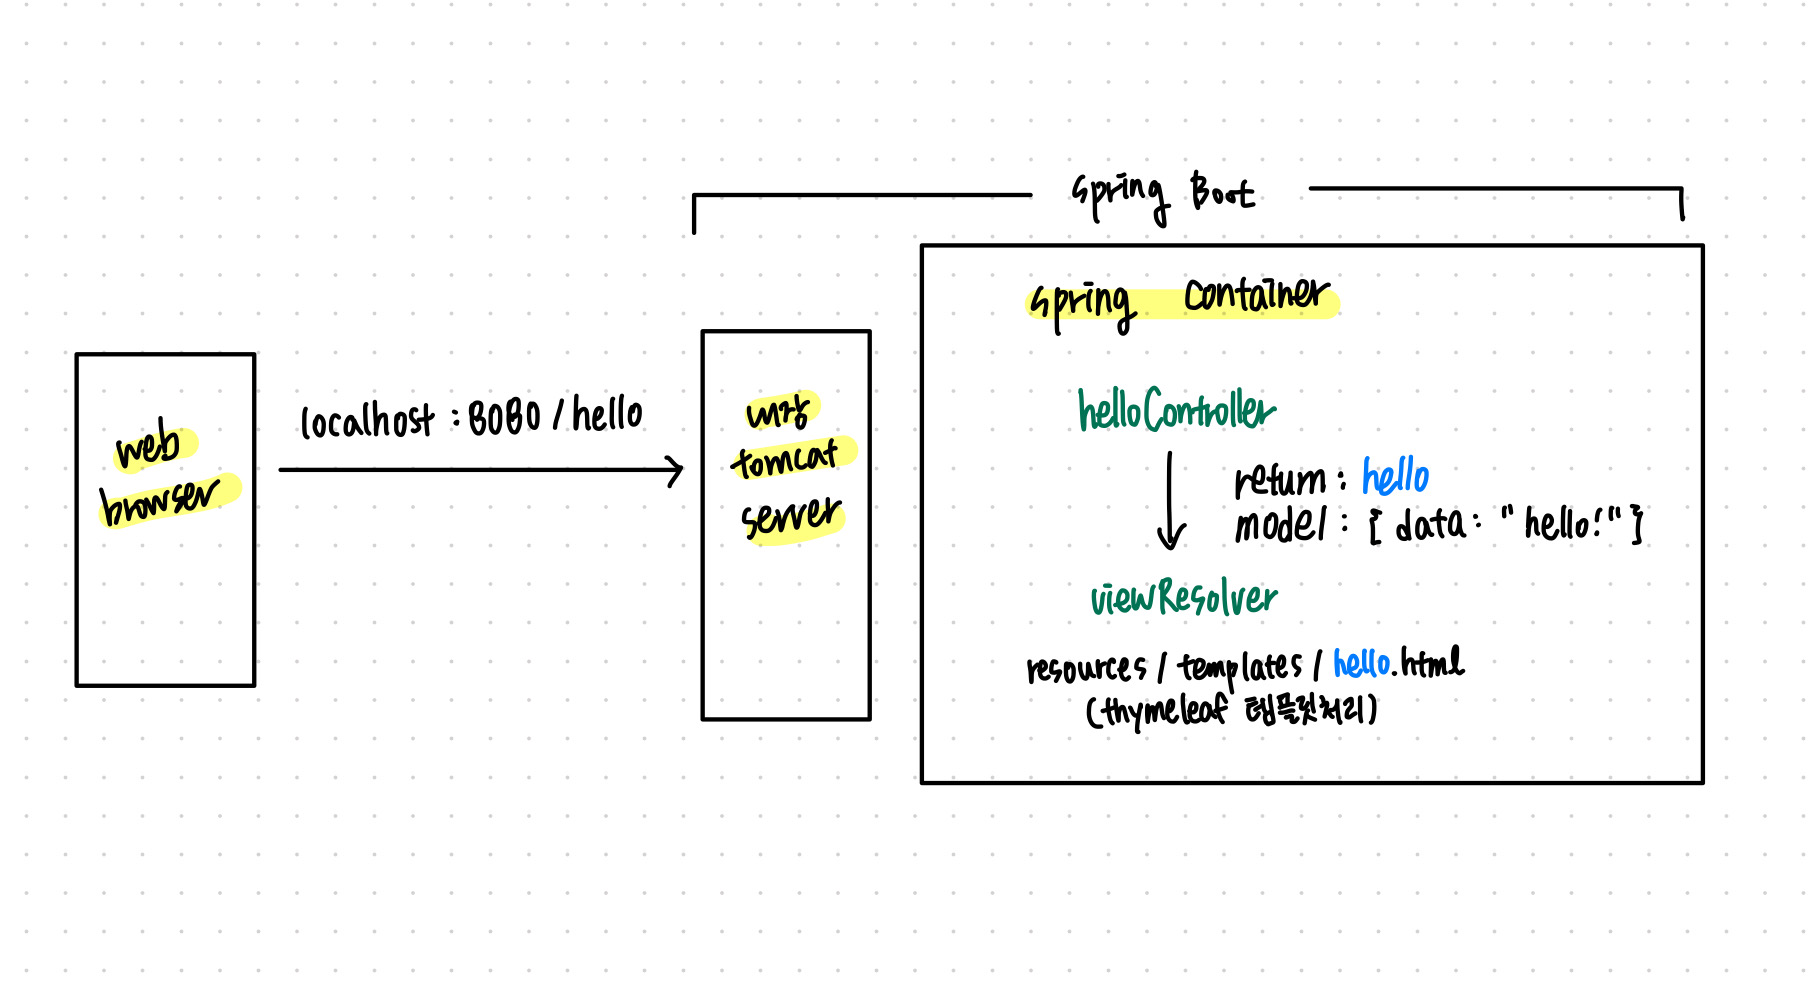
해당 과정은 위 그림에 맞춰 동작하게 된다. 컨트롤러에서 리턴 값으로 문자를 반환하게 되면 viewResolver가 반환된 문자에 대응하는 화면을 찾아 처리하게 된다. 기본적으로 resources/templates/{viewName}.html 을 바라보게 되어있다. 따라서 해당 경로에 대응하는 html이 존재해야한다.
<!--resources/templates/{viewName}.html-->

<!DOCTYPE html>
<html xmlns:th="http://www.thymeleaf.org">lang="en">
<head>
    <meta charset="UTF-8">
    <title>Title</title>
</head>
<body>
<p th:text="'안녕하세요'+${data}">안녕하세용</p>
</body>
</html>
4. 빌드하고 실행하기
IDE를 거치지 않고 어떻게 빌드할 수 있는지 추가로 알려주는 과정
해당 링크 참조