
Flutter Study 1에서는 기본적인 Flutter의 기본적인 설명과 Install에 대한 내용을 다루었다.
이번엔 총 4가지 테스트를 진행해볼까 한다.
1. Multiple FloatingActionButton
2. Image Move
3. Button Label
4. Client-Server Test using Node.js
1. Multiple FloatingActionButton
일반적인 Flutter개발 환경에서는 FloatingActionButton을 1개만 선언이 가능하다. 하지만 Stack 등을 이용하여 다중의 FloatingActionButton을 구현 가능하며, 테스트를 진행하던 도중 Scaffold 구조로 작성된 코드의 경우 정상적으로 구동이 불가능한 현상이 발생했다. 물론 FloatingActionButton Asset 외에도 RaisedButton, FlatButton, IconButton 등이 존재하지만 막연하게
"다중 FloatingActionButton을 만들 수 있는 방법은 없을까?" 라는 생각이 들었다.
What happened?
엄청난 일이 있었던건 아니다. 앞에 말했듯이 막연한 생각으로 FloatingActionButton을 하나 더 만들어보고 싶었고, Flutter에서는 FloatingActionButton은 더이상 선언이 불가능하다.
Try 1
물론 아예 방법이 없진 않았다. 아래와 같이 FloatingActionButton을 Stack으로 묶어 Align으로 나눈 다음 선언을 한다면 한 화면 내에 여러 개의 FloatingActionButton 생성이 가능하다.
Stack(
  children: <Widget>[
    Align(
      alignment: Alignment.bottomLeft,
      child: FloatingActionButton(...),
    ),
    Align(
      alignment: Alignment.bottomRight,
      child: FloatingActionButton(...),
    ),
  ],
)
Try 2
현재 코드는 Scaffold 구조로 구성되어 있어서, 아래와 같이 Stack 앞에 floatingActionButton을 선언한다.
floatingActionButton: Stack(
  children: <Widget>[
    Align(
      alignment: Alignment(Alignment.bottomRight.x, Alignment.bottomRight.y - 0.4),
      child: FloatingActionButton(
        onPressed: _incrementCounter,
        tooltip: 'Increment',
        child: Icon(Icons.arrow_upward_sharp),
      ),
    ),
    Align(
      alignment: Alignment(Alignment.bottomRight.x, Alignment.bottomRight.y - 0.2),
      child: FloatingActionButton(
        onPressed: _decrementCounter,
        tooltip: 'Decrement',
        child: Icon(Icons.arrow_downward_sharp),
      ),
    ),
    Align(
      alignment: Alignment.bottomRight,
      child: FloatingActionButton(
        onPressed: _initCounter,
        tooltip: 'Initialize',
        child: Icon(Icons.album_outlined),
      )
    )
  ],
),
Result
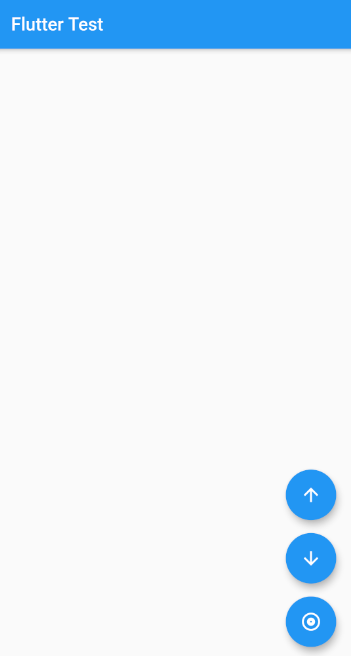
Alignment의 y값을 받아 각 버튼의 위치를 0.2, 0.4씩 변경했다.
2. Image Move
Multiple FloatingActionButton에서 여러 개의 FloatingActionButton을 통해 counter 변수의 값을 증가/감소할 수 있는 기능을 구현했다.
해당 기능을 활용하여 import된 이미지의 위치를 조정하는 기능을 구현해보자.
    return Scaffold(
      appBar: AppBar(
        title: Text(widget.title),
      ),
      body: Center(
        child: Column(
          mainAxisAlignment: MainAxisAlignment.center,
          children: <Widget>[
            Container(
              //Image.asset('assets/images/test_img.png'),
              color: Colors.blue,
              width: 200,
              height: 200,
            ),

            Text(
              'You have pushed the button this many times:',
            ),
            Text(
              '$_counter',
              style: Theme.of(context).textTheme.headline2,
            ),
          ],
        ),
      ),
이미지를 삽입하기 전 body에 테스트용 Container를 추가하여 해당 영역 안에 이미지를 배치할 예정이다.
Import Image
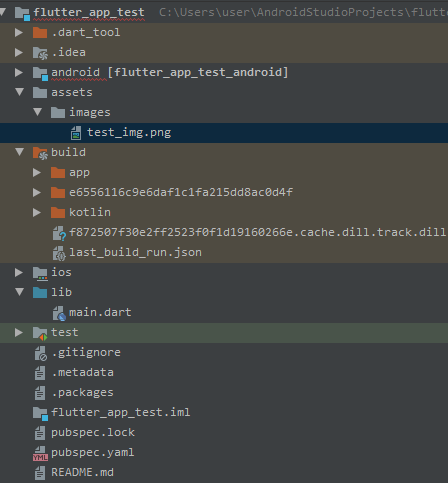
현재 프로젝트 디렉터리 구조이다. 해당 프로젝트에서 사용되는 외부 이미지와 리소스들은 모두 pubspec.yaml에 path를 꼭 작성해야한다.
flutter:
  # The following line ensures that the Material Icons font is
  # included with your application, so that you can use the icons in
  # the material Icons class.
  uses-material-design: true
  assets:
    - assets/images/test_img.png
    ...
물론 1개의 파일만 추가한다면 해당 파일의 상대 경로(assets/images/test_img.png)를 추가하면 된다. 하지만 하나의 파일이 아닌 디렉터리 단위로 추가하게 될 경우 해당 디렉터리의 상대 경로(assets/images/)를 추가하면 된다.
이 때 상대 경로의 기준점은 pubspec.yaml이다.
이렇게 외부 이미지 경로에 대한 정의를 한 뒤에 main.dart 파일로 돌아와서 해당 이미지를 출력한다.
return Scaffold(
      appBar: AppBar(
        title: Text(widget.title),
      ),
      body: Center(
        child: Column(
          mainAxisAlignment: MainAxisAlignment.center,
          children: <Widget>[
            Container(
              color: Colors.blue,
              width: 200,
              height: 200,
            ),

            Image.asset('assets/images/test_img.png'),

            Text(
              'You have pushed the button this many times:',
            ),
            Text(
              '$_counter',
              style: Theme.of(context).textTheme.headline2,
            ),
          ],
        ),
),Image.asset()은 로컬에 위치한 이미지를 출력할때 사용되고 네트워크에 위치한 이미지를 Load 해야하는 경우에는 Image.network()를 사용한다.
Image Location
현재 테스트 프로젝트는 mainAxisAlignment로 각 material들의 y축이 상대적으로 고정되어있기 때문에 이미지를 Container에 배치한 상태로 이미지의 x-Alignment Value를 변경할 예정이다.
 return Scaffold(
      appBar: AppBar(
        title: Text(widget.title),
      ),
      body: Center(
        child: Column(
          mainAxisAlignment: MainAxisAlignment.center,
          children: <Widget>[
            Container(
              child: Image.asset('assets/images/test_img.png', width:200, height:200, fit: BoxFit.fill),
              padding: EdgeInsets.only(left: 2, right: 2, bottom: 1),
              alignment: Alignment(0 - (100 - _counter)/100, 0),
            ),

            // Image.asset('assets/images/test_img.png'),

            Text(
              'You have pushed the button this many times:',
            ),
            Text(
              '$_counter',
              style: Theme.of(context).textTheme.headline2,
            ),
          ],
        ),
      ),
위와 같이 코드를 작성하였으며, 이미지 Container의 x좌표의 위치를 변경하기 위해 해당 컨테이너의 alignment를 Alignment(0 - (100 - _counter)/100, 0)로 선언하여 _counter의 값이 변경될 때 마다 이미지의 위치가 변경된다.
3. Button Label
Fluter Official Documents를 보다가 각 버튼에 label이 가능하다는 사실을 알게되었고 이 label 기능을 추가해볼까 한다.
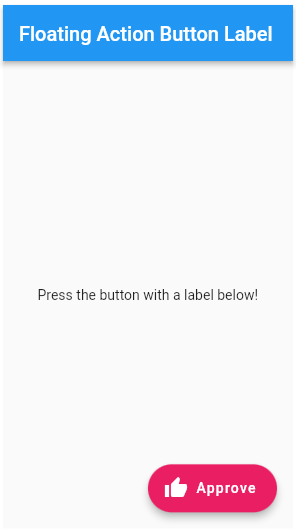
위 이미지 처럼 기존에 정의해놓은 아이콘 우측으로 label을 추가하는 방식이다.
      // Origin Code
      floatingActionButton: Stack(
        children: <Widget>[
          Align(
            alignment: Alignment(Alignment.bottomRight.x, Alignment.bottomRight.y - 0.4),
            child: FloatingActionButton(
              onPressed: _incrementCounter,
              tooltip: 'Increment',
              child: Icon(Icons.arrow_upward_sharp),
              backgroundColor: Colors.indigo,
            ),
          ),
기존 FloatingActionButton에 바로 label속성을 추가하게 되면 child에 종속되어있는 Icon속성과 정상적으로 매칭되지 않아 아래와 같은 오류가 발생한다.
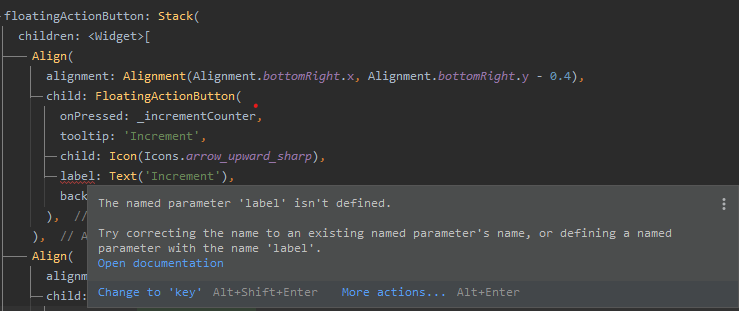
일반적인 버튼에 Label속성을 추가하기 위해서는 FloatingActionButton의 extended 메소드를 활용해야한다.
floatingActionButton: Stack(
children: <Widget>[
Align(
alignment: Alignment(Alignment.bottomRight.x, Alignment.bottomRight.y - 0.4),
child: FloatingActionButton.extended(
onPressed: _incrementCounter,
tooltip: 'Increment',
icon: Icon(Icons.arrow_upward_sharp),
label: Text('Increment'),
backgroundColor: Colors.indigo,
),
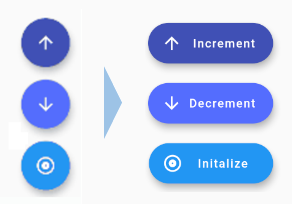
),FloatingActionButton.extended 하위에 icon과 label을 새롭게 선언하여 조금 더 직관적인 UI를 만들 수 있다.
4. Client-Server Test using Node.js
간단하게 Flutter 앱 내에서 Node.js 서버와 통신을 진행해보려 한다.
일단 Node.js 서버는 요청에 대한 응답만 넘겨주는 정도로 간단하게 구현한다.
Server(Node.js)
const http = require("http");

let fs = require('fs');
let bodyParser = require('body-parser');
// DB Start
const sqlite3 = require('sqlite3').verbose();
let sql = `SELECT * FROM user`;

let db = new sqlite3.Database('./app/database.db', (err) => {
        if (err) {
                return console.error(err.message);
        }

        console.log('Connected to the in local SQLite database.');
        db.all(sql, [], (err, rows) => {
                if (err) {
                        throw err;
                }
                rows.forEach((row) => {
                        console.log(row);
                });
        });

});
// DB End

http.createServer((req, res) => {
        res.statusCode = 200;
        res.setHeader('Content-Type', 'text/plain');
        res.end('Node.js Server-Client Test');
}).listen(4004, () => {
        console.log("Server Running at localhost:4004");
});
간단하게 테스트용으로만 구현하려고 했는데, 마침 SQLite 테스트용 서버를 구축해놓은 코드가 있어서 해당 코드를 활용하여 테스트를 진행할 예정이다.
혹시나 DataBase가 필요없는 경우에는 주석 DB Start부터 DB End까지 삭제한 뒤에 진행하면 된다.
Export Module
물론 http 라이브러리가 기존에 설치되어 있다면 아무런 제약사항이 없겠지만 혹시나 http 모듈을 설치해야 한다면 pubspec.yaml -> dev_dependencies 하위에 해당 모듈의 이름과 버전을 선언하고, 커맨드창에서 flutter pub get 명령어를 입력하면 자동으로 설치된다.
Client(Flutter)
서버와 통신하기 위해서는 http 라이브러리가 필요하기 때문에 Flutter 코드 최상단에 http 라이브러리를 참조한다.
import 'package:http/http.dart';Node.js Server - flutter Client 통신은 아래와 같이 진행하였으며, 이에 대한 내용은 주석으로 번호를 표시하여 설명하겠다.
_MyHomePageState createState() => _MyHomePageState();
}
class _MyHomePageState extends State<MyHomePage> {
// Section 1
String serverResponse = '';
// Section 2
_makeGetRequest() async {
Response response = await get( _nodeCall() );
setState(() {
serverResponse = response.body;
});
}
// Section 3
String _nodeCall()
{
return 'http://10.110.31.211:4004';
}
Widget build(BuildContext context) {
return Scaffold(
appBar: AppBar(
title: Text(widget.title),
),
body: Center(
mainAxisAlignment: MainAxisAlignment.center,
children: <Widget>[
// Section 4
Text('Server Response\n', style: Theme.of(context).textTheme.headline5),
Text('[ ' + serverResponse + ' ]', style: Theme.of(context).textTheme.headline6),
Container(
child: Image.asset('assets/images/test_img.png', width:200, height:200, fit: BoxFit.fill),
padding: EdgeInsets.only(left: 2, right: 2, bottom: 1),
alignment: Alignment(0 - (100 - _counter)/100, 0),
),
Text(
'$_counter',
style: Theme.of(context).textTheme.headline2,
),
],
),
),
floatingActionButton: Stack(
children: <Widget>[
Align(
alignment: Alignment.bottomRight,
child: FloatingActionButton.extended(
// Section 5
onPressed: _makeGetRequest,
tooltip: 'Initialize',
icon: Icon(Icons.album_outlined),
label: Text(' Node.js '),
backgroundColor: Colors.blue,
)
)
],
),
);Section 1 :
String형태의serverResponse를 선언한다. 해당 변수는 최초init시에 공백으로 보여지게 되며, 이는Section 2에서 클라이언트 요청에 대한 서버의response를 표시한다.
Section 2 :async방식으로 서버에 요청한다.Section 3에서 요청된 응답을get하여response에 저장한다.
Section 3 : 지정해놓은 서버에 요청을 전달하여, 응답 내용을return한다.
Section 4 : 응답받은serverResponse를 출력한다.
Section 5 :FloatingActionButton에_makeGetRequest Function을 적용한다.
5. Reference Pages
구글링을 통해 여러 문제들을 해결했지만, 정리해놓고 필요할 때 마다 참고하면 좋을 블로그들
▶ Flutter Widget 정리 Tistory
▶ Flutter Image Properties 정리 Tistory
▶ Markdown 문법 정리 Velog