Layout
Android Size Unit
안드로이드 위젯의 크기를 지정할 때 사용되는 단위에 대한 정리
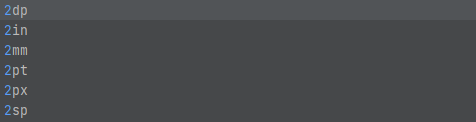
안드로이드 크기 단위에는 총 6가지(dp, in, mm, pt, px, sp)가 있다.
위젯의 크기를 설정할 때는 wrap_content, match_parent 또는 dp를 사용.
텍스트 사이즈는 sp 단위를 사용하는 것을 권고.
1. px (pixel)
실제 픽셀 수를 뜻합니다. px을 이용하면 해상도가 다른 디바이스마다 실제 크기가 다르게 보이며 심지어 이미지가 깨질 수도 있습니다.
2. dp / dip (Density Independent Pixel)
화면의 크기를 기준으로 하며, 어떠한 화면의 해상도에도 같은 비율로 출력해줍니다. px만으로 다양한 디바이스의 해상도를 지원할 수 없기 때문에 자주 쓰입니다.
3. dpi (Dots per Inch)
1인치에 들어있는 픽셀 수를 뜻하며, 안드로이드에서는 160을 기본으로 합니다.
4. sp / sip (Scale Independent Pixel)
글꼴의 단위로 자주 쓰입니다. dp와 비슷하지만 사용자가 선택한 글꼴에 따라 달라집니다.
5. in (Inch)
실제 물리적인 길이(2.54cm)입니다.
6. mm (milli meter)
네. 생각하시는 그 mm 맞습니다. 실제 물리적인 길이입니다.
7. em
글꼴과 상관 없이 동일한 텍스트의 크기를 출력합니다.
[참조] [Android Studio] 길이 단위 - dp, dpi, px, sp 의 차이점
[참조] 안드로이드 크기 단위(dp, sp, pt, px, mm, in)
LinearLayout
| Properties | Description |
|---|---|
| Orientation | horizontal, vertical 정렬 방향 설정 |
| Weight | 가중치 설정 |
Orientation(Horizontal)
<LinearLayout xmlns:android="http://schemas.android.com/apk/res/android"
    xmlns:tools="http://schemas.android.com/tools"
    android:layout_width="match_parent"
    android:layout_height="match_parent"
    tools:context=".MainActivity"
    android:orientation="horizontal">
    <TextView
        android:layout_width="match_parent"
        android:layout_height="match_parent"
        android:text="TextView1"
        android:layout_weight="1"
        android:background="#ff9966"
        android:layout_margin="5dp"
        />
    <TextView
        android:layout_width="match_parent"
        android:layout_height="match_parent"
        android:text="TextView2"
        android:layout_weight="1"
        android:background="#66ffcc"
        android:layout_margin="5dp"
        />
    <TextView
        android:layout_width="match_parent"
        android:layout_height="match_parent"
        android:text="TextView3"
        android:layout_weight="1"
        android:background="#99ff00"
        android:layout_margin="5dp"
        />
    <TextView
        android:layout_width="match_parent"
        android:layout_height="match_parent"
        android:text="TextView4"
        android:layout_weight="1"
        android:background="#cc00ff"
        android:layout_margin="5dp"
        />
</LinearLayout>
Result

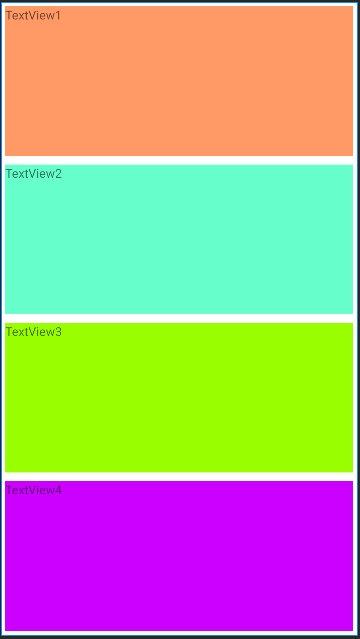
Orientation(Vertical)
<LinearLayout xmlns:android="http://schemas.android.com/apk/res/android"
    xmlns:tools="http://schemas.android.com/tools"
    android:layout_width="match_parent"
    android:layout_height="match_parent"
    tools:context=".MainActivity"
    android:orientation="vertical">
    <TextView
        android:layout_width="match_parent"
        android:layout_height="match_parent"
        android:text="TextView1"
        android:layout_weight="1"
        android:background="#ff9966"
        android:layout_margin="5dp"
        />
    <TextView
        android:layout_width="match_parent"
        android:layout_height="match_parent"
        android:text="TextView2"
        android:layout_weight="1"
        android:background="#66ffcc"
        android:layout_margin="5dp"
        />
    <TextView
        android:layout_width="match_parent"
        android:layout_height="match_parent"
        android:text="TextView3"
        android:layout_weight="1"
        android:background="#99ff00"
        android:layout_margin="5dp"
        />
    <TextView
        android:layout_width="match_parent"
        android:layout_height="match_parent"
        android:text="TextView4"
        android:layout_weight="1"
        android:background="#cc00ff"
        android:layout_margin="5dp"
        />
</LinearLayout>
Result
RelativeLayout
Target base
layout_to[location]Of="[target]":[target]의[location]지정
location: Right, Left, above, below, StartOf, EndOf
layout_align[location]="[target]":[target]의[location]기준 정렬
location: Right, Left, Top, Bottom, Baseline
View base
| Properties | Description |
|---|---|
| layout_toLeftOf | 뷰(View)를 기준 뷰(Anchor View)의 왼쪽(Left)에 배치 |
| layout_above | 뷰(View)를 기준 뷰(Anchor View)의 위(Above)에 배치 |
| layout_toRightOf | 뷰(View)를 기준 뷰(Anchor View)의 오른쪽(Right)에 배치 |
| layout_below | 뷰(View)를 기준 뷰(Anchor View)의 아래(Below)에 배치 |
| layout_toStartOf | 뷰(View)를 기준 뷰(Anchor View)의 시작(Start)에 배치 |
| layout_toEndOf | 뷰(View)를 기준 뷰(Anchor View)의 끝(End)에 배치 |
| layout_alignParentLeft | 뷰(View)를 부모(Parent) 영역 내에서 왼쪽(Left)에 배치 |
| layout_alignParentTop | 뷰(View)를 부모(Parent) 영역 내에서 위쪽(Top)에 배치 |
| layout_alignParentRight | 뷰(View)를 부모(Parent) 영역 내에서 오른쪽(Right)에 배치 |
| layout_alignParentBottom | 뷰(View)를 부모(Parent) 영역 내에서 아래쪽(Bottom)에 배치 |
| layout_centerHorizontal | 뷰(View)를 부모(Parent) 영역의 가로 방향 가운데 배치 |
| layout_centerVertical | 뷰(View)를 부모(Parent) 영역의 세로 방향 가운데 배치 |
| layout_centerInParent | 뷰(View)를 부모(Parent) 영역의 정 중앙(center)에 배치 |
| layout_alignParentStart | 뷰(View)를 부모(Parent) 영역의 시작 지점(Start)에 배치 |
| layout_alignParentEnd | 뷰(View)를 부모(Parent) 영역의 끝 지점(End)에 배치 |
| layout_alignLeft | 뷰(View)의 왼쪽(Left)을 기준 뷰(View)의 왼쪽(Left)에 맞춤 |
| layout_alignTop | 뷰(View)의 위(Top)를 기준 뷰(View)의 위(Top)에 맞춤 |
| layout_alignRight | 뷰(View)의 오른쪽(Right)를 기준 뷰(View)의 오른쪽(Right)에 맞춤 |
| layout_alignBottom | 뷰(View)의 아래(Bottom)를 기준 뷰(View)의 아래(Bottom)에 맞춤 |
| layout_alignBaseline | 뷰(View)의 폰트 기준선(Baseline)을 기준 뷰(View)의 폰트 기준선(Baseline)에 맞춤 |
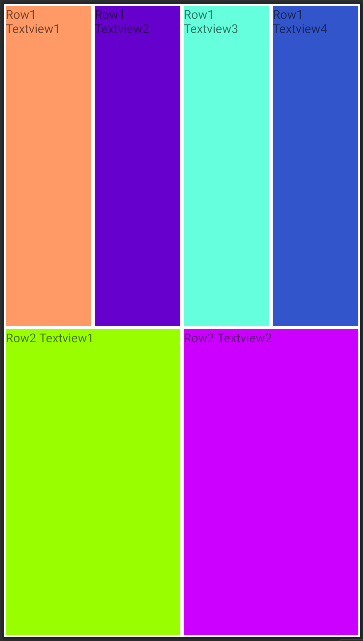
TableLayout
| Properties | Description |
|---|---|
<TableRow></TableRow> | 테이블 레이아웃의 행을 추가 |
| weight | 가중치 추가 |
| layout_span="int" | int만큼 행 병합 |
<TableLayout xmlns:android="http://schemas.android.com/apk/res/android"
    xmlns:tools="http://schemas.android.com/tools"
    android:layout_width="match_parent"
    android:layout_height="match_parent"
    tools:context=".MainActivity"
    >
    <TableRow
    android:layout_height="0dp"
    android:layout_weight="1"
    android:background="#FF0000">
    <TextView
        android:layout_width="match_parent"
        android:layout_height="match_parent"
        android:text="Row1 Textview1"
        android:layout_weight="1"
        android:background="#ff9966"
        android:layout_margin="5dp"
        />
    <TextView
        android:layout_width="match_parent"
        android:layout_height="match_parent"
        android:text="Row1 Textview2"
        android:layout_weight="1"
        android:background="#6600cc"
        android:layout_margin="5dp"
        />
    <TextView
        android:layout_width="match_parent"
        android:layout_height="match_parent"
        android:text="Row1 Textview3"
        android:layout_weight="1"
        android:background="#66ffdd"
        android:layout_margin="5dp"
        />
    <TextView
        android:layout_width="match_parent"
        android:layout_height="match_parent"
        android:text="Row1 Textview4"
        android:layout_weight="1"
        android:background="#3355cc"
        android:layout_margin="5dp"
        />
</TableRow>
    <TableRow
        android:layout_height="0dp"
        android:layout_weight="1">
        <TextView
            android:layout_width="match_parent"
            android:layout_height="match_parent"
            android:text="Row2 Textview1"
            android:layout_weight="1"
            android:background="#99ff00"
            android:layout_margin="5dp"
            />
        <TextView
            android:layout_width="match_parent"
            android:layout_height="match_parent"
            android:text="Row2 Textview2"
            android:layout_weight="1"
            android:background="#cc00ff"
            android:layout_margin="5dp"
            />
    </TableRow>
</TableLayout>
Result
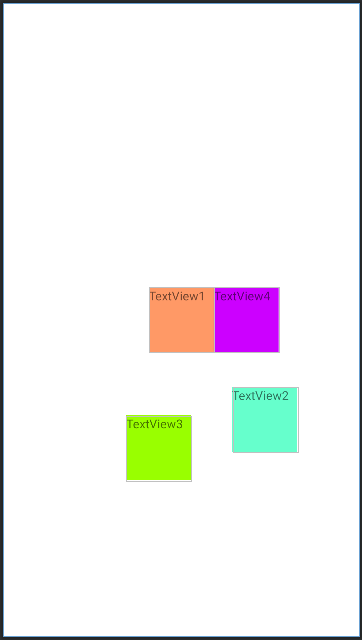
ConstraintLayout
| Properties | Description |
|---|---|
layout_constraintCircle="target" | 원을 만들 대상 |
layout_constraintCircleRadius="number" | 원의 크기 |
layout_constraintCircleAngle="radius(number)" | 원에서 위치가 될 각도 지정 |
<androidx.constraintlayout.widget.ConstraintLayout xmlns:android="http://schemas.android.com/apk/res/android"
    xmlns:tools="http://schemas.android.com/tools"
    android:layout_width="match_parent"
    android:layout_height="match_parent"
    xmlns:app="http://schemas.android.com/apk/res-auto"
    tools:context=".MainActivity">
    <TextView
        android:id="@+id/t1"
        android:layout_width="75dp"
        android:layout_height="75dp"
        android:text="TextView1"
        app:layout_constraintLeft_toLeftOf="parent"
        app:layout_constraintRight_toRightOf="parent"
        app:layout_constraintTop_toTopOf="parent"
        app:layout_constraintBottom_toBottomOf="parent"
        android:background="#ff9966"
        />
    <TextView
        android:layout_width="75dp"
        android:layout_height="75dp"
        android:text="TextView2"
        app:layout_constraintCircle="@+id/t1"
        app:layout_constraintCircleRadius="150dp"
        app:layout_constraintCircleAngle="140"
        android:background="#66ffcc"
        />
    <TextView
        android:layout_width="75dp"
        android:layout_height="75dp"
        android:text="TextView3"
        app:layout_constraintCircle="@+id/t1"
        app:layout_constraintCircleRadius="150dp"
        app:layout_constraintCircleAngle="190"
        android:background="#99ff00"
        />
    <TextView
        android:layout_width="75dp"
        android:layout_height="75dp"
        android:text="TextView4"
        app:layout_constraintLeft_toRightOf="@id/t1"
        app:layout_constraintTop_toTopOf="@id/t1"
        android:background="#cc00ff"
        />
</androidx.constraintlayout.widget.ConstraintLayout>
Result