개요
swin transformer 논문에 대하여 알아보겠습니다.
논문의 전체 이름은 Swin Transformer: Hierarchical Vision Transformer using Shifted Windows 입니다.
shifted window를 이용한다는 점과 계층적 구조를 이용한다는 것을 알 수 있습니다.
https://arxiv.org/abs/2103.14030
vision task는 다음 두가지 이유 때문에 Transformer를 적용하기 어렵다 합니다.
- 스케일의 큰 변동성
- 높은 해상도의 이미지
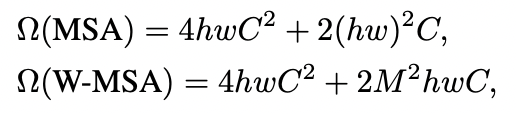
논문에서는 작은 사이즈의 패치로 나누어 깊어질수록 머징을 하는 계층구조와, 높은 해상도 때문에 생기는 quadratic computational cost 문제를 window 크기를 기준으로 줄일수 있다고 합니다. (hw -> M)
모델 구조
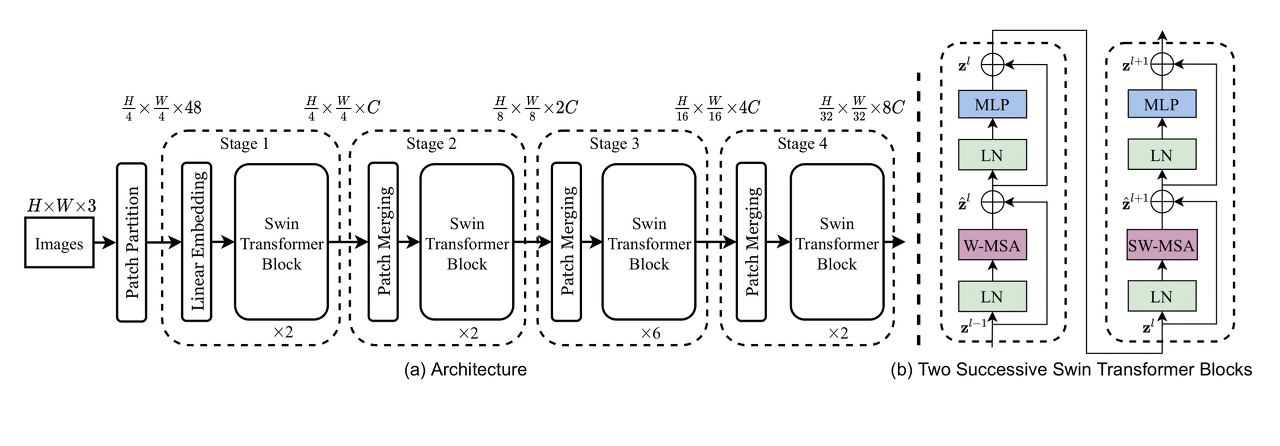
네트워크
네트워크는 위의 그림에 있는 요소들인
- Patch Partition
- Linear Embedding
- Swin Transformer Block
- Patch Merging
이 네가지를 분석 및 구현을 하며 알아 보겠습니다.
Patch Partition + Linear Embedding
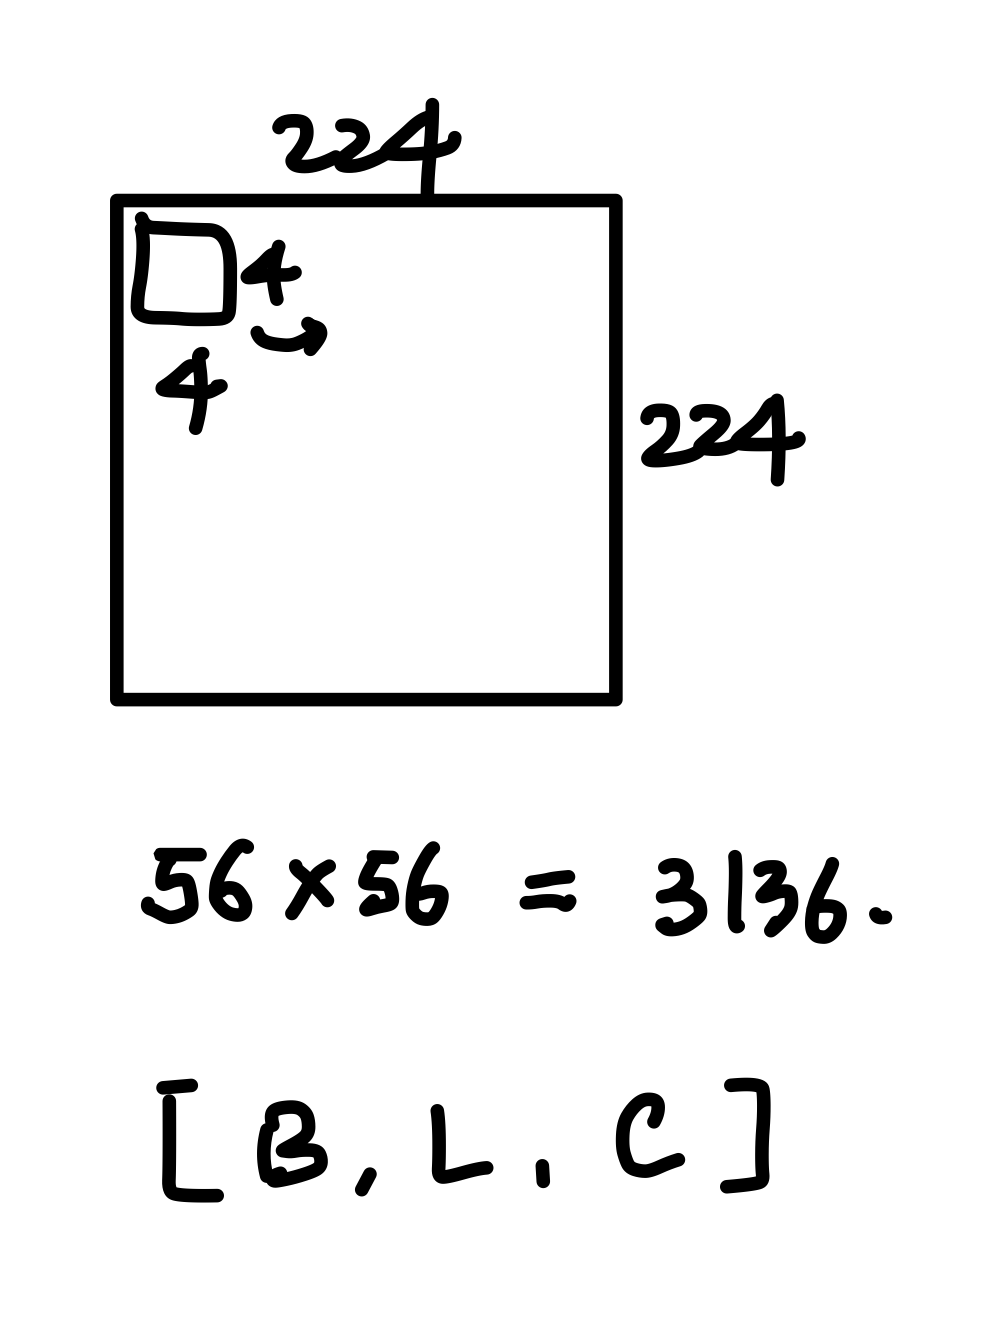
기존의 VIT는 하나의 토큰을 16 x 16 의 크기로 나누었는데, Swin Transformer는 Tiny 기준 patch를 4 x 4로 설정합니다.
그렇다면 다음 그림과 같이 sequence 의 길이는 56 x 56 = 3146이 됩니다.
코드는 다음과 같습니다.
VIT와 비슷하게 convolution의 kernel과 stride를 같게 하여 patch를 뽑습니다.
이때 convolution의 channel을 96(tiny 기준)으로 만들어 linear embedding까지 합니다.
class PatchPartition(nn.Module):
    def __init__(self,
                 patch_size: int = 4,
                 ):
        """
        this patch partition + Linear Embedding
        :param patch_size:
        """
        super().__init__()
        self.proj = nn.Conv2d(3, 96, kernel_size=patch_size, stride=patch_size)
        self.norm = nn.LayerNorm(96)

    def forward(self, x):
        x = self.proj(x)                  # [B, 96, 56, 56]
        x = x.flatten(2).transpose(1, 2)  # BCHW -> BNC
        x = self.norm(x)
        return x
Swin Transformer Block
Swin Transformer Block은 다음 두가지 attention을 이용합니다.

- W-MSA : window로 잘라서 window 내부의 sequence 끼리 attention 하는것
- SW-MSA : window를 움직여서 W-MSA 하는것
1. W-MSA
W-MSA 부분의 구현에 대하여 설명하기 위해서 논문의
Efficient batch computation for shifted configuration 챕터와 연관하여 설명해 보겠습니다.
일단 현재 우리는 Patch Partition + Linear Embedding 으로 인해
[B, 96, 56, 56] 의 크기의 텐서를 가지고 있습니다.
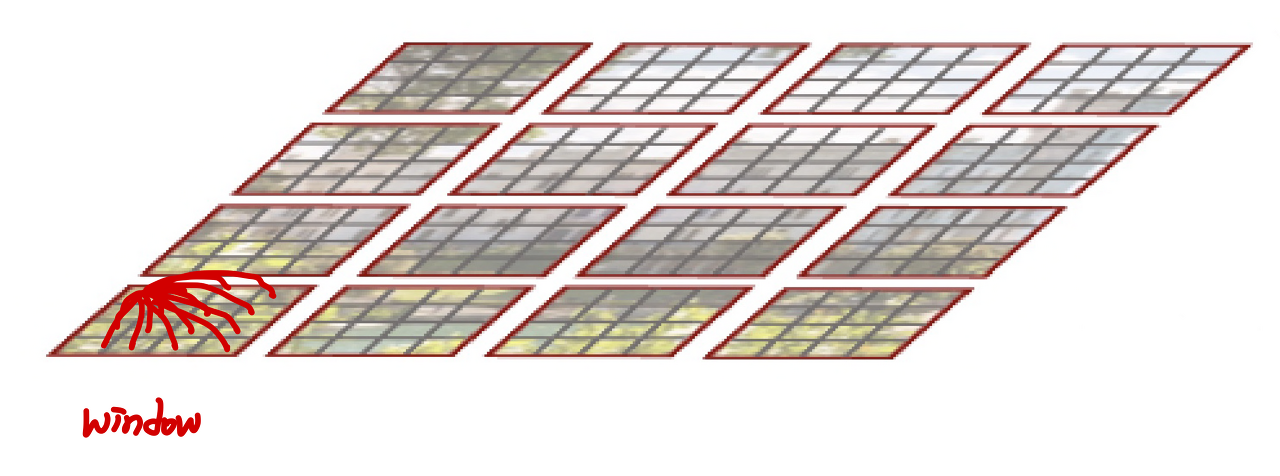
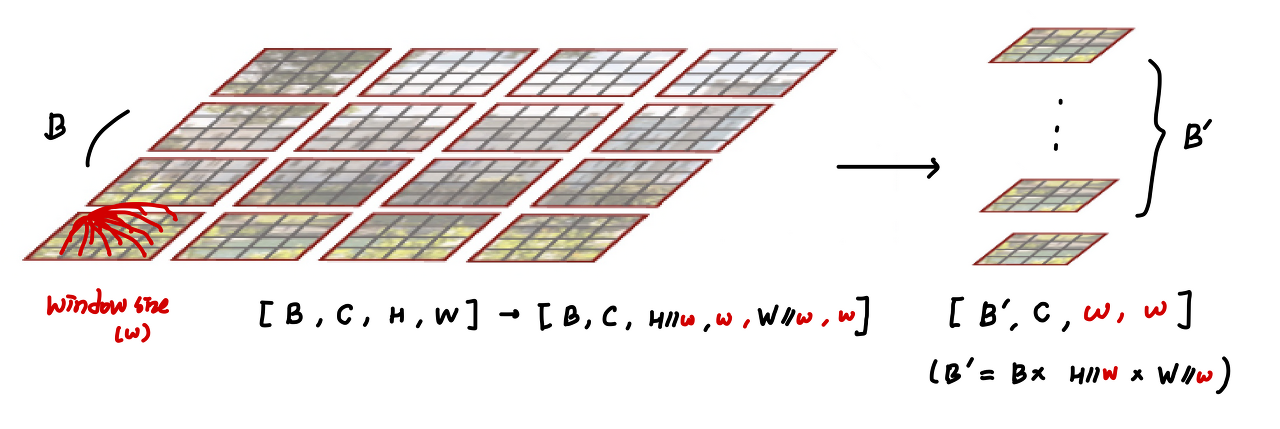
여리서 size가 7인 window로 자르면, [B, 96, 8, 7, 8, 7] 의 크기로 구분가능합니다.
여기서 7 x 7의 크기를 갖는 area를 또다른 batch로 처리를 해서 다음의 shape으로 만듭니다.
[B', 96, 7, 7] (B' = B x 8 x 8) 로 만든후 연산을 진행하고 다시 원래의 크기로 돌려줍니다.
이 방식을 Efficient batch computation 라고 하며 다음 그림으로 이해 할 수 있습니다.
W-MSA 구현은 다음과 같습니다.
(참고로 가독성을 위해 relative positional encoding 부분은 제외한 상태입니다.)
class W_MSA(nn.Module):
    def __init__(self,
                 dim, num_heads, head_dim=None, window_size=7,
                 qkv_bias=True, attn_drop=0., proj_drop=0.):

        super().__init__()
        self.dim = dim
        self.window_size = window_size
        self.num_heads = num_heads
        head_dim = head_dim or dim // num_heads
        attn_dim = head_dim * num_heads
        self.scale = head_dim ** -0.5

        self.qkv = nn.Linear(dim, attn_dim * 3, bias=qkv_bias)
        self.attn_drop = nn.Dropout(attn_drop)
        self.proj = nn.Linear(attn_dim, dim)
        self.proj_drop = nn.Dropout(proj_drop)
        self.softmax = nn.Softmax(dim=-1)

    def forward(self, x):
        # setting
        B, L, C = x.shape
        ws = self.window_size
        w = h = int(math.sqrt(L))
        h_ = int(h // ws)
        w_ = int(w // ws)

        # [B, 3136, C]
        # ----------- efficient batch computation for shifted configuration -----------
        x = x.view(B, h, w, C)                        # [B, H, W, C]
        x = x.view(B, h_, ws, w_, ws, C)              # [0, 1, 2, 3, 4, 5 ] -> [0, 1, 3, 2, 4, 5 ] - idx
        x = x.permute(0, 1, 3, 2, 4, 5).contiguous()  # [B, 8, 7, 8, 7, 96] -> [B, 8, 8, 7, 7, 96]
        x = x.view(B * h_ * w_, ws * ws, C)           # [B' = B x 8 x 8],   -> [B'         49, 96]

        # ------------------------------ attention ------------------------------
        B_, N, C = x.shape                            # [B_, 49, 96]
        qkv = self.qkv(x).reshape(B_, N, 3, self.num_heads, -1).permute(2, 0, 3, 1, 4)
        q, k, v = qkv.unbind(0)

        q = q * self.scale
        attn = (q @ k.transpose(-2, -1))

        attn = self.softmax(attn)
        attn = self.attn_drop(attn)

        x = (attn @ v).transpose(1, 2).reshape(B_, N, -1)
        x = self.proj(x)
        x = self.proj_drop(x)                                                           # [B_, 49, 96]

        # ---------- make multi-batch tensor original batch tensor ----------v
        x = x.view(B, h_, w_, ws, ws, C)              # [B, 8, 8, 7, 7, 96]
        x = x.permute(0, 1, 3, 2, 4, 5).contiguous()  # [B, 8, 7, 8, 7, 96]
        x = x.view(B, h, w, -1)               # (roll)  [B, 56, 56, 96]
        x = x.view(B, h * w, C)                       # [B, 56, 56, 96]
        return x
2. SW-MSA
Shifted Window MSA입니다.
W-MSA만 사용한다면 window간의 interection이 줄어듭니다.
따라서 window의 위치를 변경해서 W-MSA의 window간
연결성을 늘려주는 방법을 제안합니다.
다음과 같은 그림에서 1번에서 2번으로 torch.roll 을 사용하여 변경할 수 있습니다.
논문에서는 Cyclic Shift라는 용어를 사용했습니다.
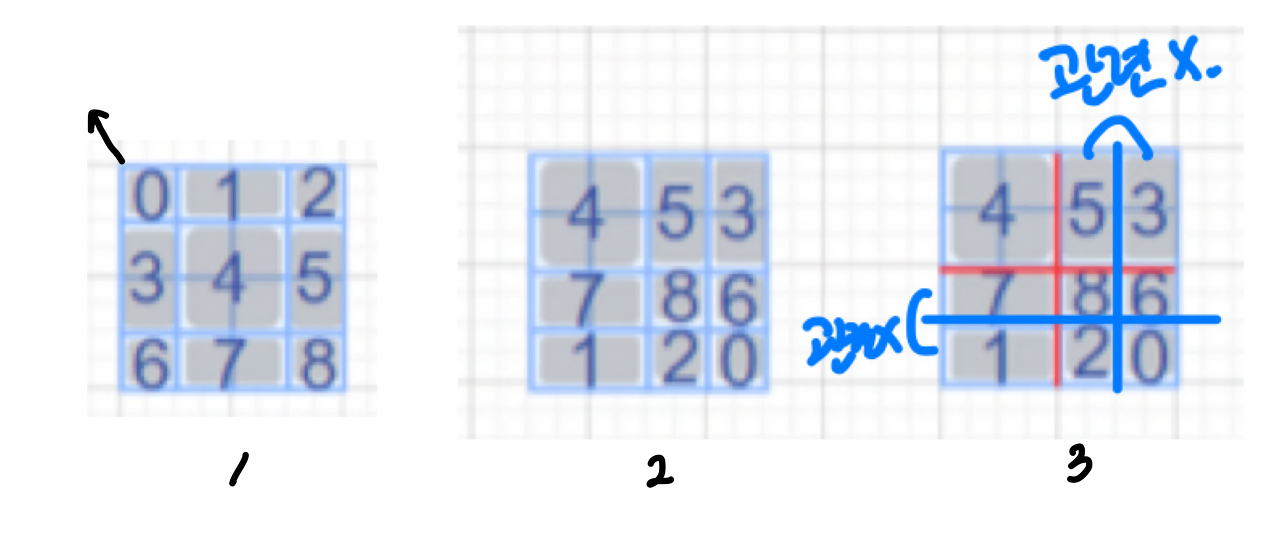
그런데 그림 3과 같이 생각을 해 보면, (5, 8) 영역은 각각 (3, 6)의 영역과 관련이 없습니다.
이미지의 입장에서 roll을 한다고 해서 그 연속성이나 연결성을 보장해주지 않기 때문입니다.
따라서 관련된 부분들만의 연산을 위해서 mask를 이용해 가려줍니다.
이를 Masked MSA라고 합니다.
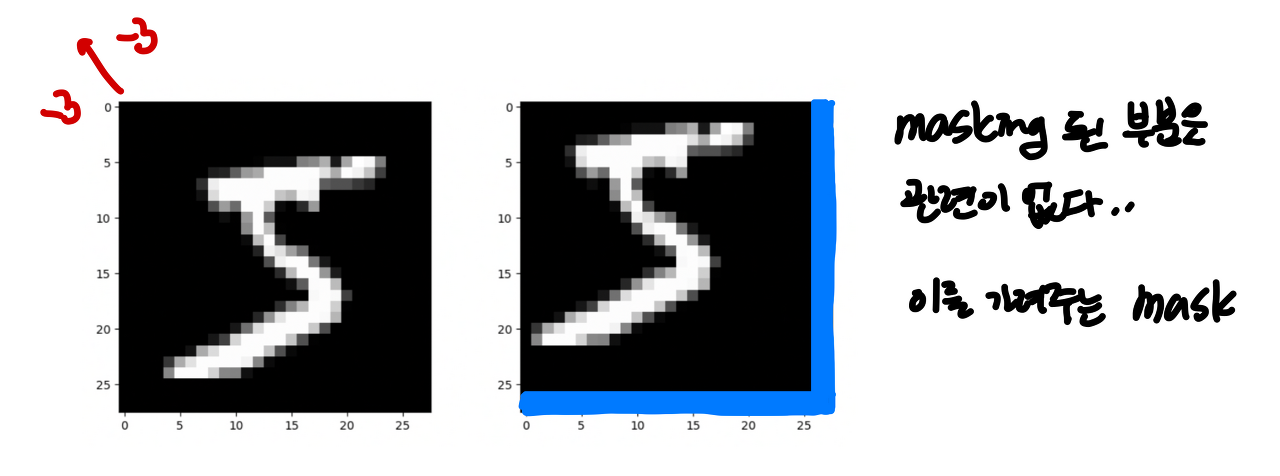
저 파런색 부분이 위에서 roll 되어온 부분이고 여기서 W-MSA를 수행하면 다음과 같습니다.
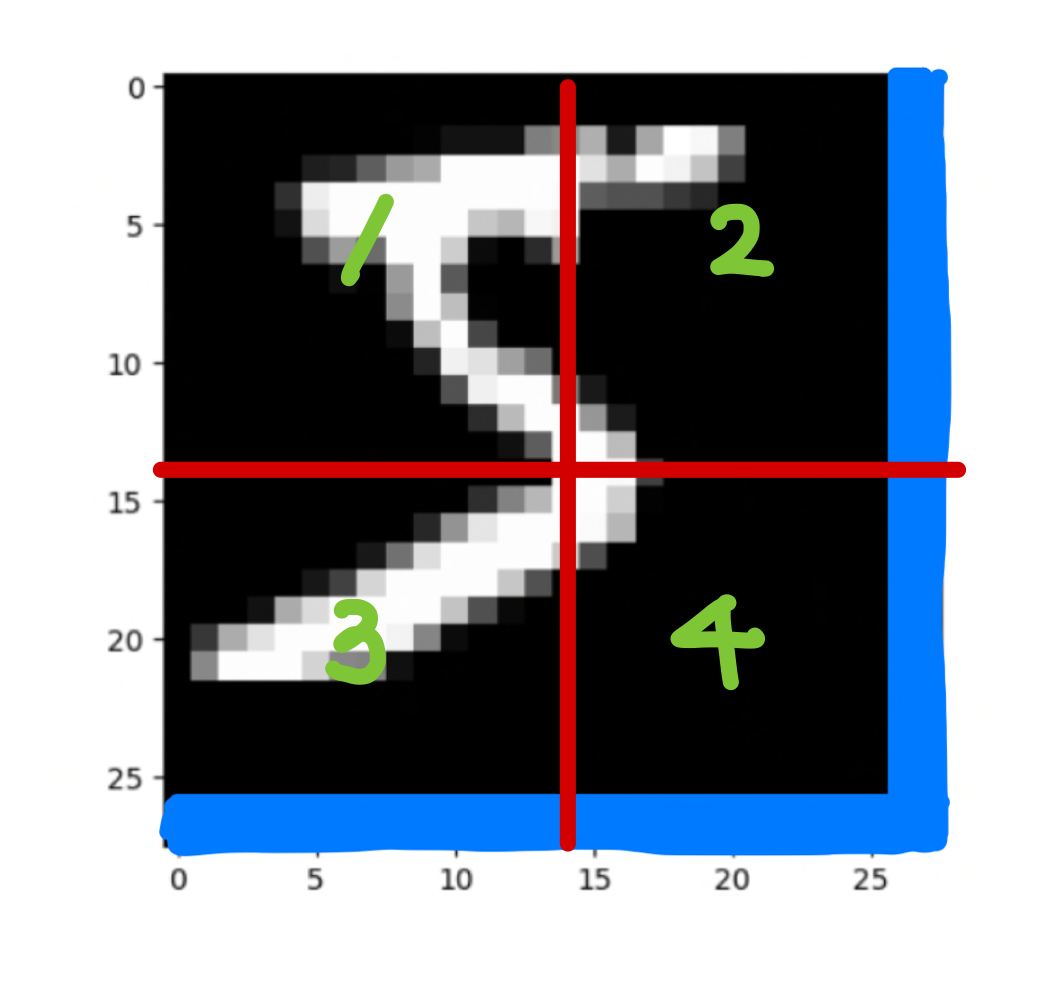
1번 영역은 sequence로 만들었을 때 영역 모두가 서로 연관된 부분이기 때문에 mask는 모두 0입니다.
2번 영역을 생각하면 이를 sequence로 폈을 때, 다음과 같습니다.

서로 연관된 부분에 대하여 masking 을 해주면 격자의 모양이 나옵니다.
3번 영역은 다음과 같은 sequence 가 되고

4번 영역은 2번과 3번의 통합된 모습이 나올것 입니다.
이에 대하여 mask들을 보면 각 영역에 대하여 다음과 같이 가려주는 부분이 생깁니다.
여기서 어두운부분이 -100, -inf 등으로 가려주는 부분이고 밝은 부분은 0으로 masking 합니다.

이렇게 W-MSA에 mask를 더해주어 attention을 하고 다시 원래자리로 돌리는 roll back을 합니다.
attention matrix에 큰 음수값을 더해주면, softmax의 특성상 그 그 부분은 매우작은 값이되어 무시됩니다.
정리하자면 다음의 1, 2, 3, 4단계를 거쳐서 SW-MSA가 완성됩니다.
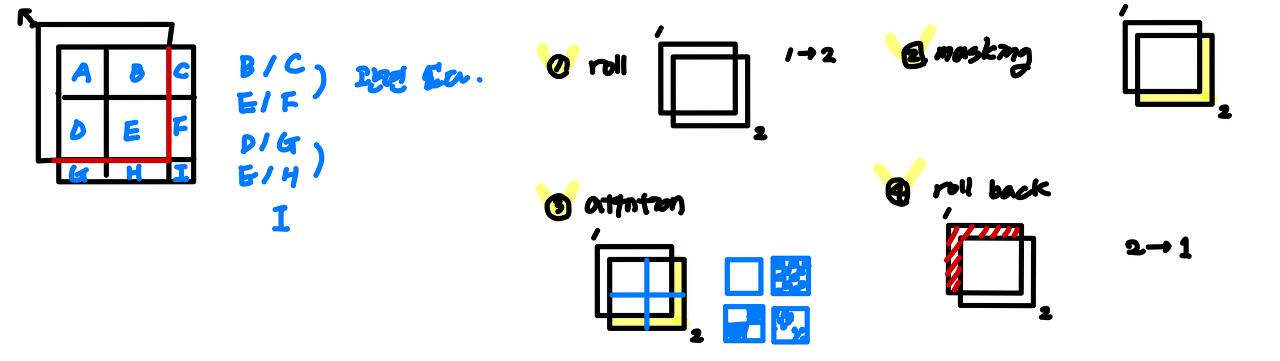
이제 다음 그림이 잘 이해가 되실것 입니다.

코드는 다음과 같습니다. (mask 부분은 official code 참조했습니다.)
class SW_MSA(nn.Module):
    """
    need shift torch.roll and attention mask
    """
    def __init__(self,
                 dim, num_heads, head_dim=None, window_size=7,
                 qkv_bias=True, attn_drop=0., proj_drop=0.,
                 input_resolution: tuple = (56, 56)):
        super().__init__()
        self.dim = dim
        self.window_size = window_size
        self.num_heads = num_heads
        head_dim = head_dim or dim // num_heads
        attn_dim = head_dim * num_heads
        self.scale = head_dim ** -0.5

        self.qkv = nn.Linear(dim, attn_dim * 3, bias=qkv_bias)
        self.attn_drop = nn.Dropout(attn_drop)
        self.proj = nn.Linear(attn_dim, dim)
        self.proj_drop = nn.Dropout(proj_drop)
        self.softmax = nn.Softmax(dim=-1)

        # calculate attention mask for SW-MSA
        self.input_resolution = input_resolution
        H, W = self.input_resolution
        img_mask = torch.zeros((1, H, W, 1))  # 1 H W 1
        cnt = 0
        for h in (
                slice(0, -self.window_size),
                slice(-self.window_size, -3),
                slice(-3, None)):
            for w in (
                    slice(0, -self.window_size),
                    slice(-self.window_size, -3),
                    slice(-3, None)):
                img_mask[:, h, w, :] = cnt
                cnt += 1
        mask_windows = window_partition(img_mask, self.window_size)  # num_win, window_size, window_size, 1
        mask_windows = mask_windows.view(-1, self.window_size * self.window_size)
        attn_mask = mask_windows.unsqueeze(1) - mask_windows.unsqueeze(2)
        self.attn_mask = attn_mask.masked_fill(attn_mask != 0, float(-100.0)).masked_fill(attn_mask == 0, float(0.0))

    def forward(self, x):
        # setting
        B, L, C = x.shape
        ws = self.window_size
        w = h = int(math.sqrt(L))
        h_ = int(h // ws)
        w_ = int(w // ws)

        # [B, 3136, C]
        # ----------- efficient batch computation for shifted configuration -----------
        x = x.view(B, h, w, C)                             # [B, H, W, C]
        x = torch.roll(x, shifts=(-3, -3), dims=(1, 2))    # [B, H, W, C]
        x = x.view(B, h_, ws, w_, ws, C)                   # [0, 1, 2, 3, 4, 5 ] -> [0, 1, 3, 2, 4, 5 ] - idx
        x = x.permute(0, 1, 3, 2, 4, 5).contiguous()       # [B, 8, 7, 8, 7, 96] -> [B, 8, 8, 7, 7, 96]
        x = x.view(B * h_ * w_, ws * ws, C)                # [B' = B x 8 x 8],   -> [B'         49, 96]

        # ------------------------------ attention ------------------------------
        B_, N, C = x.shape  # [B_, 49, 96]
        qkv = self.qkv(x).reshape(B_, N, 3, self.num_heads, -1).permute(2, 0, 3, 1, 4)
        q, k, v = qkv.unbind(0)

        q = q * self.scale
        attn = (q @ k.transpose(-2, -1))

        num_win = self.attn_mask.shape[0]
        attn = attn.view(B_ // num_win, num_win, self.num_heads, N, N) + self.attn_mask.to(torch.get_device(q)).\
            unsqueeze(1).unsqueeze(0)
        attn = attn.view(-1, self.num_heads, N, N)

        attn = self.softmax(attn)
        attn = self.attn_drop(attn)

        x = (attn @ v).transpose(1, 2).reshape(B_, N, -1)
        x = self.proj(x)
        x = self.proj_drop(x)                              # [B_, 49, 96]

        # ---------- make multi-batch tensor original batch tensor ----------v
        x = x.view(B, h_, w_, ws, ws, C)                   # [B, 8, 8, 7, 7, 96]
        x = x.permute(0, 1, 3, 2, 4, 5).contiguous()       # [B, 8, 7, 8, 7, 96]
        x = x.view(B, h, w, -1)                    # (roll)  [B, 56, 56, 96]
        x = torch.roll(x, shifts=(3, 3), dims=(1, 2))      # [B, 56, 56, 96]
        x = x.view(B, h * w, C)                            # [B, 3136, 96]
        return x
Patch merging
이부분은 resolution을 줄이고, channel을 줄이는 부분입니다.
여기는 torch.Unfold와 nn.Linear로 쉽게 구현 가능합니다.
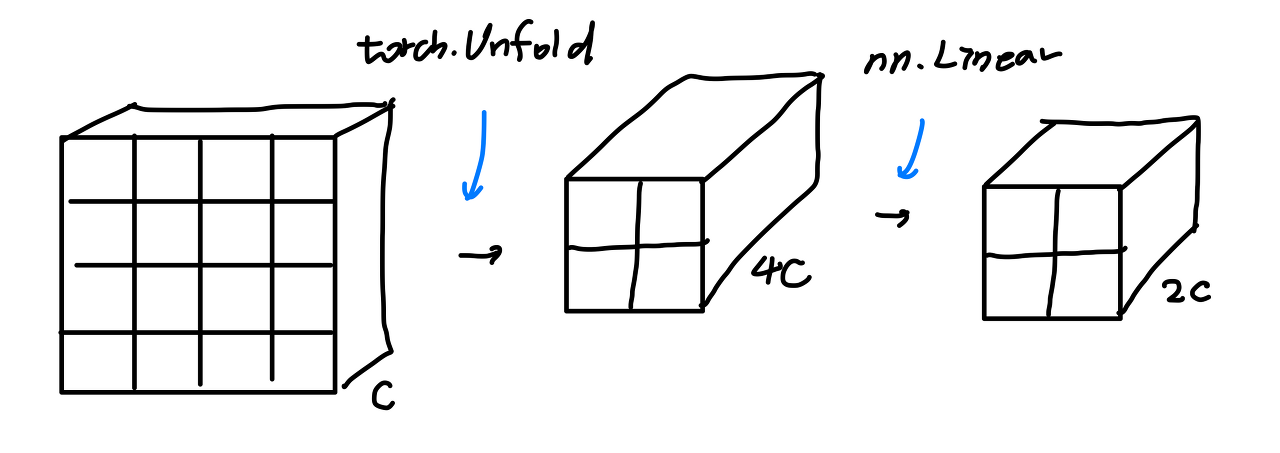
class PatchMerging(nn.Module):
    def __init__(self, in_channels, out_channels, input_resolution, downscaling_factor=2):
        super().__init__()
        self.input_resolution = input_resolution
        self.downscaling_factor = downscaling_factor
        self.patch_merge = nn.Unfold(kernel_size=downscaling_factor, stride=downscaling_factor, padding=0)
        self.linear = nn.Linear(in_channels * downscaling_factor ** 2, out_channels)

    def forward(self, x):
        b, l, c = x.shape
        h, w = self.input_resolution
        x = x.view(b, h, w, c)
        new_h, new_w = h // self.downscaling_factor, w // self.downscaling_factor
        x = self.patch_merge(x).view(b, -1, new_h, new_w).permute(0, 2, 3, 1)
        x = x.view(-1, new_h * new_w, c * self.downscaling_factor ** 2)
        x = self.linear(x)
        return x