참조
https://www.youtube.com/watch?v=dluKlOPPllY
위 영샹을 보고 정리한 글
Reuse Identifiers
재사용 식별자는 테이블 뷰 셀 클래스와 연결된 고유한 문자열입니다. 이를 통해 셀을 등록할 때 표시할 수 있는 셀의 종류와, 디큐할때 표시하는 방법을 테이블 뷰에 알릴수 있습니다.
이 재사용 식별자의 문제로 하드코딩된 문자열인 점, 셀을 등록할 때와 디큐할 때 중복되는 점을 설명하였음
Hardcoded Strings
첫 번째 문제를 해결하는 방법으로 아래와 같은 코드를 설명하심
class AppCell: UITableViewCell {
    static let reuseID = String(describing: AppCell.self)
}

// 사용 예
tableView.register(AppCell.self, forCellReuseIdentifier: AppCell.reuseID)

guard let cell = tableView.dequeueREusableCell(withIdentifier: AppCell.reuseID, for: indexPath) as? AppCell else { return UITableViewCell() }
하지만 이는 셀 하나하나에 다 작성해야하는 문제가 있습니다. 따라서 우리는 더미 프로토콜을 만들어 해결해보고자 합니다.
protocol Reusable {}

extension UITableViewCell: Reusable {}

extension Reusable where Self: UITableViewCell {
    static var reuseID: String {
        String(describing: self)
    }
}
// cool~ 하다네요 ~
Repeated Information
이번에는 셀을 등록하고, 디큐할 때 정보가 중복되는 문제를 해결해보겠습니다. 제네릭을 테이블 뷰에 활용을 한다고 합니다
extension UITableView {
    func registerCell<Cell: UITableViewCell>(_ cellClass: Cell.Type) {
        register(cellClss, forCellReuseIdentifier: cellClass.reuseID)
    }

    func dequeueReusableCell<Cell: UITableViewCell>(forIndexPath indexPath: IndexPath) -> Cell {
        guard let cell = self.dequeueREusableCell(withIdentifier: Cell.reuseID, for: indexPath) as? Cell else { fatalError("Fatal error for cell at \(indexPath)") }

        return cell
    }
}
위와 같이 확장을 사용한다면, 셀을 등록하고 디큐할 때 작성하는 코드의 양은 줄어들고 같은 정보를 중복해서 사용하지 않습니다.
UI Code Duplication
이번에는 UI 코드의 중복에 대해서 알아보겠습니다.
영상에서는 예시로 앱스토어의 중복되는 뷰(셀)에 대해 코드를 작성할 때 생기는 문제에 대해서 설명하였습니다.
되게 비슷한 뷰가 2개 있었고 이를 해결하기 위해 먼저 프로퍼티 래퍼를 활용하였다고 하심.
class AppCell: UITableViewCell {

    var appView: AppView? {
        didSet {
            setUpViews()
        }
    }

    private func setUpViews() {
        guard let appView = appView else { return }

        contentView.addSubview(appView)
        appView.pinEdgesToSuperView()
    }
}
하지만 이런 해결방법의 단점은 비슷한 유형의 화면들이 많다면 일일이 다 작성해야하는 문제가 있다는 점입니다.
이런 부분도 제네릭을 활용해서 해결을 할 수 있슴니다 !
class GenericTableViewCell<View: UIView>: UITableViewCell {

    var cellView: View? {
        didSet {
            setUpViews()
        }
    }

    private func setUpViews() {
        guard let appView = appView else { return }

        contentView.addSubview(appView)
        appView.pinEdgesToSuperView()
    }
}

// 사용예시
tableView.registerCell(GenericTalbeViewCell<AppView>.self)
tableView.dequeueReusableCell(forIndexPath: indexPath) as GenericTableViewCell<AppView>
위 처럼 작성을 하면, 이제 우리가 생성한 모든 커스텀 뷰는 중복 코드를 작성하지 않고도 테이블 뷰 셀로 재사용이 가능합니다 !
Managing Data
이번에는 데이터를 관리하는 부분입니다.
사용자의 프로필 정보를 표시하는 간단한 뷰 컨을 구축한다고 가정하였습니다.
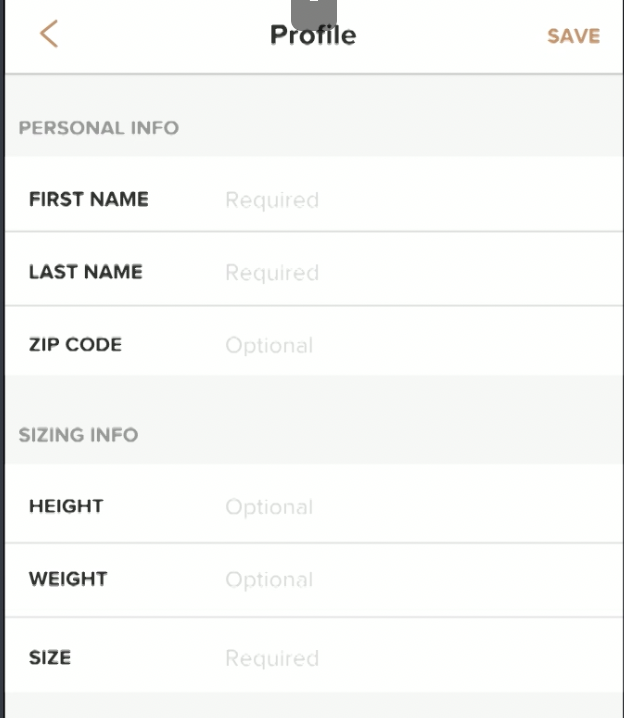
두 개의 섹션과 비슷한 행이 존재합니다.
enum UserProfileRow: String {
    case firstName = "First Name"
    case lastName = "Last Name"
    case zipCode = "Zipcode"
    ...
}

switch row {
    case .firstName: cell.textLabel?.text = "First Name"
    case .lastName: cell.textLabel?.text = "Last Name"
    ...
}

// 맨 위의 enum을 통해 위의 switch문보다 더 깔끔하게 작성이 가능
cell.textLabel?.text = row.rawValue
다음 섹션을 보면
enum UserProfileSection: Int, CaseIterable {
    case personal
    case sizing

    // enum에 String을 채택하기보다 읽기 전용 속성으로 만들었다.
    var title: String {
        switch self {
            case .personal: return "Personal Info"
            case .sizing: return "Sizing Info"
        }
    }

    // 섹션에 대해 순서대로 표시할 행 배열 속성도 추가함
    var rows: [UserProfileRow] {
        switch self {
            case .persoanl:
                return [.firstName, .lastName, .zipCode]
            case .sizing:
                return [.height, .weight, .size]
        }
    }
}

// numberOfSections 내부에 아래와 같이 작성 가능
return UserProfileSection.allCases.count

// titleForHeader
let section = UserProfileSection(rawValue: section)!
return section.title

// cellForRow
let section = UserProfileSection(rawValue: indexPath.section)
let row = section.rows[indexPath.row]
cell.textLabel?.text = row.rawValue

// numberOfRows
let section = UserProfileSection(rawValue: section)!
return section.rows.count
우리는 간단한 두 enum을 활용하여 데이터 관련 코드를 간단하게 줄이고 유연하게 만들었습니다.
추가로 사진에 행을 보면 몇몇 행을 필수거나 선택적인 행들이 있습니다. 이러한 상태들도 enum을 활용하여 간단히 추가가 가능합니다.
enum UserProfileRow: String {
    ...

    var isOptional: Bool {
        switch self {
            case .zipCode, .weight:
                return true
            default:
                return false
        }
    }

    var placeholder: String {
        return isOptional ? "Optional" : "Required"
    }
}
확실히 enum을 잘 사용해야 싶다. 많이 활용을 못하고있는데 적용을 해봐야겠슴다
Using Tags
이제 영상에서는 데이터를 서버에 보내기 전 캐싱하는 클래스를 하나 만들었는데
우리가 만든 코드에서는 텍스트가 어떤 셀에 있는지에 대한 컨텍스트가 존재하지 않습니다. 인덱스패스가 존재하지 않기 때문입니다.
따라서 업데이트해야 하는 캐시의 속성을 알지 못합니다..!
여기서는 태그를 사용한다고 합니다. 모든 UI 요소에는 태그라는 정수 속성이 존재합니다.
enum UserProfileSection: Int, CaseIterable {
    case personal
    case sizing
    ...

    // 섹션 내부 행을 flatmap을 통해 하나로 만듭니다.
    static var allRows: [UserProfileRow] {
        return UserProfileSection.allCases.flatMap{ $0.rows }
    }
    // 고유 인덱스를 들고오는 함수
    static func tag(for row: UserProfileRow) -> Int {
        return allRows.firstIndex(of: row)!
    }
    // 태그에 맞는 행을 들고옴
    static func row(for tag: Int) -> UserProfileRow {
        return allRows[tag]
    }
}

// 사용예 - cellForRow
let tag = UserProfileSection.tag(for: row)
cell.textField.tag = tag
위 코드로 태그를 준 다음 유저데이터 캐싱을 하는 코드는 아래와 같습니다.
// UITextField 딜리게이트메서드 내부에서 진행
func textFieldShouldReturn(_ textField: UITextField) -> Bool {
    textField.resignFirstResponder()
    let row = UserProfileSection.row(for: textField.tag)

    switch row {
        case .firstName: user.firstName = textField.text
        case .lastName: user.lastName = textField.text
        case .zipCode: user.zipCode = textField.text
        ...
    }

    tableView.reloadData()
    return false
}
하지만 또 switch의 못생긴 코드가 등장해버렸습니다 ㅜ ㅜ 이 문제를 해결하는 방법으로 subscript문법을 사용하였습니다.
확실히 고수다 이사람 전 이거 제대로 써본적도업슴
// class UserProfileCache 유저프로필의 캐시하는클래스 내부에 작성함
subscript(row: UserProfileRow) -> String? {
    get { return value(for: row) }
    set(newValue) { set(value: newValue, for: row) }
}

// setter
private func set(value: String?, for row: UserProfileRow) {
    switch row {
        case .firstName: firstName = value
        case .lastName: lastName = value
        case .zipCode: zipCode = value
        ...
    }
}

// getter
private func value(for row: UserProfileRow) -> String? {
    switch row {
        case .firstName: return firstName
        case .lastName: return lastName
        case .zipCode: return zipCode
        ...
    }
}

// set
user[row] = textField.text

// get
let detailText = user[row]
마지막으로, 데이터의 유효성 검사도 enum 내부 함수로 추가하여 체크하고 있다.
enum UserProfileRow: String {
func isValid(for value: String?) -> Bool { ... }
}
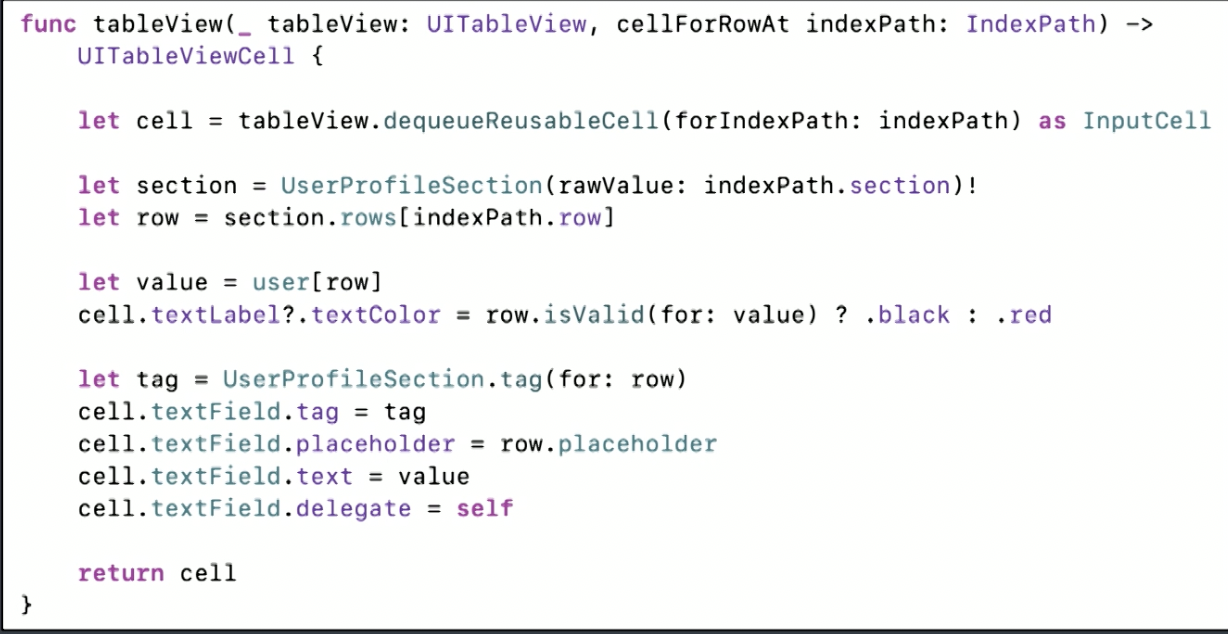
// cellForRow
...
let value = user[row]
cell.textLabel?.textColor = row.isValid(for: value) ? .black : .redcellForRow 내부 전체 코드
열거형과 프로토콜, 태그 등을 활용하여 최대한 효율적이고 유연하게 만드는 부분에서 얻어가는게 많았던 영상이였다. good ~

좋은 글 잘보고갑니다~