🚩 javascript 네트워크 통신 예제
http 사용 예제
✒️ 코드 작성
입력
css
body { font-family: "Noto Sans KR", Verdana, Geneva, Tahoma, sans-serif; color: #333; width: 968px; margin: auto; }
header { height: 120px; border-bottom: 5px solid #333; margin-bottom: 30px; }
h1 { width: 225px; height: 90px; text-indent: -9999px; margin-top: 25px; background: url("../../img/maker-logo.png") no-repeat; }
h2 { margin-bottom: 30px; font-size: 1.3em; }
#content { display: flex; }
.event { flex: 1; text-align: center; }
.eventp { padding-top: 20px; line-height: 1.5; }
.eventpstrong { font-weight: bold; font-size: 1.1em; }
.eventspan {
}
footer { border-top: 1px solid #333; margin-top: 30px; padding: 20px 0; text-align: right; color: #aaa; }
html
<body>
  <header>
    <h1>The maker bus</h1>
  </header>
  <h2>버스 정류장 위치</h2>

  <main id="content">

  </main>

  <footer>
    <p>javascript 네트워크통신</p>
  </footer>
</body>
js
const xhr = new XMLHttpRequest();
// 웹 브라우저와 웹 서버간에 데이터를 전송시키는 js객체
// 외부 데이터를 불러들이는 객체, 서버에 데이터를 요청
xhr.open("get", "data.html"); // 데이터 요청 준비
xhr.send(); // 데이터 요청을 전송
// onload할 때 함수 발생
xhr.onload = () => {
if (xhr.status == 200) {
document.querySelector("#content").innerHTML = xhr.responseText;
// 서버응답 데이터
}
};
/*
XMLHttpRequest()
.open("get/post", "주소", true/false)
- 어떤 자료를 가져올지/보낼지 지정, true-비동기/false-동기
.send()
- 서버로 요청 전송
.status
- 서버에서 받은 응답 상태(정상 : 200 / 페이지를 찾을 수 없음 : 404 / 서버오류 : 5xx)
.responseText
- 서버로부터 받은 응답 내용 (문자열)
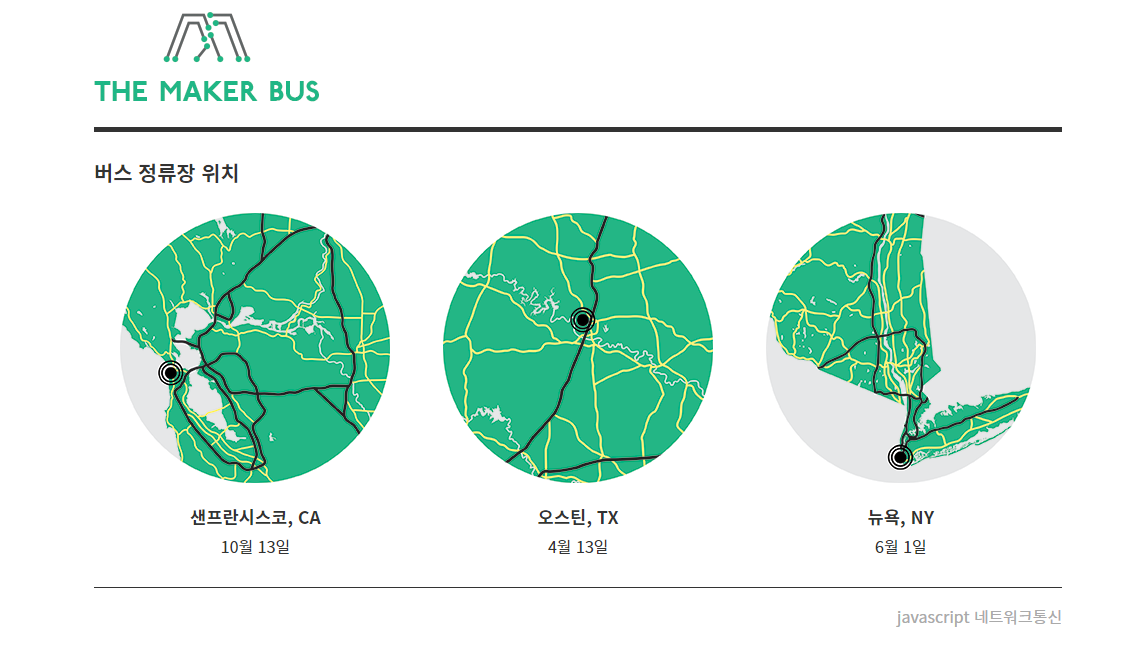
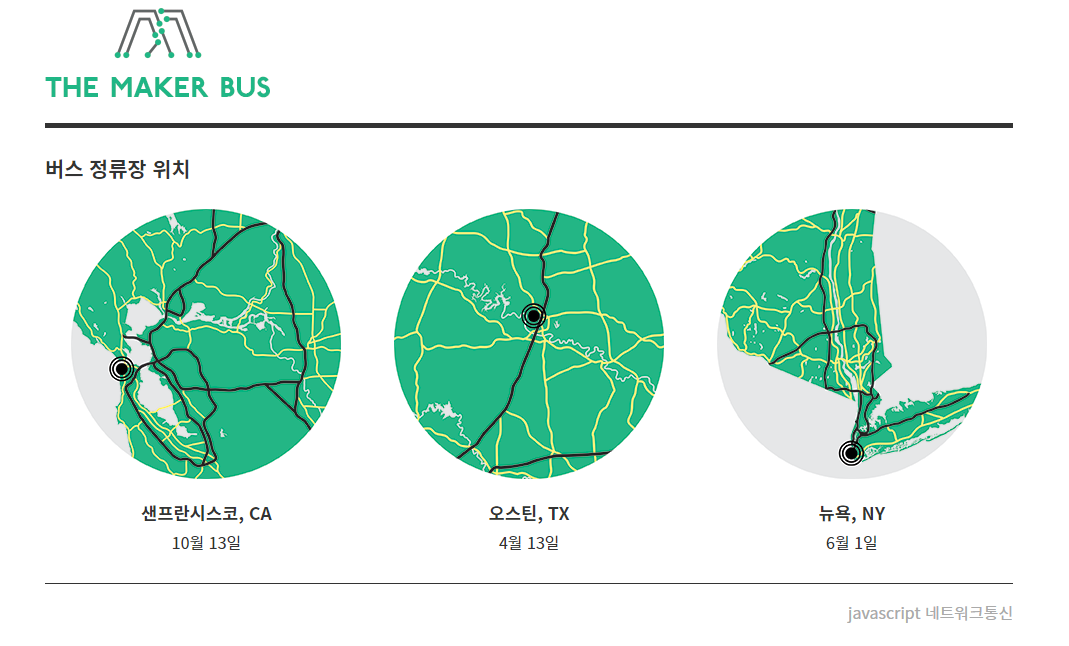
*/출력
- 이미지로 대체
json 사용 예제
✒️ 코드 작성
입력
css
body { font-family: "Noto Sans KR", Verdana, Geneva, Tahoma, sans-serif; color: #333; width: 968px; margin: auto; }
header { height: 120px; border-bottom: 5px solid #333; margin-bottom: 30px; }
h1 { width: 225px; height: 90px; text-indent: -9999px; margin-top: 25px; background: url("../../img/maker-logo.png") no-repeat; }
h2 { margin-bottom: 30px; font-size: 1.3em; }
#content { display: flex; }
.event { flex: 1; text-align: center; }
.eventp { padding-top: 20px; line-height: 1.5; }
.eventpstrong { font-weight: bold; font-size: 1.1em; }
.eventspan {
}
footer { border-top: 1px solid #333; margin-top: 30px; padding: 20px 0; text-align: right; color: #aaa; }
html
<body>
  <header>
    <h1>The maker bus</h1>
  </header>
  <h2>버스 정류장 위치</h2>

  <main id="content">

  </main>

  <footer>
    <p>javascript 네트워크통신</p>
  </footer>
</body>
js
const xhr = new XMLHttpRequest();
// 웹 브라우저와 웹 서버간에 데이터를 전송시키는 js객체
// 외부 데이터를 불러들이는 객체, 서버에 데이터를 요청

xhr.open("get", "data.json", true); // 데이터 요청 준비
xhr.send(); // 데이터 요청을 전송

// onload할 때 함수 발생
xhr.onload = () => {
  if (xhr.status == 200) { // 서버 응답이 정상일 때만 작동
    respObj = JSON.parse(xhr.responseText); //JSON문자열을 객체로 생성
    console.log(respObj);
    // 서버응답 데이터

    let newContent = ``; // 공간 생성

    // for (let i = 0; i < respObj.events.length; i++) {
    //   newContent += `<div class="event">`;
    //   newContent += `<img src=${respObj.events[i].map} alt="">`;
    //   newContent += `<p>`;
    //   newContent += `<strong>${respObj.events[i].location}</strong><br>`;
    //   newContent += `<span>${respObj.events[i].date}</span>`;
    //   newContent += `</p>`;
    //   newContent += `</div>`;
    // }

    // for문을 foreach로
    respObj.events.forEach((event) => {
      newContent += `<div class="event">`;
      newContent += `<img src=${event.map} alt="">`;
      newContent += `<p>`;
      newContent += `<strong>${event.location}</strong><br>`;
      newContent += `<span>${event.date}</span>`;
      newContent += `</p>`;
      newContent += `</div>`;
    })
    document.querySelector("#content").innerHTML = newContent;
  }
};
json
{
  "events": [
    {
      "location": "샌프란시스코, CA",
      "date": "10월 13일",
      "map": "../img/map-ca.png"
    },
    {
      "location": "오스틴, TX",
      "date": "4월 13일",
      "map": "../img/map-tx.png"
    },
    {
      "location": "뉴욕, NY",
      "date": "6월 1일",
      "map": "../img/map-ny.png"
    }
  ]
}
출력
- 이미지로 대체
🚩 json / fetch
json
📝 설명
- 객체 문법으로 구조화된 데이터를 표현하기 위한 문자 기반의 표준 포맷
- JS에서 서버와 주고받기 편하게 만든 문자열, 오브젝트 형태의 텍스트포맷
✒️ 사용법
입력
js
const nuri = {
  name: "nuri",
  age: 3,
  type: "cat",
  eat: () => {
    console.log("냠냠");
  },
};
console.log("오브젝트 nuri : ", nuri);

// JSON 문자열로 변환
const jj = JSON.stringify(nuri); // 오브젝트를 JSON으로 변환(serializing)
console.log("nuri 오브젝트를 JSON으로 변환 : ", jj);

/*
  JSON.ststringify(오브젝트) - 오브젝트를 json으로 변환(serializing)
    - 함수는 포함되지❌, 숫자를 빼고 다 문자열 형식으로 변환됨("따옴표");
*/

const oo = JSON.parse(jj);
// JSON.parse(json); // JSON을 객체로 생성
console.log("JSON으로 변환된 nuri를 다시 오브젝트로 변환 : ", oo);
출력
- 이미지로 대체

🔗 참고 링크 & 도움이 되는 링크
fetch API
📝 설명
- 웹 브라우저에서 서버로 HTTP 요청을 하게 해주는 API (비동기)
- Promise를 기반으로 동작함
✒️ 사용법
입력
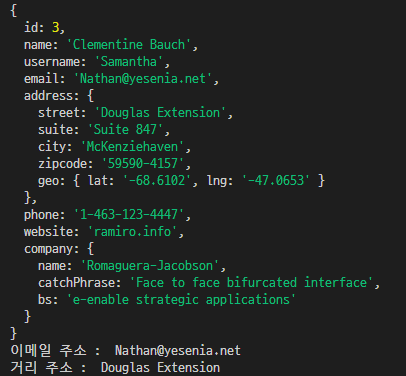
js
// https://jsonplaceholder.typicode.com/

fetch("https://jsonplaceholder.typicode.com/users/3") // fetch
  .then((response) => response.json()) // 가져온 fetch 결과물
  // 응답(response)을 받게 되면 json형태로 변환(사용할 수 있는 형태로 파싱)
  .then((data) => {
    console.log(data);
    console.log("이메일 주소 : ", data.email);
    console.log("거리 주소 : ", data.address.street);
  }) // data안에 결과물 넣음
  .catch((error) => {
    console.error("실패", error);
  });
출력
- 이미지로 대체
🔗 참고 링크 & 도움이 되는 링크

공부하는 벨로그