
tree 설치
kevin@hostos1:~$ sudo apt -y install tree디렉터리 구조 tree로 확인하기
kevin@hostos1:~$ tree. ├── Desktop ├── Documents ├── Downloads ├── Music ├── Pictures ├── Public ├── Templates └── Videos
Python
1) 일반 프로그래밍
2) 웹 프로그래밍 (socket 프로그래밍)
3) bigdate 분석 (insight를 얻기 위해)
Python 설치
권한 변경
kevin@hostos1:~$ sudo su -python 3.8 버전 설치
root@hostos1:~# docker pull python:3.8-slim
root@hostos1:~# mkdir LABs
root@hostos1:~# cd LABs/
root@hostos1:~/LABs# mkdir python && cd $_
root@hostos1:~/LABs/python
새 창에서 jupyternotebook 설치
kevin@hostos1:~$ docker pull vishwasnarayanare/jupyternotebookroot@hostos1:~/LABs/python# vi py_lotto.py
[py_lotto.py]
from random import shuffle
from time import sleep
gamenum = input('로또 게임 회수를 입력하세요: ')
for i in range(int(gamenum)):
balls = [x+1 for x in range(45)]
ret = []
for j in range(6):
shuffle(balls) # balls를 무작위로 섞고,
number = balls.pop() # balls의 제일 마지막 숫자를 추출하고, 제거
ret.append(number) # 추출된 숫자를 ret에 추가
ret.sort()
print('로또번호[%d]: ' %(i+1), end='')
print(ret)
sleep(1) root@hostos1:~/LABs/python# vi py_http.py
[py_http.py]
from http.server import BaseHTTPRequestHandler, HTTPServer
port = 8900
class SimpleHTTPRequestHandler(BaseHTTPRequestHandler):
def do_GET(self):
self.send_response(200)
self.send_header('Content-Type', 'text/html; charset=utf-8')
self.end_headers()
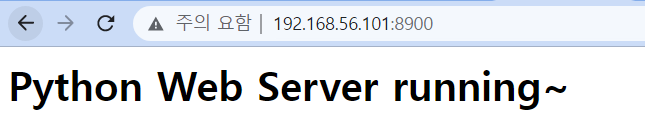
self.wfile.write('<h1>Python Web Server running~</h1>'.encode('utf-8'))
httpd = HTTPServer(('0.0.0.0', port), SimpleHTTPRequestHandler)
print(f'Server running on port:{port}')
httpd.serve_forever()root@hostos1:~/LABs/python# docker run -itd --name=py-test -p 8900:8900 python:3.8-slim
e41a32f159959fa90a1e5d9890a426036c38cf4a9c70e155bd784a8aa6b0b651
root@hostos1:~/LABs/python# docker ps | grep python
e41a32f15995 python:3.8-slim "python3" 12 seconds ago Up 10 seconds 0.0.0.0:8900->8900/tcp, :::8900->8900/tcp py-test
root@hostos1:~/LABs/python# docker cp py_lotto.py py-test:/py_lotto.py
root@hostos1:~/LABs/python# docker cp py_http.py py-test:/py_http.py
root@hostos1:~/LABs/python# docker exec -it py-test python /py_lotto.py
로또 게임 회수를 입력하세요: 5
로또번호[1]: [6, 20, 23, 33, 42, 43]
로또번호[2]: [6, 11, 13, 30, 32, 43]
로또번호[3]: [2, 13, 24, 38, 41, 43]
로또번호[4]: [3, 7, 20, 27, 40, 42]
로또번호[5]: [21, 30, 31, 35, 40, 44]
root@hostos1:~/LABs/python# docker exec -it py-test python /py_http.py
Server running on port:8900
192.168.56.1 - - [13/Sep/2022 00:51:47] "GET / HTTP/1.1" 200 -
192.168.56.1 - - [13/Sep/2022 00:51:47] "GET /favicon.ico HTTP/1.1" 200 -주소창에 192.168.56.101:8900 을 치면
jupyternotebook 실행
kevin@hostos1:~$ docker run -it -p 8888:8888 --name=pyjup vishwasnarayanare/jupyternotebookjupyternotebook 접근 (내 ip를 통해 접근 가능)
http://192.168.56.101:8888/lab?token=efd95098884638a0a53d86ea3981a057c015c446e48ad41e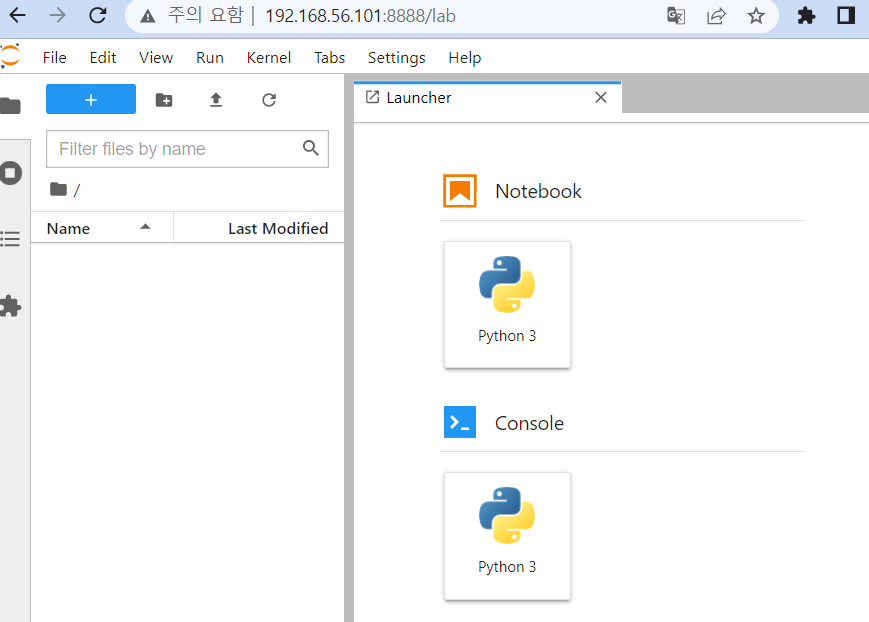

Node
node 설치
root@hostos1:~/LABs/node# docker pull node:17-slimmynode라는 이름으로 node 컨테이너를 8800번 포트에서 실행
root@hostos1:~/LABs/node# docker run -d -it -p 9000:8800 --name=mynode node:17-slim현재 컨테이너 상태
root@hostos1:~/LABs/node# docker ps
CONTAINER ID   IMAGE             COMMAND                  CREATED          STATU                                                                   S          PORTS                                       NAMES
5932a071e43e   node:17-slim      "docker-entrypoint.s…"   2 seconds ago    Up 2                                                                    seconds    0.0.0.0:9000->8800/tcp, :::9000->8800/tcp   mynode
실행할 node 파일 생성
root@hostos1:~/LABs/node# vi runapp.js# 내용 var http = require('http'); var content = function(req, resp) { resp.end("Good morning Korea~!" + "\n"); resp.writeHead(200); } var web = http.createServer(content); web.listen(8000);
실행할 node 파일을 복사하여 컨테이너에 저장 (???)
root@hostos1:~/LABs/node# docker cp runapp.js mynode:/runapp.jsmynode 컨테이너를 실행하여 디렉터리 확인
root@hostos1:~/LABs/node# docker exec -it mynode ls
bin   dev  home  lib64  mnt  proc  run        sbin  sys  usr
boot  etc  lib   media  opt  root  runapp.js  srv   tmp  var
node service start
root@hostos1:~/LABs/node# docker exec -it mynode node /runapp.js다른 터미널: hostOPS에서 node container ip 확인
kevin@hostos1:~$ docker inspect mynode | grep IPAddress

MongoDB
- 특징: humongous(거대한) ▶ bigdate(무작위 데이터)
기본 포트번호: 27017
MongoDB 설치
kevin@hostos1:~$ docker pull mongo:5.0MongoDB를 mongodb라는 이름의 컨테이너로 실행
kevin@hostos1:~$ docker run -itd --name=mongodb -p 27017:27017 mongo:5.0MongoDB 상태 확인
kevin@hostos1:~$ docker ps | grep mongo
MongoDB
- DB 확인
> show dbs
admin   0.000GB
config  0.000GB
local 0.000GB- 'sampledb` db 사용 (db 생성)
> use sampledb
switched to db sampledb- 현재 db
> db
sampledb- db table 't1'을 생성하고(없을 경우) 데이터 insert
> db.t1.insert({name: 'arkang', job:'student'})
WriteResult({ "nInserted" : 1 })- t1 select
> db.t1.find()
{ "_id" : ObjectId("631fe365378044001065a4a6"), "name" : "arkang", "job" : "st- show dbs
> show dbs
admin     0.000GB
config    0.000GB
local     0.000GB
sampledb 0.000GB- 현재 db 내의 table 목록
> show collections
t1
Docker
- linux의 nfs: data volumes를 통해 디렉터리 공유
Docker Docs
docker pull
docker pull전 hub.docker.com에서 해당 image 정보 확인 (최신 버전은 비추천)
docker run ... -p 27017:27017
			(EXPOSE, 이미지 port번호이며 변경 가능)
docker pull mongo:5
▶ docker hub에서 pull (어떻게 docker hub인 것을 알까요? docker info로 확인 가능)
kevin@hostos1:~$ docker pull mongo:5.0
5.0: Pulling from library/mongo
675920708c8b: Pull complete
6f9c8c301e0f: Pull complete
73738965c4ce: Pull complete
7fd6635b9ddf: Pull complete
73a471eaa4ad: Pull complete
5abd0e4db1c7: Pull complete
90013e6cca25: Pull complete
045ba07b518a: Pull complete
a52094d39d26: Pull complete
Digest: sha256:fb76bf6795acc0b34a8673c4dde3ba6125c849b1d0556855f510de8ef49943b
Status: Downloaded newer image for mongo:5.0
docker.io/library/mongo:5.0
kevin@hostos1:~$ docker info | grep -i registr
Registry: https://index.docker.io/v1/
Insecure Registries:
gcr.io에서 이미지 다운로드
kevin@hostos1:~$ docker pull gcr.io/google-samples/hello-app:1.0

1.0: Pulling from google-samples/hello-app
59bf1c3509f3: Pull complete
da75187f77d8: Pull complete
Digest: sha256:88b205d7995332e10e836514fbfd59ecaf8976fc15060cd66e85cdcebe7fb356
Status: Downloaded newer image for gcr.io/google-samples/hello-app:1.0
gcr.io/google-samples/hello-app:1.0
Docker 구조
kevin@hostos1:~$ docker pull httpd:2.4
2.4: Pulling from library/httpd
7a6db449b51b: Already exists
b4effd428409: Pull complete
6b29c2b62286: Pull complete
c2123effa3fc: Pull complete
152876b0d24a: Pull complete
Digest: sha256:b418eccc8ec9a04dc07596aef200edfa4d2020dc1168654d6a17af145c33cae6
Status: Downloaded newer image for httpd:2.4
docker.io/library/httpd:2.4
Layer
image는 layer, 계층 구조의 집합 형태
- layer 형태로 다운로드하기 때문에 merged ▶ snapshot
container의 실체
1) image의 snapshot이다.
2) process이다.
3) image는 container의 infra(H/W: container의 cgroup이 4대 리소스 제공, OS
Already exists: 컨테이너를 공유하기 때문에 이미 존재하는 컨테이너는 pull 하지 않아도 사용 가능
Digest
sha256 암호화 알고리즘으로 Layer들을 압축하여 암호화
docker image | grep httpd
kevin@hostos1:~$ docker images | grep httpd
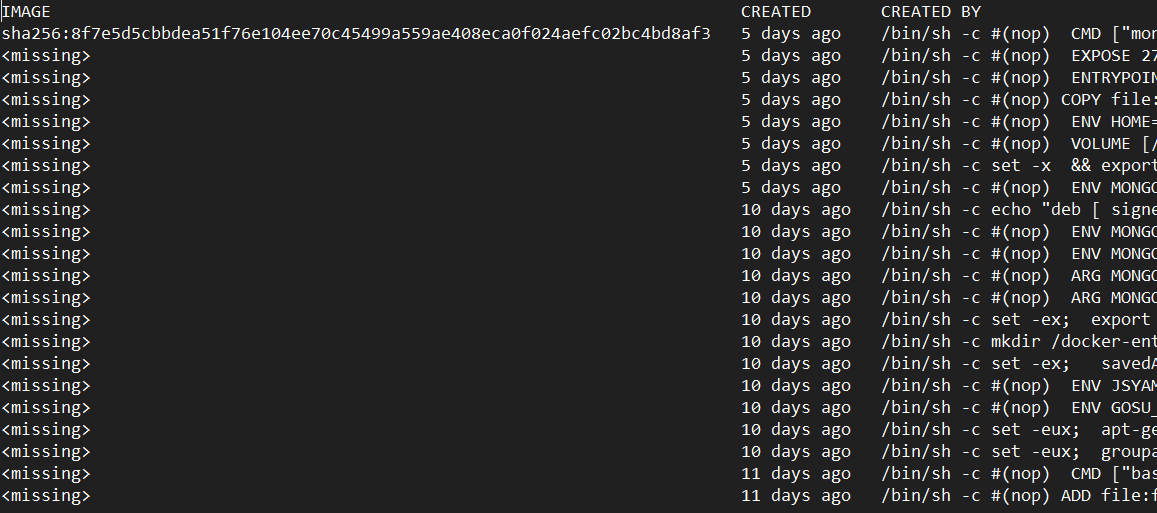
httpd 2.4 a981c8992512 2 weeks ago 145MBdocker image history 이미지
이미지 포트번호(EXPOSE), 이미지 소스 핵심 경로(WORKDIR) 등 확인 가능
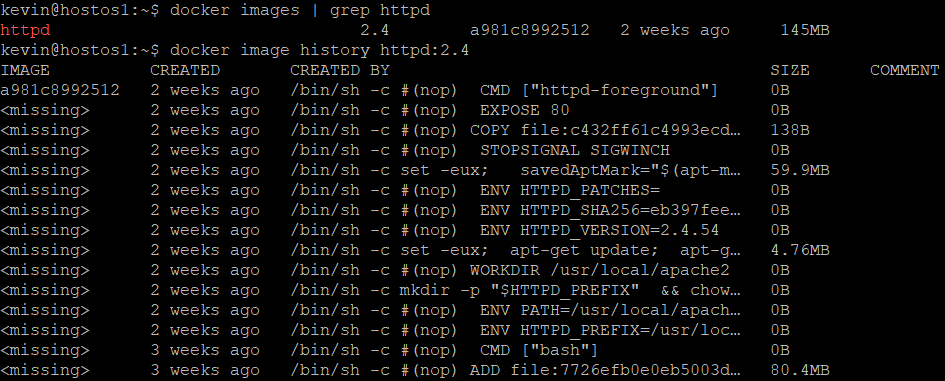
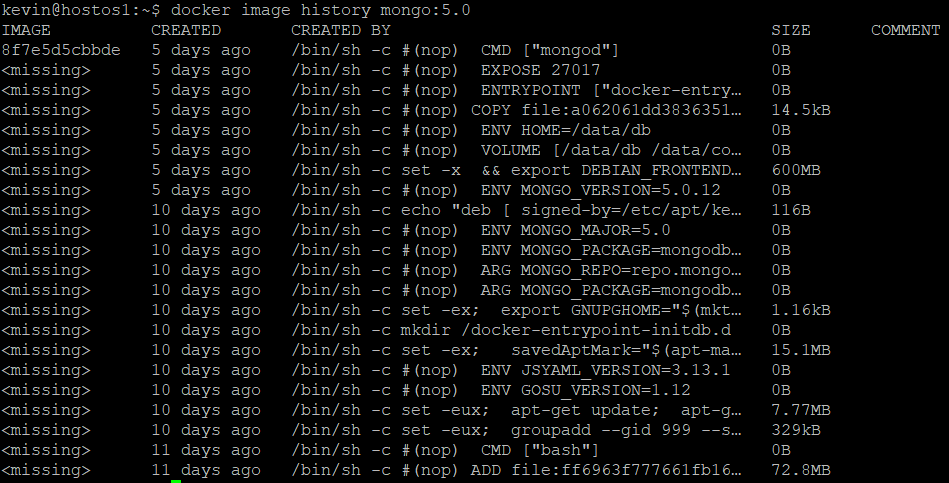
image history를 text 파일로 만들어 확인
kevin@hostos1:~$ docker image history mongo:5.0 --no-trunc > httpd_dockerfile.txt
image에 대한 정보 확인
kevin@hostos1:~$ docker image inspect httpd:2.4- dockerfile의 line 수: Step ▶ Container 개수
-
이미지 기본 경로 확인 가능

-
이미지의 저장소 - 디렉터리
- LowerDir: 읽기 전용 디렉터리
- MergedDir
- UpperDir
- WorkDir
format: 보고싶은 정보 지정 가능 (Json 형식)
kevin@hostos1:~$ docker image inspect --format="{{ .Os }}" httpd:2.4

>> linux
kevin@hostos1:~$ docker image inspect --format="{{ .Os }} {{ .Config.ExposedPorts }}" httpd:2.4
>> linux map[80/tcp:{}]kevin@hostos1:~$ docker image inspect --format="{{ .ContainerConfig.Env }}" httpd:2.4
>> [PATH=/usr/local/apache2/bin:/usr/local/sbin:/usr/local/bin:/usr/sbin:/usr/bin:/sbin:/bin HTTPD_PREFIX=/usr/local/apache2 HTTPD_VERSION=2.4.54 HTTPD_SHA256=eb397feeefccaf254f8d45de3768d9d68e8e73851c49afd5b7176d1ecf80c340 HTTPD_PATCHES=]IP/MAC Address
- image는 정적 ▶ ip, mac 주소가 존재하지 않음
- docker engine이 container의 ip, mac 주소를 할당해줌
kevin@hostos1:~$ docker inspect py-test | grep -i ipaddress

>>
            "SecondaryIPAddresses": null,
            "IPAddress": "172.17.0.2",
                    "IPAddress": "172.17.0.2",
docker image에 대한 정보 2
kevin@hostos1:~$ docker search httpd- docker hub 내에 있는 정보를 간단하게 확인 가능
docker 용량 관리
- image 삭제 전 반드시 참조 중인 container는 없어야 한다.
--force: 강제 삭제도 가능
docker image rm python:3.8-slim삭제하려는 이미지를 참조하고 있는 컨테이너가 있는 경우, 컨테이너를 삭제해야 한다.
container 삭제 (container = process + snapshot)
- container 정지:
docker stop py-test - container 삭제:
docker rm py-test - image 삭제:
docker image rm python:3.8-slim==docker rmi python:3.8-slim
kevin@hostos1:~$ docker ps -akevin@hostos1:~$ docker ps -a -qkevin@hostos1:~$ docker ps -a -q --filter 'status=exited'kevin@hostos1:~$ docker rm $(docker ps -a -q --filter 'status=exited')alias로 사용자 정의 명령어로 지정
kevin@hostos1:~$ vi .bashrc

>> alias cexrm='docker rm $(docker ps -a -q --filter status=exited)'

kevin@hostos1:~$ soruce .bashrc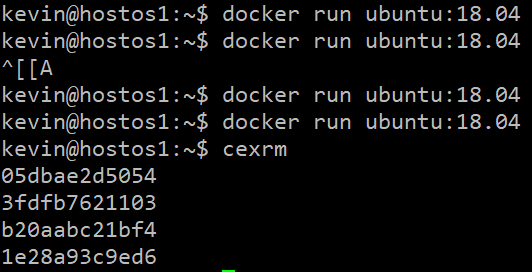
Registry에 생성한 image upload(push)
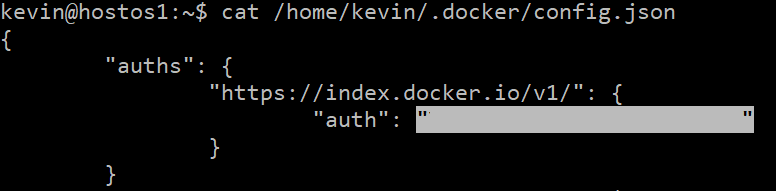
1) docker login/logout: 현재 프롬프트에 로그인이 되어 있어야 한다. (계정이 존재해야 한다.)
계정자에게 push 하기 위해 ▶ docker.io/aramu

2) docker image tag: 태그를 걸어야 한다. 왜??? 업로드할 주소 입력을 위해 작성 ▶ 버전 관리에 사용
3) docker push:
docker push 계정자 ID/저장소:태그 ▶ docker push aramu/이미지명:버전 ▶ repo 주소
docker repository에 push
kevin@hostos1:~$ docker images | grep myweb
kevin@hostos1:~$ docker image tag myweb:1.0 aramu/myweb:1.0

kevin@hostos1:~$ docker push aramu/myweb:1.0
The push refers to repository [docker.io/aramu/myweb]
지윤이 repo에 있는 myweb:1.0 버전을 pull
kevin@hostos1:~$ docker pull jjy9922/myweb:1.0docker run
docker run = [pull] + create + start + [command]

옵션
-
-i: interactive -
-t: tty(단말)-it: 작업 수행 -
-d: detach(백그라운드로 실행 ▶ nginx:-d) -
-p: publish host_port:container_port -
-e: 환경변수- 다수 환경변수 사용 시:
-e ... -e ... -e ... - 파일(예. env_list)을 만들어 환경변수 저장:
--env-file=env_list
- 다수 환경변수 사용 시:
-
--restart: 기본값 nokubernetes는 기본값이 restart=Always로 되어 있음
▶ Auto-healingrestart=always | ...: 사용자가 직접 stop한 것이 아닌 비정상적인 컨테이너 종료(예기지 못한) 시 자동 재시작
-
--name: 컨테이너 이름 -
--rm: container stop과 동시에 자동 rm 수행 ▶ test용 container에 적합 -
-u: 컨테이너의 기본 사용자는root이나 특정 계정에서 application 수행 시-u=kevin으로 계정을 지정su - kevin과 동일
-
-w: workdir과 같이 컨테이너 내부 접속 시 연결되는 경로 지정 -
-v: 볼륨 지정(container to host, container to container ▶ NFS와 유사, 파일이나 디렉터리 공유 가능)
예시.
kevin@hostos1:~$ docker run -d --rm centos /bin/ping localhost-d: 백그라운드에서 실행(daemon)-rm: stop되면 자동 삭제
docker stats
cpu memory disk network 사용량을 분석하여 보여주는 명령어
docker port / docker top
docker port 컨테이너명 / docker top 컨테이너명
컨테이너의 publish된 port 번호, 컨테이너의 상태정보 확인
docker restart
컨테이너 재시작
kevin@hostos1:~$ docker restart myweb2
docker pause
컨테이너 일시 정지
kevin@hostos1:~$ docker pause myweb2
docker unpause
일시정지된 컨테이너 재시작
kevin@hostos1:~$ docker unpause myweb2
docker rename
컨테이너 이름 변경
kevin@hostos1:~$ docker rename 컨테이너명 변경컨테이너명
docker attach

docker exec 사용 권장!
docker diff
컨테이너 내의 변동사항이나 새로운 파일이 생긴 경우(Change: update, delete)
kevin@hostos1:~$ docker diff mycent2docker commit
새로운 이미지를 생성 (기존 이미지 수정 불가)