Alert View에 대해 알아보도록 하겠습니다.
Alerts
H.I.G
기기의 상태와 관련된 중요한 정보를 전달하고 종종 피드백을 요청할 때 Alerts을 사용합니다.
Alert을 사용할 때 주의 할점
- Alert을 최소화 하는 것이 좋다.
Alert은 구매하는 작업이나 삭제하는 작업등의 중요한 작업에만 사용해야 한다.
경고빈도가 낮을수록 사람들이 경고를 심각하게 받아 들인다. - 여러 단어로 구성된 짧은 설명으로 제목을 작성하자.
제목은 한 단어가 아닌 짧은 문장을 사용하는 것이 정보 전달에 좋다. 그렇지만 한 줄을 넘는 것은 좋지 않다. - 일반적으로 버튼은 2개를 사용한다.
버튼이 3가지 이상이 되면 복잡해질 수 있기 때문에 버튼을 3가지 이상이 필요하다면 ActionSheets를 사용하는 것이 좋다. - 버튼 위치
일반적으로 사람들이 탭할 가능성이 높은 버튼을 오른쪽에 두어야 한다.
취소 버튼은 항상 왼쪽에 둔다. - 사용자가 홈화면을 통해 알림을 취소할 수 있게 한다.
Alerts이 표시되고 사용자의 선택을 받을 때 사용자가 홈화면으로 가게 하면 앱이 종료되도록 하는 것이 좋다.
또, 취소버튼을 누른 것과 같은 효과를 내야한다.
사용법
Alerts는 아래와 같이 사용합니다.
title은 제목 message는 세부내용을 적습니다.
preferredStyle은 .alert을 선택합니다. .actionSheet를 선택하면 ActionSheet로 되는 것 같습니다.
let alert = UIAlertController(title: nil, message: "메시지", preferredStyle: .alert)그 뒤에 버튼을 추가해줍니다..
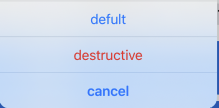
title은 버튼에 표시될 제목이고, style은 버튼의 스타일을 말하는데
아래 이미지를 보시면 위에부터 default, destructive, cancel 입니다.
cancel 스타일은 항상 버튼이 두개일때는 왼쪽, 3개 이상일 때는 아래에 배치됩니다.
let okAction = UIAlertAction(title: "OK", style: .default)
let noAction = UIAlertAction(title: "Cancel", style: .cancel)
그리고 버튼을 추가 해주고 present를 해줍니다.
present에서 animated를 true와 false를 선택할 수 있는데 true로 하게되면 좀 우와앙..?하고 나오는 효과가 있습니다. false로 할 때에는 아무런 효과 없이 딱 하고 나옵니다.
alert.addAction(okAction)
alert.addAction(noAction)
present(alert, animated: true)
구현 코드
let alert = UIAlertController(title: nil, message: "메시지", preferredStyle: .alert)
let okAction = UIAlertAction(title: "OK", style: .default)
let noAction = UIAlertAction(title: "Cancel", style: .cancel)
alert.addAction(okAction)
alert.addAction(noAction)
present(alert, animated: true)
호박에 줄 그어서 수박 되는 성장 드라마