
Pojo 1-1 복습
A a = new A()
Sonata myCar = new Sonata();
# Pojo 1-1 에 대한 개선점


<jsp:useBeean id = "myCar" class = "com.di.Sonata" scope = page|request|session|application/>

Sonata myCar = new Sonata();


------마임타입에 대한 복습
res.setContentType("text/html; utf-8");

(res)인가? 를 볼 때 서블릿관점에서 마임타입으로 jsp로 넘겨줘야된다.
액션 태그로 객체 생성이 가능하다.
이 태그는 Jsp에 작성이 된다.
jsp -> jsp가 받는 것은 (Model1)
jsp -> Servlet 받는 것은 Mode2 : 요청을 서블릿이 받는다.
개선점
-
어떤 요청에 대해서
처리를 담당할 클래스를결정하는 일을 전담하는 클래스가 있어야 하지 않을까? -
응답처리를 어떻게 할 것인가? - html (마임타입) -> DataSet를 가지고 있나?(없다)
-
이 부분을 해결하기 위해서 JavaSript를 이용해서 값을 끼워넣어야한다.
-
그렇다면 DataSet를 받아야 된다는 얘기인데, 그렇다면 마임타입이 application/json으로 받아야한다.
-> json을 읽어오려면 (JavaScript) -> JSON.Pasrse / Json.Stringify
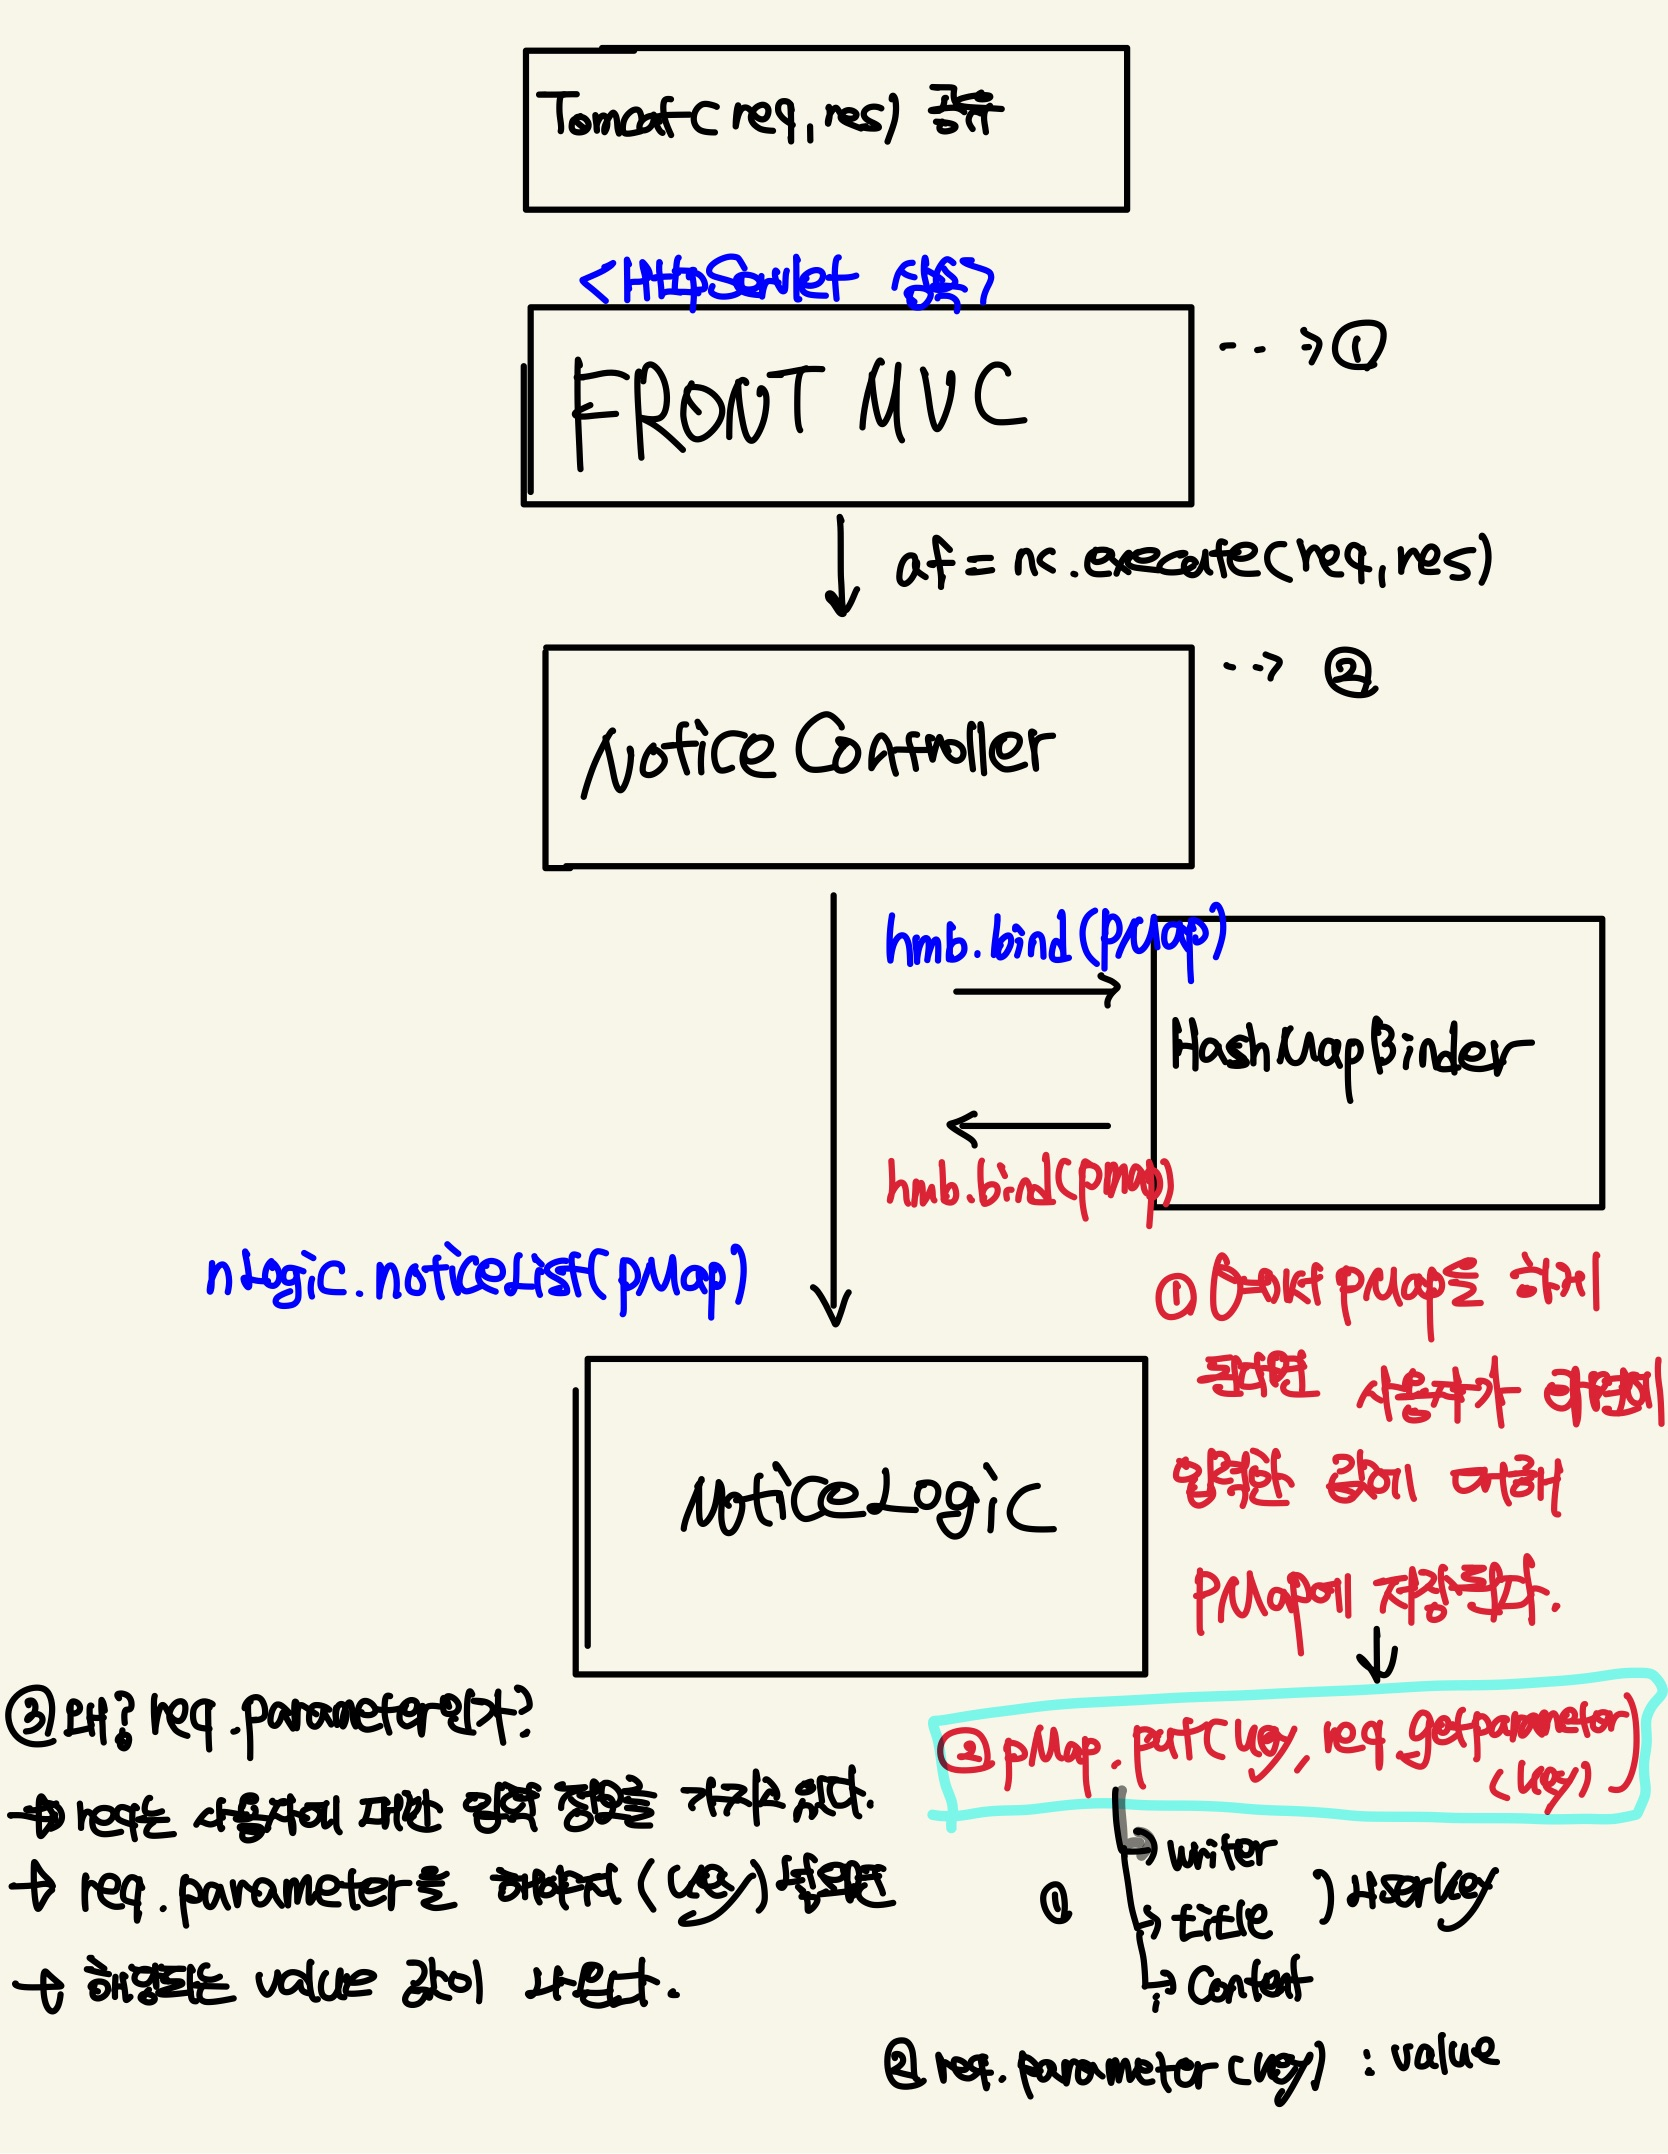
NoticeController nc = new NoticeController();//결합도가 강하다-별로다-제어역전아니다 af = nc.execute(req, res); -
메소드마다 url패턴을 적용할 수 없어서 if문으로 처리했다.
getRequestURI()으로 처리하고 있다.- upmu[0] = notice + upmu[1] = noticeList를 담았다.
- req.setAttribute("upmu",upmu);로 썼다.
-
스프링이랑 비교 했을 때 (메소드마다 매핑을 지원하는 @이 지원되고 있다) 별로다.
@RequestMapping@GetMapping@PostMapping이 지원되고 있다.
NoticeController(수정부분) + Detail 추가
		/**
		 * path.append("jsonNoticeList.jsp"); 이 부분 개선점
		 * int result = 0; 공통코드로 계속 나온다. 개선점
		 *
		 * 전체보기와 상세보기는 페이지가 바뀐다.
		 * 여기선 상세보기가 구현되어 있지 않지만, 상세보기를 구현하려면 응답으로 나오는페이지가 다르다.
		 *
		 * 마이바티스는 동적쿼리를 지원해서 전체조회와 단 건 조회를 같은 메소드를 사용해도 된다.
		 * 이 부분은 nList = nLogic.noticeList(); nList.size()가 1이지만, nList.size() = N이다.(위 전체조회는)
		 * 굳이 나누는 이유는 유지보수를 위해서 나눈다.
		 * 같은 메소드를 호출하지만 그 응답페이지 이름이 달라서 뿌려주는 path문이 달라진다.
		 * req.setAttribute("nList", nList);
		 * path.append("NoticeDetail.jsp");
		 * Select * from where n_no = ??이렇게 나와야된다. 그렇게 되면 파라미터를 넘겨줘야된다.
		 * noticeList(n_no)에 파라미터가 들어가야된다. 여기서 n_no는 pk이다. 메소드 설계를 다시해야된다.
		 *
		 */


		else if("NoticeDetail".equals(upmu[1])) {//select
			logger.info("NoticeController 클래스에서 if문 NoticeDetail에 들어왔습니다.");
			List<Map<String ,Object>> nList = null;
			nList = nLogic.noticeList();
			//원본에다가 담아 두자
			req.setAttribute("nList", nList);
			//Select * from where n_no = ??이렇게 나와야된다. 그렇게 되면 파라미터를 넘겨줘야된다.
			//1-2에선 이 부분을 개선해보자. 실제 프로젝트에선 이렇게 하지 않는다.
			path.append("NoticeDetail.jsp");
			isRedirect = false;//false이면 forward처리됨
		}
-
path.append("jsonNoticeList.jsp"); 이 부분 개선점이다.
-
int result = 0; 공통코드로 계속 나온다. 개선점
-
전체보기와 상세보기는 페이지가 바뀐다.
여기선 상세보기가 구현되어 있지 않지만, 상세보기를 구현하려면 응답으로 나오는페이지가 다르다. -
마이바티스는 동적쿼리를 지원해서 전체조회와 단 건 조회를 같은 메소드를 사용해도 된다.
이 부분은 nList = nLogic.noticeList(); nList.size()가 1이지만, nList.size() = N이다.(위 전체조회는)
굳이 나누는 이유는 유지보수를 위해서 나눈다. -
같은 메소드를 호출하지만 그 응답페이지 이름이 달라서 뿌려주는 path문이 달라진다.
req.setAttribute("nList", nList);
path.append("NoticeDetail.jsp");
Select * from where n_no = ??이렇게 나와야된다. 그렇게 되면 파라미터를 넘겨줘야된다. -
noticeList(n_no)에 파라미터가 들어가야된다. 여기서 n_no는 pk이다. 메소드 설계를 다시해야된다.
-
그래서 공통코드를 처리하는 HashMapBinder를 설계하였다.
HashMapBinder
- 메소드 설계시 리턴타입이 아닌 파라미터 자리를 통해서 값을 전달하는 식으로 설계함.
- 사용자가 입력한 값을 담아 -> 맵이 외부 클래스에서 인스턴스화 되어 넘어오니깐 초기화 처리 후(clear) 사용한다.
- @param pMap :은 필요한 클래스에서 주입해야한다.
-
선언하는 자리이지 생성하는 자리는 아니다.
-
즉, 필요한 클래스에서 pMap을 생성하고 Data를 가지고 넘겨줘야된다.
- 어떤 클래스에서 pMap을 생성할 것인가?
- noticeController 인가? FrontMVC인가?
- 어떤 클래스에서 pMap을 생성할 것인가?
-
package com.example.demo.pojo1;

import java.util.Enumeration;
import java.util.Map;

import org.slf4j.Logger;
import org.slf4j.LoggerFactory;

import jakarta.servlet.http.HttpServletRequest;


public class HashMapBinder {
	Logger logger = LoggerFactory.getLogger(HashMapBinder.class);
	HttpServletRequest req = null;

	HashMapBinder(HttpServletRequest req)
	{
		this.req = req;
	}

	public void bind(Map<String,Object> pMap)
	{
		pMap.clear(); // map을 비워주는 역할
		// <input type ="text" name = "n_title"/>
		//  <input type ="text" name = "n_content"/>
		//  <input type ="text" name = "n_writer"/>
		Enumeration<String> em = req.getParameterNames();

			String key = em.nextElement();
			pMap.put(key,req.getParameter(key));


		}
	}

}
-
HashMapBinder 클래스는 어디 클래스와 의존관계를 지닐까?
-
서블릿과 의존관계가 있다.
+구체적으로 어디?
->noticeController? || FrontMVC?
-> 정답은 FrontMVC이다. -
왜? noticeController는 단순히 action하는 것이지 req,res를 쥐고 있지않다.
-> 그렇다면, HttpServelt를 받기 위해서 FrontMVC와 의존관계가 있다.
-> 구체적으로 코드적으로 어디 부분을 보면 알 수 있나?
-> 생성자 req => this.req = req이 부분이 주입받는 부분 (FrontMVC)에서HashMapBinder(HttpServletRequest req) { this.req = req; }
다음은 어떻게 그 값을 받아와서 pMap에 put하는지 살펴보자.
public void bind(Map<String,Object> pMap) { pMap.clear(); // map을 비워주는 역할 // <input type ="text" name = "n_title"/> // <input type ="text" name = "n_content"/> // <input type ="text" name = "n_writer"/> Enumeration<String> em = req.getParameterNames(); String key = em.nextElement(); pMap.put(key,req.getParameter(key)); } -
-
em=req.getParameterNames(); : em에 name의 이름들을 받아온다.
여기선 n_title. n_content, n_writer가 저장된다.(Enumeration => iterator와 비슷하다. 링크 걸어놨음)
-
key에 em.nextElement를 담고 -> pMap에 {key : value} 형태로 담는다. 담을 떈 req.getParameter가 의미하는 바는 토드에 저장된 값들을 의미한다.

req.getParameter는
일반적인 파라미터로 가져오는 데이터는
예> ?aaa=111&bbb=222&ccc=333request.getParameter("Key 값")
위와 같은 방식으로 가져올 수 있다.
post방식
em
{
	n_title,n_content,n_writer
}
에 대한 정보를 가지고 있다.

key값으로 돌면

pMap
{
	n_title : 휴관일,
    n_content : 이번주 일요일은 휴관입니다.,
    n_writer : 관리자

}


- post맨

[
    {N_TITLE=휴관일, N_WRITER=관리자, N_CONTENT=이번주 일요일은 휴관일입니다., N_NO=1
    },
    {N_TITLE=겨울방학이벤트, N_WRITER=관리자, N_CONTENT=1년 33만원 겨울방학이벤트, N_NO=0
    },
    {N_TITLE=겨울방학이벤트, N_WRITER=관리자, N_CONTENT=2년 33만원 겨울방학이벤트, N_NO=3
    },
    {N_TITLE=겨울방학이벤트, N_WRITER=관리자, N_CONTENT=23년 33만원 겨울방학이벤트, N_NO=4
    }
]

= 이렇게 key와 value로 연결됐다. json과 다르다.
Map 은 (=) 이렇게 연결되어있고

json은 (:) 으로 되어있다.
Map 은 (=) 이렇게 연결되어있고
json은 (:) 으로 되어있다.
Toad Oracle 업데이트
insert into  notice(n_no,  n_title, n_content, n_writer)
values(seq_notice_no.nextval, 1, '제목', '작성자');

update notice
      set n_title = '제목1'
          ,  n_content = '내용1'
          , n_writer = '작성자1'
  where n_no = 1;

delete from notice where n_no = 1;
'제목', '작성자' 이 부분은 사용자로부터 값을 입력받아야한다.
다음 noticeController에서 자바단에 보내는 구조를 바꿨다.
        path.append("/notice/");

		Map<String,Object> pMap = new HashMap<>();
		HashMapBinder hmb = new HashMapBinder(req);


		if("noticeList".equals(upmu[1])) {//select
			logger.info("NoticeController 클래스에서 if문 noticeList에 들어왔습니다.");
			List<Map<String ,Object>> nList = null;
			hmb.bind(pMap);
			nList = nLogic.noticeList(pMap);
			//원본에다가 담아 두자
			req.setAttribute("nList", nList);
			path.append("noticeList.jsp");
			isRedirect = false;//false이면 forward처리됨
		}

		else if("jsonNoticeList".equals(upmu[1])) {//select
			logger.info("NoticeController 클래스에서 if문 jsonNoticeList에 들어왔습니다.");
			List<Map<String ,Object>> nList = null;
			hmb.bind(pMap);
			nList = nLogic.noticeList(pMap);
			//원본에다가 담아 두자
			req.setAttribute("nList", nList);
			//1-2에선 이 부분을 개선해보자. 실제 프로젝트에선 이렇게 하지 않는다.
			path.append("jsonNoticeList.jsp");
			isRedirect = false;//false이면 forward처리됨
		}

		else if("NoticeDetail".equals(upmu[1])) {//select
			logger.info("NoticeController 클래스에서 if문 NoticeDetail에 들어왔습니다.");
			List<Map<String ,Object>> nList = null;
			hmb.bind(pMap);
			nList = nLogic.noticeList(pMap);
			//원본에다가 담아 두자
			req.setAttribute("nList", nList);
			//Select * from where n_no = ??이렇게 나와야된다. 그렇게 되면 파라미터를 넘겨줘야된다.
			//1-2에선 이 부분을 개선해보자. 실제 프로젝트에선 이렇게 하지 않는다.
			path.append("NoticeDetail.jsp");
			isRedirect = false;//false이면 forward처리됨
		}

		//jsp - 입력 - action(insert) - 1 - 성공 - action(select) - jsp
		else if("noticeInsert".equals(upmu[1])) {//insert
			logger.info("NoticeController 클래스에서 if문 noticeInsert에 들어왔습니다.");
			int result = 0;
			hmb.bind(pMap);
			result = nLogic.noticeInsert(pMap);
			if(result == 1) {
				path.append("noticeList.gd");
				isRedirect = true;
			}else {
				path.append("noticeError.jsp");
				isRedirect = true;
			}
		}else if("noticeUpdate".equals(upmu[1])) {//update
			logger.info("NoticeController 클래스에서 if문 noticeUpdate에 들어왔습니다.");
			int result = 0;
			hmb.bind(pMap);
			result = nLogic.noticeUpdate(pMap);
			if(result == 1) {
				path.append("noticeList.gd");
				isRedirect = true;
			}else {
				path.append("noticeError.jsp");
				isRedirect = true;
			}

		}else if("noticeDelete".equals(upmu[1])) {//delete
			logger.info("NoticeController 클래스에서 if문 noticeDelete에 들어왔습니다.");
			int result = 0;
			hmb.bind(pMap);
			result = nLogic.noticeDelete(pMap);
			if(result == 1) {
				path.append("noticeList.gd");
				isRedirect = true;
			}else {
				path.append("noticeError.jsp");
				isRedirect = true;
			}
		}
		af.setPath(path.toString());
		af.setRedirect(isRedirect);
		return af;
	}

}
- 스프링에서는 이런 공통된 관심사에 대해서 지원하고 있다.
		Map<String,Object> pMap = new HashMap<>();
HashMapBinder hmb = new HashMapBinder(req);- 이 부분이 사용자로부터 입력받은 값을 처리하는 부분이다.
- 스프링에서는 HashMapBinder와 같은 클래스를 따로 구현하지 않아도 된다.
마이바티스 변경
	<select id="noticeList" parameterType="map"  resultType = "map">
		select n_no, n_title, n_content, n_writer from notice
		<where>
			<if test = "n_no!=null">AND n_no = #{n_no}</if>
		</where>
	</select>
조건검색을 하려면
<?xml version="1.0" encoding="UTF-8"?>
<!DOCTYPE mapper
 PUBLIC "-//mybatis.org//DTD Mapper 3.0//EN"
 "http://mybatis.org/dtd/mybatis-3-mapper.dtd">
<mapper namespace="com.mybatis.mapper.NoticeMapper">
	<select id="noticeList" parameterType="map"  resultType = "map">
		select n_no, n_title, n_content, n_writer from notice
		<where>
			<if test = "n_no!=null">AND n_no = #{n_no}</if>
			<if test = "gubun != null">
				<choose>
					<when>
						AND n_title, LIKE '%'||#{keyword}||'%'
					</when>
				</choose>

			</if>
		</where>
	</select>
</mapper>
이렇게 와일드 카드로 조건검색을 해야된다. 우리는 컬럼을 기준으로 나눠지기 때문에 gubun이라는 키워드값을 주고 진행한다.
이걸 어떻게 그릴것인가?
부트스트랩에 들어가서
부트스트랩 HTML 폼 태그에 select 이 부분에
<select class="form-select" aria-label="Disabled select example" disabled>
  <option selected>Open this select menu</option>
  <option value="1">One</option>
  <option value="2">Two</option>
  <option value="3">Three</option>
</select>

저기 value 부분에 들어간다. 들어간다.
그렇다면 조건절 3가지를 비교해줘야된다.
12-13 페이지 읽어보기
<?xml version="1.0" encoding="UTF-8"?>
<!DOCTYPE mapper
 PUBLIC "-//mybatis.org//DTD Mapper 3.0//EN"
 "http://mybatis.org/dtd/mybatis-3-mapper.dtd">
<mapper namespace="com.mybatis.mapper.NoticeMapper">

<insert id = "noticeInsert" parameterType = "map">

</insert>

<update id = "noticeUpdate" parameterType = "map">

</update>

<delete id = "noticeDelete" parameterType = "map">

</delete>


	<select id="noticeList" parameterType="map"  resultType = "map">
		select n_no, n_title, n_content, n_writer from notice
		<where>
			<if test = "n_no!=null">AND n_no = #{n_no}</if>
			<if test = "gubun != null">
				<choose>
					<when test = 'gubun.equals("n_title")'>
						AND n_title LIKE '%'||#{keyword}||'%'
					</when>

					<when test = 'gubun.equals("n_content")'>
						AND n_content LIKE '%'||#{keyword}||'%'
					</when>

					<when test = 'gubun.equals("n_writer")'>
						AND n_writer LIKE '%'||#{keyword}||'%'
					</when>
				</choose>

			</if>
		</where>
	</select>
</mapper>
choose 관련되서 마이바티스 pdf 42page 보기
동적 SQL 에서 가장 공통적으로 사용되는 것으로 where 의 일부로 포함될 수 있다.
<select id=”findActiveBlogWithTitleLike”
parameterType=”Blog” resultType=”Blog”>
  SELECT * FROM BLOG
  WHERE state = ‘ACTIVE’
  <if test=”title != null”>
    AND title like #{title}
  </if>
</select>- 문자열 검색 기능을 제공할 것이다. 만약에 title 값이 없다면, 모든 active 상태의 Blog 가 리턴될 것이다.
- 하지만 title 값이 있다면, 그 값과 비슷한 데이터를 찾게 될 것이다.
- title 과 author 을 사용하여 검색하고 싶다면? 먼저, 의미가 좀더 잘 전달되도록 구문의 이름을 변경할 것이다. 그리고 다른
조건을 추가한다.
<select id=”findActiveBlogLike”
parameterType=”Blog” resultType=”Blog”>
  SELECT * FROM BLOG WHERE state = ‘ACTIVE’
  <if test=”title != null”>
    AND title like #{title}
  </if>
  <if test=”author != null and author.name != null”>
    AND author_name like #{author.name}
  </if>
</select>
Insert 로직 추가
NoticeInsert.java (NoticeController)
		//jsp - 입력 - action(insert) - 1 - 성공 - action(select) - jsp
		else if("noticeInsert".equals(upmu[1])) {//insert
			logger.info("NoticeController 클래스에서 if문 noticeInsert에 들어왔습니다.");
			int result = 0;
			hmb.bind(pMap);
			result = nLogic.noticeInsert(pMap);
			if(result == 1) {
				path.append("noticeList.gd");
				isRedirect = true;
			}else {
				path.append("noticeError.jsp");
				isRedirect = true;
			}
NoticeInsert(nLogic)
public int noticeInsert(Map<String, Object> pMap){
		logger.info("NoticeLogic 클래스 noticeInsert이 실행중입니다.");
		int result = 0;
		sqlSessionFactory = MyBatisCommonFactory.getSqlSessionFactory();
		SqlSession sqlSession = sqlSessionFactory.openSession();
		try {
			result = sqlSession.insert("noticeInsert", pMap);
			// pMap를 넣어줘야 #{}에 대한 처리가 된다.
			sqlSession.commit(); // 빼먹으면 안 된다.

		}

		catch(Exception e) {
			e.printStackTrace();
		}

		return result;
	}
xml
<insert id = "noticeInsert" parameterType = "map">
		insert into  notice(n_no,  n_title, n_content, n_writer)
		values(seq_notice_no.nextval, #{n_title}, #{n_content}, #{n_writer})
</insert>
토드 시퀀스 추가하기
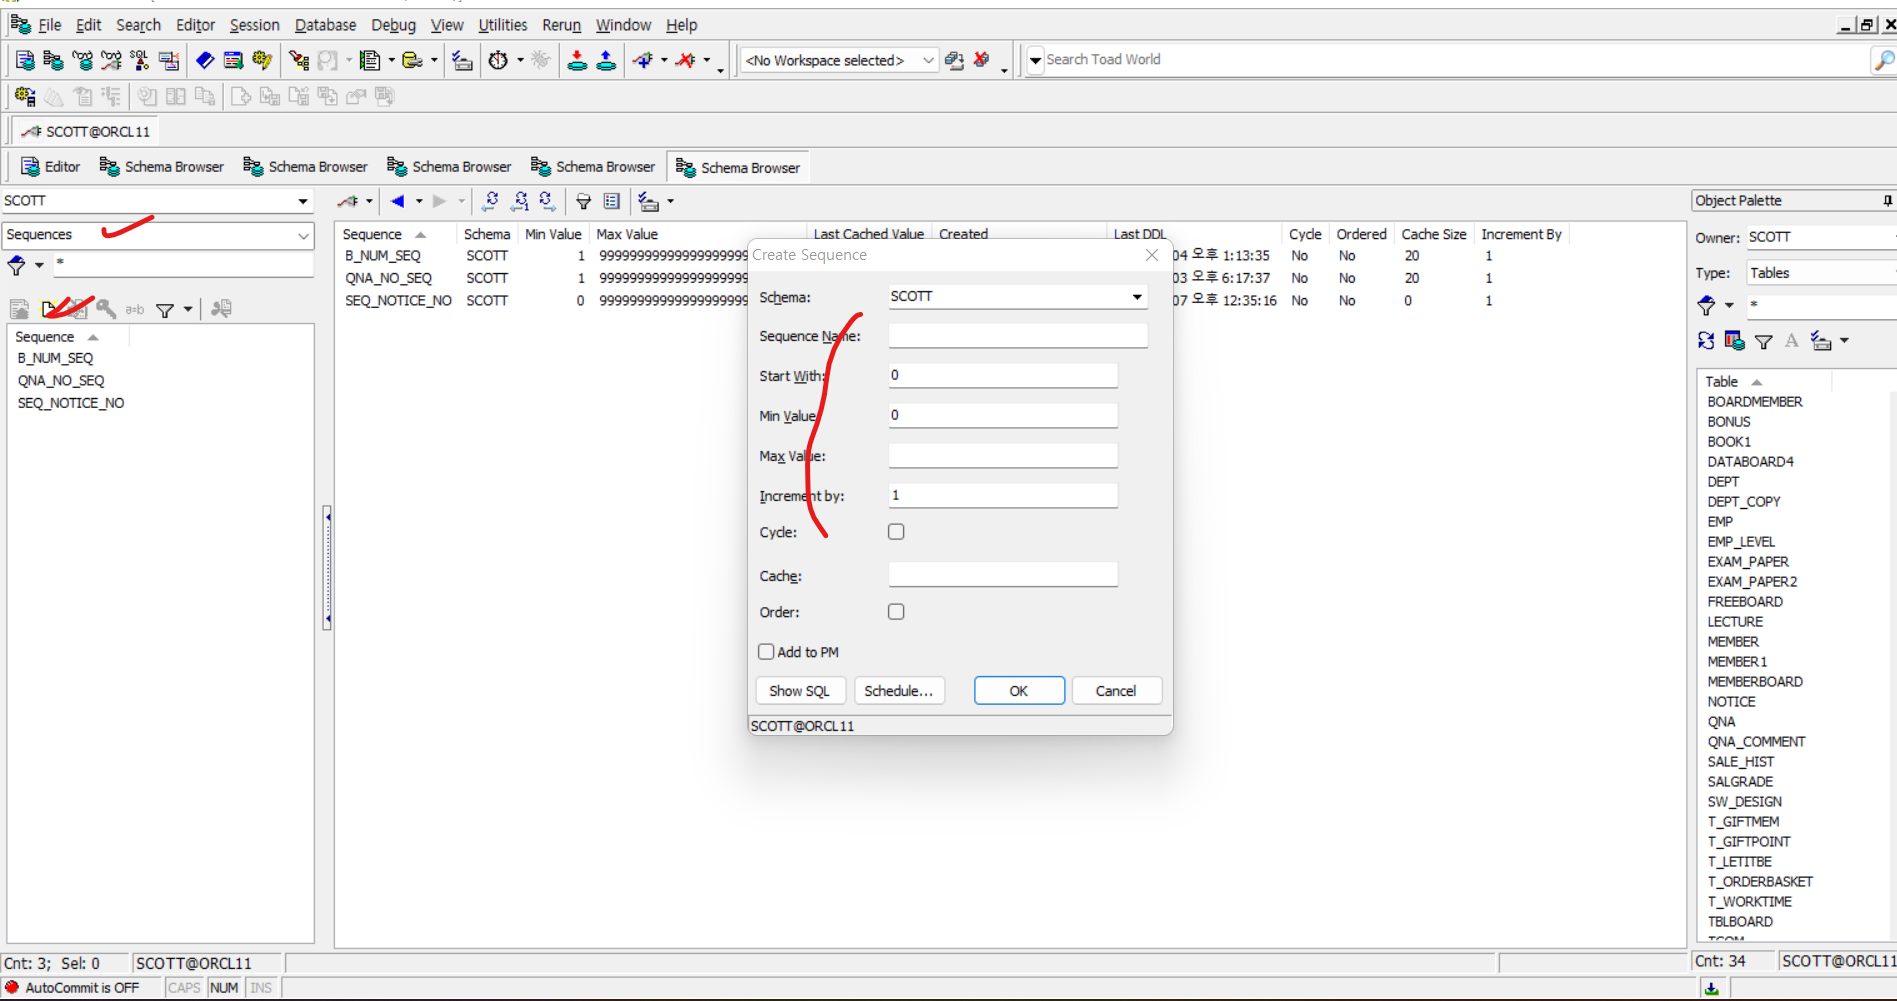
포스트맨 테스트해보기

반영 되었는가?

잘 반영되었다.
큰 틀에서 정리하기
정리
-
무엇을 위한 실습인가? -> PostMan
-
화면이 없이도 나는 개발할 수 있다.
-
화면이 없는 상태에서도 나는 단위테스트 할 수 있다.
패턴화
insert
Jsp(입력받기) - 서블릿(insert) - 서블릿(select) - jsp - 등록하기
update
서블릿(select) - jsp(입력) - 서블릿(업데이트) - 서블릿(select) - jsp - 수정하기
delete
jsp - 서블릿(delete) - 요청하신 건에 대해 취소처리 되었습니다.(다시 돌아와서 조회해야된다.(동기화))서블릿(select) - jsp (1번 동일)
일반조회
서블릿(select) -> jsp -> 전체조회
상세보기
jsp - 서블릿(select) - jsp - 상세보기