File Upload
1. 계획
FrontEnd
유저가 파일을 업로드하고 이를 보낸다고 가정한다.
이 때 보내야 할 값들은 아래와 같다고 가정한다
- user : (String) 유저 이름
- content : (String) 글 내용
- files : (File Object 들의 배열) 업로드한 파일들
BackEnd
유저가 보낸 정보들을 한 번에 받아 게시글을 생성하려고 한다.
Post 값으로 받을 것이고 /board 에 전달 받을 것이다.
2. FrontEnd
2-1. form 태그를 이용하여 전송
보통 사용되는 방법이고 간단한 구현을 할 것이므로 html 만으로 작성한다.
<!DOCTYPE html>
<html lang="en">
<head>
<meta charset="UTF-8">
<meta name="viewport" content="width=device-width, initial-scale=1.0">
<meta http-equiv="X-UA-Compatible" content="ie=edge">
<title>파일 보내기 예제</title>
</head>
<body>
<form name="form" method="post" action="http://localhost:8080/board" enctype="multipart/form-data">
<input name="user" value="Pyo"/>
<input name="content" value="Content"/>
<input type="file" name="files" multiple="multiple"/>
<input type="submit" id="submit" value="전송"/>
</form>
</body>
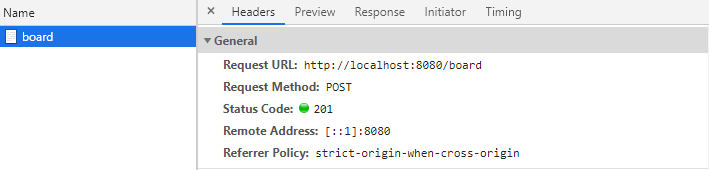
</html>아래와 같은 창에서 전송을 누르면 값이 Backend로 보내어진다.

2-2. Axios 를 이용하여 전송
자바스크립트에서 제어하는 방법도 알아보기 위해 Axios 예제도 만들어보았다.
<!DOCTYPE html>
<html lang="en">
  <head>
    <meta charset="UTF-8">
    <meta name="viewport" content="width=device-width, initial-scale=1.0">
    <meta http-equiv="X-UA-Compatible" content="ie=edge">
    <title>파일 보내기 예제</title>
    <script src="https://cdn.jsdelivr.net/npm/axios/dist/axios.min.js"></script>
  </head>
  <body>
    <input type="file" id="File" name="files" multiple="multiple"/>
    <button id="Button">전송</button>

    <script src="./index.js"></script>
  </body>
</html>
HTML 의 전송 기본은 form 태그로 감싸고, button의 이벤트를 onSubmit으로 설정하는 것이 기본이다!
자바스크립트에서 전송 함수가 작동하는 것을 확인하려고 클릭 이벤트를 활용했다.
오류에 찌들어서 미친것이다.
const ButtonElement = document.querySelector('#Button');
const FileElement = document.querySelector('#File');
const getData = async () => {
try{
const formData = new FormData();
formData.append("user", "Pyo");
formData.append("content", "this is content");
for(let i = 0; i < FileElement.files.length; i++){
formData.append("files", FileElement.files[i]);
}
const url = 'http://localhost:8080/board';
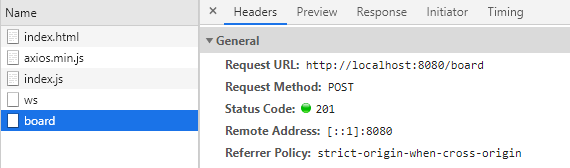
const response = await axios.post(url, formData);
console.log(response)
}
catch (error){
console.error(error);
}
}
ButtonElement.addEventListener('click', getData);- async ~ await 를 사용해 비동기 처리를 해주었다.
- try ~ catch 로 예상치 못 한 오류가 발생하면 Error를 출력하도록 하였다.
- axios.post() 를 이용하였다
FormData 를 통해 값을 전달하였다.

FormData 객체의 append 를 이용해 배열을 전달하고 싶을 때, 배열 자체를 넣는 것이 아니라 같은 Key에 Element들을 하나하나 넣어주어야 한다.
배열을 넣었을 때 Controller에서 이를 인식하지 못하는 오류를 겪었다.
아마도 FormData의 append 함수는 객체를 넣었을 때 무시되는 것 같다.
확실한거 아님
3. BackEnd
3-1. 사진을 저장하는 Entity
실제로 DB에 사진을 저장하는 것은 비효율, 병목현상 등을 고려해 하지 않는다고 한다.
실제 사진은 서버의 특정 위치에 저장하도록 하고 DB에는 사진에 대한 정보만을 저장한다.
BoardPicture.class
@Entity
@Builder
@Getter
@AllArgsConstructor
@NoArgsConstructor
public class BoardPicture {
    @Id
    @GeneratedValue
    private Integer ID;
    @NotNull
    private Integer boardIdx;

    // 원본 파일이름 과 서버에 저장된 파일 경로 를 분리한 이유?
    // 동일한 이름을 가진 파일이 업로드가 된다면 오류가 생긴다.
    // 이를 해결하기 위함
    @NotEmpty
    private String original_file_name;
    @NotEmpty
    private String stored_file_path;

    private long file_size;
}
다시 사진을 읽을 때에는 저장된 정보를 이용해 불러올 것이다.
BoardPictureRepository.java
public interface BoardPictureRepository extends CrudRepository<BoardPicture, Integer> {
    BoardPicture save(BoardPicture boardPicture);

    List<BoardPicture> findAllByBoardIdx(Integer boardIdx);
}
CRUD Repository를 이용할 때 주의점
요소들을 Snake case 가 아닌 Camel case 를 이용할 것
스네이크 표기법인 컬럼으로 Repository에서 쿼리를 생성하는데 에러가 발생한다.
언더스코어는 이미 Spring Data JPA의 탐색 경로를 설정하는 예약어이기 때문에 Property Expressions에 사용하면 안된다.
스네이크 표기법을 사용하기보단 자바의 네이밍 컨벤션인 카멜 표기법을 사용하는 것을 추천한다
3-2. Controller
a) CORS Error
Backend 에서 무작정 코딩을 한 뒤에 프론트에서 정보를 보내보면 아래와 같은 오류가 뜬다.
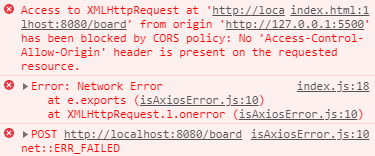
Same Origin과 Cross Origin Policy 때문에 내가 접속한 사이트에서 다른 Origin에 요청한 것들을 기본적으로 차단된다.
사전요청은 되지만 그 데이터를 읽는 건 보안상의 이유로 차단한다.
다른 Origin으로부터의 자원 공유가 필요한 경우에는?
CORS(Cross Origin Resource Sharing) : 다른 Origin의 데이터를 사용한다면 CORS 표준을 지켜 다른 도메인을 허용하도록 할 수 있게 한다
컨트롤러에서 @CrossOrigin 어노테이션을 이용해 다른 포트에서의 요청을 허용할 수 있다.
Class 에서의 모든 Mapping 이 다른 Origin을 허용하는 방법은 아래와 같다.
@CrossOrigin
@RestController
public class BoardController {
	// ~~
}
해당 함수만 다른 Origin을 허용하는 방법은 아래와 같다.
@RestController
public class BoardController {
	// ~~
    @CrossOrigin(origins = {"http://localhost:5500"})
    @PostMapping
    public ResponseEntity<?> create(){}
	// ~~
b) @RequestParam 이용하기
Controller에서 PostMapping을 사용했을 때 @RequestBody를 사용했을 때 정보를 받으면 아래의 Error가 뜰 때가 있다.
Resolved [org.springframework.web.HttpMediaTypeNotSupportedException: Content type 'multipart/form-data;boundary=----WebKitFormBoundary7bFMK5q5ziAvA0tq;charset=UTF-8' not supported ]@RequestBody는 json형태의 바디로 들어오는 데이터를 파싱해주는데 Content-Type이 multipart/form-data 으로 전달될 때는 Exception 을 발생시키게 된다.
@RequestParam() 을 이용해서 데이터를 받아보도록 하자
List<MultipartFile> 자료형을 이용해 여러 개의 이미지를 처리할 수 있다.
@CrossOrigin
@RestController
public class BoardController {
    @Autowired
    private BoardService boardService;

    @PostMapping("/board")
    public ResponseEntity<?> createBoard(
            @Valid @RequestParam("user") String User,
            @Valid @RequestParam("content") String content,
            @Valid @RequestParam("files") List<MultipartFile> files
    ) throws Exception {
        Board board = boardService.addBoard(Board.builder()
                .user(user)
                .content(content)
                .build(), files);

        URI uriLocation = new URI("/board/" + board.getID());
        return ResponseEntity.created(uriLocation).body("{}");
    }
}
c) MultipartHttpServletRequest ?
MultipartHttpServletRequest는 ServletRequest를 상속받아 구현된 인터페이스로 업로드된 파일을 처리하기 위한 여러 가지 메서드를 제공한다.
서버는 클라이언트의 HTTP 요청 메시지 자체를 컨트롤 하는 것이기 때문에 함수 내에서 요청 메시지 안에 포함된 파라미터들을 뜯어내야 하는 코드를 작성해야 한다.
@CrossOrigin
@RestController
public class BoardController {
    @Autowired
    private BoardService boardService;

    @PostMapping("/board")
    public ResponseEntity<?> createBoard(
            @Valid @RequestParam("user") String user,
            @Valid @RequestParam("content") String content,
            MultipartHttpServletRequest multipartHttpServletRequest
    ) throws Exception {
        Board board = boardService.addBoard(Board.builder()
                .user(user)
                .content(content)
                .build(), multipartHttpServletRequest);

        URI uriLocation = new URI("/board/" + board.getID());
        return ResponseEntity.created(uriLocation).body("{}");
    }
3-3. Service
a) FileHandler
List<MultipartFile> 를 받아 사진을 저장하고 이에 대한 정보를 List<boardPicture> 로 변경하여 반환하는 클래스이다.
@Component
public class FileHandler {
    public List<BoardPicture> parseFileInfo(
            Integer boardID,
            List<MultipartFile> multipartFiles
    ) throws Exception{

        // 반환을 할 파일 리스트
        List<BoardPicture> fileList = new ArrayList<>();

        // 파일이 빈 것이 들어오면 빈 것을 반환
        if(multipartFiles.isEmpty()){
            return fileList;
        }

        // 파일 이름을 업로드 한 날짜로 바꾸어서 저장할 것이다
        SimpleDateFormat simpleDateFormat = new SimpleDateFormat("yyyyMMdd");
        String current_date = simpleDateFormat.format(new Date());
// 반환을 할 파일 리스트
        List<BoardPicture> fileList = new ArrayList<>();

        // 파일이 빈 것이 들어오면 빈 것을 반환
        if(multipartFiles.isEmpty()){
            return fileList;
        }

        // 파일 이름을 업로드 한 날짜로 바꾸어서 저장할 것이다
        SimpleDateFormat simpleDateFormat = new SimpleDateFormat("yyyyMMdd");
        String current_date = simpleDateFormat.format(new Date());

        // 프로젝트 폴더에 저장하기 위해 절대경로를 설정 (Window 의 Tomcat 은 Temp 파일을 이용한다)
        String absolutePath = new File("").getAbsolutePath() + "\\";

        // 경로를 지정하고 그곳에다가 저장할 심산이다
        String path = "images/" + current_date;
        File file = new File(path);
        // 저장할 위치의 디렉토리가 존지하지 않을 경우
        if(!file.exists()){
            // mkdir() 함수와 다른 점은 상위 디렉토리가 존재하지 않을 때 그것까지 생성
            file.mkdirs();
        }

        // 파일들을 이제 만져볼 것이다
        for (MultipartFile multipartFile : multipartFiles){
            // 파일이 비어 있지 않을 때 작업을 시작해야 오류가 나지 않는다
            if(!multipartFile.isEmpty()){
                // jpeg, png, gif 파일들만 받아서 처리할 예정
                String contentType = multipartFile.getContentType();
                String originalFileExtension;
                    // 확장자 명이 없으면 이 파일은 잘 못 된 것이다
                if (ObjectUtils.isEmpty(contentType)){
                    break;
                }
                else{
                    if(contentType.contains("image/jpeg")){
                        originalFileExtension = ".jpg";
                    }
                    else if(contentType.contains("image/png")){
                        originalFileExtension = ".png";
                    }
                    else if(contentType.contains("image/gif")){
                        originalFileExtension = ".gif";
                    }
                    // 다른 파일 명이면 아무 일 하지 않는다
                    else{
                        break;
                    }
                }
                // 각 이름은 겹치면 안되므로 나노 초까지 동원하여 지정
                String new_file_name = Long.toString(System.nanoTime()) + originalFileExtension;
                // 생성 후 리스트에 추가
                BoardPicture boardPicture = BoardPicture.builder()
                        .boardIdx(boardID)
                        .original_file_name(multipartFile.getOriginalFilename())
                        .stored_file_path(path + "/" + new_file_name)
                        .file_size(multipartFile.getSize())
                        .build();
                fileList.add(boardPicture);

                // 저장된 파일로 변경하여 이를 보여주기 위함
                file = new File(absolutePath + path + "/" + new_file_name);
                multipartFile.transferTo(file);
            }
        }

        return fileList;
    }
Spring Boot 설정에서 server.tomcat.basedir 를 특정 경로로 지정하지 않을 경우 기본으로 temp 경로가 설정이 된다.
String absolutePath = new File("").getAbsolutePath() + "\\";그래서 위와 같이 프로젝트 폴더를 구하고 절대경로를 따로 구하여 저장했다
절대 경로를 구하는 다른 방법은 아래와 같다.
String absolutePath = System.getProperty("user.dir");;이를 이용하지 않고 파일을 저장하려고 하면 아래와 같은 오류가 발생한다.
java.io.IOException: java.io.FileNotFoundException: C:\Users\pyosh\AppData\Local\Temp\tomcat.10361523148407138883.8080\work\Tomcat\localhost\ROOT\images\20210209\298457256522500.jpg (지정된 경로를 찾을 수 없습니다)b) 각 Repository 에 저장
@Service
public class BoardService {
    private BoardRepository boardRepository;

    private BoardPictureRepository boardPictureRepository;

    private FileHandler fileHandler;

    @Autowired
    public BoardService(BoardRepository boardRepository, BoardPictureRepository boardPictureRepository) {
        this.boardRepository = boardRepository;
        this.boardPictureRepository = boardPictureRepository;
        this.fileHandler = new FileHandler();
    }

    public Board addBoard(
            Board board,
            List<MultipartFile> files
    ) throws Exception {
        // 파일을 저장하고 그 BoardPicture 에 대한 list 를 가지고 있는다
        List<BoardPicture> list = fileHandler.parseFileInfo(board.getID(), files);

        if(list.isEmpty()){
            // TODO : 파일이 없을 땐 어떻게 해야할까.. 고민을 해보아야 할 것
        }
        // 파일에 대해 DB에 저장하고 가지고 있을 것
        else{
            List<BoardPicture> pictureBeans = new ArrayList<>();
            for(BoardPicture boardPicture : list) {
                pictureBeans.add(boardPictureRepository.save(boardPicture));
            }
            board.setPictures(pictureBeans);
        }

        board.setReported_date(new Date().toString());

        return boardRepository.save(board);
    }
}
참조
JPA Property Expressions 쿼리 생성시 참조타입 탐색 경로 지정하기


글 잘보고 갑니다 ^^