
Hooks 이전
if (컴포넌트 내부 상태가 있을 경우) {
  class
} else if (컴포넌트 내부 상태가 없을 경우) {
  if (라이프사이클을 사용해야 하는 경우) {
    class
  } else if (라이프사이클에 관계 없는 경우) {
    function
  }
}
Hooks 이후
- class
- function
function 컴포넌트에서도 Hooks을 통해서 상태나 라이프사이클 기능을 이용할 수 있음
1. 컴포넌트 만들기
Class 컴포넌트
import React from 'react'

class ClassComponent extends React.Component {
  render() {
    return <div>Hello</div>
  }
}
// 사용
<ClassComponents />
Function 컴포넌트
import React from 'react'

// 정의1
function FunctionComponent1() {
  return <div>Hello</div>
}
<FunctionComponent1 /> // 사용

// 정의2
const FunctionComponent2 = () => <div>Hello</div>
<FunctionComponent2 /> // 사용
2. React createElement로 컴포넌트 만들기
React.createElement(
  type, // 태그 이름 문자열 | 리액트 컴포넌트 | React.Fragment
  [props], // 리액트 컴포넌트에 넣어주는 데이터 객체
  [...children] // 자식으로 넣어주는 요소들
)
1. 태그 이름 문자열 type
ReactDOM.render(
  React.createElement("h1", null, `type이 '태그 이름 문자열'입니다.`)
  document.querySelector('#root')
)
2. 리액트 컴포넌트 type
const Component = () => {
  return React.createElement(
    'p',
    null,
    `type이 '리액트 컴포넌트'입니다.`
  )
}
// <Component></Component> => <Component /> => <p>`type이 '리액트 컴포넌트'입니다.`</p>
ReactDOM.render(
  React.createElement(Component, null, null),
  document.querySelector("#root")
)
3. React.Fragment type
- 새로운
Element를 생성하지 않고 타겟에 주입할 수 있음
ReactDOM.render(
  React.createElement(
    React.Fragment,
    null,
    `type이 '리액트 컴포넌트'입니다.`
  ),
  document.querySelector("#root")
)
4. 복잡한 리액트 엘리먼트 모임
- React.createElement의 한계
- 아래 코드는 순수한 js로 코딩
자바스크립트의 라이브러리로ReactDOM과 API(React.createElement)를 호출
ReactDOM.render(
  React.createElement(
    "div",
    null,
    React.createElement(
      "div",
      null,
      React.createElement('h1', null, '주제'),
      React.createElement(
        'ul',
        null,
        React.createElement('li', null, 'React')
        React.createElement('li', null, 'Vue')
      )
    )
  )
  document.querySelector("#root")
)
3. JSX
-
JSX 문법으로 작성된 코드는 순수한 JS로 컴파일하여 사용한다
Q. 이 컴파일을 누가 해준다? A. babel
-
ex) 바벨에서의 컴파일 예시
<div>hello</div>
⇒React.createElement('div', null, 'hello')
$ install babel
// <script type="text/javascript"> // 기존
<script type="text/babel"> // 수정

ReactDOM.render(
  <div>
    <div>
      <h1>주제</h1>
      <ul>
        <li>React</li>
        <li>Vue</li>
      </ul>
    </div>
  </div>,
  document.querySelector("#root")
)
Q. 왜 JSX를 쓰나요?
A1. React.createElement보다 JSX의 가독성이 훨씬 좋음
A2. babel과 같은 컴파일 과정에서 문법적 오류를 인지하기 쉬움
JSX 문법
- 최상위 요소가 하나여야 한다
- 최상위 요소 리턴하는 경우, ()로 감싸야 합니다.(예외)
- 자식들을 바로 랜더링하고 싶으면
<>자식들</>을 사용합니다. =>Fragment - 자바스크립트 표현식을 사용하려면,
{표현식}을 이용함 - if문은 사용할 수 없습니다.
삼항 연산자 혹은 &&를 사용합니다 - style을 이용해 인라인 스타일링이 가능합니다.
- class 대신 className을 사용해 class를 적용할 수 있습니다.
- 자식요소가 있으면, 꼭 닫아야 하고, 자식요소가 없으면 열면서 닫아야 합니다.
<p>어쩌구</p>
<br />
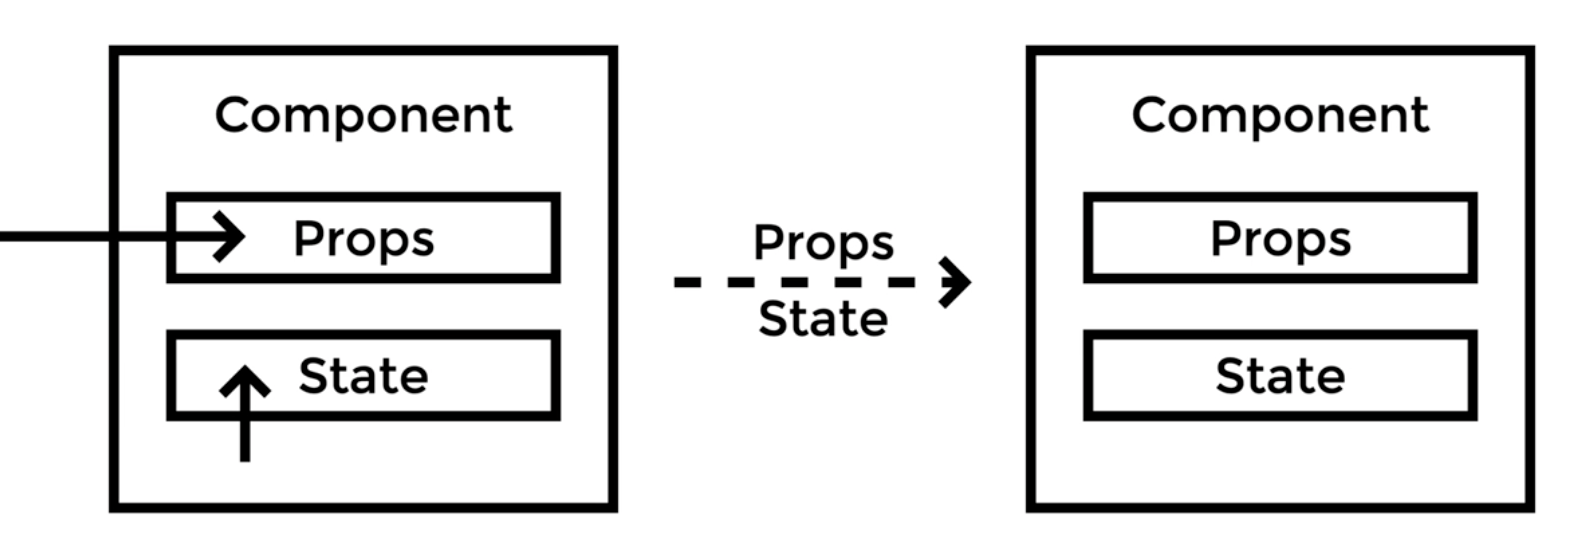
4. Props와 State
Props는 컴포넌트 외부에서 컴포넌트에게 주는 데이터State는 컴포넌트 내부에서 변경할 수 있는 데이터- 둘 다 변경이 발생하면, 랜더가 다시 일어날 수 있음
Render 함수
- Props와 State를 바탕으로 컴포넌트를 그림
- Props와 State가 변경되면 컴포넌트를 다시 그림
- 컴포넌트를 그리는 방법을 기술하는 함수가 랜더 함수
Props 예시
function
function Component(props) {
  return {
    <div>
      <h1>{props.message}, 함수로 만든 컴포넌트</h1>
    <div>
  }
}

ReactDOM.render(
  <Component message="안녕하세요~" />,
  document.querySelector("#root")
)
function - set default
function Component(props) {
  return {
    <div>
      <h1>{props.message}, 함수로 만든 컴포넌트</h1>
    <div>
  }
}
Component.defaultProps = {
  message: '기본값!!'
}
ReactDOM.render(
  <Component message="hello~" />,
  document.querySelector("#root")
)
class
class Component extends React.Component {
  render() {
    <div>
      <h1>{this.props.message}, 클래스로 만든 컴포넌트</h1>
    <div>
  }
}
ReactDOM.render(
  <Component message="hello~" />,
  document.querySelector("#root")
)
class - set default
- 방법1
class Component extends React.Component {
  render() {
    <div>
      <h1>{this.props.message}, 클래스로 만든 컴포넌트</h1>
    <div>
  }
}
Component.defaultProps = {
  message: '기본값'
}
ReactDOM.render(
  <Component message="hello~" />,
  document.querySelector("#root")
)- 방법2
class Component extends React.Component {
  render() {
    <div>
      <h1>{this.props.message}, 클래스로 만든 컴포넌트</h1>
    <div>
  }
  static defaultProps = {
    message: "기본값2"
  }
}
ReactDOM.render(
  <Component message="hello~" />,
  document.querySelector("#root")
)
State 예시
- 방법1
class Component extends React.Component {
  constructor(props) {
    super(props)
    this.state = { count: 0 }
  }

  render() {
    <div>
      <h1>{this.props.message}, 클래스로 만든 컴포넌트</h1>
    <p>{this.state.count}</p>
    <div>
  }
  componentDidMount() { // lifecycle hook
    setTimeout(() => {
      // this.state.count += 1
      this.setState({
        count: this.state.count + 1
      })
    }, 1000)
  }
  static defaultProps = {
    message: "기본값2"
  }
}
ReactDOM.render(
  <Component message="hello~" />,
  document.querySelector("#root")
)- 방법2
class Component extends React.Component {
  state = {
    count: 0
  }
  render() {
    <div>
      <h1>{this.props.message}, 클래스로 만든 컴포넌트</h1>
    <p>{this.state.count}</p>
    <div>
  }
  componentDidMount() { // lifecycle hook
    setTimeout(() => {
      // this.state.count += 1
      this.setState({
        count: this.state.count + 1
      })
    }, 1000)
  }
  static defaultProps = {
    message: "기본값2"
  }
}
ReactDOM.render(
  <Component message="hello~" />,
  document.querySelector("#root")
)- 방법3
class Component extends React.Component {
  state = {
    count: 0
  }
  render() {
    <div>
      <h1>{this.props.message}, 클래스로 만든 컴포넌트</h1>
    <p>{this.state.count}</p>
    <div>
  }
  componentDidMount() { // lifecycle hook
    setTimeout(() => {
      // this.state.count += 1
      // this.setState({
      //   count: this.state.count + 1
      // })
      this.setState((previousState) => {
        const newState = {count: previousState.count + 1}
        return newState
      })
    }, 1000)
  }
  static defaultProps = {
    message: "기본값2"
  }
}
ReactDOM.render(
  <Component message="hello~" />,
  document.querySelector("#root")
)
5. Event Handling
- 이벤트가 발생하고, 그에 맞는 변경이 일어나도록 해야함
- JSX에 이벤트 설정 가능
- camelCase로만 사용할 수 있으며 앞에
on이 붙음
: ex)onClick,onMouseEnter - 이벤트에 연결된 자바스크립트 코드는 함수
:이벤트 = {함수} - 실제 DOM 요소들에만 사용 가능
: 리액트 컴포넌트에 사용하면, 그냥props로 전달함
function
function Component() {
  return {
    <div>
      <button
        onClick={() => {
          console.log("clicked")
        }}
      >
        클릭
      </button>
    <div>
  }
}

ReactDOM.render(
  <Component />,
  document.querySelector("#root")
)
class
class Component extends React.Component {
  render() {
    return {
      <div>
        <button
          onClick={() => {
            console.log("clicked")
          }}
        >

        클릭
        </button>
      <div>
    }
  }
}
ReactDOM.render(
  <Component />,
  document.querySelector("#root")
)
class - click event
class Component extends React.Component {
  state = {
    count: 0
  }
  render() {
    return {
      <div>
        <p>{this.state.count}</p>
        <button
          onClick={() => {
            console.log("clicked")
            this.setState((state) => ({
              ...state,
              count: state.count + 1
            }))
          }}
        >
          클릭
        </button>
      <div>
    }
  }
}
ReactDOM.render(
  <Component />,
  document.querySelector("#root")
)
class - click event - method 분리
class Component extends React.Component {
  state = {
    count: 0
  }
  // constructor(props) {
    // super(props)
    // this.click = this.click.bind(this)
  // }
  render() {
    return {
      <div>
        <p>{this.state.count}</p>
        <button
          onClick={() => {
          }}
        >
          클릭
        </button>
      <div>
    }
  }
}
click = () => {
  console.log("clicked")
  this.setState((state) => ({
    ...state,
    count: state.count + 1
  }))
}
ReactDOM.render(
  <Component />,
  document.querySelector("#root")
)
6. Component Lifecycle
- 리액트 컴포넌트는 탄생부터 죽음까지 여러지점에서 개발자가 작업 가능하도록 메서드를 오버라이딩 할 수 있게 해준다.
Declarative | 디클레러티브
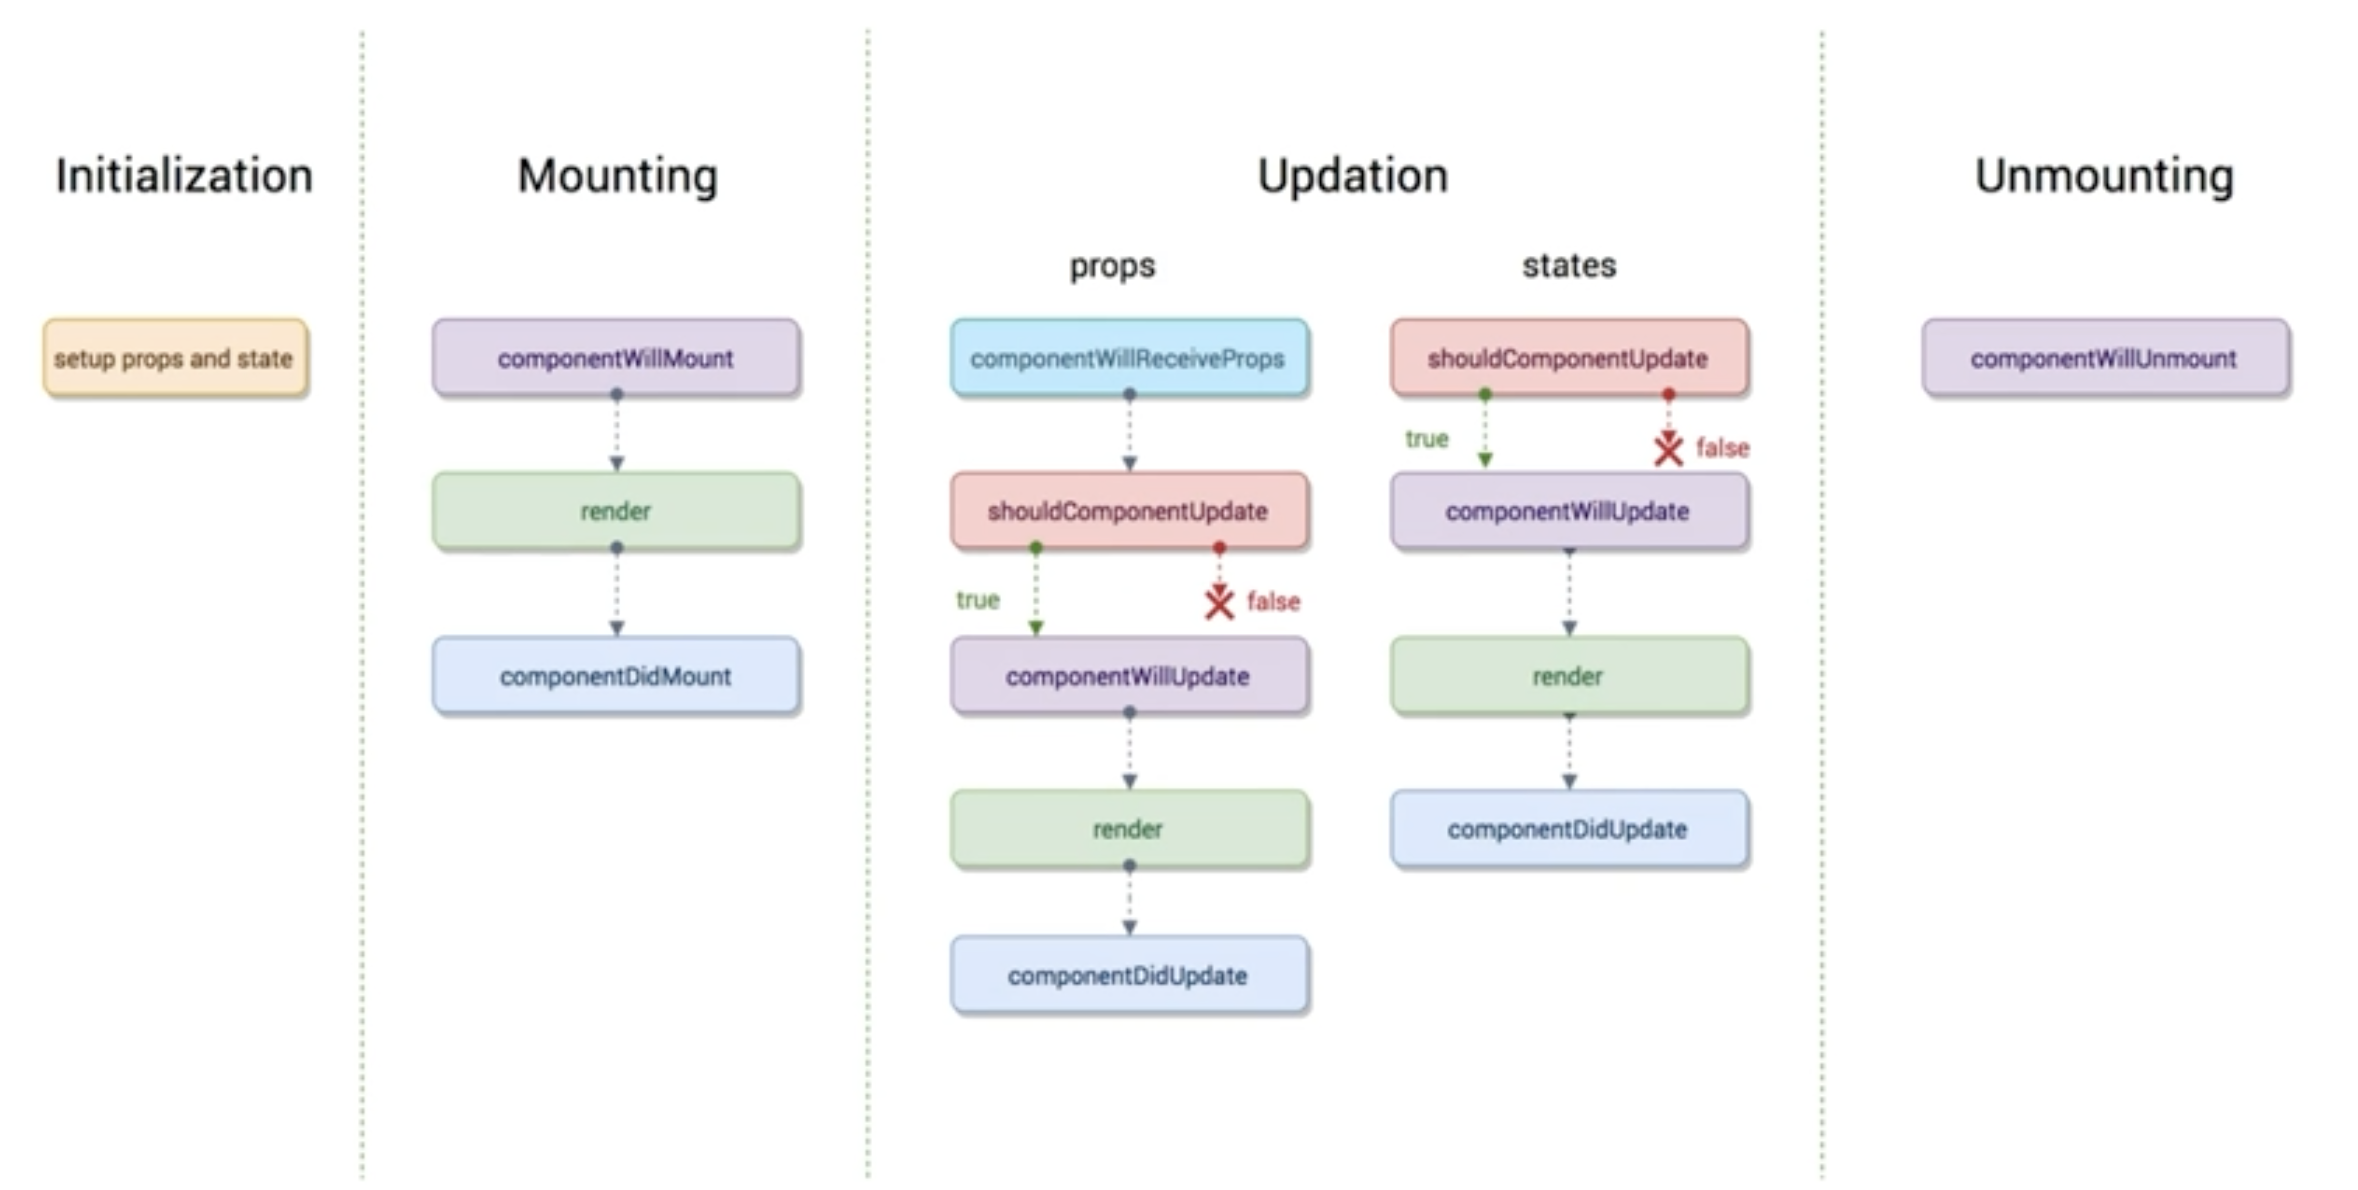
Component 생성 및 마운트(< v16.3)
- constructor
- componentWillMount
- render(최초 렌더)
- componentDidMount
class App extends React.Component {
  state = {
    age: 39,
  }
  constructor(props) {
    super(props)
    console.log("constructor", props)
  }
  render() {
    console.log('render')
    return (
      <div>
        <h2>
          Hello {this.props.name} - {this.state.age}
        </h2>
      </div>
    )
  }
  componentWillMount() {
    console.log("componentWillMount")
  }
  componentDidMount() {
    console.log("componentDidMount")
    setInterval(() => {
      this.setState(state => ({ ...state, age: state.age + 1 }))
    })
  }
}

ReactDOM.render(<App name="Mark" />, document.querySelector("#root"))
Component props, state 변경(<v16.3)
- componentWillReceiveProps
- shouldComponentUpdate
- componentWillUpdate
- render
- componentDidUpdate
componentWillReceiveProps
- props를 새로 지정했을 때 바로 호출
- state의 변경에 반응하지 않음
⇒ 여기서 prop의 값에 따라 state를 변경해야 한다면 setState를 이용해 state를 변경합니다.
⇒ 그러면 다음 이벤트로 각각 가는 것이 아니라 한 번에 변경됩니다.
shouldComponentUpdate
- props만 변경되어도
- state만 변경되어도
- props & state 둘 다 변경되어도
- new Props 와 new State를 인자로 해서 호출
- return type이 boolen
: true이면 render
: false이면 render가 호출되지 않음
: 이 함수를 구현하지 않으면, 디폴트는 true
componentWillUpdate
- 컴포넌트가 재렌더링 되기 직전에 불림
- 여기선 setState 같은 것을 쓰면 안됨
render
componentDidUpdate
- 컴포넌트가 재렌더링을 마치면 불림
Component 언마운트 (<v16.3)
componentWillUnmount
Component 라이프사이클 변경 (v16.3)
- constructor
- componentWillMount => getDerivedStateFromProps
- render
- componentDidMount
- componentWillReceiveProps => getDerivedStateFromProps
- shouldComponentUpate
- render
- componentWillUpdate => getSnapshotBeforeUpdate
(dom에 적용) - componentDidUpdate
- componentWillUnmount
Component 에러 캐치
- componentDidCatch
- Error Boundaries를 통해서 자식의 에러를 감지
: 보통의 경우 라이브러리를 설치해서 활용

protect me from what i want