Intro
Next.js로 만든 웹 서비스를 배포하는 많은 방법 중, 초기 비용 부담이 없이 서비스를 시작하고, 증가하는 트래픽 처리를 할 수 있는 플랫폼을 테스트 하게 되었습니다.
AWS Lambda가 우선 순위에 올랐고, 단점이던 용량 한계도 docker image로 deploy 하게 되면 10기가까지 묶을 수 있어 AWS Lambda가 최종 낙점 되었습니다.
Lambda deploy는 serverless가 쉽고 간단하여 이를 사용 하였습니다.
2022.12.28 수정사항
빌드된 도커이미지에서 png, jpege등과 같은 바이너리 데이터를 서비스 하기 위해 serverless.yaml에 apiGateway 설정을 추가하였습니다.
Project Setup
$ npx create-next-app@latest next-lambda --use-yarn
$ cd next-lambda
$ yarn dev
브라우저에서 http://localhost:3000 으로 접속하면 샘플 페이지가 출력되는것을 볼 수 있습니다.
Docker Setup
사전 준비사항
- Docker Desktop : https://www.docker.com/products/docker-desktop/
docker image로 빌드하기 위해서는 next.config.js에서 output을 'standalone'으로 설정 하여야 합니다.
//
// next.config.js
//

/** @type {import('next').NextConfig} */
const nextConfig = {
  reactStrictMode: true,
  output: 'standalone', // 추가
};

module.exports = nextConfig;
#
# Dockerfile
#
# Install dependencies only when needed
FROM node:18-alpine AS deps
# Check https://github.com/nodejs/docker-node/tree/b4117f9333da4138b03a546ec926ef50a31506c3#nodealpine to understand why libc6-compat might be needed.
RUN apk add --no-cache libc6-compat
WORKDIR /app
# Install dependencies based on the preferred package manager
COPY package.json yarn.lock* package-lock.json* pnpm-lock.yaml* ./
RUN \
if [ -f yarn.lock ]; then yarn --frozen-lockfile; \
elif [ -f package-lock.json ]; then npm ci; \
elif [ -f pnpm-lock.yaml ]; then yarn global add pnpm && pnpm i --frozen-lockfile; \
else echo "Lockfile not found." && exit 1; \
fi
# Rebuild the source code only when needed
FROM node:18-alpine AS builder
WORKDIR /app
COPY --from=deps /app/node_modules ./node_modules
COPY . .
# Next.js collects completely anonymous telemetry data about general usage.
# Learn more here: https://nextjs.org/telemetry
# Uncomment the following line in case you want to disable telemetry during the build.
# ENV NEXT_TELEMETRY_DISABLED 1
RUN yarn build
# If using npm comment out above and use below instead
# RUN npm run build
# Production image, copy all the files and run next
FROM node:18-alpine AS runner
WORKDIR /app
ENV NODE_ENV production
# Uncomment the following line in case you want to disable telemetry during runtime.
# ENV NEXT_TELEMETRY_DISABLED 1
RUN addgroup --system --gid 1001 nodejs
RUN adduser --system --uid 1001 nextjs
COPY --from=builder /app/public ./public
# Automatically leverage output traces to reduce image size
# https://nextjs.org/docs/advanced-features/output-file-tracing
COPY --from=builder --chown=nextjs:nodejs /app/.next/standalone ./
COPY --from=builder --chown=nextjs:nodejs /app/.next/static ./.next/static
###
### aws-lambda-adapter
###
COPY --from=public.ecr.aws/awsguru/aws-lambda-adapter:0.6.0 /lambda-adapter /opt/extensions/lambda-adapter
###
###
###
USER nextjs
EXPOSE 3000
ENV PORT 3000
CMD ["node", "server.js"]Dockerfile의 내용은 공식문서와 with-docker 예제의 내용을 참고 하였습니다.
AWS lambda의 적용을 위해 'aws-lambda-adapter' 관련한 내용을 추가 하였습니다.
aws-lambda-adapter는 웹 서비스를 Lambda에서 처리할 수 있게 하는 어뎁터 입니다.
$ docker build -t next-lambda .
$ docker run -p 3000:3000 next-lambda
이전에 yarn dev 로 실행된 서버를 중지하고 위의 커멘드를 실행하면,
브라우저에서 http://localhost:3000 으로 접속하면 샘플 페이지가 출력되는것을 볼 수 있습니다.
Lambda Deploy
사전 준비사항
먼저 serverless.yaml을 생성합니다.
#
# serverless.yaml
#
service: next-lambda

provider:
  name: aws
  runtime: nodejs18.x
  region: ap-northeast-2
  stage: ${opt:stage, 'dev'}
  ecr:
    images:
      next-lambda:
        path: ./
#       platform: linux/amd64  ## x86으로 도커이미지 빌드

  #
  # 바이너리 서비스를 위해 api gateway 설정 추가
  #
  apiGateway:
    binaryMediaTypes:
      - '*/*'
functions:
  api:
    architecture: arm64 ## arm64 플랫폼으로 서비스
    image:
      name: next-lambda
    events:
      - http:
          cors: true
          method: any
          path: '/'
      - http:
          cors: true
          method: any
path: '{any+}'- 저의 개발 환경이 macbook m1이기에 별도의 지정 없이 docker build를 하게되면, arm64 이미지가 생성 됩니다.
- 그래서 Lambda의 플렛폼을 arm64로 설정 하였습니다. (serverless 기본 설정은 x86 입니다.)
$ npx serverless deploy출력
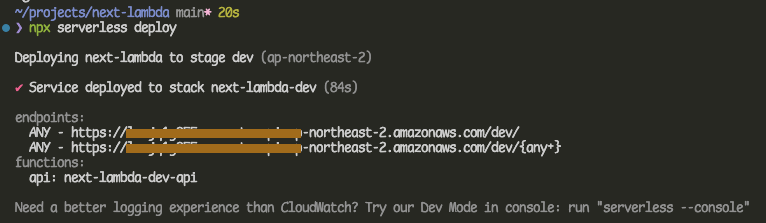
결과화면에 나온 URL로 브라우저에서 접속을 하게되면 deploye된 NextJS는 잘 실행 되지만 아래와 같이 깨진 화면이 출력 됩니다.
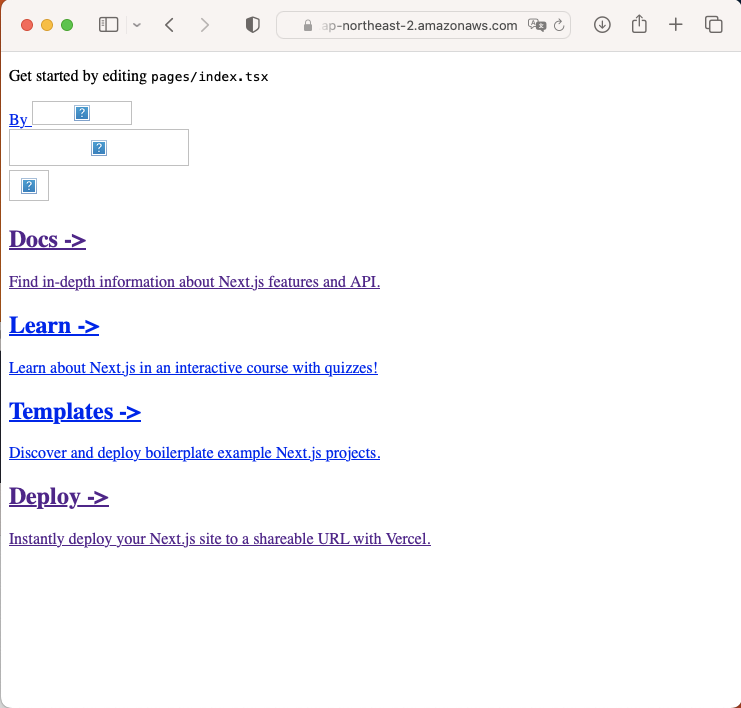
페이지가 깨지는 원인은, Lambda에서 url 뒤에 /dev 와 같은 stage path가 추가 되기 때문에 root path가 맞지 않기 때문입니다.
<image
       src="/vercel.svg"
       alt="Vercel Logo"
       className="{styles.vercelLogo}"
       width="{100}"
       height="{24}"
       priority
/>
자동 생성된 _app.tsx의 소스코드의 이미지 샘플을 보면 위와 같이 /vercel.svg 로 코딩 되어있는데, Lambda 서비스 에서는 /dev/vercel.svg 로 바꾸어야 화면에 출력 됩니다.
이를 해결하는 방법을 몇가지 시도 하였습니다.
local test, build, deploy 과정 중에서, 제가 테스트 한 방법 중에서 가장 안정적인 방법은 custom domain을 사용하는 방법이였습니다. (어짜피 서비스 하려면 커스텀 도메인을 사용해야 하기에 ...)
Service에 Custom Domain 적용
사전 준비사항
- AWS Route53에 도메인 호스팅
- AWS로 도메인 네임서버 변경 (외부에서 구입한 도메인을 사용 할 경우)
- AWS Certificate Manager(ACM)에 인증서 생성
AWS에서 바로 도메인을 구입하고 등록하면 조금 더 편하지만, 외부에서 이미 도메인을 구매 하였다면, AWS에 도메인 호스팅을 등록하고, 네임서버를 AWS로 이전 등록을 하면 됩니다. 이에 대한 자세한 설명은 많은 자료가 있으니 생략 합니다.
그리고 AWS ACM의 인증서를 생성 해야 합니다. (public 인증서는 무료 입니다.)
인증서의 생성은 us-east-1 에서 생성 하여야 Lambda에 적용 됩니다.
serverless에서 custom domain을 설정을 위한 패키지를 설치 합니다.
$ yarn add -D serverless-domain-managerserverless.yaml를 수정 합니다.
#
# serverless.yaml
#
service: next-lambda

### ...
### 하단에 아래 항목 추가 ###
### ...

plugins:
  - serverless-domain-manager

custom:
  customDomain:
    domainName: xxxxx.pndsoft.co.kr
    basePath: ''
    stage: ${self:provider.stage}
    createRoute53Record: true
    certificateArn: arn:aws:acm:us-east-1:000000000000:certificate/xxxxxxxx-xxxx-xxxx-xxxx-xxxxxxxxxxxxx
API Gateway에 custom도메인을 적용 합니다.
$ npx serverless create_domain마지막으로 Next.JS앱을 deploy 합니다.
$ npx serverless deploydeploy가 완료되고 나온 aws url로 접속하면 이전의 오류 화면과 같은 결과지만, 설정한 custom 도메인으로 접속하면 정상적인 페이지가 출력되는것을 확인할 수 있습니다.
Conclusion
AWS Lambda에 Next.JS를 적용해보니, 비용 부담없이 마이크로프론트엔드 서비스를 구성하기에 나쁘지 않다는 결론을 얻었습니다. 이런 저런 작업들을 하나 보면 또 다른 문제가 발생할 수 있지만 어떻게든 해결 할 수 있을 것이고, 이러한 노력은, 부담없는 비용으로 시작할 수 있는 Lambda의 장점에 비해 작아 보였습니다.
나름대로 많은 자료를 찾고 테스트 해서 쉬운 방법을 찾았으나, 더 좋은 설정 방법이나 활용 방법이 있으면 공유 부탁 드립니다.
Reference
https://nextjs.org/docs/deployment
https://github.com/vercel/next.js/tree/canary/examples/with-docker
https://github.com/awslabs/aws-lambda-web-adapter
https://blog.youhogeon.com/127?category=920905