React 실전 (Project)
Udemy - 한입크기로 잘라 먹는 리액트
📌 감정일기장 페이지 구현 - 일기 쓰기(/new)
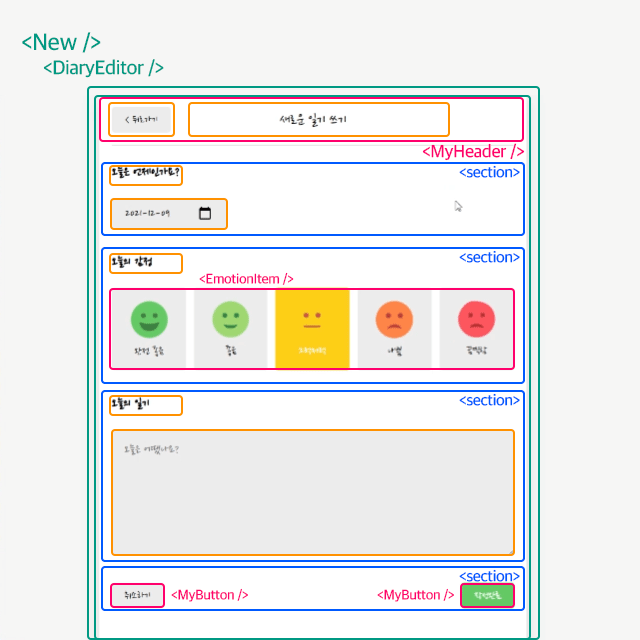
☑️ 일기 쓰기(/new) Layout
New 컴포넌트: 홈 > 새 일기쓰기 버튼 클릭 시 이동하는 페이지(/new)
ㄴDiaryEditor 컴포넌트
....ㄴMyHeader와 4개의 section
....ㄴ 1번째 section : 오늘의 날짜 datepicker
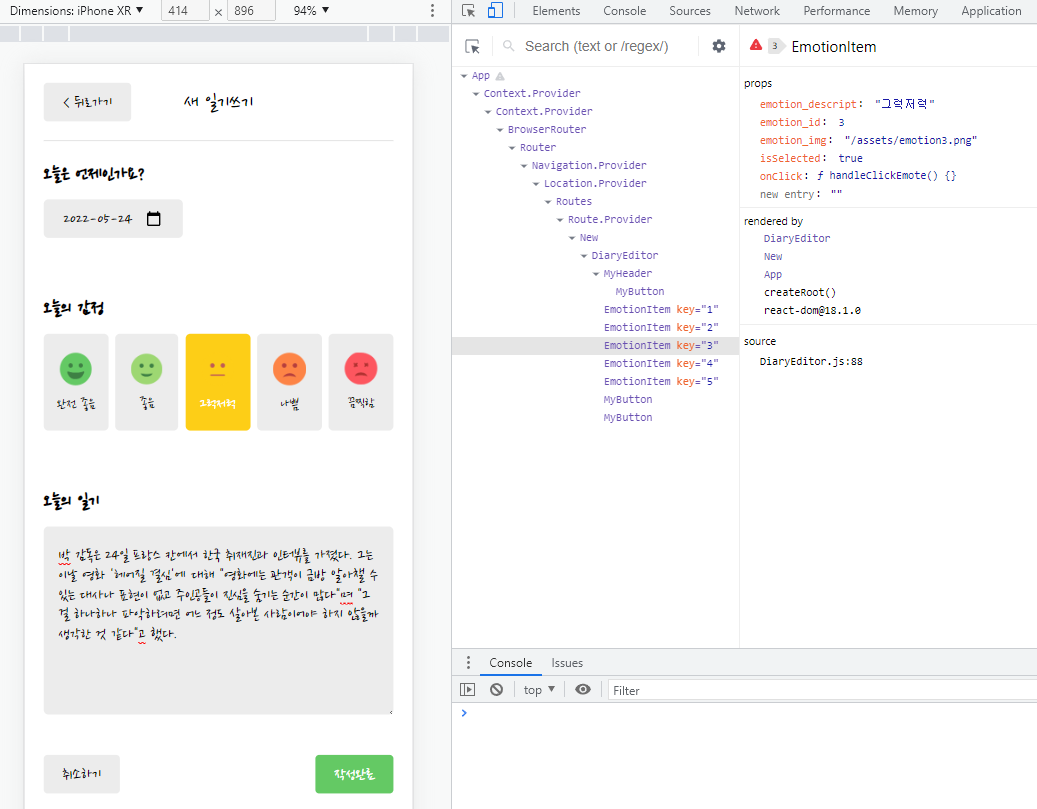
....ㄴ 2번째 section : 오늘의 감정EmotionItem컴포넌트
....ㄴ 3번째 section : 오늘의 일기 textarea
....ㄴ 4번째 section :MyButton 컴포넌트(취소하기, 작성완료)
☑️ New 수정
- New에 있던 기존 내용을 DiaryEditor로 별도 컴포넌트로 분리 (DiaryEditor는 생성 후 import)
src/pages/New.js
import DiaryEditor from "../components/DiaryEditor";

const New = () => {
  return (
    <div>
      <DiaryEditor />
    </div>
  );
};

export default New;
☑️ DiaryEditor
- MyHeader, MyButton 컴포넌트로 header, 하단 button 만들기
- EmotionItem 컴포넌트의 감정 버튼, setEmotion (useState)
- 오늘 날짜 달력 (기본 datepicker)에 날짜 표시, 새 일기 작성 시 당일 날짜 표시 (useState)
- 오늘의 일기 작성란 글자 수 미만 시 focusing (useState, useRef)
- 취소하기 시 이전 화면 이동 (useNavigate)
- 작성완료 시 작성된 데이터 props으로 전달 (DiaryDispatchContext)
src/components/DiaryEditor.js
// hooks
import { useState, useRef, useContext } from "react";
import { useNavigate } from "react-router-dom";
import { DiaryDispatchContext } from "./../App";

// components
import MyHeader from "./MyHeader";
import MyButton from "./MyButton";
import EmotionItem from "./EmotionItem";

// EmotionItem의 img 불러오기 (1~5개의 감정 배열)
const env = process.env;
env.PUBLIC_URL = env.PUBLIC_URL || "";

const emotionList = [
  {
    emotion_id : 1,
    emotion_img : process.env.PUBLIC_URL + `/assets/emotion1.png`,
    emotion_descript : '완전 좋음'
  },
  {
    emotion_id : 2,
    emotion_img : process.env.PUBLIC_URL + `/assets/emotion2.png`,
    emotion_descript : '좋음'
  },
  {
    emotion_id : 3,
    emotion_img : process.env.PUBLIC_URL + `/assets/emotion3.png`,
    emotion_descript : '그럭저럭'
  },
  {
    emotion_id : 4,
    emotion_img : process.env.PUBLIC_URL + `/assets/emotion4.png`,
    emotion_descript : '나쁨'
  },
  {
    emotion_id : 5,
    emotion_img : process.env.PUBLIC_URL + `/assets/emotion5.png`,
    emotion_descript : '끔찍함'
  },
]

// 날짜 표시는 YYYY-MM-DD 형태의 9개의 문자열 반환(toISOString)
// date 객체를 전달받음
const getStringDate = (date) => {
  return date.toISOString().slice(0, 10);
};

const DiaryEditor = () => {
  const [emotion, setEmotion] = useState(3); // 그럭저럭 감정(3) 기본값
  const [date, setDate] = useState(getStringDate(new Date())); // new Date 오늘 날짜 초기값
  const [content, setContent] = useState(); // textarea 상태 변화
  const contentRef = useRef(); // textarea 참조

// EmotionItem 클릭 시 해당 state로 변화
  const handleClickEmote = (emotion) => {
    setEmotion(emotion);
  };

// 작성완료 시 App.js에 전달
  const {onCreate} = useContext(DiaryDispatchContext);

// 아무 것도 작성하지 않았다면(1글자 미만) textarea 참조받아 focusing
  const handleSubmit = () => {
    if(content.length < 1) {
      contentRef.current.focus();
      return;
    }

	// 일기 작성 시 날짜, 내용, 감정 onCreate의 인자로
    onCreate(date, content, emotion);

    // 작성완료 시 home 화면 이동
    // 일기 작성 옵션 뒤로가기 막기(replace:true)
    navigate('/', {replace:true});
  };

// 경로 이동
  const navigate = useNavigate();

  return (
    <div className="DiaryEditor">
      <MyHeader
        headText={"새 일기쓰기"}
        leftChild={<MyButton text={"< 뒤로가기"} onClick={()=>navigate(-1)} />}
      />
      <div>
        <section>
          <h4>오늘은 언제인가요?</h4>
          <div className="inputBox">
            <input
              className="inputDate"
              type="date"
              value={date}
              onChange={(e)=>setDate(e.target.value)} />
          </div>
        </section>
        <section>
          <h4>오늘의 감정</h4>
          <div className="inputBox emotionListWrapper">
            {emotionList.map((it)=>(

            // EmotionItem 컴포넌트
            // 클릭하여 선택한 감정 id와 감정이 맞는지
              <EmotionItem key={it.emotion_id} {...it} onClick={handleClickEmote} isSelected={it.emotion_id === emotion} />
              // <div key={it.emotion_id}>{it.emotion_descript}</div>
            ))}
          </div>
        </section>
        <section>
          <h4>오늘의 일기</h4>
          <div className="inputBox textWrapper">
            <textarea
              placeholder="오늘은 어땠나요?"
              ref={contentRef}
              value={content}
              onChange={(e)=>setContent(e.target.value)}
            />
          </div>
        </section>
        <section>
          <div className="controlBox">
            <MyButton text={"취소하기"} onClick={()=>navigate(-1)} />
            <MyButton text={"작성완료"} type={"positive"} onClick={handleSubmit} />
          </div>
        </section>
      </div>
    </div>
  );
};

export default DiaryEditor;
src/components/EmotionItem.js
// 감정id, 감정img, 감정명, onClick, isSelected를 props으로 전달
const EmotionItem = ({ emotion_id, emotion_img, emotion_descript, onClick, isSelected }) => {
  return (

  // 오늘의 감정 5개 중 선택 시
  // 선택한 item은 EmotionItem_on번호
  // 선택하지 않은 item은 EmotionItem_off
    <div
      className={[
        "EmotionItem",
        isSelected ? `EmotionItem_on${emotion_id}` : `EmotionItem_off`].join(" ")}
      onClick={()=>onClick(emotion_id)}
    >
      <img src={emotion_img} alt={emotion_descript} />
      <span>{emotion_descript}</span>
    </div>
  );
};

export default EmotionItem;
☑️ CSS Styling
/* reset */

/* DiaryEditor */
.DiaryEditor { position:relative; }
.DiaryEditor section { margin:0 0 40px 0; }
.DiaryEditor h4 { padding:24px 0 16px;font-size:22px;font-weight:600; }
.DiaryEditor .inputBox { position:relative; }
.DiaryEditor .inputDate { margin:0 10px 0 0;padding:9px 20px;border:none;border-radius:5px;background-color:#ececec;font-size:18px; }
.DiaryEditor .emotionListWrapper { display:grid;grid-template-columns:repeat(5, auto);gap:2%; }

/* textWrapper */
.DiaryEditor textarea { padding:20px 16px;font-size:18px;box-sizing:border-box;width:100%;min-height:200px;resize:vertical;border-radius:5px;background-color:#ececec;border:none; }
.DiaryEditor textarea:focus { background-color:#fff;border:1px solid #ececec; }

/* controlBox */
.DiaryEditor .controlBox { display:flex;justify-content:space-between;align-items:center; }

/* EmotionItem */
.EmotionItem { cursor:pointer;border-radius:5px;padding:20px 0;display:flex;flex-direction:column;justify-content:center;align-items:center; }
.EmotionItem img { width:50%; }
.EmotionItem span { display:inline-block;margin-top:12px;font-size:16gpx; }

/* EmotionItem On/Off */
.EmotionItem_off { background-color:#ececec; }
.EmotionItem_on1 { background-color:#64c964;color:#fff; }
.EmotionItem_on2 { background-color:#9dd772;color:#fff; }
.EmotionItem_on3 { background-color:#fdce17;color:#fff; }
.EmotionItem_on4 { background-color:#fd8446;color:#fff; }
.EmotionItem_on5 { background-color:#fd565f;color:#fff; }
☑️ Results
💬 생각해보기
reset css도 별도로 추가함. 퍼블리셔다보니 html 구조로 생각하게 되는데 jsx에서 구조화할 때 공통요소가 많아지니 section, form, title 요소 등을 전부 컴포넌트화하고 DiaryEditor에 import하면 어떨까도 생각해봤는데 그러면 구조상으로는 하위요소가 많아질 거 같은데, 수정할 때는 개별적으로 해서 편리할 거 같기도 하고..? (다 완성하고 한번 나눠보는 것도 좋을 거 같다.)

필요한 내용을 공부하고 저장합니다.