vite+web component 로 간단한 웹 boilerplate 만들기 (storybook을 곁들인...)

여러가지 해보고 싶은것도 하다보니 프레임워크를 사용하여 진행하는 프로젝트도 많은 반면에 프레임워크를 올려서 하는 프로젝트가 오버스팩인 경우도 많았다. 프레임워크에 의존적이지 않는 프로젝트를 구성해야 되거나, 간단한 Html + Javascript만 사용하고 싶을때 사용해 보려고 진행했다.
요구조건
- vite 사용
- web component(custom element) 이용하여 재사용성 증가
- devDependencies만 사용해서 build시에 들어가는 내용 없게하기
- Storybook을 사용해서 컴포넌트 개발할수 있게하기
- 살짝의 FSD
dependencies
순수 Javascript만으로 작성하려고 해서 Vite만 제외하고는 모든 의존성이 없다.
// package.json
{
  "name": "structure-publish-web-component",
  "version": "1.0.0",
  "type": "module",
  "scripts": {
    "serve:dev": "vite --mode dev",
    "serve:stg": "vite --mode stage",
    "serve:prod": "vite --mode prod",
    "build": "vite build",
    "lint": "eslint . --ext .js,.jsx,.cjs,.mjs,.ts,.tsx,.cts,.mts --fix --ignore-path .gitignore",
    "delete-files": "rm -f package-lock.json && rm -rf node_modules && rm -rf dist",
    "npm-cache-clean": "npm cache clean --force",
    "npm-install": "npm i",
    "storybook": "storybook dev -p 6006",
    "build-storybook": "storybook build"
  },
  "devDependencies": {
    "@rollup/plugin-html": "^1.0.3",
    "@rushstack/eslint-patch": "^1.10.3",
    "@storybook/addon-a11y": "^8.1.11",
    "@storybook/addon-actions": "^8.1.11",
    "@storybook/addon-essentials": "^8.1.11",
    "@storybook/addon-interactions": "^8.1.11",
    "@storybook/addon-links": "^8.1.11",
    "@storybook/addon-measure": "^8.1.11",
    "@storybook/addon-storysource": "^8.1.11",
    "@storybook/addon-viewport": "^8.1.11",
    "@storybook/blocks": "^8.1.11",
    "@storybook/cli": "^8.1.11",
    "@storybook/test": "^8.1.11",
    "@storybook/web-components-vite": "^8.1.11",
    "dotenv": "^16.4.5",
    "eslint": "^8.57.0",
    "eslint-plugin-storybook": "^0.8.0",
    "sass": "^1.77.8",
    "storybook": "^8.1.11",
    "vite": "^5.3.3"
  }
}
web component
Javascript만으로 구성해야 하고, 공통화를 하여서 코드의 사용량을 줄이고 라이프사이클을 생성하는 해야한다.
Core Component
// component.js
export class Component extends HTMLElement {
  static observedAttributes;
  props = {};
  slot;

  constructor() {
    super();
    this.getSlot();
    this.mounted();
  }

  mounted() {
  }

  destroy() {
  }

  getSlot() {
    this.slot = this.innerHTML;
  }

  connectedCallback() {
    this.innerHTML = this.template();
    this.setEvent();
  }

  disconnectedCallback() {
    this.destroy();
  }

  template() {
    return ``;
  }

  setEvent() {
  }

  propsWatch() {
    return {};
  }

  attributeChangedCallback(name, oldValue, newValue) {
    this.props[name] = newValue;

    if (oldValue !== null) {
      const watcher = this.propsWatch();
      if (!!watcher[name]) {
        watcher[name](oldValue, newValue);
      }

      this.connectedCallback();
    }
  }
}
Component를 상속받아서 대부분의 공통으로 행해지는 부분들을 미리 구현해 놓았다.
Template
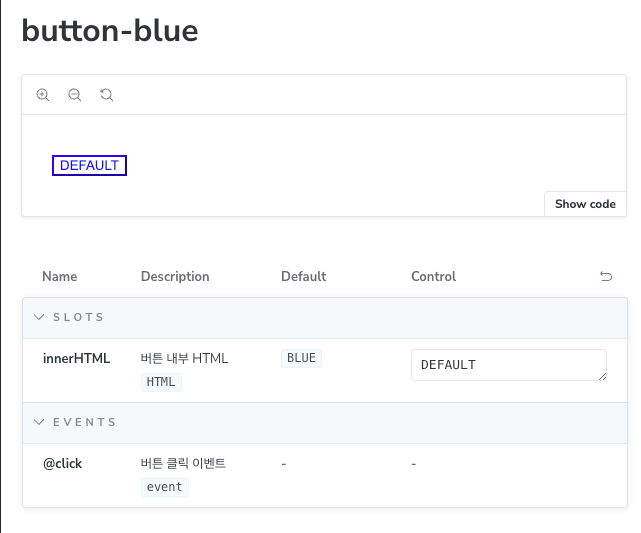
// button-blue.js
import {Component} from '/src/shared/core';

class ButtonBlue extends Component {
  template() {
    let slot = this.slot;

    if (!this.slot) {
      slot = 'BLUE';
    }

    return `<button type="button" class="button-blue">${slot}</button>`;
  }

  setEvent() {
    this.querySelector('button').addEventListener('click', (event) => {
      this.dispatchEvent(new CustomEvent('@click', event));
    });
  }
}

customElements.define('button-blue', ButtonBlue);template함수를 통해서 DOM을 만들고, 상태(props, slot 등)에 따라서 DOM이 업데이트 되도록 작성하였다. setEvent에서는 DOM에 이벤트 리스너를 등록하거나 이벤트에 따라서 DOM이 변경해야 하는 부분을 작성하였다.
Props
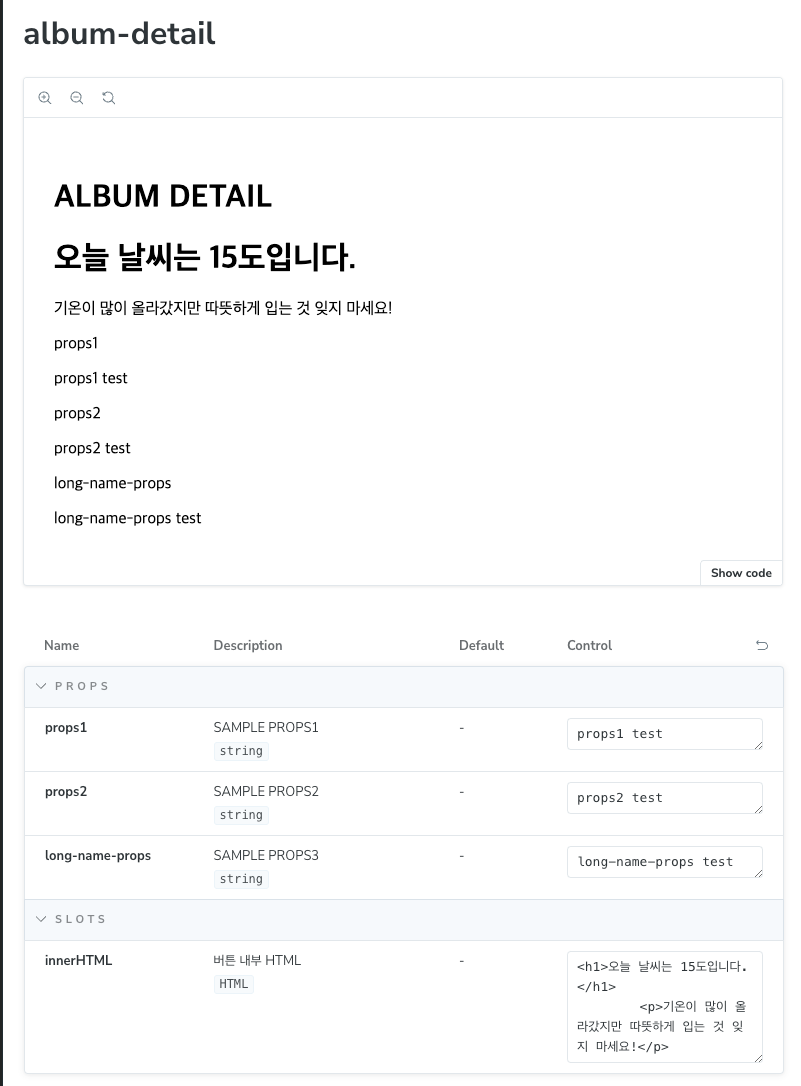
// album-detail.js
import {Component} from '/src/shared/core';

class AlbumDetail extends Component {
  static observedAttributes = ['props1'];

  mounted() {
    console.log('AlbumDetail mounted');
  }

  template() {
    return `
    <h1>ALBUM DETAIL</h1>

    <div>
        <label>props1</label>
        <p>${this.props['props1']}</p>
    </div>
    `;
  }

  propsWatch() {
    return {
      'props1': (oldValue, newValue) => {
        console.log('props1', oldValue, newValue);
      },
    };
  }
}

customElements.define('album-detail', AlbumDetail);propsWatch와 observedAttributes을 작성하게 되면 Attribute가 업데이트 될때 마다 DOM을 업데이트 하게 된다.
Events
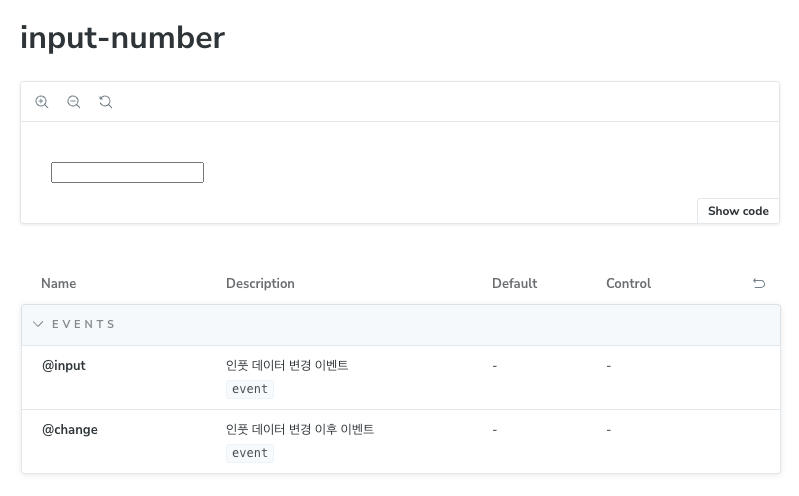
// input-number.js
import {Component} from '/src/shared/core';
class InputNumber extends Component {
template() {
return `<input type="number"/>`;
}
setEvent() {
this.querySelector('input').addEventListener('change', (event) => {
this.dispatchEvent(new CustomEvent('@change', {detail: event.target.value}));
});
this.querySelector('input').addEventListener('keypress', (event) => {
this.dispatchEvent(new CustomEvent('@input', {detail: event.target.value}));
});
}
}
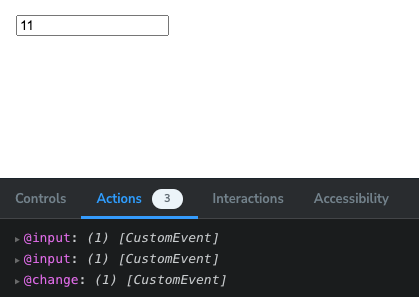
customElements.define('input-number', InputNumber);이벤트를 CustomEvent로 변경하여 정확히 이벤트를 전달한다.
Recursive
// recursive-test.js
import {Component} from '/src/shared/core';

class RecursiveTest extends Component {
  static observedAttributes = ['step'];

  template() {
    const nowSlot = parseInt(this.props['step']);
    const parseSlot = nowSlot + 1;

    return `
    <h1>Recursive - ${nowSlot}</h1>
    ${parseSlot <= 10 ? `<recursive-test step="${parseSlot}"></recursive-test>` : ''}
    `;
  }
}

customElements.define('recursive-test', RecursiveTest);
재귀 컴포넌트도 정상적으로 동작한다. 꼭 제한을 걸도록 하자...
Storybook
Template
// button-blue.stories.js
import {withActions} from '@storybook/addon-actions/decorator';
import {fn}          from '@storybook/test';

export default {
  title:     '@features/button/button-blue',
  component: 'button-blue',

  render: ({innerHTML}) => {
    const html = document.createElement('div');
    html.innerHTML =
      `
    <button-blue>${innerHTML}</button-blue>
`;

    return html;
  },

  args: {
    innerHTML: 'DEFAULT',
    '@click':  fn(),
  },

  argTypes: {
    innerHTML: {
      control:     'text',
      description: '버튼 내부 HTML',

      table: {
        defaultValue: {
          summary: 'BLUE'
        },

        category: 'SLOTS',

        type: {
          summary: 'HTML'
        },
      },
    },

    '@click': {
      description: '버튼 클릭 이벤트',

      table: {
        category: 'EVENTS',

        type: {
          summary: 'event'
        },
      },
    },
  },

  parameters: {
    actions: {
      handles: ['@click'],
    },
  },

  decorators: [withActions],

  tags: ['autodocs'],
};

export const DEFAULT = {};
Props
// album-detail.stories.js
export default {
  title:     '@widgets/album/album-detail',
  component: 'album-detail',

  render: (args) => {
    const html = document.createElement('div');
    html.innerHTML =
      `
    <album-detail props1="${args.props1}"
                  props2="${args.props2}"
                  long-name-props="${args['long-name-props']}">
        ${args.innerHTML}
    </album-detail>
`;

    return html;
  },

  args: {
    props1:            'props1',
    props2:            'props2',
    'long-name-props': 'long-name-props',

    innerHTML: `<h1>오늘 날씨는 15도입니다.</h1>
        <p>기온이 많이 올라갔지만 따뜻하게 입는 것 잊지 마세요!</p>`,
  },

  argTypes: {
    props1: {
      control:     'text',
      description: 'SAMPLE PROPS1',

      table: {
        category: 'PROPS',

        type: {
          summary: 'string'
        },
      },
    },

    props2: {
      control:     'text',
      description: 'SAMPLE PROPS2',

      table: {
        category: 'PROPS',

        type: {
          summary: 'string'
        },
      },
    },

    'long-name-props': {
      control:     'text',
      description: 'SAMPLE PROPS3',

      table: {
        category: 'PROPS',

        type: {
          summary: 'string'
        },
      },
    },

    innerHTML: {
      control:     'text',
      description: '버튼 내부 HTML',

      table: {
        category: 'SLOTS',

        type: {
          summary: 'HTML'
        },
      },
    },
  },

  tags: ['autodocs'],
};

export const DEFAULT = {};argTypes를 사용하여 PROPS, SLOTS, EVENTS를 분리하고, 기본값등 정보들을 표현한다.
Events
// input-number.stories.js
import {withActions} from '@storybook/addon-actions/decorator';
import {fn}          from '@storybook/test';

export default {
  title:     '@features/input/input-number',
  component: 'input-number',

  render: (args) => {
    const html = document.createElement('div');
    html.innerHTML =
      `
    <input-number></input-number>
`;

    html.querySelector('input-number').addEventListener('@input', (event) => {
      args['@input'](event);
    });

    html.querySelector('input-number').addEventListener('@change', (event) => {
      args['@change'](event);
    });

    return html;
  },

  args: {
    '@input':  fn(),
    '@change': fn(),
  },

  argTypes: {
    '@input': {
      description: '인풋 데이터 변경 이벤트',

      table: {
        category: 'EVENTS',

        type: {
          summary: 'event'
        },
      },
    },

    '@change': {
      description: '인풋 데이터 변경 이후 이벤트',

      table: {
        category: 'EVENTS',

        type: {
          summary: 'event'
        },
      },
    },
  },

  parameters: {
    actions: {
      handles: ['@input', '@change'],
    },
  },

  decorators: [withActions],

  tags: ['autodocs'],
};

export const DEFAULT = {};args에 적용된 fn()을 가지고 이벤트를 적용한다.
FSD
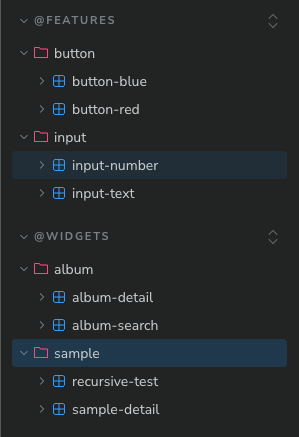
FSD를 적용하여 폴더별로 정리 되었다.
Build
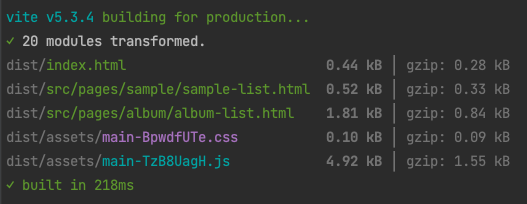
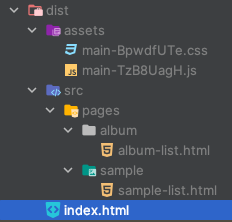
정상적으로 빌드가 되고, Javascript가 Minify, Uglify 되고, SCSS -> CSS로 컴파일 되었다.
결과
장점
- 단순하게 컴포넌트를 생성할수 있다.
- 간단하게 화면을 볼수있다.
- 용량이 작다. 많이 작다.
단점
- 빌드시에 불편한 점이 있다.(HTML 주소를 입력해 놓아야함.)
- Router가 없다.
- 필요한 기능이 있으면 다 만들어야 한다.
참조
- https://stackblitz.com/edit/vitejs-vite-xeazsh?file=main.js&terminal=dev
- https://ko.javascript.info/web-components
- https://junilhwang.github.io/TIL/Javascript/Design/Vanilla-JS-Component/
- https://storybook.js.org/docs/get-started/frameworks/web-components-vite
- https://developer.mozilla.org/ko/docs/Web/API/Web_components/Using_custom_elements
- https://developer.mozilla.org/ko/docs/Web/API/Web_components