JAVA의 제어문
- 프로그램의 흐름 변경 (+ 특정 조건)
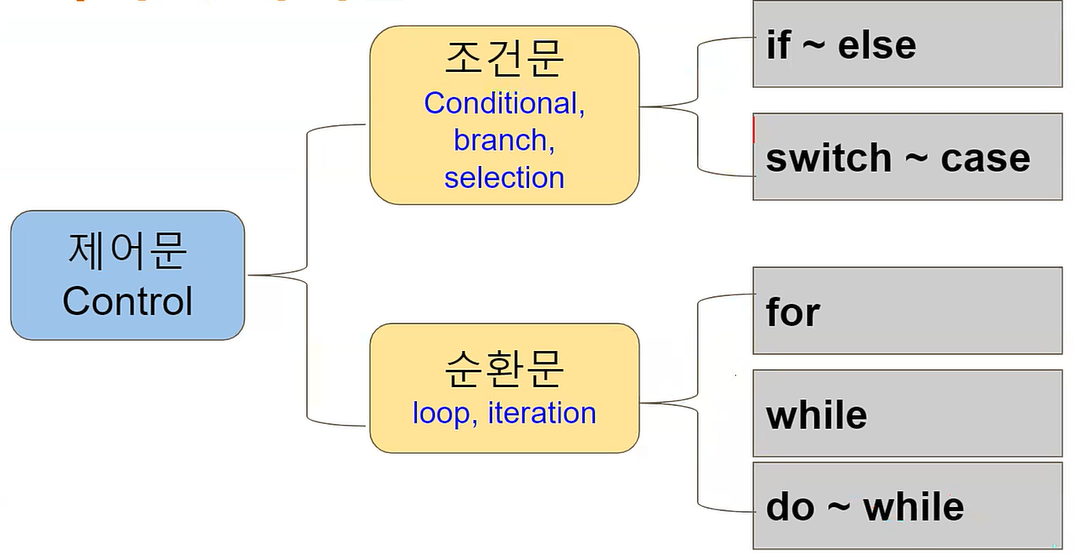
순환문(loop)
- for
- while
- do ~ while // 현재 프로그래밍 언어에서는 잘 사용하지 않음
- 순환문을 작성시 내가 만드는 순환문에 대해 다음을 확실하게 인지하고 작성해야 한다.
- 몇번 순환하는가?
- 순환중에 사용된 인덱스값의 시작값과 끝값은?
- 순환문이 끝난뒤 인덱스값은?
1. for문
- for 순환문 구문
for(①초기식; ②조건식; ④증감식){
③수행문;
..
}
①초기식 : 최초에 단한번 수행
②조건식 : true / false 결과값
-> 위 조건식의 결과가 false 이면 for문 종료
③수행문 : 위 조건식이 true 이면 수행
④증감식 : 수행문이 끝나면 증감식 수행
증감식이 끝나면 다시 ②조건식 으로..- 예시
for(int i = 2; i<10; i++) {
for(int j = 1; j<10; j++) {
System.out.print(i*j+" ");
}
System.out.println("");
}

for문 작성시 TIP
1) n번 순환 하는 경우 (즉 횟수가 촛점인 경우)
for(int i = 0; i < n; i++){ .. }
2) a ~ b 까지 순환하는 경우 (즉 시작값과 끝값이 중요한 경우)
for(int i = a; i <= b; i++){ .. }
public class For01Main {

	public static void main(String[] args) {
		System.out.println("for 반복문");

		// 순환문이 왜 필요한가?
		System.out.println("Hello, Java 1");
		System.out.println("Hello, Java 2");
		System.out.println("Hello, Java 3");

		System.out.println();

		// for문
		for(int count = 1; count <= 3; count++) {
			System.out.println("Hello, Java " + count);
		}

		System.out.println();
		for(int count = 10; count > 0; count--) {
			System.out.println("count " + count);
		}

//		System.out.println("for 종료후 count = " + count); // for{} 블럭의 local 에서 선언된 변수라 for{}가 끝나면 소멸된다.

		// 초기식과 증감식에 식을 여러개 사용 가능.
		int i, j;
		for(i = 0, j = 10; i < j; i++, j-=2) {
			System.out.println("i:" + i);
		}
		System.out.println("for 종료후 i: " + i + " j :" + j);
	} // end main()

} // end class For01Main
[연습1 : 구구단 출력]
package com.lec.java.for02;

public class For02Main {

	public static void main(String[] args) {
		System.out.println("For문 - 구구단 출력");

//		구구단 2단
//		2 x 1 = 2
//		2 x 2 = 4
//		2 x 3 = 6
//		2 x 4 = 8
//		2 x 5 = 10
//		2 x 6 = 12
//		2 x 7 = 14
//		2 x 8 = 16
//		2 x 9 = 18

		System.out.println("구구단 2단");
		for(int i=1; i < 10 ; i++) {
			System.out.println("2 x " + i + " = " + (2 * i));
		}


	} // end main()

} // end class For02Main
[연습2 : 1 ~ 10 수 중에서 짝수(2의 배수)만 출력]
package com.lec.java.for03;

public class For03Main {

	public static void main(String[] args) {
		System.out.println("for 연습");

		// 1 ~ 10 수 중에서 짝수(2의 배수)만 출력
		for(int i = 1; i <=10; i++) {
			if(i % 2 == 0) {
				System.out.println(i);
			}
		}

		System.out.println("\n다른 방법");
		for(int i = 2; i < =10; i += 2) {
			System.out.println(i);
		}
	} // end main()

} // end class For03Main
[연습3 : 1 ~ 100 수 중에서 2와 7의 공배수만 출력 / 1부터 n 가지의 합을 계산]
package com.lec.java.for04;
public class For04Main {
public static void main(String[] args) {
System.out.println("for문 연습");
// 1 ~ 100 수 중에서 2와 7의 공배수만 출력
// 2와 7의 공배수: 2의 배수 && 7의 배수
System.out.println("\n2와 7의 공배수 출력");
// 1) 1 ~ 100 수를 모두 출력 (for문 이용)
// 2) 조건에 맞는 경우만 출력을 하도록 수정 (if문)
for(int i=1 ; i <= 100; i++) {
if((i % 2 == 0) && (i % 7 == 0)) {
System.out.println(i);
}
}
// 1부터 n 가지의 합을 계산
int n = 1000;
System.out.printf("\n1 부터 %d까지의 합\n", n);
int sum = 0;
for(int i = 1; i <= n; i++) {
sum+= i; // 누적 합산
}
System.out.println("sum = " + sum);
} // end main ()
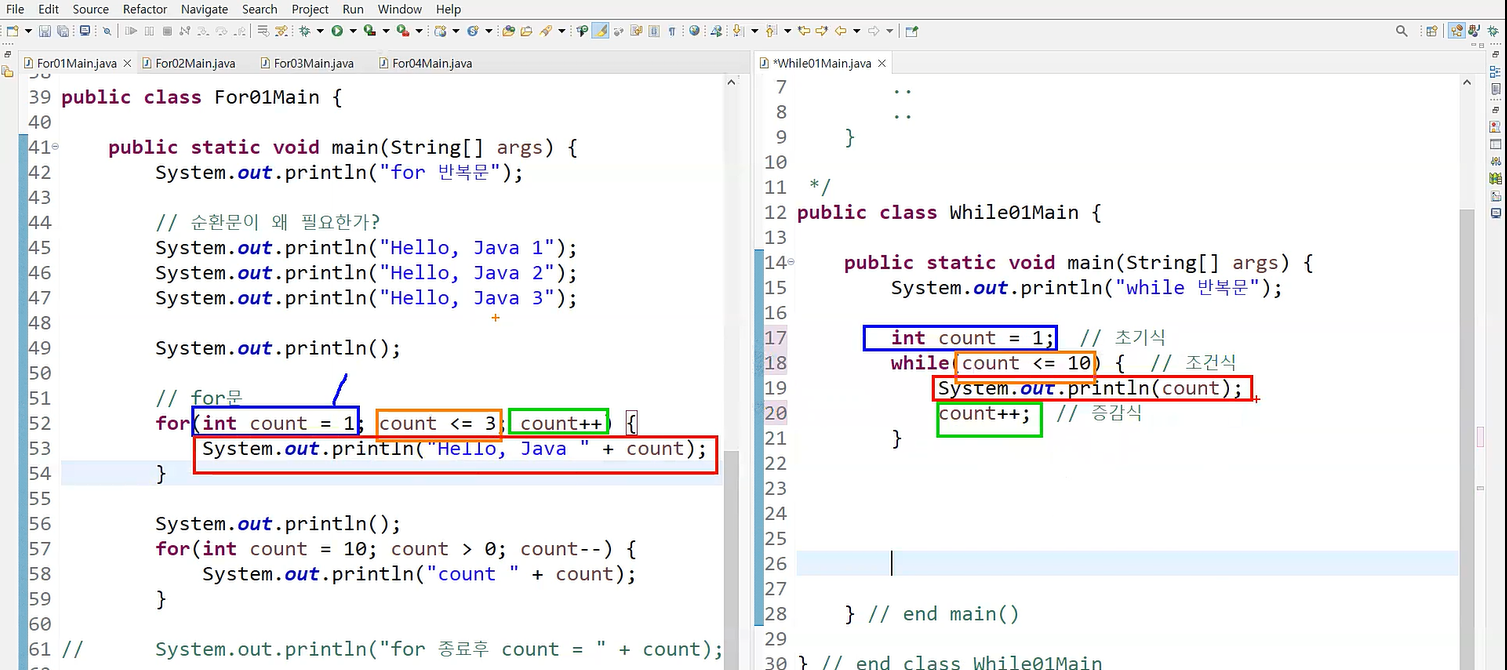
} // end class For04Main2. while문
- 조건식이 true 인 동안 while 블럭 반복
while(조건식 true / false) {
..
..
}
package com.lec.java.while01;

public class While01Main {

	public static void main(String[] args) {
		System.out.println("while 반복문");

		int count = 1;	// 초기식
		while(count <= 10) {	// 조건식
			System.out.println(count);
			count++;	//증감식
		}


	} // end main()

} // end class While01Main
[연습1 : 구구단 출력]
package com.lec.java.while02;

public class While02Main {

	public static void main(String[] args) {
		System.out.println("while 연습");

//		구구단 2단
//		2 x 1 = 2
//		2 x 2 = 4
//		2 x 3 = 6
//		2 x 4 = 8
//		2 x 5 = 10
//		2 x 6 = 12
//		2 x 7 = 14
//		2 x 8 = 16
//		2 x 9 = 18

		int i = 1;
		while (i <= 9) {
			System.out.println("2 x " + i + " = " + (2 * i));
			i++;
		}

	} // end main()

} // end class While02Main
3. for문과 while문의 호환
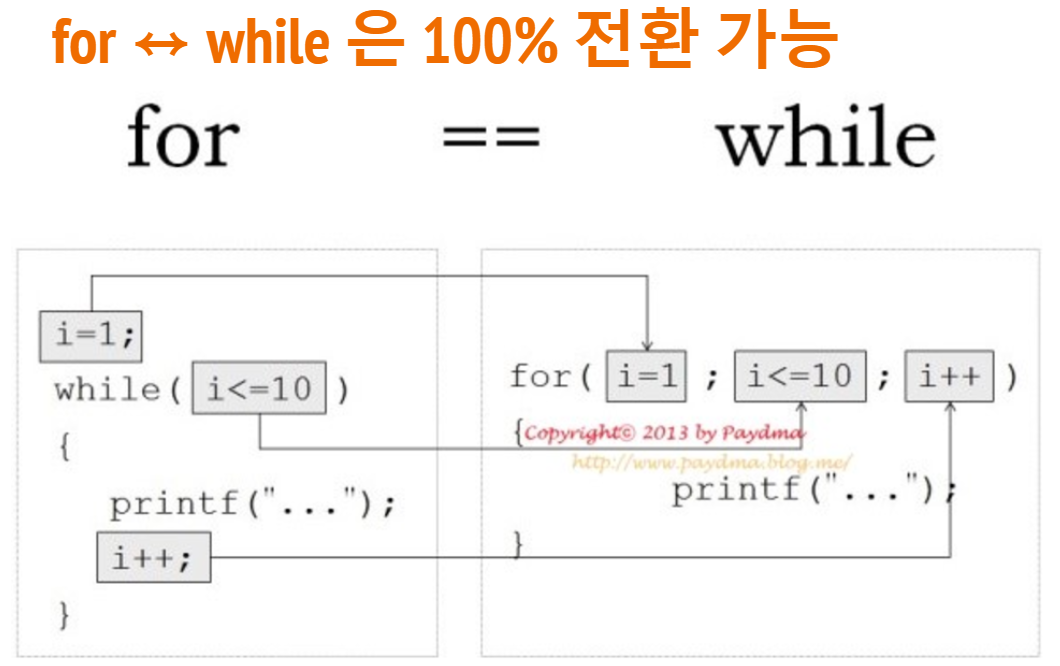
[예시]
4. 자주하는 실수
- 제어문 뒤에 ';' 붙이지 않기
package com.lec.java.while03;

public class While03Main {

	public static void main(String[] args) {
		System.out.println("while 연습");

		int n = 34;

		if(n % 1 == 0);	// if, for, while 뒤에 ; 붙이지 마세요
			System.out.println("홀수입니다");

		System.out.println("프로그램 종료");

	} // end main()

} // end class While03Main
5. break
순환문(for, while, do~while) 안에서 break를 만나면 break를 감싸는 가장 가까운 순환문 종료

public class Loop01Main {

	public static void main(String[] args) {
		System.out.println("Break");

		int num = 1;
		while(num <= 10) {
			System.out.println(num);

			if(num == 3) {
				break;
			}

			num++;
		}
		System.out.println("while 끝난후 num = " + num);


		System.out.println();
		// 2와 7의 최소공배수를 출력
		// 최소공배수: 공배수 중에서 가장 작은 수

		// TODO


		System.out.println();
		System.out.println("무한 루프와 break;");

		num = 1;
		while(true) {
			System.out.println(num);
			num++;

			if(num == 5) break;	// 무한루프 종료 조건
		}


		System.out.println();
		// 2단은 x 2 까지 출력
		// 3단은 x 3 까지 출력

		// TODO


		System.out.println("\n프로그램 종료");
	} // end main()

} // end class
[연습문제1]
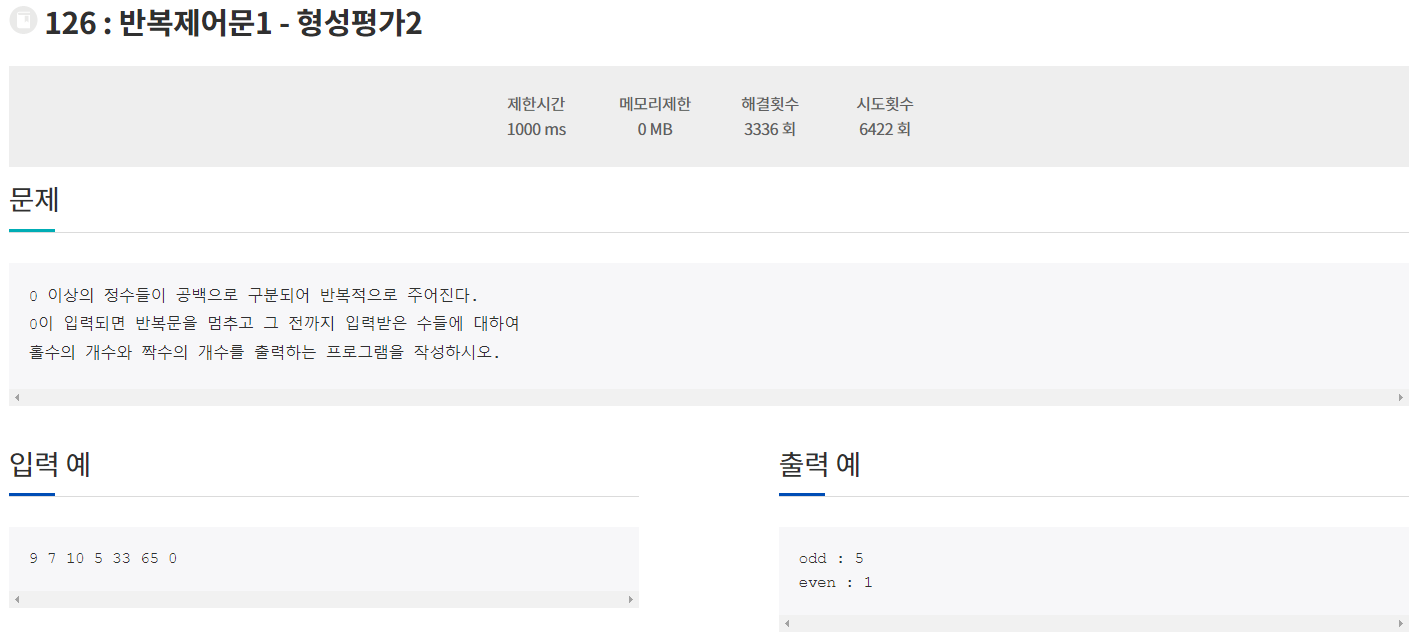
package 반복제어문1.형성평가02;

import java.util.Scanner;

public class Main {

	public static void main(String[] args) {

		Scanner sc = new Scanner(System.in);

		int i;
		int cntOdd = 0;
		int cntEven = 0;

		while(true) {
			i = sc.nextInt();

			if(i == 0) break; // 종료조건

			if(i % 2 == 0) cntEven++;
			else cntOdd++;
		}

		sc.close();
		System.out.println("odd : " +cntOdd);
		System.out.println("even : "+cntEven);

	}

}
[연습문제2]
package com.lec.java.loop03;

public class Loop03Main {

	public static void main(String[] args) {
		System.out.println("중첩 for 문 nested for");

		// 2 x 1 = 2
		// ..
		// 2 x 9 = 18
		// 3 x 1 = 3
		// ..
		// 3 x 9 = 27
		// ...
		// 9 x 1 = 9
		// ..
		// 9 x 9 = 81

		// 구구단 출력 : 중첩 for 사용
		// 2단 ~ 9단
		for(int dan = 2; dan <= 9; dan++) {

			System.out.println(dan + "단");

			// x 1 ~ x 9
			for(int mul = 1; mul <= 9; mul++) {
				System.out.println(dan + " x " + mul + " = " + (dan * mul));
			}

			System.out.println();
		}


		System.out.println();
		// 구구단 출력 : 중첩 while 문 사용
		int dan = 2;
		while (dan < 10) {
			System.out.println("구구단 " + dan + "단");
			int mul = 1;
			while (mul <9) {
				System.out.println(dan + " x " + mul + " = " + (dan * mul));
				mul++;
			} // end while (n)
			System.out.println();

			dan++;
		}	// end while (dan)

		System.out.println("\n프로그램 종료");
	} // end main()

} // end class
[연습문제3]

package 반복제어문3.자가진단02;

import java.util.Scanner;

public class Main {

	public static void main(String[] args) {
		Scanner sc = new Scanner(System.in);

		int n = sc.nextInt();

		for(int i = 0; i < n; i++) {
			for(int j = 0; j <= i; j++) {
				System.out.print("*");
			}
			System.out.println();
		}

		sc.close();
	}

}
[연습문제4]


package practice.game369;

public class Game369Main {

	public static void main(String[] args) {
//		 // 방법1
//		{
//			System.out.println("1의 자리와 10의 자리만 확인");
//			int number = 100;
//
//			int i = 1;
//			while(i <= number) {
//
//				int d1 = i % 10;	// 일의 자리 숫자
//				int d10 = i / 10;	// 십의 자리 숫자
//
//				if(d1 == 3 || d1 == 6 || d1 == 9
//						|| d10 == 3 || d10 == 6 || d10 == 9) {
//					System.out.printf("%4s", "*");
//				} else {
//					System.out.printf("%4d", i);
//				}
//
//				if(i % 10 == 0) System.out.println();
//
//				i++;
//			}
//		}
//

		// 방법2: 임의 숫자까지 369 만들기
		{

			System.out.println("자릿수를 하나씩 깍아 내려오면서 3의 배수가 있는지 확인");
			int number = 1000;

			int i = 1;
			while(i <= number) {

				int k = i;
				while(k > 0) {
					int d1 = k % 10;
					if(d1 == 3 || d1 == 6 || d1 == 9) {
						System.out.printf("%5s", "*");
						break;
					}

					k /= 10;	// 한자리씩 깍아와
				}

				if(k == 0) {	// 모든 자릿수를 다 깍아내었는데도 3, 6, 9를 발견 못하면 출력
					System.out.printf("%5d", i);
				}

				if(i % 10 == 0) System.out.println();

				i++;
			}
		}

	}

}
🎇Tips!
- 동일한 변수 하이라이트 선택 & 변경
- 단축키 : alt + shift + r
- 마우스 오른쪽 클릭 -> Refactor -> Rename
(이클립스에서의 사각형 의미 : 지금부터 키보드로만 움직여라! 마우스 사용 X)
- 찾아바꾸기
- Find/Replae
- 단축키 : crtl + f