[6/30 일반] React/ 실습 - (실습) 비동기 제어하기
1. 학습한 내용
1) 필기 내용
- 동기와 비동기
동기 : 작업들이 순차적으로 이루어지는 것 / 다른 작업들은 정지(blocking)
비동기 :작업들이 순차적으로 이루어지지 않음 / 다른 작업들은 비정지(non-blocking) / 자바 스크립트를 사용한 비동기 통신 방식을 Ajax라고 함 / Http요청(GET, POST), 이벤트 핸들fj(click, over), setTimeout, setInterval
ㅡㅡㅡㅡㅡㅡㅡㅡㅡㅡㅡㅡㅡㅡㅡㅡㅡㅡㅡㅡㅡㅡㅡㅡㅡㅡㅡㅡㅡㅡㅡㅡㅡㅡ
ㅡㅡㅡㅡㅡㅡㅡㅡㅡㅡㅡㅡㅡㅡㅡㅡㅡㅡㅡㅡㅡㅡㅡㅡㅡㅡㅡㅡㅡㅡㅡㅡㅡㅡ
- 날씨 앱 만들기
→ 앱이 실행되자마자 현재위치 기반의 날씨가 보인다.
→ 날씨정보에는 도시, 섭씨, 화씨, 날씨상태
→ 5개의 버튼이 있다.(1개는 현재위치, 4개는 다른도시)
→ 도시버튼을 클릭할 때마다 도시별 날씨가 나온다.
→ 현재위치 버튼을 누르면 다시 현재위치 기반의 날씨가 나오낟.
→ 데이터를 들고오는 동안 로딩 스피너가 돈다.
ㅡㅡㅡㅡㅡㅡㅡㅡㅡㅡㅡㅡㅡㅡㅡㅡㅡㅡㅡㅡㅡㅡㅡㅡㅡㅡㅡㅡㅡㅡㅡㅡㅡㅡ
es7 react 확장 패키지 설치하고,
projweather/src/components/WeatherBox.js에서 rcc말고 rafce치고 엔터치면
import React from 'react'

const WeatherBox = () => {
  return (
    <div>WeatherBox</div>
  )
}

export default WeatherBox
라고 뜸
ㅡㅡㅡㅡㅡㅡㅡㅡㅡㅡㅡㅡㅡㅡㅡㅡㅡㅡㅡㅡㅡㅡㅡㅡㅡㅡㅡㅡㅡㅡㅡㅡㅡㅡ
-
npm install react-bootstrap bootstrap을 통해 bootstrap 설치
-
https://openweathermap.org/current#one에서 API call 입력방법이 나옴
-
https://www.w3schools.com/html/html5_geolocation.asp에서 Geolocation 함수를 불러올 수 있음
ㅡㅡㅡㅡㅡㅡㅡㅡㅡㅡㅡㅡㅡㅡㅡㅡㅡㅡㅡㅡㅡㅡㅡㅡㅡㅡㅡㅡㅡㅡㅡㅡㅡㅡ
import logo from './logo.svg';
import './App.css';
import WeatherBox from './components/WeatherBox';
import WeatherButton from './components/WeatherButton';
import 'bootstrap/dist/css/bootstrap.min.css';
import { Container } from 'react-bootstrap';
import React, { useState, useEffect } from 'react';
import {ClipLoader} from 'react-spinners';

const API_KEY = 'b4a0b63fb0a27cc709f6ea5ecd5f5d7';
const cities = ['paris', 'new york', 'tokyo', 'seoul'];

const App = () => {
  const [city, setCity] = useState(null);
  const [weather, setWeather] = useState(null);
  const [loading, setLoading] = useState(false);

  const getWeatherByCurrentLocation = async (lat, lon) => {
    try {
      let url =
        //`https://api.openweathermap.org/data/2.5/weather?lat=${lat}&lon=${lon}&appid=${API_KEY}`;
        // `https://api.openweathermap.org/data/2.5/weather?q=${city}&appid=${API_KEY}`;
        'http://api.openweathermap.org/data/2.5/weather?lat=35.87222&lon=128.60250&appid=b4a0b63fb0a27cc709f6ea5ecd5f5d7d';
      //&units=metric
;
      const res = await fetch(url);
      const data = await res.json();
      setWeather(data);
      setLoading(false);
    } catch (err) {
      console.log(err.message);
      setLoading(false);
    }
  };

  const getCurrentLocation = () => {
    navigator.geolocation.getCurrentPosition((position) => {
      const { latitude, longitude } = position.coords;
      getWeatherByCurrentLocation(latitude, longitude);
      console.log('현재위치?', latitude, longitude);
    });
  };

  const getWeatherByCity = async () => {
    try {
      let url = `https://api.openweathermap.org/data/2.5/weather?q=${city}&appid=${API_KEY}`;
      //&units=metric
      const res = await fetch(url);
      const data = await res.json();
      setWeather(data);
      setLoading(false);
    } catch (err) {
      console.log(err);
      setLoading(false);
    }
  };

  useEffect(() => {
    if (city == null) {
      setLoading(true);
      getCurrentLocation();
    } else {
      getWeatherByCity();
    }
  }, [city]);

  const handleCityChange = (city) => {
    if (city === 'current') {
      setCity(null);
    } else {
      setCity(city);
    }
  };

  return (
    <>
      <Container className="vh-100">
        <div></div>
        <div className="main-container">
          <WeatherBox weather={weather} />
          <WeatherButton
            cities={cities}
            handleCityChange={handleCityChange}
            selectedCity={city}
          />
        </div>
      </Container>
    </>
  );
};

export default App;
→
const res = await fetch(url);
const data = await res.json();
는 url을 가져와서(fetch) res에 저장, json으로 응답합니다.
ㅡㅡㅡㅡㅡㅡㅡㅡㅡㅡㅡㅡㅡㅡㅡㅡㅡㅡㅡㅡㅡㅡㅡㅡㅡㅡㅡㅡㅡㅡㅡㅡㅡㅡ
(추가) https://home.openweathermap.org/api_keys에서 나의 API 키를 알 수 있음
ㅡㅡㅡㅡㅡㅡㅡㅡㅡㅡㅡㅡㅡㅡㅡㅡㅡㅡㅡㅡㅡㅡㅡㅡㅡㅡㅡㅡㅡㅡㅡㅡㅡㅡ
-
리액트는 한방향!
App.js가 parent(부모)
weatherBox, weatherButton은 child(자식)(자식 간에는 데이터 전달이 안 됨) -
stateful: 부모 컴포넌트가 모든 정보를 갖고 있음
stateless: 자식은 정보를 갖지 않고 있기 때문에, 데이터를 받기만 함
ㅡㅡㅡㅡㅡㅡㅡㅡㅡㅡㅡㅡㅡㅡㅡㅡㅡㅡㅡㅡㅡㅡㅡㅡㅡㅡㅡㅡㅡㅡㅡㅡㅡㅡ
components/WeatherBox.js
import React from 'react';
import { Card } from 'react-bootstrap';

const WeatherBox = ({ weather }) => {
  const temperatureC =
    weather && weather.main ? (weather.main.temp - 273.15).toFixed(2) : '';
  const temperatureF =
    weather && weather.main
      ? (((weather.main.temp - 273.15) * 9) / 5 + 32).toFixed(2)
      : '';
  return (
    <Card className="weather-card">
      <Card.ImgOverlay className="d-flex flex-column justify-content-center text-center">
        <Card.Title>{weather?.name}</Card.Title>
        <Card.Text className="text-success h1">
          {`${temperatureC} °C / ${temperatureF} °F`}
        </Card.Text>
        <Card.Text className="text-info text-uppercase h2">
          {weather && weather.weather[0]?.description}
        </Card.Text>
      </Card.ImgOverlay>
    </Card>
  );
};

export default WeatherBox;
ㅡㅡㅡㅡㅡㅡㅡㅡㅡㅡㅡㅡㅡㅡㅡㅡㅡㅡㅡㅡㅡㅡㅡㅡㅡㅡㅡㅡㅡㅡㅡㅡㅡㅡ
components/WeatherButton.js
import React from 'react';
import { Button } from 'react-bootstrap';

const WeatherButton = ({ cities, selectedCity, handleCityChange }) => {
  return (
    <div class="menu-container">
      <Button
        variant={`${selectedCity === null ? 'outline-warning' : 'warning'}`}
        onClick={() => handleCityChange('current')}
      >
        Current Location
      </Button>

      {cities.map((city) => (
        <Button
          variant={`${selectedCity === city ? 'outline-warning' : 'warning'}`}
          onClick={() => handleCityChange(city)}
        >
          {city}
        </Button>
      ))}
    </div>
  );
};

export default WeatherButton;
→ WeatherButton.js에서 버튼 코드는
https://react-bootstrap.github.io/components/buttons/ 에서 불러옴
ㅡㅡㅡㅡㅡㅡㅡㅡㅡㅡㅡㅡㅡㅡㅡㅡㅡㅡㅡㅡㅡㅡㅡㅡㅡㅡㅡㅡㅡㅡㅡㅡㅡㅡ
https://www.npmjs.com/package/react-spinners : react-spinner 설치 방법 페이지
npm install —save react-spinners를 terminal 창에 입력하면 설치 가능
ㅡㅡㅡㅡㅡㅡㅡㅡㅡㅡㅡㅡㅡㅡㅡㅡㅡㅡㅡㅡㅡㅡㅡㅡㅡㅡㅡㅡㅡㅡㅡㅡㅡㅡ
→ 위의 결과(아래 그림)
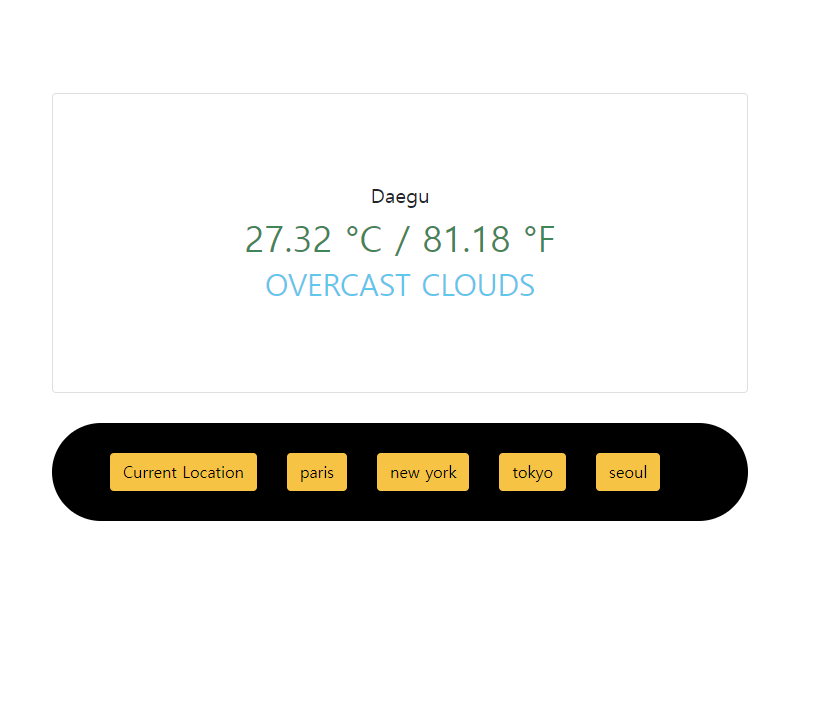
→ ... 배경화면이 안나옴 / 각 지역을 눌렀을 때, 흰 화면으로 바뀜...
→ 강사님 것을 그대로 사용해봐도... 놀랍게도 결과는 같다...
→ 과연 난 무엇을 빠뜨린 것일까...?
2. 학습한 내용 중 어려웠던 점 또는 해결못한 것들
1) 오늘은 정말 어려웠다. component, bootstrap, react-spinner 다양한 것들을 사용하게 되면서, 뭐가 어떻게 동작하는지 이해가 어려웠다...
2) 결국 나는 background도 강사님 링크를 사용했을 정도인데, 왜 기능이 작동을 안하는 것일까?
3. 해결방법 작성
1) 각 기능들을 이해하는 것이 먼저라고 생각됨... 그러므로 코드 작성을 다시 보면서 각 코드들을 이해하기
2) 기능... 작동할 때까지 영상 다시보기
4. 학습 소감
1) 이예봉 강사님의 마지막 강의였다... 물론 나도 마지막으로 듣는 강의일 것 같다... 왜냐하면 내일부터 프로젝트 수업이라고 하는데, 난 전적으로 참여를 못하므로...?
2) 코딩과 설명이 함께 이루어지는 것이다보니, 너무 어렵다. 근데 사실 코딩하고 이와 관련되어서 설명을 해주시는 것 조차 어려우니, 자신감 뚝 떨어졌담