드래그 앤 드롭 리스트를 구현해보자!
react-beautiful-dnd 라는 라이브러리를 사용하여 구현해 볼 것이다!

라이브러리 설치
https://www.npmjs.com/package/react-beautiful-dnd
npm i react-beautiful-dnd
적용
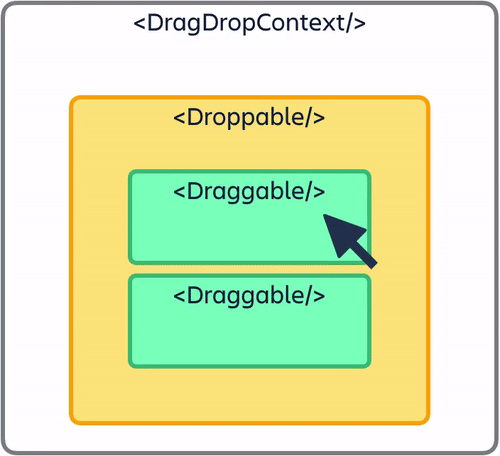
위 이미지를 보면 DragDropContext 와 Droppable , Draggable 이 세가지가 있다.
하나 하나 무엇인지 한번 살펴보자.
간단하게 정리하면 다음과 같다.
DragDropContext: 드래그 앤 드롭을 구현할 영역Droppable: 드롭 할 수 있는 영역Draggable: 드래그 할 수 있는 영역
그러면 이제 기본적인 틀을 한번 만들어 보자.
우선, DragDropContext 컴포넌트를 만들어야한다.
import { DragDropContext } from "react-beautiful-dnd"

function App () {
  return (
  	<DragDropContext>
  	</DragDropContext>
  )
}

export default App;
그런데 이렇게 작성하면, 에러가 발생한다.
DragDropContext 컴포넌트는 원하는게 두가지 있기 때문이다.
첫 번째, onDragEnd 속성인데, 이것은 드래그를 마쳤을 때 실행되는 함수를 넣어주는 속성이다.
그리고 두번째는 children 이다.
이 두 조건을 충족시켜서 코드를 다시 작성하면 다음과 같다.
import { DragDropContext } from "react-beautiful-dnd"

function App () {
  const onDragEnd = () => {
  	console.log("onDragEnd!");
  }
  return (
  	<DragDropContext onDragEnd={onDragEnd}>
    	<span>Hello</span>
  	</DragDropContext>
  )
}

export default App;
그런데 여기서 드래그 앤 드롭을 구현하기 위해 넣어줘야하는 children은 span 같은것이 아님!
아까 위에 GIF 에서 봤듯이 Droppable 컴포넌트가 들어가야함!
import { DragDropContext, Droppable } from "react-beautiful-dnd"

function App () {
  const onDragEnd = () => {
  	console.log("onDragEnd!");
  }
  return (
  	<DragDropContext onDragEnd={onDragEnd}>
    	<Droppable></Droppable>
  	</DragDropContext>
  )
}

export default App;
그런데 이 Droppable 컴포넌트도 요구사항이 있음!
droppableId 속성과 children을 요구한다!
droppableId 속성은 droppable 영역이 여러곳 존재할 수 있기때문에 식별하기 위한 값을 지정하기 위해 요구하는 속성이다.
그리고 여기서도 children 이 필요한데, 여기 들어가는 children은 무조건 함수형태로 들어가야한다.
import { DragDropContext, Droppable } from "react-beautiful-dnd"

function App () {
  const onDragEnd = () => {
  	console.log("onDragEnd!");
  }
  return (
  	<DragDropContext onDragEnd={onDragEnd}>
    	<Droppable droppableId="one">
          {() => (
          	<ul>
            	Hello
            </ul>
          )}
    	</Droppable>
  	</DragDropContext>
  )
}

export default App;
Droppable 컴포넌트까지 만들었다.
이제 Draggable 컴포넌트를 만들 차례다.
Droppable안에 들어가야하니깐!
import { DragDropContext, Draggable, Droppable } from "react-beautiful-dnd";

function App() {
  const onDragEnd = () => {
  	console.log("onDragEnd!");
  };
  return (
    <DragDropContext onDragEnd={onDragEnd}>
      <Droppable droppableId="one">
        {() => (
          <ul>
            <Draggable draggableId="first" index={0}>
              {() => <li>one</li>}
            </Draggable>
            <Draggable draggableId="second" index={1}>
              {() => <li>two</li>}
            </Draggable>
          </ul>
        )}
      </Droppable>
    </DragDropContext>
  );
}

export default App;
Draggable 컴포넌트도 요구사항이 두개 있다.
위 코드에서 확인 할 수 있듯이 draggableId가 필요하고, index, 그리고 children이 필요하다.
여기서의 children도 함수형태로 들어가야한다.
그러면 이제 기본적인 틀은 완성되었다.
근데 지금 이상태에서는 아직 드래그 앤 드랍 기능이 작동하지 않는다.
더 필요한게 있기 때문이다.
import { DragDropContext, Draggable, Droppable } from "react-beautiful-dnd";

function App() {
  const onDragEnd = () => {
  	console.log("onDragEnd!");
  };
  return (
    <DragDropContext onDragEnd={onDragEnd}>
      <Droppable droppableId="one">
        // beautiful-dnd에서 제공하는 특별한 prop
        {(provided) => (
          <ul>
            <Draggable draggableId="first" index={0}>
              {() => <li>one</li>}
            </Draggable>
            <Draggable draggableId="second" index={1}>
              {() => <li>two</li>}
            </Draggable>
          </ul>
        )}
      </Droppable>
    </DragDropContext>
  );
}

export default App;
Droppable 컴포넌트의 children으로 들어가는 함수의 첫번째 매개변수를 provided 라는 이름으로 넣어주었다.
이때 이름은 원하는 이름으로해도 상관없다.
Droppable은 provided를 통하여 여러가지를 제공해준다.
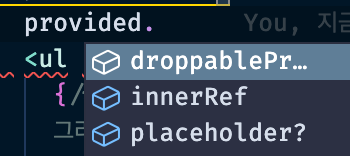
droppableProps를 먼저 ul의 prop 으로 넣어주자.
그리고 ref도 같이 작성해준다.
import { DragDropContext, Draggable, Droppable } from "react-beautiful-dnd";

function App() {
  const onDragEnd = () => {
  	console.log("onDragEnd!");
  };
  return (
    <DragDropContext onDragEnd={onDragEnd}>
      <Droppable droppableId="one">
        {(provided) => (
          <ul ref={provided.innerRef} {...provided.droppableProps}>
            <Draggable draggableId="first" index={0}>
              {() => <li>one</li>}
            </Draggable>
            <Draggable draggableId="second" index={1}>
              {() => <li>two</li>}
            </Draggable>
          </ul>
        )}
      </Droppable>
    </DragDropContext>
  );
}

export default App;
Draggable에서도 비슷한 작업을 해주면 된다.
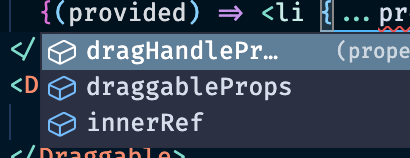
(Draggable 내부의 provided에서 주는것들)
다음과 같이 코드를 작성
import { DragDropContext, Draggable, Droppable } from "react-beautiful-dnd";

function App() {
  const onDragEnd = () => {
  	console.log("onDragEnd!");
  };
  return (
    <DragDropContext onDragEnd={onDragEnd}>
      <Droppable droppableId="one">
        {(provided) => (
          <ul ref={provided.innerRef} {...provided.droppableProps}>
            <Draggable draggableId="first" index={0}>
              {(provided) => (
                <li
                  ref={provided.innerRef}
                  {...provided.draggableProps}
                  {...provided.dragHandleProps}
                >
                  one
                </li>
              )}
            </Draggable>
            <Draggable draggableId="second" index={1}>
              {(provided) => (
                <li
                  ref={provided.innerRef}
                  {...provided.draggableProps}
                  {...provided.dragHandleProps}
                >
                  two
                </li>
              )}
            </Draggable>
          </ul>
        )}
      </Droppable>
    </DragDropContext>
  );
}

export default App;
여기까지 작성하면 이제 드래그가 되는걸 확인할 수 있다.

여기까지 했는데 안된다면 한가지 점검해볼것이있다.
React18버전 + Strict Mode가 설정중이라면 정상적으로 작성했는데 동작이 되지 않는다.
Strict Mode를 해제시켜주면된다.
움직일 수 있는 또 다른 영역 만들기
지금은 one 전체를 움직인다.
하지만 일부분만 움직일 수 있게 만들수있다.
import { DragDropContext, Draggable, Droppable } from "react-beautiful-dnd";

function App() {
  const onDragEnd = () => {
  	console.log("onDragEnd!");
  };
  return (
    <DragDropContext onDragEnd={onDragEnd}>
      <Droppable droppableId="one">
        {(magic) => (
          <ul ref={magic.innerRef} {...magic.droppableProps}>
            <Draggable draggableId="first" index={0}>
              {(provided) => (
                <li ref={provided.innerRef} {...provided.draggableProps}>
                  <span {...provided.dragHandleProps}>🎇</span>
                  One
                </li>
              )}
            </Draggable>
            <Draggable draggableId="second" index={1}>
              {(provided) => (
                <li ref={provided.innerRef} {...provided.draggableProps}>
                  <span {...provided.dragHandleProps}>🎇</span>
                  Two
                </li>
              )}
            </Draggable>
          </ul>
        )}
      </Droppable>
    </DragDropContext>
  );
}

export default App;
위와 같이 작성하면 다음과 같은 효과를 볼 수 있다.

불꽃 이모지 부분만 잡을수 있게 바뀌었다.
이를 통해 dragHandleProps 이녀석이 손잡이 역할을 해준다는걸 알 수 있다.
여기까지 기본적인 적용방법을 알아보았다!
되게 쉽게 DnD를 구현할 수 있었다.
다른 복잡한 로직이라던지 그런거없이 그냥 제공되는 prop을 적절하게 끼워넣어준것만으로 DnD가 구현된것이다!
더 자세한 사용법은 다음 링크를 참고하여 학습해보도록하자!