Docker-compose로 Redis-cluster 구성하기 + 도커 외부에서 접속 트러블 슈팅
Docker-compose 활용 Redis cluster 구성
docker-compose를 통해서 레디스 클러스터를 아래와 같이 구성했다.
master는 최소 3개, 그에 따라 slave가 최소 3개, 총 6개의 노드가 필요하다.
docker-compose.yml
networks:
  redis-cluster-compose:
    driver: bridge

services:
  redis-node-1:
    container_name: redis-node-1
    image: redis:latest
    ports:
      - 6479:6479
      - 16479:16479
    networks:
      - redis-cluster-compose
    hostname: redis-node-1
    volumes:
      - ./data/6479:/redis
    command: redis-server /redis/redis.conf
  redis-node-2:
    container_name: redis-node-2
    image: redis:latest
    ports:
      - 6480:6480
      - 16480:16480
    networks:
      - redis-cluster-compose
    hostname: redis-node-2
    volumes:
      - ./data/6480:/redis
    command: redis-server /redis/redis.conf

  redis-node-3:
    container_name: redis-node-3
    image: redis:latest
    ports:
      - 6481:6481
      - 16481:16481
    networks:
      - redis-cluster-compose
    hostname: redis-node-3
    volumes:
      - ./data/6481:/redis
    command: redis-server /redis/redis.conf

  redis-node-4:
    container_name: redis-node-4
    image: redis:latest
    ports:
      - 6482:6482
      - 16482:16482
    networks:
      - redis-cluster-compose
    hostname: redis-node-4
    volumes:
      - ./data/6482:/redis
    command: redis-server /redis/redis.conf

  redis-node-5:
    container_name: redis-node-5
    image: redis:latest
    ports:
      - 6483:6483
      - 16483:16483
    networks:
      - redis-cluster-compose
    hostname: redis-node-5
    volumes:
      - ./data/6483:/redis
    command: redis-server /redis/redis.conf

  redis-node-6:
    container_name: redis-node-6
    image: redis:latest
    ports:
      - 6484:6484
      - 16484:16484
    networks:
      - redis-cluster-compose
    hostname: redis-node-6
    volumes:
      - ./data/6484:/redis
    command: redis-server /redis/redis.conf

  redis-cluster-creator:
    image: redis:latest
    ports:
      - 6999:6999
    networks:
      - redis-cluster-compose
    command: redis-cli -p 6379 -a password --cluster create redis-node-1:6479 redis-node-2:6480 redis-node-3:6481 redis-node-4:6482 redis-node-5:6483 redis-node-6:6484 --cluster-replicas 1 --cluster-yes
    depends_on:
      - redis-node-1
      - redis-node-2
      - redis-node-3
      - redis-node-4
      - redis-node-5
      - redis-node-6

  redis-insight:
    image: redislabs/redisinsight
    ports:
      - 8001:8001
    networks:
      - redis-cluster-compose
    volumes:
      - ./data/redisinsight:/db
    depends_on:
      - redis-cluster-creator
외부에서의 접속 문제
레디스 클러스터를 구성하고나서 컨테이너 내부에서는 redis-cli로 서로 잘 통신이 된다. 하지만 호스트머신에서 redis-cli로 접속하여 데이터를 저장하고 가져올 때 또는 spring boot나 intellij에서 데이터소스를 추가해서 접속하려고 할 때에는 무한 대기가 일어나며 클러스터 간 통신이 안되는 것 같다
예상으로는 컨테이너 외부접속 시 각 클러스터 간의 ip, port 정보를 받아와서 클러스터 간의 통신할 위치 정보를 주고 받으며 라우팅하는데, 별도의 설정이 없는 경우에는 컨테이너 내부 네트워크의 ip, port를 전달해주게 되고, 이 정보를 호스트 머신에서 사용하다 보니까 컨테이너 ip와 port로 호스트 머신에서는 접속할 수 없는 듯하다.
그러므로 호스트 머신에서 레디스 컨테이너로 접속할 수 있도록 정보를 전달 해준다면 문제 해결이 가능해보인다.
아래 문서 내용을 확인 해보면 힌트를 얻을 수 있는 것 같다.
https://redis.io/docs/latest/operate/oss_and_stack/management/scaling/
Redis Cluster TCP ports
Every Redis Cluster node requires two open TCP connections: a Redis TCP port used to serve clients, e.g., 6379, and second port known as the cluster bus port. By default, the cluster bus port is set by adding 10000 to the data port (e.g., 16379); however, you can override this in the
cluster-portconfiguration.Cluster bus is a node-to-node communication channel that uses a binary protocol, which is more suited to exchanging information between nodes due to little bandwidth and processing time. Nodes use the cluster bus for failure detection, configuration updates, failover authorization, and so forth. Clients should never try to communicate with the cluster bus port, but rather use the Redis command port. However, make sure you open both ports in your firewall, otherwise Redis cluster nodes won't be able to communicate.
For a Redis Cluster to work properly you need, for each node:
- The client communication port (usually 6379) used to communicate with clients and be open to all the clients that need to reach the cluster, plus all the other cluster nodes that use the client port for key migrations.
- The cluster bus port must be reachable from all the other cluster nodes.
If you don't open both TCP ports, your cluster will not work as expected.
Redis Cluster and Docker
Currently, Redis Cluster does not support NATted environments and in general environments where IP addresses or TCP ports are remapped.
Docker uses a technique called port mapping: programs running inside Docker containers may be exposed with a different port compared to the one the program believes to be using. This is useful for running multiple containers using the same ports, at the same time, in the same server.
To make Docker compatible with Redis Cluster, you need to use Docker's host networking mode. Please see the
--net=hostoption in the Docker documentation for more information.
요약을하자면 tcp 포트는 두 가지가 있는데 클라이언트 서비스에 제공하는 클라이언트 통신 포트와 장애 감지, 구성 업데이트, 장애 조치 권한 부여 등을 위해 클러스터 버스에 사용하는 클러스터 버스 포트가 있다.
클라이언트 통신 포트는 다른 모든 클러스터 노드에 열려 있어야하고
클러스터 버스 포트는 다른 모든 클러스터 노드에서 접근이 가능해야한다.
Docker는 포트 매핑이라는 기술을 사용하는데 Redis와 호환되게 하려면 Docker 호스트 네트워킹 모드를 사용해야한다.
여기서 호스트 네트워킹 모드를 사용해도되지만 호스트 네트워크와 도커 컨테이너의 네트워크를 구분짓고 싶어 다른 방식으로 해결 했다.
Announce 옵션을 사용하여 문제 해결
볼륨 설정
redis.conf 파일을 편하게 수정할 수 있게 다음과 같이 볼륨 설정을 해준다.
  volumes:
    - ./data/6479:/redis
다음과 같이 redis.conf 파일을 수정해서 ./data/{node} 디렉토리에 넣어준다.
굳이 볼륨 설정을 할 필요 없이 컨테이너에 접속해서 redis.conf파일을 직접 수정해도 된다.
하지만 이래저래 테스트할 때에는 볼륨 설정하는 편이 편리하다.
아래 세 가지 옵션에 대해 설정이 필요하다.
- cluster-announce-ip
- cluster-announce-port
- cluster-announce-bus-port
redis.conf 기본 파일에 기재된 cluster-announce-ip, cluster-announce-port, cluster-announce-bus-port에 대한 설명은 다음과 같다.
########################## CLUSTER DOCKER/NAT support ########################
In certain deployments, Redis Cluster nodes address discovery fails, because
addresses are NAT-ted or because ports are forwarded (the typical case is
Docker and other containers).
In order to make Redis Cluster working in such environments, a static
configuration where each node knows its public address is needed. The
following four options are used for this scope, and are:
cluster-announce-ip
cluster-announce-port
cluster-announce-tls-port
cluster-announce-bus-port
Each instructs the node about its address, client ports (for connections
without and with TLS) and cluster message bus port. The information is then
published in the header of the bus packets so that other nodes will be able to
correctly map the address of the node publishing the information.
If tls-cluster is set to yes and cluster-announce-tls-port is omitted or set
to zero, then cluster-announce-port refers to the TLS port. Note also that
cluster-announce-tls-port has no effect if tls-cluster is set to no.
If the above options are not used, the normal Redis Cluster auto-detection
will be used instead.
Note that when remapped, the bus port may not be at the fixed offset of
clients port + 10000, so you can specify any port and bus-port depending
on how they get remapped. If the bus-port is not set, a fixed offset of
10000 will be used as usual.
정확한 의미 해석인지는 모르겠지만 도커와 같이 포트 포워딩이 되는 환경에서는 각 노드를 외부에 공개해줄 ip/port 정보가 필요하고 이럴때 사용할 수 있는 옵션이라는 뜻인 것 같다.
redis.conf (./data/6479/redis.conf)
모든 노드의 옵션을 설정해준다. 아래는 6개의 노드 중 한 노드의 설정 파일이다.
port 6479
cluster-enabled yes
cluster-config-file nodes.conf
cluster-node-timeout 3000
cluster-announce-ip {본인의 호스트 ip}
cluster-announce-port 6479
cluster-announce-bus-port 16479
requirepass password
masterauth password
appendonly yes
cluster-announce-ip : 호스트 머신의 ip를 입력했다.(ex: 192.x.x.x)
cluster-announce-port : Redis node port
cluster-announce-bus-port : Redis 클러스터의 노드 간 통신용 포트.
레디스의 포트와 announce port를 일치 시키고 docker-compose.yml 파일에 각 컨테이너 포트 매핑또한 외부/내부를 일치 시킨다.
requirepass/masterauth
클러스터를 생성하거나 할 때 각 노드 간 통신이 이루어지는데 이 때 requirepass가 걸려있는 노드라면 auth를 요구한다.
이럴때 비밀번호를 입력해줘야하는데 masterauth 설정으로 비밀번호를 지정해주면 auth 요구 시 자동으로 입력해준다.
requirepass 옵션으로 인증을 요구한다면 꼭 입력해주기.
Master-Slave 간 데이터 복제 확인
master에 입력된 데이터가 slave에 잘 복사가 되는지 확인해본다.
Redis-cli로 노드에 접속하여 확인
우선 master 노드 중 하나에 redis-cli로 접속하고 info replication 명령어로 slave 노드를 확인한다.
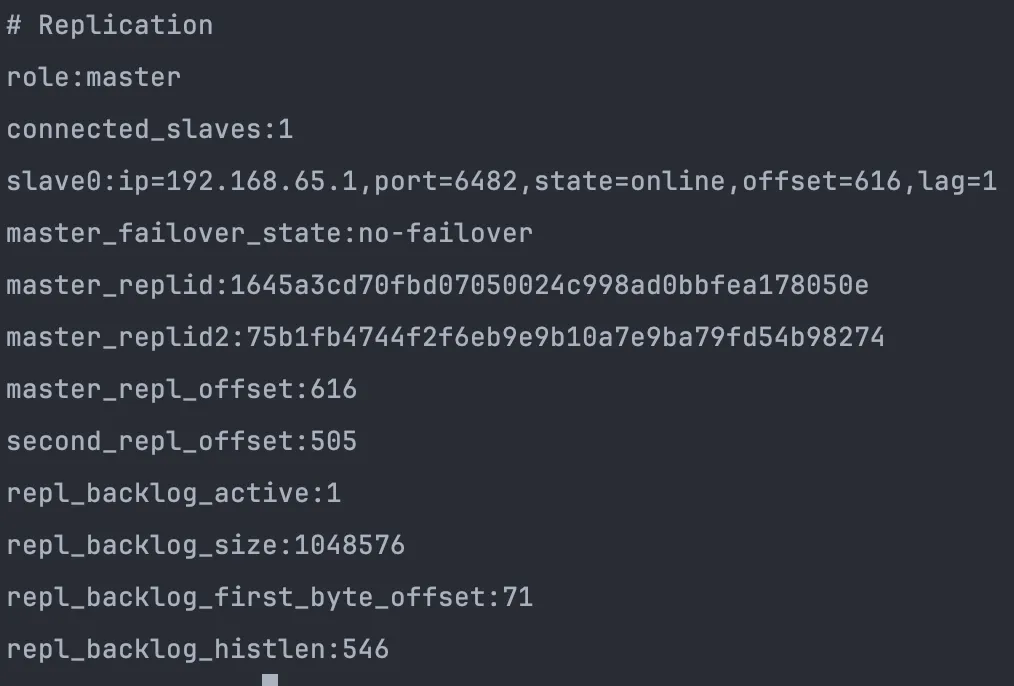
port가 6482인 node-4가 node-3의 slave인 것을 확인.
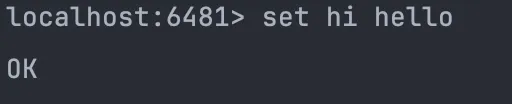
set 명령어로 데이터를 저장하고 잘 저장이 되었는지 확인
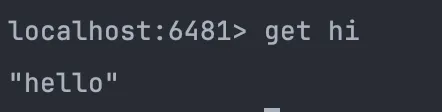
이제 slave 노드로 접속하여 같은 데이터가 복제되었는지 확인해본다.
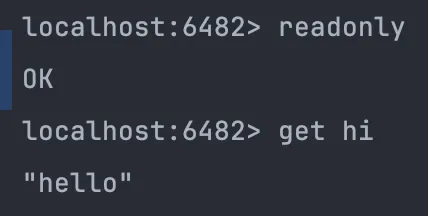
readonly 명령어 이후 get hi 명령어를 입력하니 “hello” 데이터가 정상적으로 출력되는 것을 확인할 수 있다.
Monitor 명령어를 통한 확인
monitor 명령어로도 확인이 가능하다
아래와 같이 slave 노드에서 monitor 명령어를 입력하고 master 노드에서 키 지정을 했을 경우 같은 명령어가 slave 노드에 입력되는 것을 확인할 수 있다.


Redis-cluster Slave의 Master 승격 확인
master 노드에 문제가 생기면 master 노드에 연결된 slave노드는 master로 승격된다.
확인 해보자.
Master/Slave 관계 확인
node-4(port: 6482)가 master고 node-3(port: 6481)이 node-4의 slave인 상황
INFO replication 명령어를 통한 확인
redis-cli -h {node-4} -p 6482로 접속하여 INFO replication 명령어로 master/slave 관계 확인
# Replication
role:master
connected_slaves:1
slave0:ip=192.168.65.1,port=6481,state=online,offset=196,lag=1
master_failover_state:no-failover
master_replid:75b1fb4744f2f6eb9e9b10a7e9ba79fd54b98274
master_replid2:419190353c7f054bccbd56cd69f5c5e4be2b16ed
master_repl_offset:196
second_repl_offset:57
repl_backlog_active:1
repl_backlog_size:1048576
repl_backlog_first_byte_offset:1
repl_backlog_histlen:196
role은 master slave는 6481포트인 node-3인 것으로 확인할 수 있다.
redis-cli -h {node-4} -p 6481로 접속하여 같은 방식으로 확인.
# Replication
role:slave
master_host:192.168.35.59
master_port:6482
master_link_status:up
master_last_io_seconds_ago:1
master_sync_in_progress:0
slave_read_repl_offset:350
slave_repl_offset:350
slave_priority:100
slave_read_only:1
replica_announced:1
connected_slaves:0
master_failover_state:no-failover
master_replid:75b1fb4744f2f6eb9e9b10a7e9ba79fd54b98274
master_replid2:0000000000000000000000000000000000000000
master_repl_offset:350
second_repl_offset:-1
repl_backlog_active:1
repl_backlog_size:1048576
repl_backlog_first_byte_offset:71
repl_backlog_histlen:280
role은 slave로 master는 6482 port인 node-4인 것을 확인 할 수 있다.
Slave → Master 승격 확인
이 상황에서 마스터인 node-4를 꺼버린다면?
Master 노드 Off
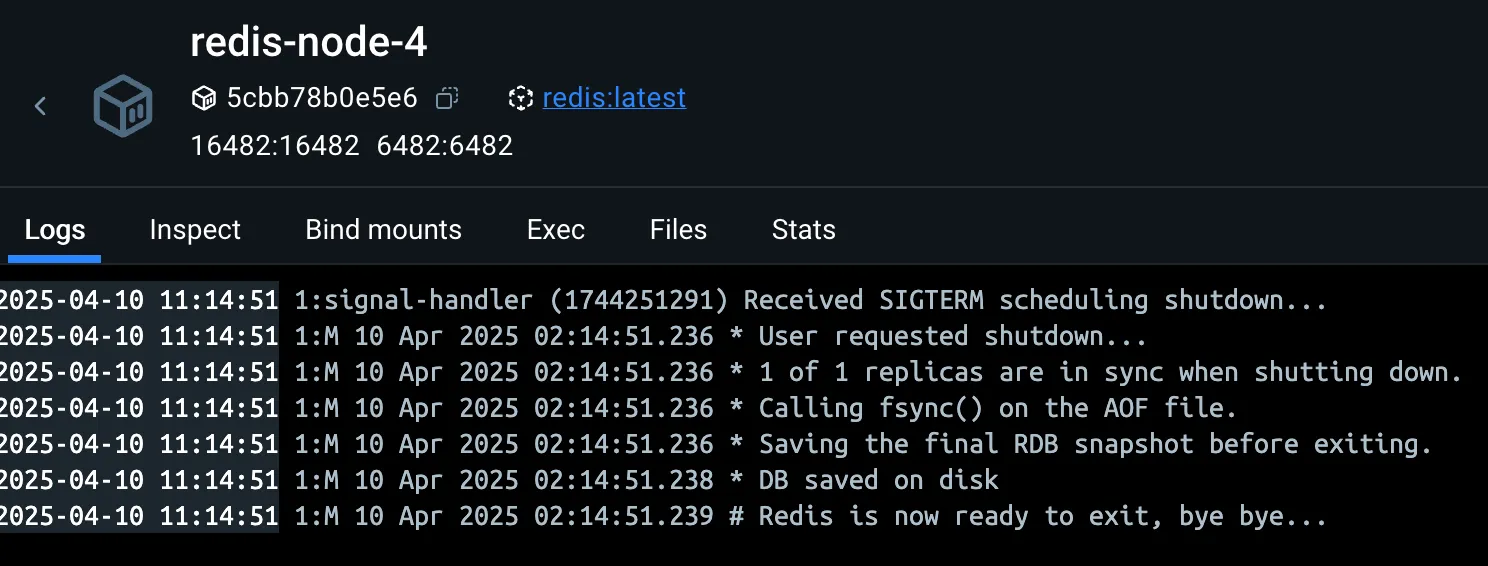
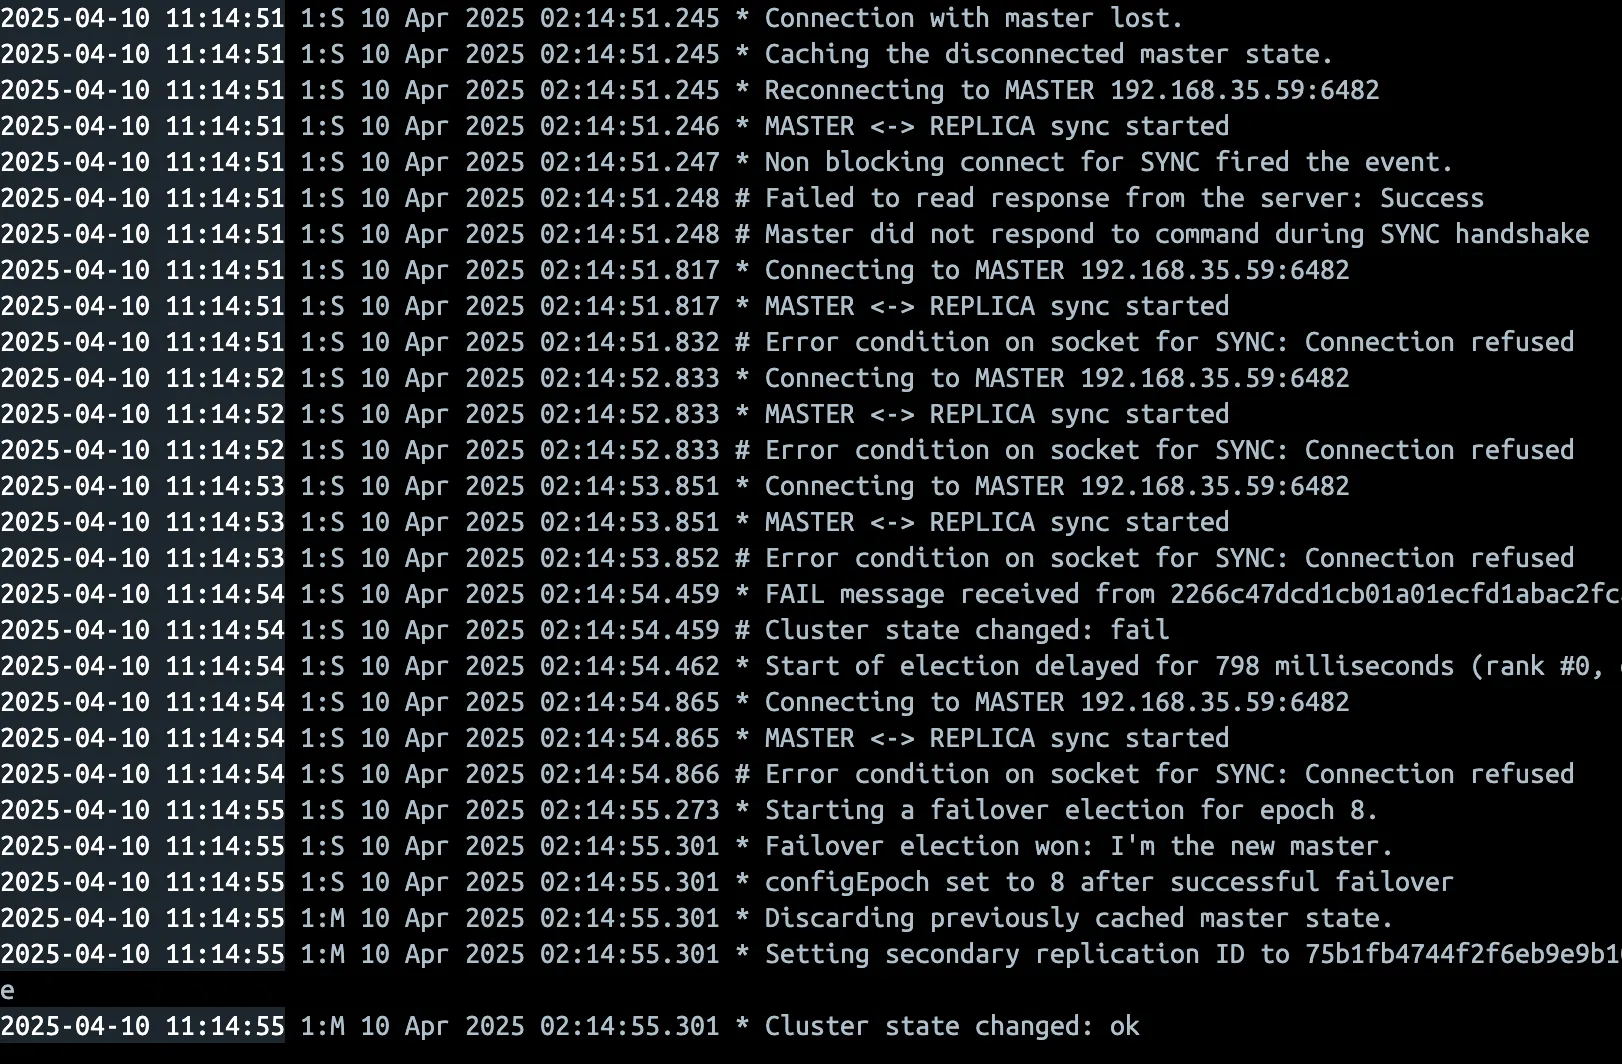
Slave Node 로그 확인
node-3의 로그를 확인해보면 아래와 같이 몇번의 커넥션 실패 이후 Failover election won: I'm the new master. 로그와 함께 해당 노드가 master로 승격 되었다는 로그가 발생한다.
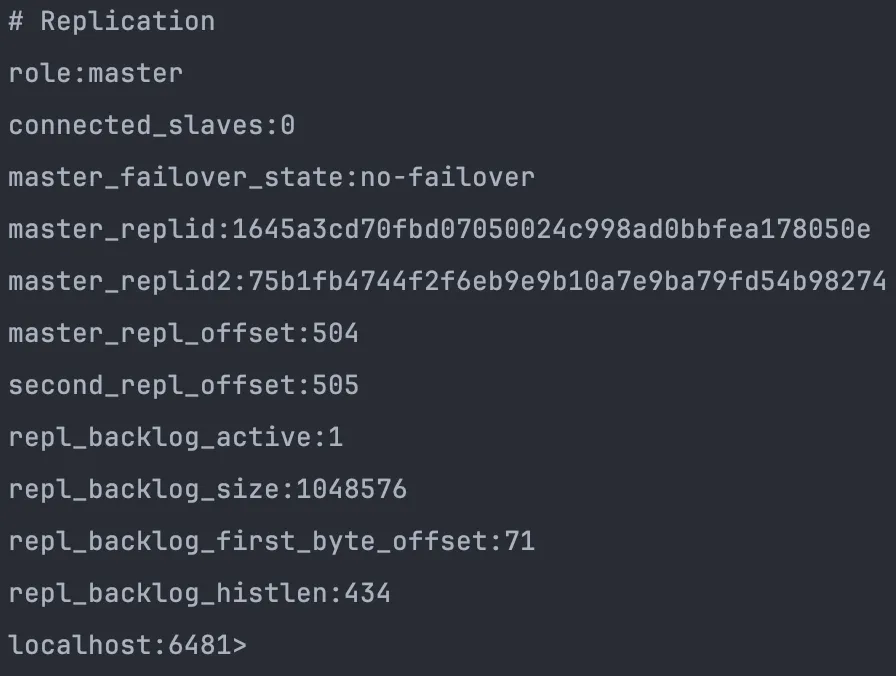
INFO replication 명령어로 확인
node-3에 redis-cli로 접속하여 INFO replication 명령어로 확인해보면 다음과 같이 이전의 role은 slave였는데 master로 변경된 것을 확인할 수 있다.
master-slave 1:1구조였기 때문에 slave 노드 정보는 없는 것을 확인할 수 있다.
.jpg)