
조회 기능만 주로 맡아서 RecyclerView만 주구장창했었는데 DiffUtil도 제대로 모르고 있다는 사실을 알게 되었다. 팀플도 끝났으니 한 번 파봤다.
DiffUtil
DiffUtil is a utility class that calculates the difference between two lists and outputs a list of update operations that converts the first list into the second one.
두 개의 리스트를 비교해서 첫 번째 리스트를 두 번째 리스트로 변환하는 업데이트 작업 목록을 출력하는 유틸리티 클래스
🐥 Utility Class(Helper Class)란? 참고 링크
관련된 메서드와 상수를 모아서 만든 클래스
기본적으로 Utility Class의 모든 메서드들은 static(따로 객체를 만들지 않고 바로 메서드 호출 가능)이다. 또한 이 클래스는 인스턴스화 될 필요가 없기 때문에 이를 방지하기 위해 기본 생성자를 private으로 만들기도 한다. 또한 상속 방지를 위해 클래스를 final 로 선언한다.
어쨌튼,
DiffUtil은 두 개의 리스트들을 비교한 후에 첫 번째 리스트를 두 번째 리스트로 업데이트해서 보여준다.
It can be used to calculate updates for a RecyclerView Adapter. See ListAdapter and AsyncListDiffer which can simplify the use of DiffUtil on a background thread.
라고 공식문서가 그래서 ListAdapter 먼저 알아본다.
한줄한줄 직독직해하기
ListAdapter
RecyclerView.Adapter base class for presenting List data in a RecyclerView, including computing diffs between Lists on a background thread.
= 백그라운드 스레드에서 목록 간의 차이점 계산을 포함하여 RecyclerView에서 목록 데이터를 표시하기 위한 RecyclerView.Adapter 베이스 클래스입니다.
This class is a convenience wrapper around AsyncListDiffer that implements Adapter common default behavior for item access and counting.
= 이 클래스는 아이템의 access와 counting을 위한 Adapter의 공통 기본 동작을 구현하는 AsyncListDiffer의 convenience wrapper입니다. (?이게 뭔 소리람)
While using a LiveData is an easy way to provide data to the adapter, it isn't required - you can use submitList when new lists are available.
= LiveData를 사용하는 것이 데이터를 어댑터에게 제공하는 쉬운 방법이지만 필수는 아닙니다. - submitList를 사용해서 새로운 리스트를 사용할 수 있습니다.
AsyncListDiffer
Helper for computing the difference between two lists via DiffUtil on a background thread.
= 백그라운드 스레드에서 DiffUtil에 의해 두 개의 리스트의 차이를 계산하는 도우미
It can be connected to a RecyclerView.Adapter, and will signal the adapter of changes between sumbitted lists.
= 이것은 RecyclerView.Adapter와 연결될 수 있고 보내진 리스트들 사이에서의 변경사항을 어댑터에게 알린다.
For simplicity, the ListAdapter wrapper class can often be used instead of the AsyncListDiffer directly. This AsyncListDiffer can be used for complex cases, where overriding an adapter base class to support asynchronous List diffing isn't convenient.
= AsyncListDiffer를 직접 사용하는 대신 단순하게 하기 위해, ListAdapter 래퍼 클래스를 사용할 수 있다. 이 AsyncListDiffer는 비동기 목록 차이를 지원하기 위해 어댑터 베이스 클래스를 오버라이딩하는 것이 편리하지 않은 복잡한 상황들에서 사용된다.
The AsyncListDiffer can consume the values from a LiveData of List and present the data simply for an adapter. It computes differences in list contents via DiffUtil on a background thread as new Lists are received.
= AsyncListDiffer는 List의 LiveData의 값들을 사용할 수 있고 Adapter에게 데이터를 제공할 수 있다. 새로운 리스트들이 들어오게 되면 백그라운드 스레드에서 DiffUtil에 따라 내용의 차이를 계산한다.
Use getCurrentList to access the current List, and present its data objects. Diff results will be dispatched to the ListUpdateCallback immediately before the current list is updated. If you're dispatching list updates directly to an Adapter, this means the Adapter can safely access list items and total size via getCurrentList.
= getCurrentList를 사용하여 현재 리스트에 접근해라. Diff 결과는 현재 목록이 업데이트되기 직전에 ListUpdateCallback으로 전송됩니다. 목록 업데이트를 어댑터에 직접 전송하는 경우 어댑터가 getCurrentList를 통해 목록 항목과 총 크기에 안전하게 액세스할 수 있습니다.
신나는~ 코드 분석 시간~!🎵
공식문서만 읽어서는 이해가 안됐다.
그러다가 우연히 DiffUtil 코드를 대충 보고 https://dev.gmarket.com/79 이 블로그를 읽으니 대충 알아들었는데 확실하게는 이해가 안됐다.
그래서 내 나름대로 살펴보면서 정리해보려고 한다.
class ColorAdapter(
    private val onColorClickListener: (Int) -> Unit,
) : ListAdapter<PaintColor, ColorViewHolder>(ColorDiffUtilCallback) {

    override fun onCreateViewHolder(parent: ViewGroup, viewType: Int): ColorViewHolder {
        return ColorViewHolder(parent, onColorClickListener)
    }

    override fun onBindViewHolder(holder: ColorViewHolder, position: Int) {
        holder.bind(getItem(position))
    }

    companion object {
        object ColorDiffUtilCallback : DiffUtil.ItemCallback<PaintColor>() {
            override fun areItemsTheSame(oldItem: PaintColor, newItem: PaintColor): Boolean {
                return oldItem.colorRes == newItem.colorRes
            }

            override fun areContentsTheSame(oldItem: PaintColor, newItem: PaintColor): Boolean {
                return oldItem == newItem
            }
        }
    }
}
위와 같은 간단한 RecyclerView Adapter가 있다.
이 코드를 기반으로 뜯어볼거다.
ListAdapter
일단 위의 ColorAdapter 클래스가 상속하고 있는 ListAdapter부터 살펴보겠다.
public abstract class ListAdapter<T, VH extends RecyclerView.ViewHolder> extends RecyclerView.Adapter<VH> {

		final AsyncListDiffer<T> mDiffer;

		// ...

		// 6
		protected ListAdapter(@NonNull DiffUtil.ItemCallback<T> diffCallback) {
		    mDiffer = new AsyncListDiffer<>(new AdapterListUpdateCallback(this),
		            new AsyncDifferConfig.Builder<>(diffCallback).build());
		    mDiffer.addListListener(mListener);
		}

		// 1
		public void submitList(@Nullable List<T> list) {
			mDiffer.submitList(list);
		}

		// 2
		public void submitList(@Nullable List<T> list, @Nullable final Runnable commitCallback) {
		    mDiffer.submitList(list, commitCallback);
		}

		// 3
		protected T getItem(int position) {
		    return mDiffer.getCurrentList().get(position);
		}

		// 4
		@Override
		public int getItemCount() {
		    return mDiffer.getCurrentList().size();
		}

		// 5
		@NonNull
		public List<T> getCurrentList() {
		    return mDiffer.getCurrentList();
		}
}
이렇게 친절하게 코드에서 다 설명해주는데 나는 뭐가 무섭다고 공식문서부터 보고 앉아있던걸까
앞으로는 코드 먼저 봐야겠다.
순서대로 설명 들어갑니다잉
submitList 메소드는 새로 보여질 list를 인자로 받는다. 이미 보여지고 있는 것이 있다면 그것과 새로 들어온 것을 background thread에서 계산하여 main thread에서 Adapter.notifyItem 이벤트를 실행한다.
그런데 submitList가 2개다.
2번
새로 보여질 list뿐만 아니라 callback 메소드도 인자로 받는다. 이 callback은 list에 대한 계산과 수행이 끝난 후에 실행될 작업이다.
예를 들어, 필터검색을 한 후에 돌아오면 다시 submitList를 하고 recyclerView가 맨 위로 올라가야 한다. 이럴 때 recyclerView가 맨 위로 올라가는 메소드도 함께 줘서 비동기 작업(background에서 수행)이 끝난 후에 이 콜백을 실행할 수 있다.
3번
getItem은 말그대로 갖고 있는 List의 position번째의 아이템을 반환해준다. currentList[position]이라고 하는 것보다는 이왕 제공해주는 함수를 사용해서 getItem(position)이라고 하자
4번
RecyclerView.Adapter를 구현했기 때문에 오버라이드 해야할 것을 여기서 해준 것이다.
5번
갖고 있는 list 반환
6번
이러한 함수들을 구현하는 ListAdapter를 어떻게 만드느냐!
AdapterListUpdateCallback(this)과 DiffUtil.ItemCallback<T>이 필요하다.
AdapterListUpdateCallback(this)는 밑에서 나오겠지만 notify 메소드를 불러주는 클래스이다. 그 클래스에 자신(ListAdapter)을 넣어준다. (adapter.notify해야하니까~)
DiffUtil.ItemCallback<T> 이건 또 뭘까.
public abstract static class ItemCallback<T> {
	public abstract boolean areItemsTheSame(@NonNull T oldItem, @NonNull T newItem);

	public abstract boolean areContentsTheSame(@NonNull T oldItem, @NonNull T newItem);

	@Nullable
	public Object getChangePayload(@NonNull T oldItem, @NonNull T newItem) {
	    return null;
	}
}
DiffUtil 안에 있는 클래스인데, 이걸로 우리가 맨위에 있는 ColorAdapter의 companion object에 만들어 두었던 ColorDiffUtilCallback을 구현한다.
두 개의 list들 사이에서 어떻게 차이점을 계산할지 결정해주는 역할을 한다.
이러한 DiffUtil.ItemCallback를 가지고 AsyncDifferConfig에서 builder()를 통해 AsyncListDiffer를 만들어낸다.
보면 알겠지만 이 모든 함수들이 AsyncListDiffer를 통해서 이루어지고 있다.
그렇다. 사실 ListAdapter는 AsyncListDiffer를 편하게 사용하고자 만들어진 것이고 찐은 AsyncListDiffer이다.
이제 진짜를 보러 가보자.
AsyncListDiffer
public class AsyncListDiffer<T> {

	// 1
    private final ListUpdateCallback mUpdateCallback;

    // 2
    @SuppressWarnings("WeakerAccess") /* synthetic access */
    final AsyncDifferConfig<T> mConfig;

    // 3
    Executor mMainThreadExecutor;

	@Nullable private List<T> mList;
	@NonNull public List<T> getCurrentList() { return mReadOnlyList; }
	@SuppressWarnings("WeakerAccess") public void submitList(@Nullable final List<T> newList) { submitList(newList, null); }

	// 4
	@SuppressWarnings("WeakerAccess")
	public void submitList(@Nullable final List<T> newList, @Nullable final Runnable commitCallback) {
		...
		final List<T> oldList = mList;
		mConfig.getBackgroundThreadExecutor().execute(new Runnable() {
			@Override
			public void run() {
				final DiffUtil.DiffResult result = DiffUtil.calculateDiff(new DiffUtil.Callback() {
					@Override
					public int getOldListSize() { return oldList.size(); }
					@Override
					public int getNewListSize() { return newList.size(); }
					@Override
					public boolean areItemsTheSame(int oldItemPosition, int newItemPosition) { ... }
					@Override
					public boolean areContentsTheSame(int oldItemPosition, int newItemPosition) { ... }
					@Nullable
					@Override
					public Object getChangePayload(int oldItemPosition, int newItemPosition) { ... }
				});

				mMainThreadExecutor.execute(new Runnable() {
					@Override
					public void run() {
						if (mMaxScheduledGeneration == runGeneration) {
							latchList(newList, result, commitCallback);
						}
					}
				});
			}
		});
	}

}
1번
AdapterListUpdateCallback 을 가지고 있다.
public final class AdapterListUpdateCallback implements ListUpdateCallback {
    @NonNull
    private final RecyclerView.Adapter mAdapter;

    public AdapterListUpdateCallback(@NonNull RecyclerView.Adapter adapter) {
        mAdapter = adapter;
    }

    @Override
    public void onInserted(int position, int count) {
        mAdapter.notifyItemRangeInserted(position, count);
    }

    @Override
    public void onRemoved(int position, int count) {
        mAdapter.notifyItemRangeRemoved(position, count);
    }

    @Override
    public void onMoved(int fromPosition, int toPosition) {
        mAdapter.notifyItemMoved(fromPosition, toPosition);
    }

    @Override
    public void onChanged(int position, int count, Object payload) {
        mAdapter.notifyItemRangeChanged(position, count, payload);
    }
}ListAdapter에서 AsyncListDiffer만드는 과정(6번)에서 말했던 것처럼 받아온 adapter에서 notify메소드를 호출해주는 형태이다.
2번
ThreadExecutor를 가지고 스레드를 실행시켜주기 위해 AsyncDifferConfig을 가지고 있어준다.
3번
이 mMainThreadExecutor은 이름 그대로 mainThread을 실행시켜주는 Executor를 가진다.
2번의 config에서 가져오거나 없으면 이 안에서 만들어준다.
mainThread에서 어떻게 수행시켜주나 했더니 Handler의 post()를 사용한다.
베리가 알아본 그것
4번
그리고 submitList() 를 통해 backgroundThreadExecutor 에서 DiffUtil.calculateDiff() 함수를 호출하여 두 리스트 간의 차이점을 얻어내고(그게 diffResult), mainThreadExecutor 에서 latchList()에서 새로운 List를 업데이트한다.
latchList()를 자세히 보면, 안에서 diffResult.dispatchUpdatesTo(mUpdateCallback);을 하는데,
여기서 ListUpdateCallback을 보내주고 어떻게어떻게 해서 1번의 함수가 실행되게 된다. 이것까지 굳이 이해할 필요는 없을 것 같아서 설명 생략. 그래도 궁금하면 코드 까보세요~
이제 블로그의 그림이 아주 잘 이해가 되지요~?
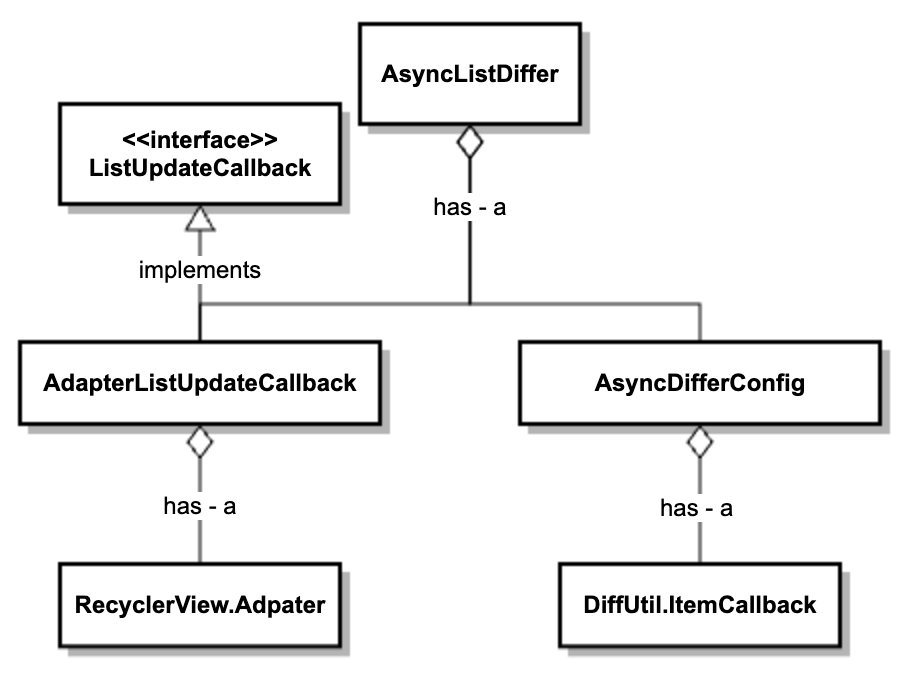
지금까지 본 코드들 그대로 입니다~
정리
DiffUtil을 사용하기 전에는 적당한 notify메소드를 적당한 곳에서 호출해주어야 했다.
하지만 DiffUtil을 사용하면 AsyncListDiffer에서 이전 List와 새로 들어온 List를 백그라운드 스레드에서 계산한 후에 알아서 메인스레드에서 적당한 notify 메소드를 호출해준다.
전체적으로 엄청 생략했으니 궁금하면 코드 살펴보는 것을 추천합니다~!
참고
https://dev.gmarket.com/79
https://junroot.github.io/programming/Utility-Class/
https://developer.android.com/reference/androidx/recyclerview/widget/DiffUtil
https://developer.android.com/reference/androidx/recyclerview/widget/ListAdapter
https://developer.android.com/reference/androidx/recyclerview/widget/AsyncListDiffer