리소스 삭제했으므로 별도의 코드 가감 없음
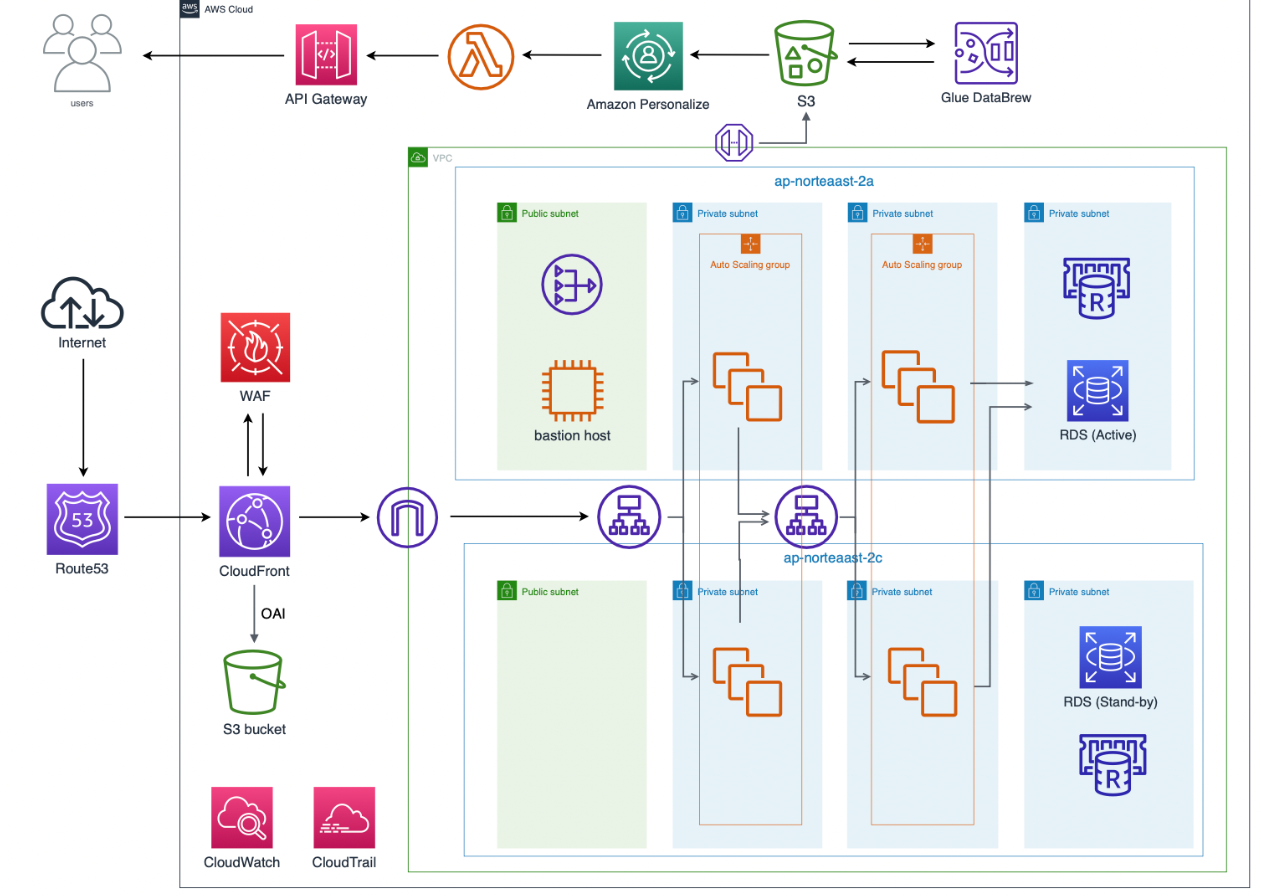
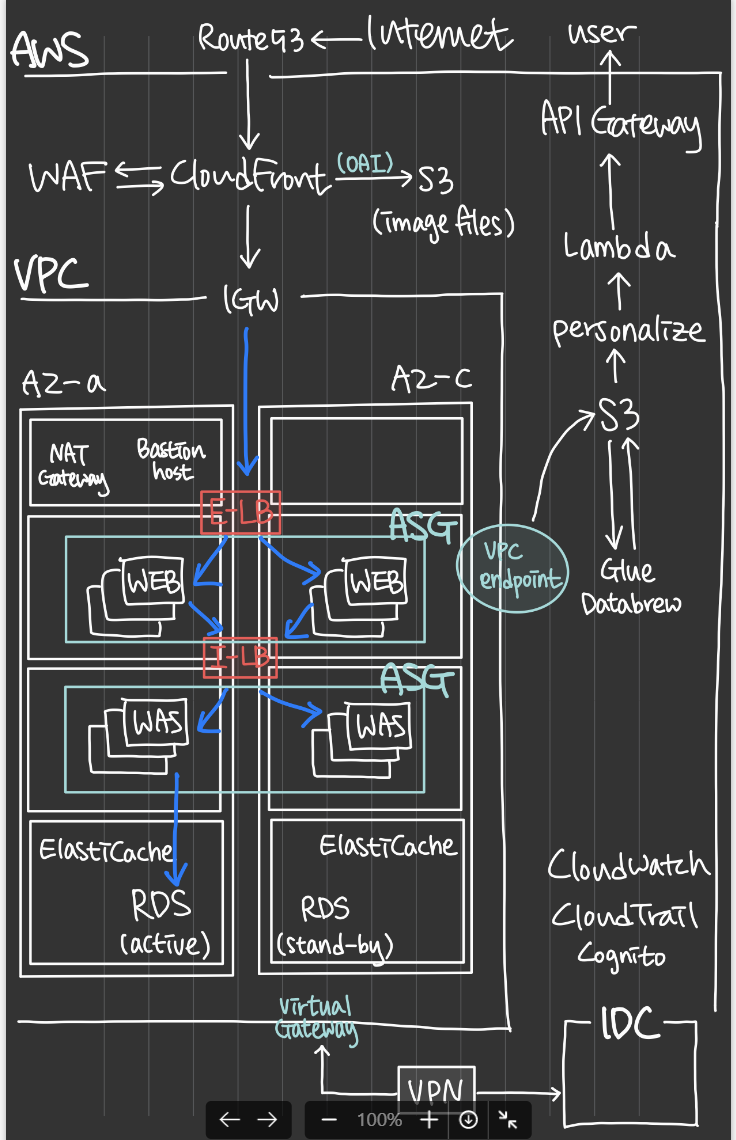
우리의 아키텍쳐
S3
1. s3 버킷생성
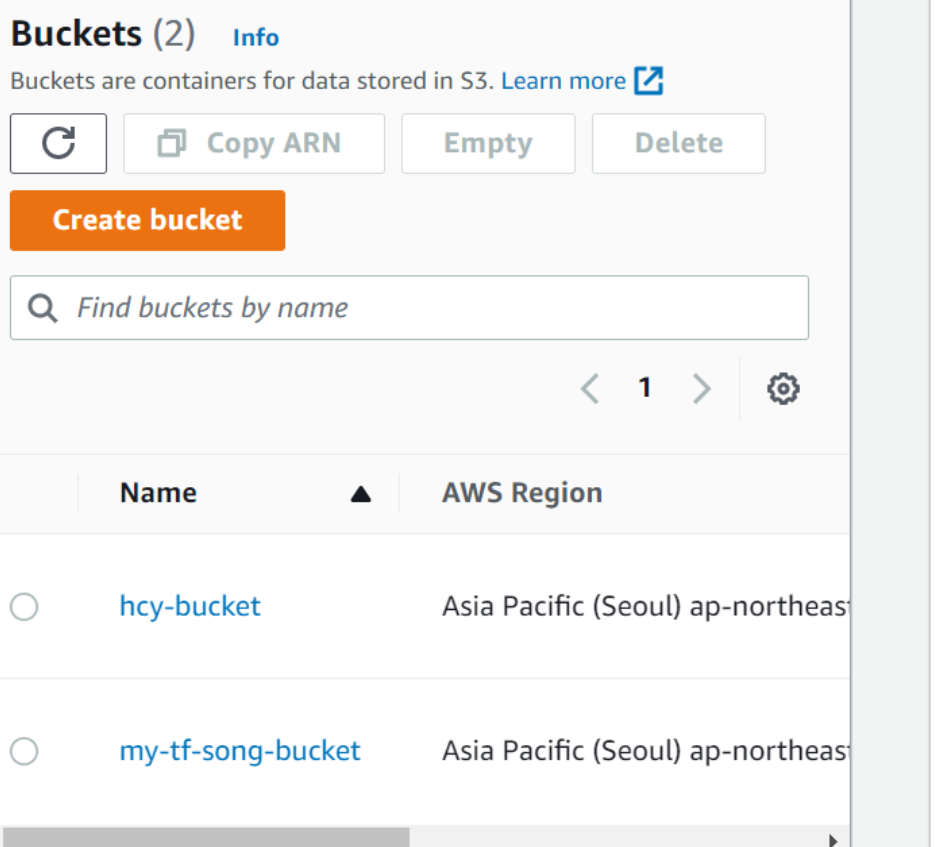
resource "aws_s3_bucket" "song-bucket" {
bucket = "my-tf-song-bucket" #버킷 이름은 전 리전적으로 유일한 이름이어야 함.
tags = {
Name = "Song-S3"
Environment = "Dev"
}
}
resource "aws_s3_bucket_acl" "song-example" {
bucket = aws_s3_bucket.song-bucket.id
acl = "private" # 나만 접근가능
// 기본값은 private
# private, public- read, public-read-write, aws-exec-read, authenticated-read,log-delivery-write
}
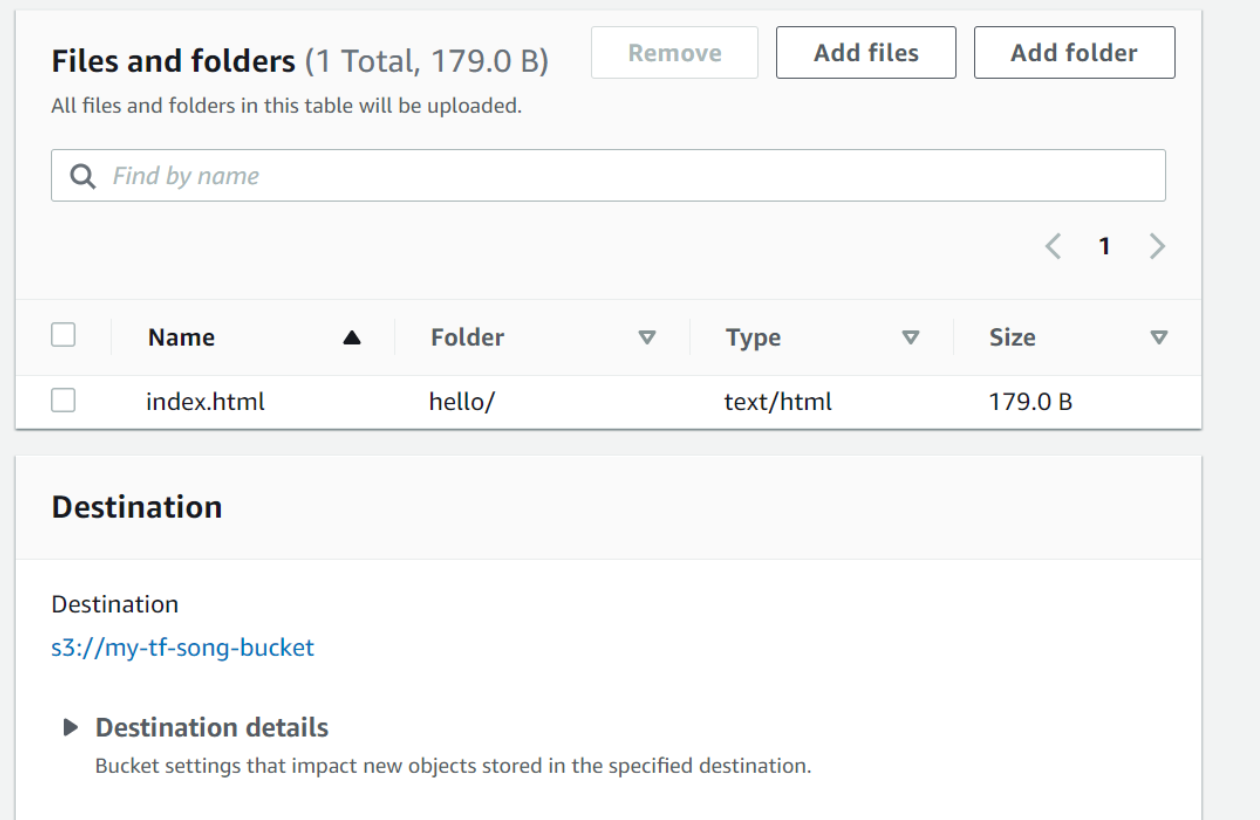
#Uploading a file to a bucket
resource "aws_s3_object" "object" {
bucket = aws_s3_bucket.song-bucket.id
key = "index.html"
source = "/hello/index.html"
content_type = "text/html"
# The filemd5() function is available in Terraform 0.11.12 and later
# For Terraform 0.11.11 and earlier, use the md5() function and the file() function:
# etag = "${md5(file("path/to/file"))}"
etag = md5("/hello/index.html")
}etag = filedmd5 로 시작하는데 자꾸 파일을 못 찾는다길래, md5로 바꿔주었다.
Your new solution using md5() seems to be the best way to handle this using the local_file resource.
라고 하기에,, 로컬파일 리소스에는 저 함수가 더 맞는듯 하다.

테라폼으로 하면 아무리해도 경로를 못찾아서
직접올려줌
클라우드 프론트
너무 무턱대고 테라폼 코드를 짜려고 했어서, aws 창을 본 뒤에 이해를 거친 뒤 짜보도록 하겠다.
cloudfront 기본 설계
cloudfront - aws 콘솔 공부
1. Distribution
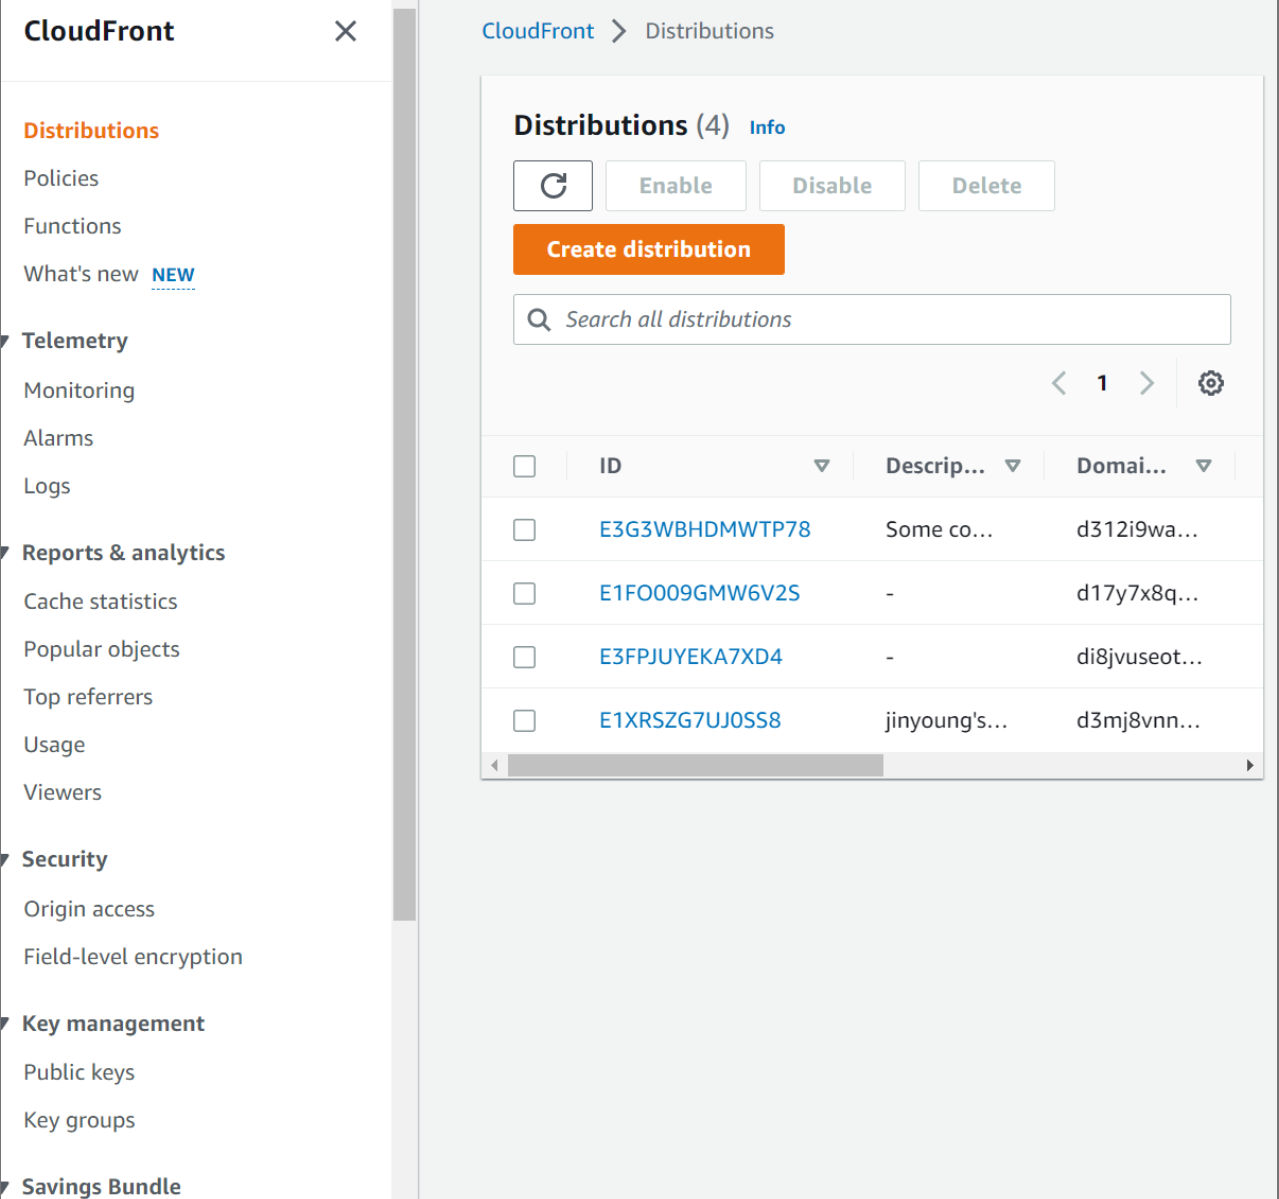
Distribution 은
Cloudfront 서버를 생성하는 작업으로, 배포 라고도 부른다.
Origin 세팅
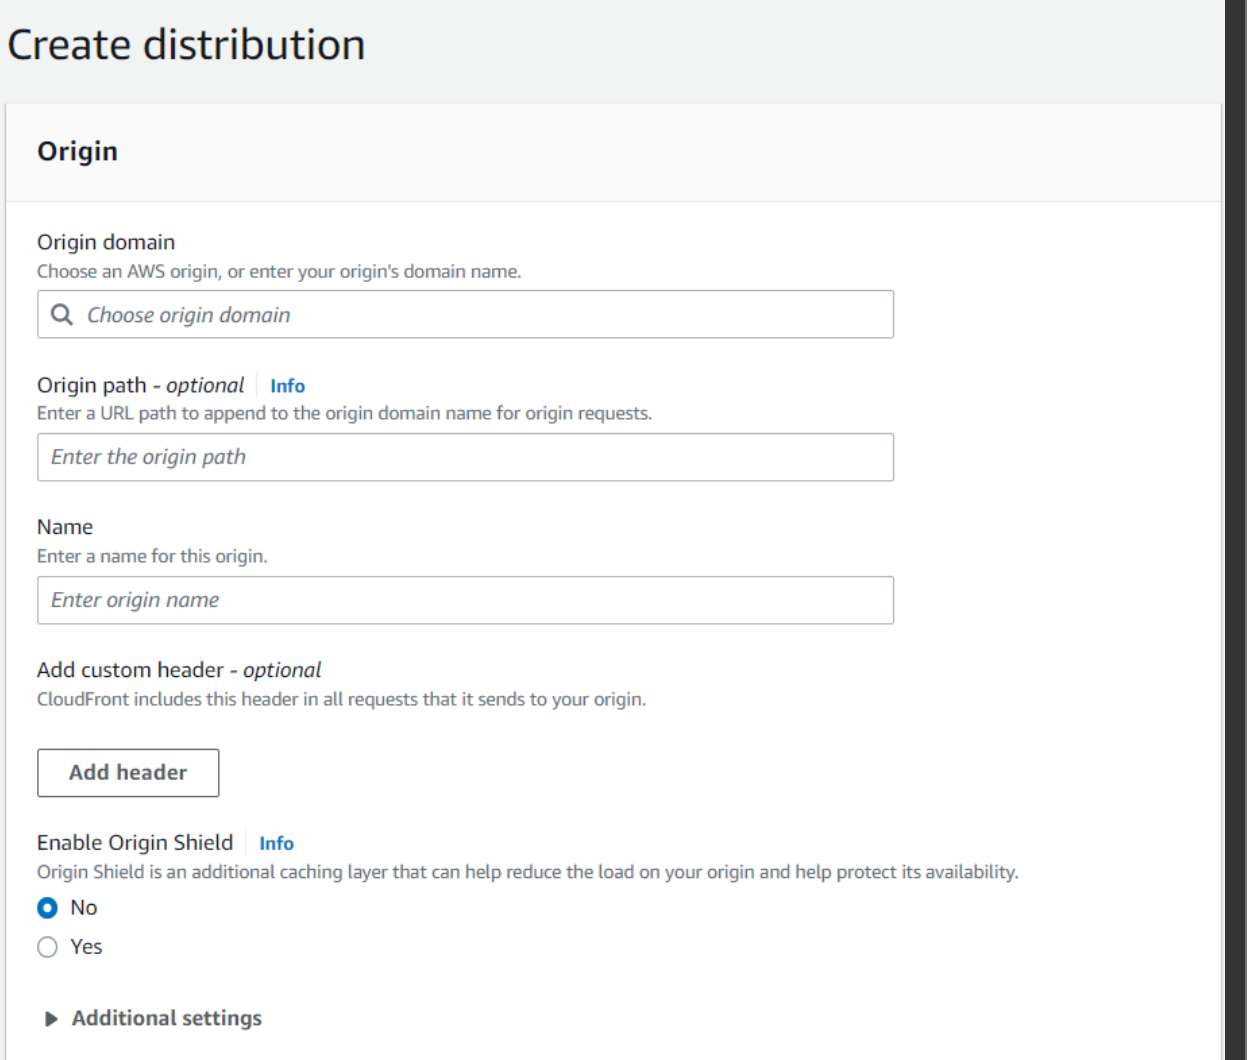
origin에는 - 도메인 이름
- 프로토콜, 포트, ssl등에 관한 설정이 있다면 프로젝트 성격에 맞게 진행
- 캐시 설정은 특별히 수정해야 할 캐시 정책(Cache policy)이 없다면, 기본값을 사용해도 무방함.

뷰어 프로토콜 정책
- HTTP and HTTPS : http또는 https 둘다 사용할때
- Redirect HTTP to HTTPS : 만일 http로 접속하면 https로 리다이렉트. 보통 가장 많이 쓰임
- HTTPS only : https로만
Cache 설정
cloudfront의 기본 cache 의 수명은 24시간으로 설정되어있기 때문에, 웹 서버의 변경사항을 바로 반영하지 못한다.

캐시 키 (Cache Key)
- 어떤 기준으로 컨텐츠를 캐싱할 것인지 결정
- 기본적으로 URL로 캐싱
- 설정에 따라 Header와 Cookies, 쿼리스트링 등을 사용 가능 (같은 URL로 접속했지만 헤더나 쿠키를 이용해 영어로된 컨텐츠를 보여주거나 광고를 보여주거나 등 다르게 세팅 가능)
TTL (Time to live)
- 캐싱된 아이템이 살아있는 시간 → TTL초 이후에는 캐싱에서 삭제
정책
- CloudFront가 동작하는 방법을 정의한 정책
- 어떻게 캐싱을 할지, 어떤 내용을 Origin에 보낼지, 어떤 헤더를 허용할지 등 결정
무효화
무효화 기능(invalidation)을 통해 수정된 파일이 캐시로 바로 반영하도록 설정
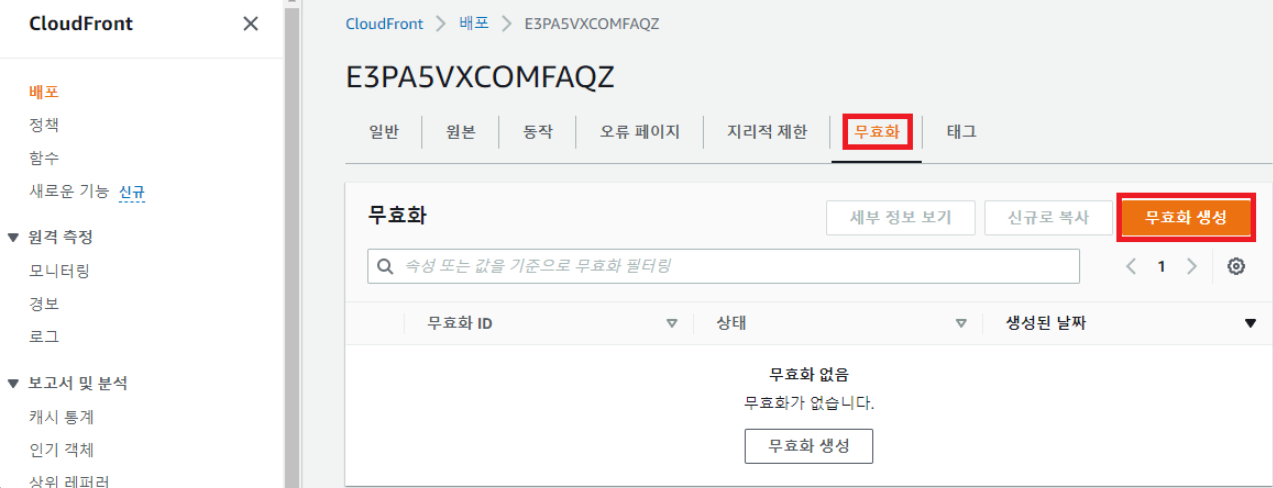
웹서버 (origin)의 cache를 무효화 하는것이 아닌 기본 cache를 무효화 하는것이다.waf는 설정에 있다.
참고
[AWS] 📚 CloudFront 개념 원리 & 사용 세팅 💯 정리
[CloudFront] CloudFront 기본 사용법
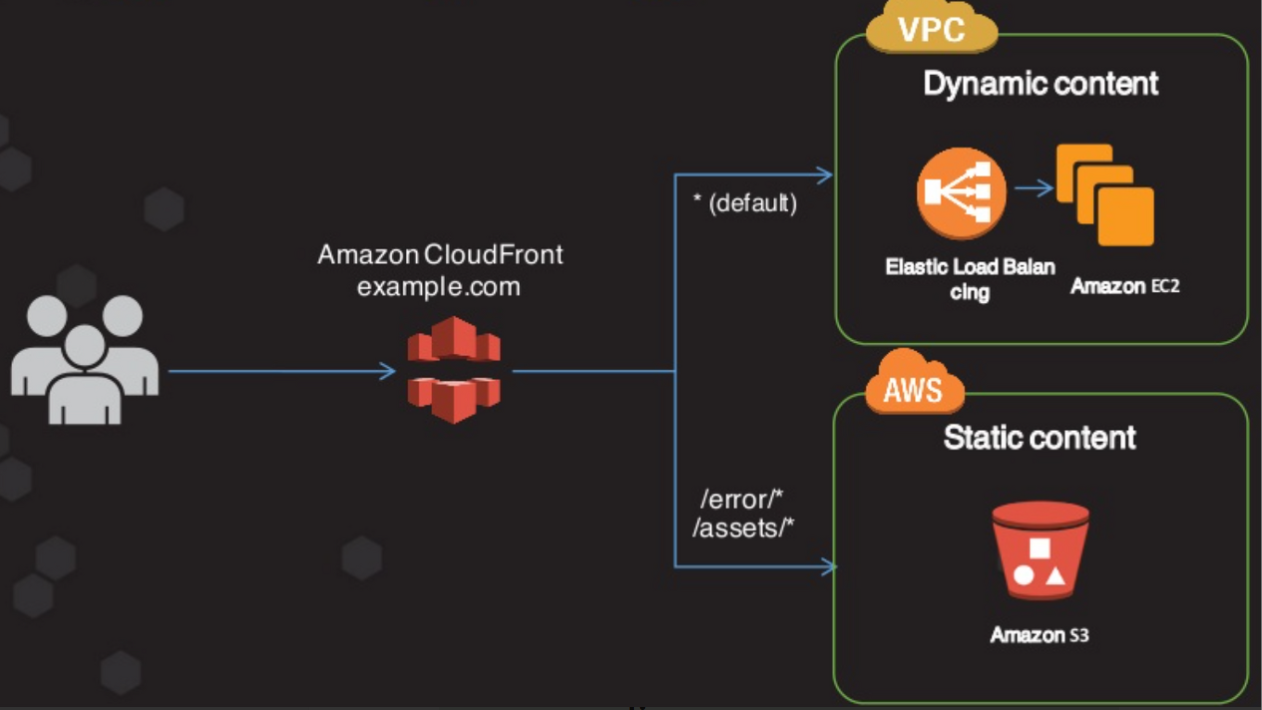
S3앞단에 Cloudfront - tf 코드 작성해보기!
참고
공식문서
테라폼 공식 문서에서 어떤걸 가져와서 짜야 하는지 모르겠어서 찾은 문서
초기 세팅 + vpc + 어플리케이션 서비스 + static 페이지 만들기 + jenkins배포 실습까지 써있어서 유용한 듯!
일단은 cloudfront부분만 참고해보도록 하겠음
도메인이 없으므로, cloudfront에서 제공해주는 default domain 사용 가능하다.!
[Terraform] S3 버킷 앞단에 CloudFront를 붙이는 아키텍처 구현
- 코드
공식문서에, S3 orign 과 함께 쓰는 cloudfront distribution 이라 나와있어 일단 이 코드를 가져와서 수정했다.resource "aws_s3_bucket" "b" { bucket = "mybucket" tags = { Name = "My bucket" } } resource "aws_s3_bucket_acl" "b_acl" { bucket = aws_s3_bucket.b.id acl = "private" } locals { s3_origin_id = "myS3Origin" } resource "aws_cloudfront_distribution" "s3_distribution" { origin { domain_name = aws_s3_bucket.b.bucket_regional_domain_name origin_id = local.s3_origin_id s3_origin_config { origin_access_identity = "origin-access-identity/cloudfront/ABCDEFG1234567" } } enabled = true is_ipv6_enabled = true comment = "Some comment" default_root_object = "index.html" logging_config { include_cookies = false bucket = "mylogs.s3.amazonaws.com" prefix = "myprefix" } aliases = ["mysite.example.com", "yoursite.example.com"] default_cache_behavior { allowed_methods = ["DELETE", "GET", "HEAD", "OPTIONS", "PATCH", "POST", "PUT"] cached_methods = ["GET", "HEAD"] target_origin_id = local.s3_origin_id forwarded_values { query_string = false cookies { forward = "none" } } viewer_protocol_policy = "allow-all" min_ttl = 0 default_ttl = 3600 max_ttl = 86400 } # Cache behavior with precedence 0 ordered_cache_behavior { path_pattern = "/content/immutable/*" allowed_methods = ["GET", "HEAD", "OPTIONS"] cached_methods = ["GET", "HEAD", "OPTIONS"] target_origin_id = local.s3_origin_id forwarded_values { query_string = false headers = ["Origin"] cookies { forward = "none" } } min_ttl = 0 default_ttl = 86400 max_ttl = 31536000 compress = true viewer_protocol_policy = "redirect-to-https" } # Cache behavior with precedence 1 ordered_cache_behavior { path_pattern = "/content/*" allowed_methods = ["GET", "HEAD", "OPTIONS"] cached_methods = ["GET", "HEAD"] target_origin_id = local.s3_origin_id forwarded_values { query_string = false cookies { forward = "none" } } min_ttl = 0 default_ttl = 3600 max_ttl = 86400 compress = true viewer_protocol_policy = "redirect-to-https" } price_class = "PriceClass_200" restrictions { geo_restriction { restriction_type = "whitelist" locations = ["US", "CA", "GB", "DE"] } } tags = { Environment = "production" } viewer_certificate { cloudfront_default_certificate = true } }
- amazon doc 참고
공개적으로 액세스할 수 없도록 Amazon S3 버킷에 대한 액세스를 제한
해당 코드 (참고)
resource "aws_cloudfront_origin_access_identity" "example" {
  comment = "Some comment"
}
S3.tf 를 다른 폴더에 두었더니 버킷 이름을 인식을 못해서..

- 코드
→ 주석처리 한 코드 설명resource "aws_s3_bucket" "song-bucket" { bucket = "my-tf-song-bucket" #버킷 이름은 전 리전적으로 유일한 이름이어야 함. tags = { Name = "Song-S3" Environment = "Dev" } } resource "aws_s3_bucket_acl" "song-bucket" { bucket = aws_s3_bucket.song-bucket.id #acl = "private" # 나만 접근가능 acl = "public-read" // 기본값은 private # private, public- read, public-read-write, aws-exec-read, authenticated-read,log-delivery-write } #Uploading a file to a bucket resource "aws_s3_object" "object" { bucket = aws_s3_bucket.song-bucket.id key = "index.html" source = "hello/index.html" content_type = "text/html" # The filemd5() function is available in Terraform 0.11.12 and later # For Terraform 0.11.11 and earlier, use the md5() function and the file() function: # etag = "${md5(file("path/to/file"))}" etag = md5("/hello/index.html") } resource "aws_cloudfront_origin_access_identity" "test" { comment = "Song-test distribution" } resource "aws_cloudfront_distribution" "s3_distribution" { origin { domain_name = aws_s3_bucket.song-bucket.bucket_domain_name #cloudfront임의의 도메인 origin_id = aws_s3_bucket.song-bucket.id s3_origin_config { origin_access_identity = aws_cloudfront_origin_access_identity.test.cloudfront_access_identity_path } } enabled = true is_ipv6_enabled = true comment = "Some comment" default_root_object = "index.html" # logging_config { # include_cookies = false # bucket = "mylogs.s3.amazonaws.com" # prefix = "myprefix" # } # aliases = ["mysite.example.com", "yoursite.example.com"] default_cache_behavior { allowed_methods = ["DELETE", "GET", "HEAD", "OPTIONS", "PATCH", "POST", "PUT"] cached_methods = ["GET", "HEAD"] target_origin_id = aws_s3_bucket.song-bucket.id forwarded_values { query_string = false cookies { forward = "none" } } viewer_protocol_policy = "allow-all" min_ttl = 0 default_ttl = 3600 max_ttl = 86400 } /* # Cache behavior with precedence 0 ordered_cache_behavior { path_pattern = "/content/immutable/*" allowed_methods = ["GET", "HEAD", "OPTIONS"] cached_methods = ["GET", "HEAD", "OPTIONS"] target_origin_id = local.s3_origin_id forwarded_values { query_string = false headers = ["Origin"] cookies { forward = "none" } } min_ttl = 0 default_ttl = 86400 max_ttl = 31536000 compress = true viewer_protocol_policy = "redirect-to-https" } # Cache behavior with precedence 1 ordered_cache_behavior { path_pattern = "/content/*" allowed_methods = ["GET", "HEAD", "OPTIONS"] cached_methods = ["GET", "HEAD"] target_origin_id = local.s3_origin_id forwarded_values { query_string = false cookies { forward = "none" } } min_ttl = 0 default_ttl = 3600 max_ttl = 86400 compress = true viewer_protocol_policy = "redirect-to-https" } */ price_class = "PriceClass_All" #지리적 제한: 특정국가에서만 접근하도록 화이트 리스트 작성 restrictions { geo_restriction { #restriction_type = "whitelist" restriction_type = "none" #locations = ["US", "CA", "GB", "DE"] } } tags = { Environment = "production" } viewer_certificate { cloudfront_default_certificate = true } }
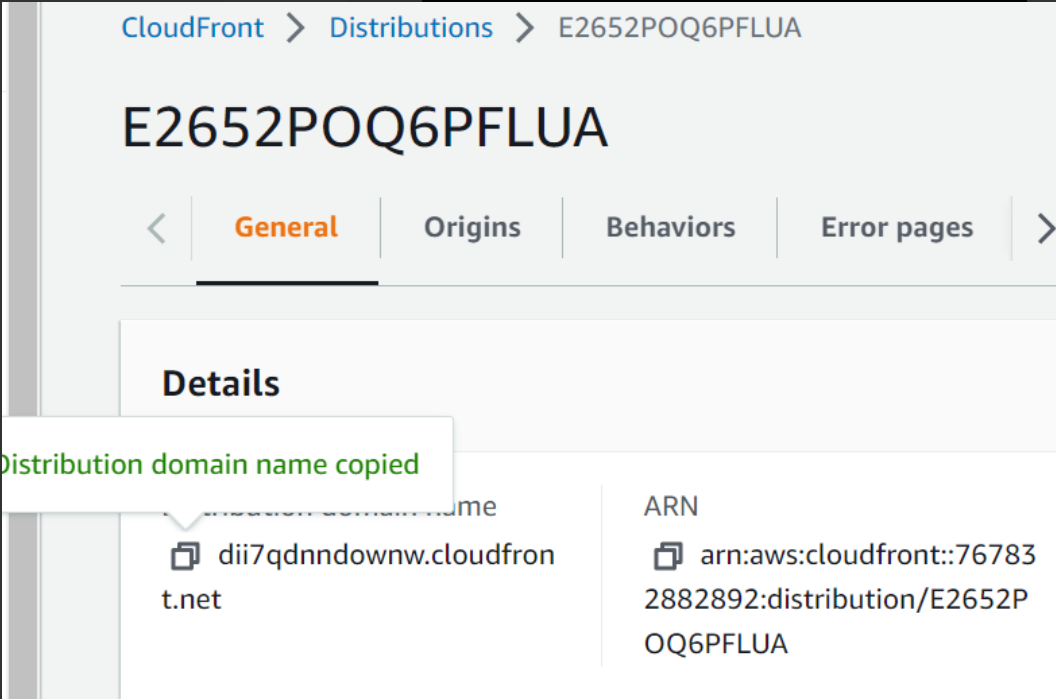
도메인 만들어진거 확인가능
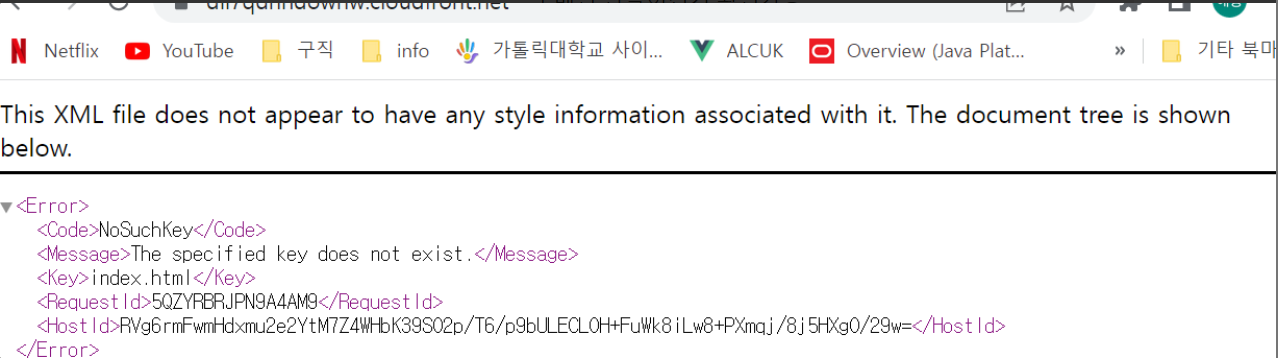
이익!! index.html 페이지가 나타나지를 않는다..!! ㅜㅜ
문서 경로 문제인줄 알고 바꿔줬더니,

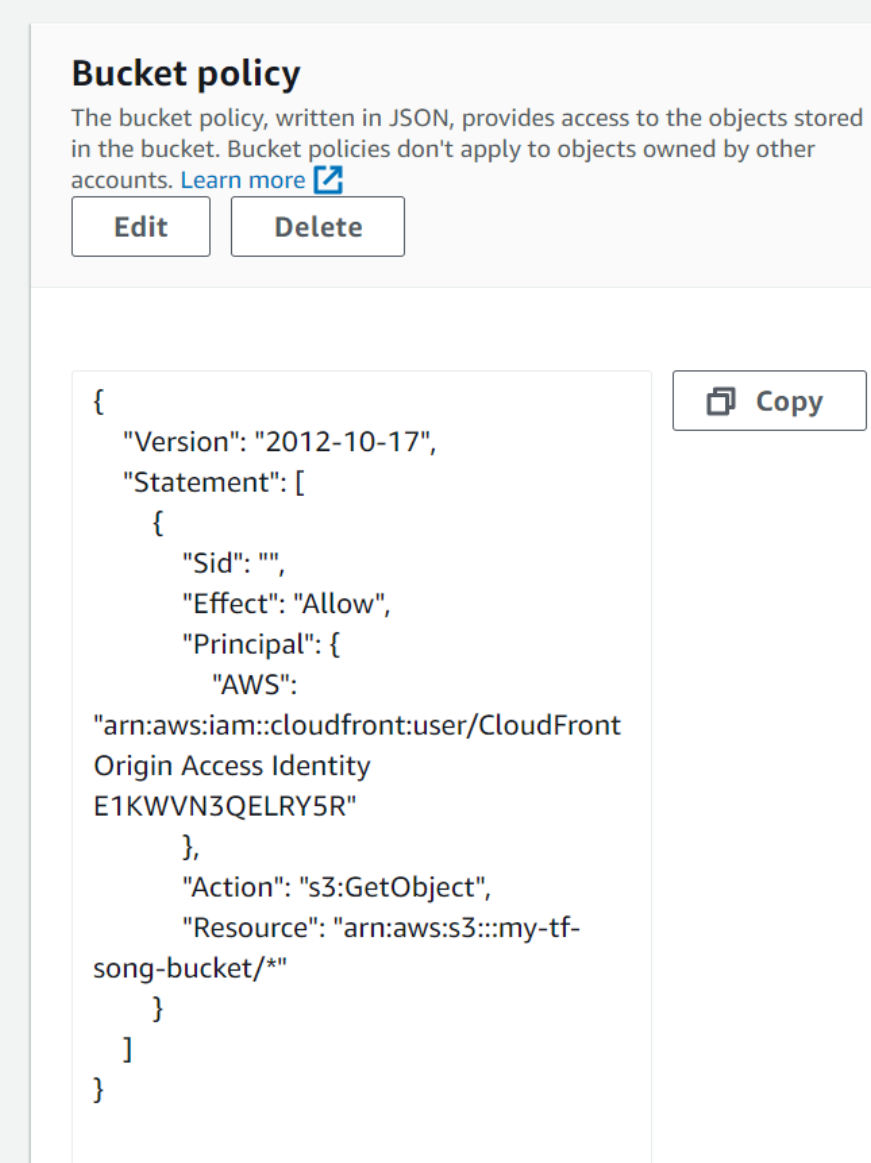
s3에서도 권한 설정 access identity 를 해줬어야 한다고한다.
- 코드
# 버킷 정책
data "aws_iam_policy_document" "s3_policy" {
  # statement {
  #   sid = "bucketPolicyTest"
  #   principals {
  #     type        = "*"
  #     identifiers = ["*"]
  #   }

  #   actions = [
  #     "s3:GetObject"
  #   ]

  #   resources = [
  #     aws_s3_bucket.test.arn,
  #     "${aws_s3_bucket.test.arn}/*",
  #   ]
  # }

  statement {
    actions   = ["s3:GetObject"]
    resources = ["${aws_s3_bucket.song-bucket.arn}/*"]

    principals {
      type        = "AWS"
      identifiers = [aws_cloudfront_origin_access_identity.test.iam_arn]
    }
  }
}
resource "aws_s3_bucket_policy" "example" {
  bucket = aws_s3_bucket.song-bucket.id
  policy = data.aws_iam_policy_document.s3_policy.json
}

# resource "aws_s3_bucket_website_configuration" "website-config" {
#   bucket = aws_s3_bucket.test.id
#   index_document {
#     suffix = "index.html"
#   }
추가 잘됨.
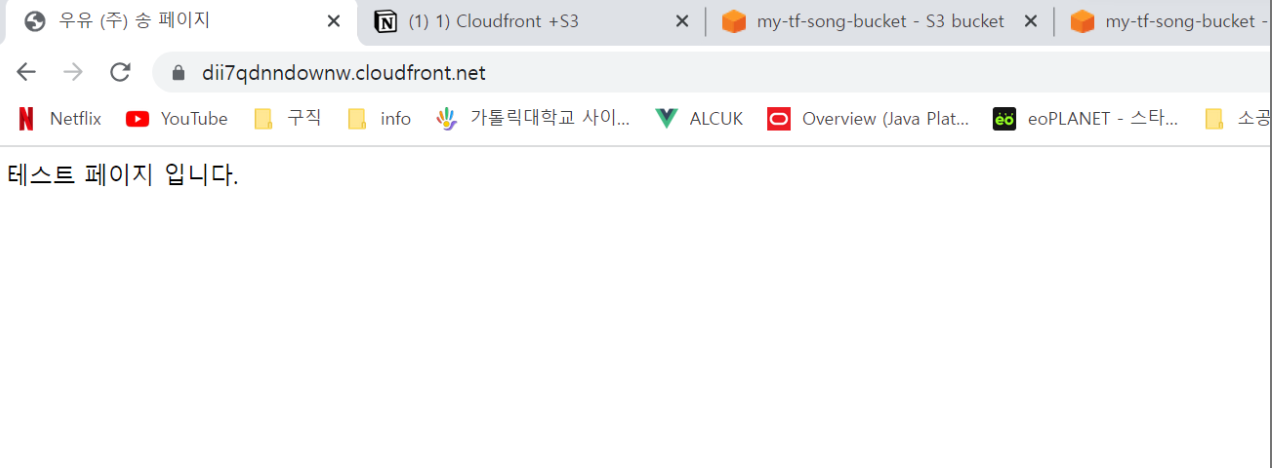
과연?
성공!
personalize
1. 테라폼으로 personalize가능할까?
불가능하다
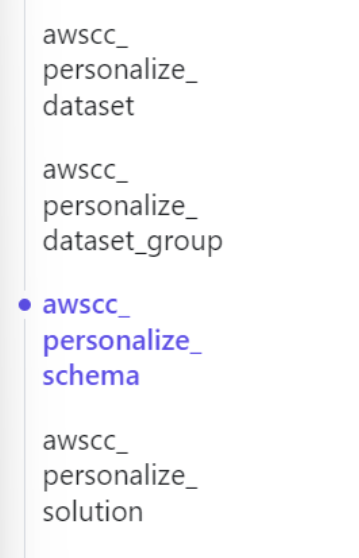
근데 awscc..가뭐지? 찾아봐야겠다.
2. aws 콘솔에서 보는 personalize
데이터 셋 그룹 선택

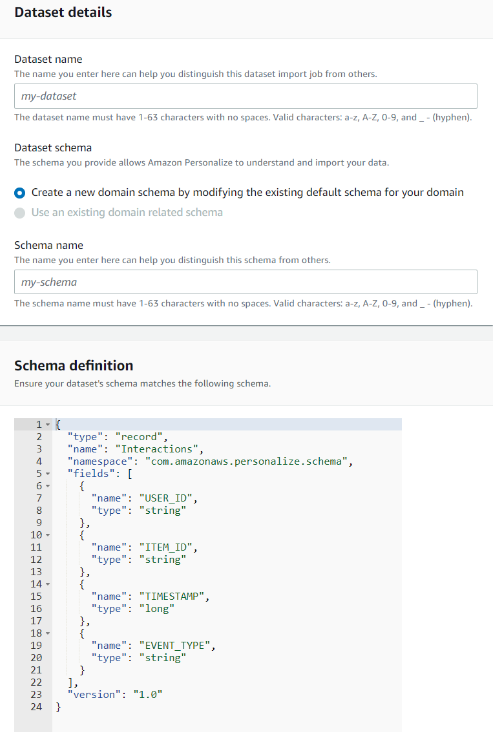
스키마로 데이터 지정해주는것같다.
Lamda
아직 안해써요
3 -Tier 구현
1계층: clinet-tier : presentation layer
2계층: Application Tier
3계층: Data Tier
이 세가지를 각각 다른플랫폼상에서 구현한 것
- 🌱3 -tier 아키텍처
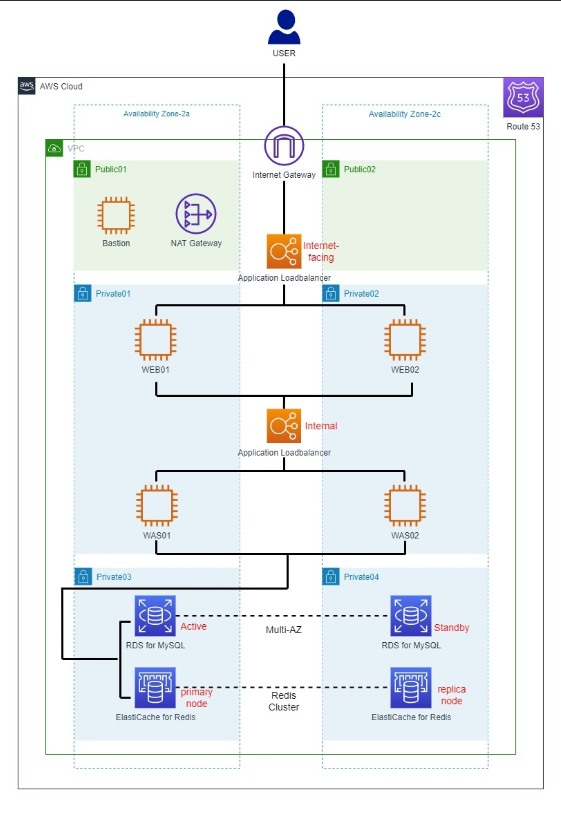
- 🌱우리의 아키텍처
구현은 생각보다 많은 시간이 필요할 것 같아 구성을 참고 + 생각해보기로 했다.
[참고]
-
VPC
- 규정된 vpc에서 사용하는 사설 아이피 대역 10.0.0.0 ~ 10.255.255.255(10/8 prefix (접두사)) 172.16.0.0 ~ 172.31.255.255(182.16/12 prefix) 192.168.0.0 ~ 192.168.255.255(192.168/16 prefix)
- aws 에서 규정한 vpc 사설 아이피 대역 ip는 같으나, /28~/16 넷 마스크 대역 사용
Name CIDR milk -vpc 10.0.0.0/16 - 규정된 vpc에서 사용하는 사설 아이피 대역 10.0.0.0 ~ 10.255.255.255(10/8 prefix (접두사)) 172.16.0.0 ~ 172.31.255.255(182.16/12 prefix) 192.168.0.0 ~ 192.168.255.255(192.168/16 prefix)
-
서브넷
- vpc를 쪼갠 조각.
- 하나의 subnet은 하나의 az에 할당됨
- 동일한 네트워크 내에서 통신할 시 routing table을 필요로 하지않음.
- aws 의 관리 ip 10.0.1.0 : 네트워크 주소 10.0.1.1 : aws에서 vpc라우터용으로 예약한 주소 (default gw) 10.0.1.2 : aws 에서 예약한 주소 dns서버의 ip주소는 기본 vpc네트워크 범위에 2를 더한 주소, cidr블록이 여러개인 vpc의 경우, dns서버의 ip 주소가 기본 cidr에 위치한다. 10.0.1.3: aws에서 앞으로 사용하려고 예약한 주소 10.0.1.255 :네트워크 브로드 캐스트 주소. vpc에서는 브로드 캐스트를 지원하지 않으므로, 이 주소를 예약한다.
AZ ap-northeast-2a ap-northeast-2c public subnet pub1-milk 10.0.1.0/24 pub2-milk 10.0.11.0/24 private subnet1 websub1-milk 10.0.2.0/24 websub2-milk 10.0.12.0/24 private subnet2 wassub1-milk 10.0.3.0/24 wassub2-milk 10.0.13.0/24 private subnet3 dbsub1-milk 10.0.4.0/24 dbsub2-milk 10.0.14.0/24 - IGW
라우팅 테이블은 local routing뿐만 아니라, subnet에 소속된 resource(ec2 등)가 외부 인터넷 망으로 나갈 수 있는 routing을 가질 수 있다. 이를 IGW라고 한다.
IGW없이는 외부 인터넷으로 나아갈 방법은 없다.
- 갖춰야 할 조건
-
리소스가 공인 ip보유
-
리소스가 소속된 서브넷의 라우팅 테이블에 ‘0.0.0.0/0’ 목적지로 갖는 라우팅 IGW가 있을것
-
network acl과 보안 그룹 규칙에서 허용할 것
aws 에서는 공인 인터넷과 통신 가능한 subnet을 public subnet, 공인 인터넷이 차단된 사설 ip만 할당된 subnet을 private subnet이라고 부른다.
때문에, private subnet 은 local routing만 갖고 있으므로 내부 통신만 가능하다.
-
- 라우팅 테이블
모든 목적지 정보에 대한 해당 목적지에 도달하기 위해 거쳐야 할 다음 라우터의 정보를 가지고 있다.
vpc내의 서브넷은 각기 다른 네트워크 대역을 가지고 있기 때문에
한 서브넷이 다른 서브넷으로 가기 위해서는 ,’Routing’이 필요하다.
각각의 subnet은 서로 다른 네트워크 영역이기 때문이다.
그렇다면, vpc를 다루기 위해서는 어떻게 routing을 설정해야 할까?
→ routing이 vpc내부(모든 sublet)에 대해서 자동으로 생성된다!
별도의 설정 없이 한 subnet에서 다른 subnet으로 통신이 가능하다!
-이는 vpc router 를 통해 가능하다.
-
서브넷 연결
- public - public 서브넷 연결
- private - private 서브넷 연결
-
라우팅 연결
- public : 인터넷 게이트웨이 연결
- private : nat gw 연결
ap-northeast-2c:
web2-milk,was2-milk,db2-milknat-milk,igw-milk,rds1-milk,rds2-milk
-
보안 그룹 생성
-
SG-BASTION
-
SG-WEB
-
SG-WAS
-
SG-External_ALB
-
SG-Internal_ALB
-
SG-RDS
ec2,vpc생성
-
1) 깃헙 연결
git init
git add *
git commit -m “test”
git remote add origin 레포지토리 주소
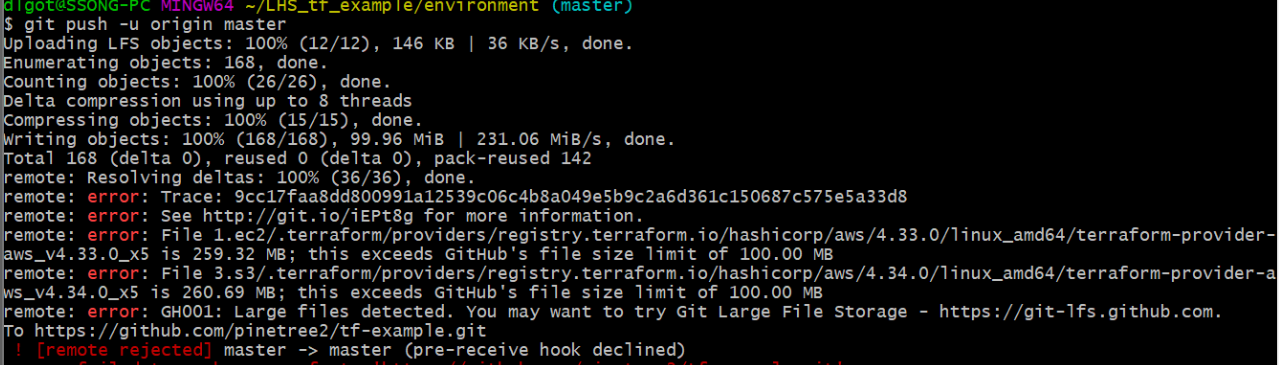
git push -u origin master
권한 설정 (토큰)
Github 에러 해결법: Authentication failed for ~ use a personal access token instead
저장소의 현재 상태 유지해야함
-
2) 키페어 생성
인스턴스에 키페어 생성후
cloud 9 에 파일 복붙

키페어 생성
aws 콘솔에 있는 키페어 삭제 후 pub키 등록

-
3) ec2 생성

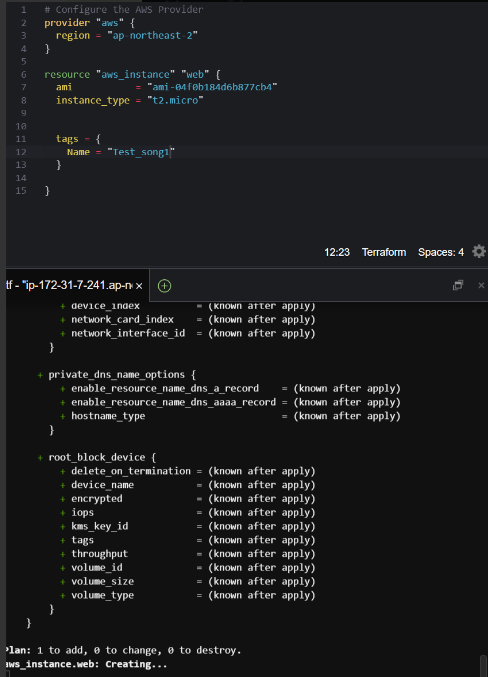
인스턴스 생성중
설정한 태그를 가진 인스턴스 생성 완료

- 4) vpc 생성
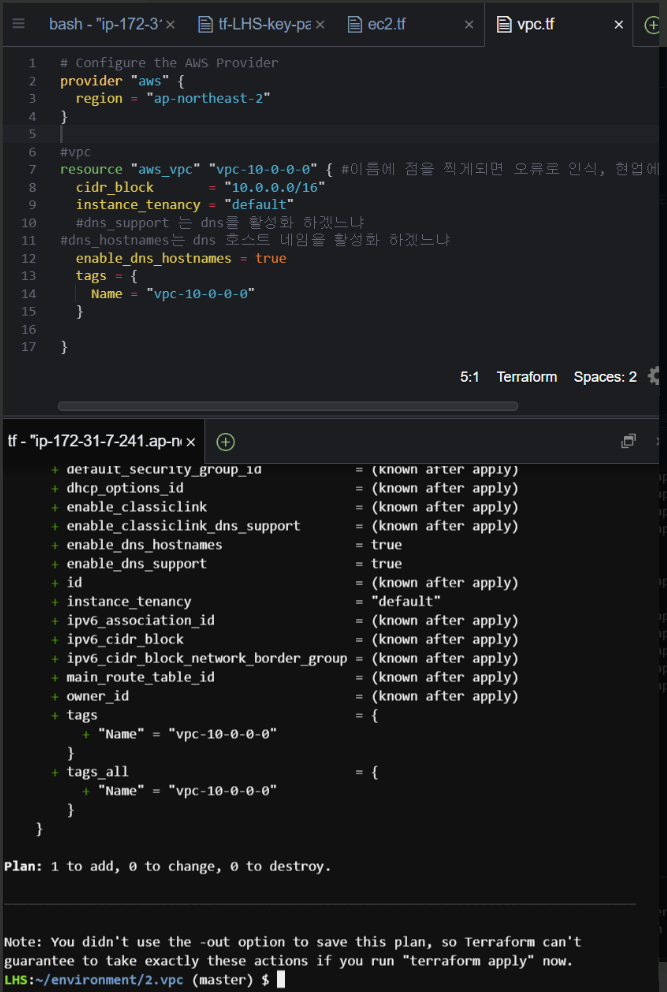

vpc 생성 확인
하드 코딩 : 인스턴스 여러개
++..깃헙에 올리고싶은데 용량 너무 커서 안됨..ㅜㅡㅜ (하소연)
추가적으로 공부가 필요한 부분