0. 실습할 프로젝트 예제 만들기
- 딱 한 번만 Lorem ipsum을 출력하는 애플리케이션을 만들어보자!
1) 프로젝트 폴더 만들기
cd ~/Desktop
mkdir fe-sprint-webpack-tutorial // 폴더 만들기
cd fe-sprint-webpack-tutorial // 폴더로 이동
2) package.json 생성하기
npm init -y
- package.json 기본값으로 바로 생성
package.json
{
  "name": "fe-sprint-webpack-tutorial",
  "version": "1.0.0",
  "description": "",
  "main": "index.js",
  "scripts": {
    "test": "echo \"Error: no test specified\" && exit 1"
  },
  "keywords": [],
  "author": ""
}
3) entry 파일(index.js)과 불러올 디펜던시 생성
1. 디펜던시 생성
- 디펜던시(dependency; 의존하는 파일 또는 라이브러리) : entry 경로의
index.js파일에서 필요한 파일.
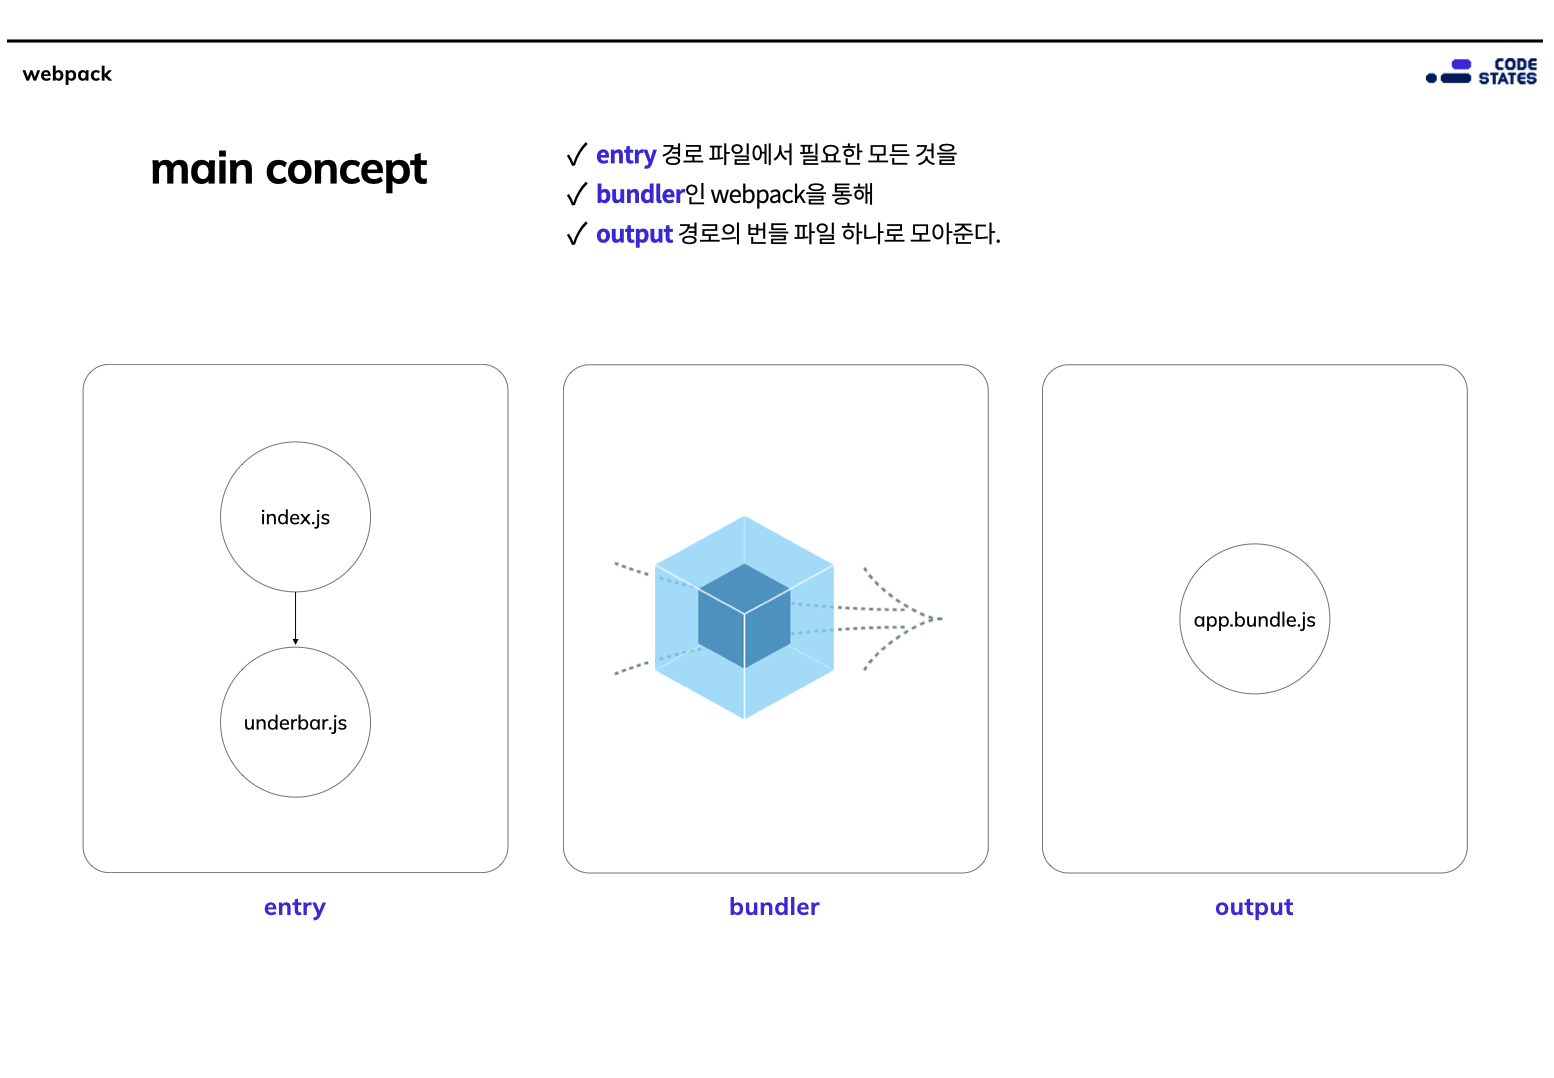
src > underbar.js
loadish라이브러리의once메소드를 직접 구현한 것-는 함수(func)를 인자로 받아 익명함수를 리턴하는 함수(once)가 들어있는 객체const _ = { once(func) { // 아래 변수들은 아래 선언/리턴되는 함수 안에서 참조됩니다. // 리턴되는 함수의 scope 내에 존재하므로, 리턴되는 함수를 언제 실행해도 이 변수들에 접근할 수 있습니다. let result; let alreadyCalled = false; return function (...args) { // TIP: arguments 키워드 혹은, spread operator를 사용하세요. if (!alreadyCalled) { alreadyCalled = true; result = func(...args); } return result; }; }, }; module.exports = _; // 다른 파일에서 사용할 수 있게 export
2. index.js 생성 & _ 모듈 불러와서 사용하기
src > index.js
const _ = require('./underbar.js') // _ 불러오기

const shout = (...sentences) => console.log(...sentences);

const loremIpsum = "Lorem ipsum dolor sit amet, consectetur adipiscing elit. Duis egestas feugiat elit, ac tincidunt neque vestibulum at. Mauris a eros sit amet urna efficitur tempus."

const shoutOnce = _.once(shout); // 직접 구현한 _ 사용

shoutOnce(loremIpsum);
shoutOnce(loremIpsum);
shoutOnce(loremIpsum);
shoutOnce(loremIpsum);
underbar.js에서 직접 구현한_(once메서드)를 사용했기 때문에 여러 번 출력을 시도했지만 한 번만 출력한다.
3. 실행해보기
node src/index.js명령어로 파일 실행.
- Lorem ipsum가 1번만 출력된다.

1. 웹팩 설치하기
- 웹팩을 사용하기 위해서는 npm으로
webpack,webpack-cli를 설치해야 한다. webpack은 이 프로젝트를 번들링하기 위한 라이브러리이긴 하지만, 실제 프로젝트에 사용하지 않기 때문에devDependency옵션을 설정하고 설치한다. (애플리케이션을 받아서 사용하는 사용자는webpack사용해 번들링 할 일이 없을 것이기 때문에!)
npm install -D webpack webpack-cli
2. 웹팩 config 파일 작성
1) webpack.config.js 파일 생성하기 (root 경로에)
2) entry와 output 정보 적어주기
(output에서 path 속성을 사용하려면 path 모듈 불러와야 함)
webpack.config.js
const path = require('path'); // path 모듈 불러오기

module.exports = {
  entry: './src/index.js',
  output: {
    path: path.resolve(__dirname, 'dist'), // './dist'의 절대 경로를 리턴합니다.
    filename: 'app.bundle.js',
  },
};
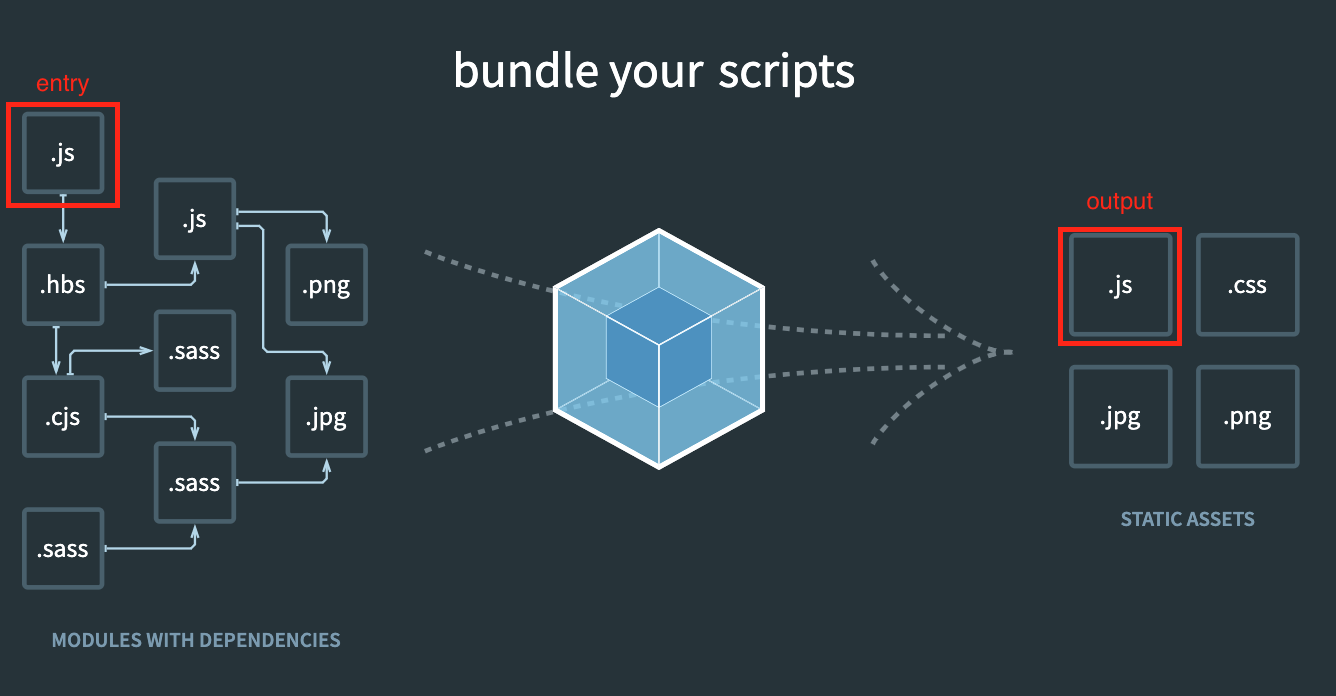
🔥🔥🔥 Entry와 Output
- entry 파일에서 필요한 모든 것(디펜던시, 의존하는 파일 또는 라이브러리)을 웹팩이 모아서 번들링 해준다.
- 번들링의 결과물이 output에 지정한 대로(경로와 파일 이름) 산출된다.
3. 번들링 하기
npx webpack
👉🏽 config 파일의 output에서 설정한 대로 dist 폴더에 번들링된 결과물인 app.bundle.js 파일이 생성된다.
4. npm run build 설정하기
package.json파일에서 npm script에 build를 추가한다.
👉🏽 이제npm run build스크립트로 언제든지 번들링 할 수 있다.
package.json
{
  "name": "fe-sprint-webpack-tutorial",
  "version": "1.0.0",
  "description": "",
  "main": "index.js",
  "scripts": {
	"build": "webpack", // 👉🏽 추가하기
    "test": "echo \"Error: no test specified\" && exit 1"
  },
  "keywords": [],
  "author": "",
  "devDependencies": {
    "webpack": "^5.73.0",
    "webpack-cli": "^4.10.0"
  }
}