출처 : 점프 투 스프링부트
로그인 구현하기
스프링 시큐리티를 사용하여 로그인 기능을 구현한다.
로그인 URL 등록
스프링 시큐리티 설정 클래스인 SecurityConfig에 다음의 코드를 추가한다.
.formLogin((formLogin) -> formLogin
                        .loginPage("/user/login")
                        .defaultSuccessUrl("/"))
.formLogin()
: 사용자가 웹페이지에서 로그인할 때 사용되는 폼 로그인을 활성화한다.loginPage("/user/login")
: 로그인 페이지의 경로를 설정한다.
사용자가 로그인하지 않은 상태에서 접근하려는 보호된 페이지에 접근할 때 해당 url로 리다이렌션한다.defaultSuccessUrl("/")
: 로그인 성공 시 기본적으로 이동할 페이지의 경로를 루트로 설정
UserController
login_form.html 템플릿을 렌더링하는 GET방식의 login 메서드를 추가한다.
@GetMapping("/login")
    public String login() {
        return "login_form";
    }
💡 실제 로그인을 진행하는 @PostMapping 방식의 메서드는 스프링 시큐리티가 대신 처리하므로 직접 구현할 필요 없다.
login_form.html
<html layout:decorate="~{layout}">
<div layout:fragment="content" class="container my-3">
    <form th:action="@{/user/login}" method="post">
        <div th:if="${param.error}">
            <div class="alert alert-danger">
                사용자ID 또는 비밀번호를 확인해 주세요.
            </div>
        </div>
        <div class="mb-3">
            <label for="username" class="form-label">사용자ID</label>
            <input type="text" name="username" id="username" class="form-control">
        </div>
        <div class="mb-3">
            <label for="password" class="form-label">비밀번호</label>
            <input type="password" name="password" id="password" class="form-control">
        </div>
        <button type="submit" class="btn btn-primary">로그인</button>
    </form>
</div>
</html>
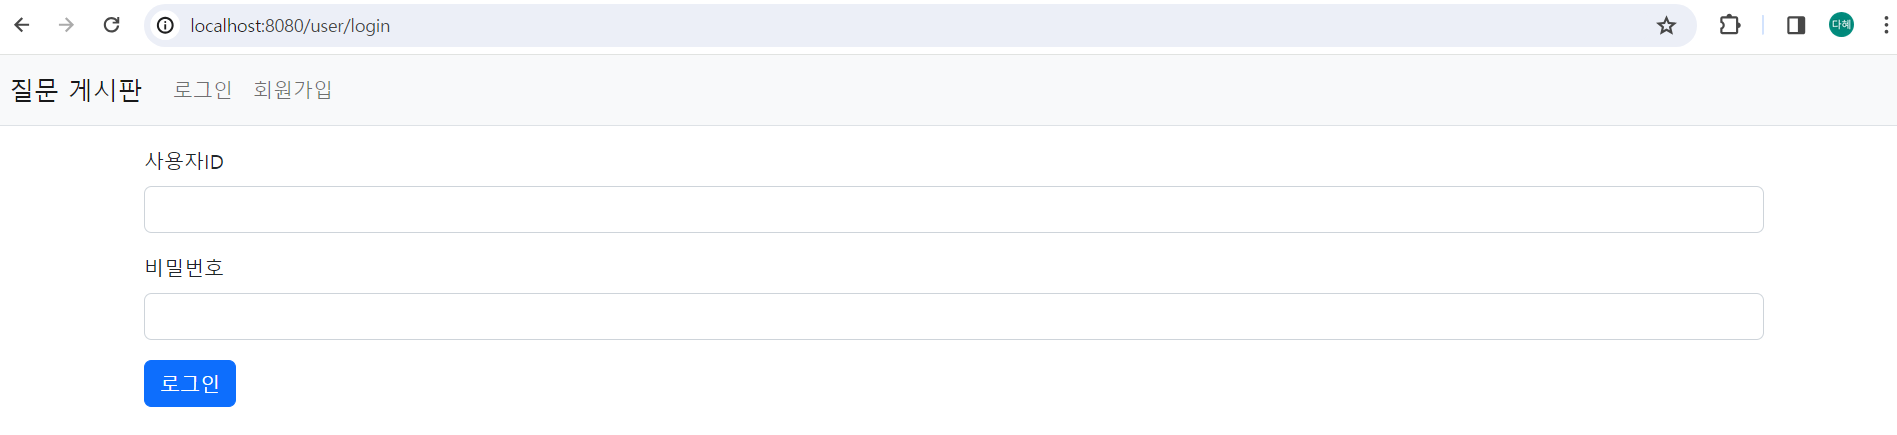
사용자 ID와 비밀번호로 로그인할 수 있는 로그인 템플릿을 만들었다.
로그인에 실패하면 로그인 페이지로 다시 리다이렌트되는데, 이 때 스프링 시큐리티 규칙에 따라 페이지 파라미터로 error가 함께 전달되어 "사용자ID 또는 비밀번호를 확인해 주세요."라는 오류 메시지를 출력한다.
로그인 화면
이제 데이터베이스에서 사용자를 조회하는 서비스를 만들고 그 서비스를 스프링 시큐리티에 등록하는 방법에 대해 알아본다.
UserRepository
데이터베이스에서 username으로 SiteUser를 조회하는 메서드를 추가한다.
public interface UserRepository extends JpaRepository<SiteUser, Long> {
    Optional<SiteUser> findByusername(String username);
}
UserRole
권한을 정의하는 데 사용되는 열거형으로 ADMIN, USER 2개의 권한이 있다.
@Getter
public enum UserRole {
    ADMIN("ROLE_ADMIN"),
    USER("ROLE_USER");

    UserRole(String value) {
        this.value = value;
    }

    private String value;
}
UserSecurityService
UserSecurityService는 스프링 시큐리티 로그인 처리의 핵심 부분이다.
스프링 시큐리티가 제공하는 UserDetailsService 인터페이스를 구현하여 loadUserByUsername 메서드를 구현한다.
@Service
@RequiredArgsConstructor
public class UserSecurityService implements UserDetailsService {

    private final UserRepository userRepository;

    @Override
    public UserDetails loadUserByUsername(String username) throws UsernameNotFoundException {
        Optional<SiteUser> _siteUser = this.userRepository.findByusername(username);
        if (_siteUser.isEmpty()) {
            throw new UsernameNotFoundException("사용자를 찾을수 없습니다.");
        }
        SiteUser siteUser = _siteUser.get();
        List<GrantedAuthority> authorities = new ArrayList<>();
        if ("admin".equals(username)) {
            authorities.add(new SimpleGrantedAuthority(UserRole.ADMIN.getValue()));
        } else {
            authorities.add(new SimpleGrantedAuthority(UserRole.USER.getValue()));
        }
        return new User(siteUser.getUsername(), siteUser.getPassword(), authorities);
    }
}
- UserRepository에서 만든 findByusername으로 데이터베이스에서 사용자를 조회한다.
- 만약 사용자를 찾지 못하면 UsernameNotFoundExcepion을 던진다.
- 사용자가 있다면 Optional 객체에서 .get()으로 사용자 정보를 가져온다.
- 사용자의 권한을 나타내는 GrantedAuthority 객체를 담을 리스트를 생성한다.
이 때 리스트로 생성하는 이유는 사용자가 여러개의 권한을 가질 수 있기 때문이다. - 사용자의 이름이 admin이면 authorities에 ADMIN 권한을 추가하고, 아니라면 USER 권한을 추가한다.
- 이름, 비밀번호, 권한 정보를 가지는 UserDetails 객체를 반환한다.
SecurityConfig
스프링 시큐리티에 AuthenticationManager 빈을 생성한다.
AuthenticationManager는 Spring Security에서 인증(Authentication)을 처리하는 핵심 인터페이스 중 하나이다.
@Bean
    AuthenticationManager authenticationManager(AuthenticationConfiguration authenticationConfiguration) throws Exception {
        return authenticationConfiguration.getAuthenticationManager();
    }
로그아웃 구현하기
SecurityConfig에 다음의 코드를 추가한다.
.logout((logout) -> logout
                .logoutRequestMatcher(new AntPathRequestMatcher("/user/logout"))
                .logoutSuccessUrl("/")
                .invalidateHttpSession(true))  // 사용자 세션 삭제
로그아웃 URL을 /user/logout으로 설정하고 로그아웃이 성공하면 루트(/) 페이지로 이동하도록 했다.