1. batch 작업 자동 실행
먼저, 아래와 같이 application.yml 파일을 설정한다.
application.yml
server:
  port: 8090
spring:
  threads:
    virtual:
      enabled: true
  datasource:
    url: jdbc:h2:./db_dev;MODE=MYSQL
    username: sa
    password:
    driver-class-name: org.h2.Driver
  jpa:
    hibernate:
      ddl-auto: create
    properties:
      hibernate:
        default_batch_fetch_size: 100
        format_sql: true
        highlight_sql: true
        use_sql_comments: true
  batch:
    jdbc:
      initialize-schema: always
logging:
  level:
    com.ll.sbb20240111: DEBUG
    org.hibernate.SQL: DEBUG
    org.hibernate.orm.jdbc.bind: TRACE
    org.hibernate.orm.jdbc.extract: TRACE
    org.springframework.transaction.interceptor: TRACE
배치 작업을 위한 DB가 메모리 모드가 아닌 경우에는 반드시 스키마 설정이 필요하다.
이 때, 'spring.jpa.hibernate.ddl-auto'를 'create'로 설정해도 배치 테이블은 유지된다.
또한, job 실행 시에 파라미터가 새로운 것이 아니라면, 기존의 작업으로 판단한다.
파라미터가 동일하더라도 새로운 작업으로 판단하고 실행하게 하고 싶으면 아래와 같이
.incrementer(new RunIdIncrementer()) 를 추가해주면 된다.
    @Bean
    public Job helloJob(JobRepository jobRepository, Step helloStep1) {
        return new JobBuilder("helloJob", jobRepository)
                .start(helloStep1)
                .incrementer(new RunIdIncrementer())
                .build();
    }
다음으로, Spring Batch의 Job 설정을 위해 아래와 같이 HelloJobConfig 클래스를 생성한다.
HelloJobConfig.java
import lombok.extern.slf4j.Slf4j;
import org.springframework.batch.core.Job;
import org.springframework.batch.core.Step;
import org.springframework.batch.core.job.builder.JobBuilder;
import org.springframework.batch.core.repository.JobRepository;
import org.springframework.batch.core.step.builder.StepBuilder;
import org.springframework.batch.core.step.tasklet.Tasklet;
import org.springframework.batch.repeat.RepeatStatus;
import org.springframework.context.annotation.Bean;
import org.springframework.context.annotation.Configuration;
import org.springframework.transaction.PlatformTransactionManager;
@Slf4j
@Configuration
public class HelloJobConfig {
@Bean
public Job helloJob(JobRepository jobRepository, Step helloStep1) {
return new JobBuilder("helloJob", jobRepository)
.start(helloStep1) // helloStep1 스텝을 시작 스텝으로 설정
.build();
}
@Bean
public Step helloStep1(JobRepository jobRepository, Tasklet helloStep1Tasklet1, PlatformTransactionManager platformTransactionManager) {
return new StepBuilder("helloStep1Tasklet1", jobRepository)
.tasklet(helloStep1Tasklet1, platformTransactionManager)
.build();
}
@Bean
public Tasklet helloStep1Tasklet1() {
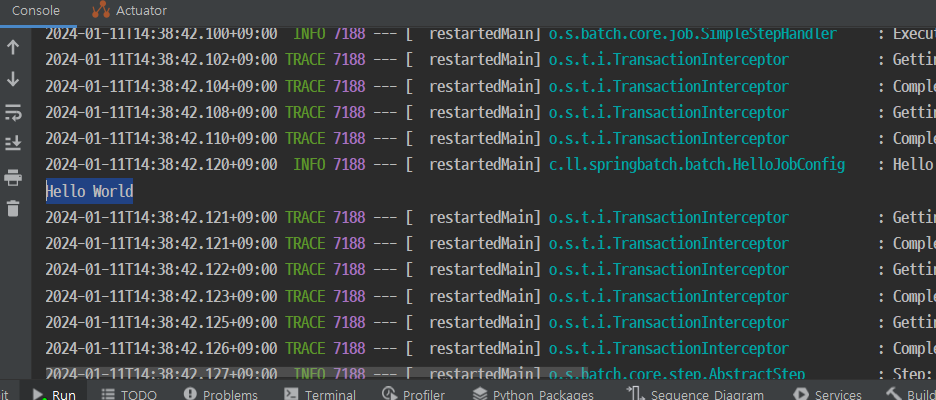
return ((contribution, chunkContext) -> {
log.info("Hello World");
System.out.println("Hello World");
return RepeatStatus.FINISHED;
});
}
}
Job: 스프링 배치 작업을 정의하는 클래스JobBuilder: Job 객체를 생성하기 위한 빌더 클래스Step: 스프링 배치 작업의 단계를 정의하는 클래스StepBuilder: Step 객체를 생성하기 위한 빌더 클래스Tasklet: 스프링 배치 작업의 실행될 Tasklet을 정의하는 인터페이스
이제 실행해보면 Hello World가 출력된다.
2. 특정 메서드 호출 시 해당 배치 시작
지금까지는 스프링 부트가 시작되었을 대 자동으로 스프링 배치 작업이 실행되도록 했지만,
이번에는 특정 메서드가 호출되면 그 때 해당 뱇가 시작되도록 만들어보자.
application.yml
먼저 배치 작업이 자동 실행되지 않도록 설정을 추가한다.
batch:
  job:
    enabled: false
BatchController
@Controller
@RequiredArgsConstructor
@RequestMapping("/batch")
public class BatchController {
private final BatchService batchService;
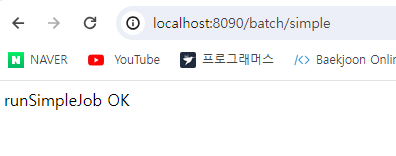
@GetMapping("/simple")
@ResponseBody
public String simple() {
batchService.runSimpleJob();
return "runSimpleJob OK";
}
}BatchService
@Service
@RequiredArgsConstructor
public class BatchService {

    private final JobLauncher jobLauncher;
    private final Job simpleJob;

    public void runSimpleJob() {
        try {
            JobParameters jobParameters = new JobParametersBuilder()
                    .toJobParameters();
            jobLauncher.run(simpleJob, jobParameters);
        } catch (Exception e) {
            e.printStackTrace();
        }
    }
}
JobParameters: 스프링 배치 작업에 전달되는 매개변수를 나타내는 클래스jobLauncher.run(simpleJob, jobParameters): jobLauncher를 사용하여 simpleJob을 실행한다. jobParameters는 작업 실행에 필요한 매개변수를 전달하는 역할
이제 /batch/simple 엔드 포인트로 요청이 들어오면 스프링 배치 작업이 시작된다.