소심한 총무 개발 시, 기획 요구 사항으로 소셜 로그인이 필수였다.
그 중, Kakao 로그인을 요구했으며 이후 추가될 가능성이 있다는 기획 방향성을 들었다.
전체 코드는 GitHub 에서 확인할 수 있습니다.
소심한 총무 BackEnd
🤔 OAuth 2.0 이란?

들어가기 앞서, OAuth에 관해서 알아보자.
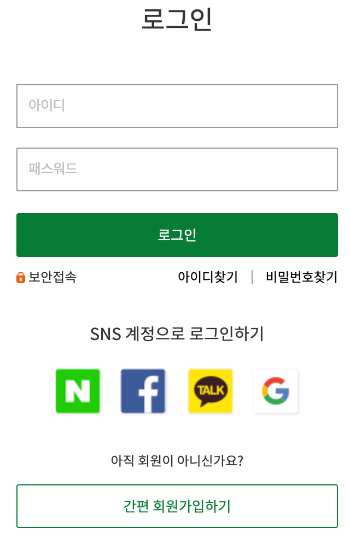
위 사진처럼 SNS 계정으로 로그인하기 즉, 외부 소셜 계정을 기반으로 간편하게 회원가입 및 로그인이 가능하게 한 인증 프로토콜이 OAuth이다.
OAuth 1.0에서 보안적인 면을 개선한 버전이 OAuth 2.0
🔎 OAuth 2.0 Flow
OAuth 서비스 등록하는 과정은 기술하지 않겠습니다.
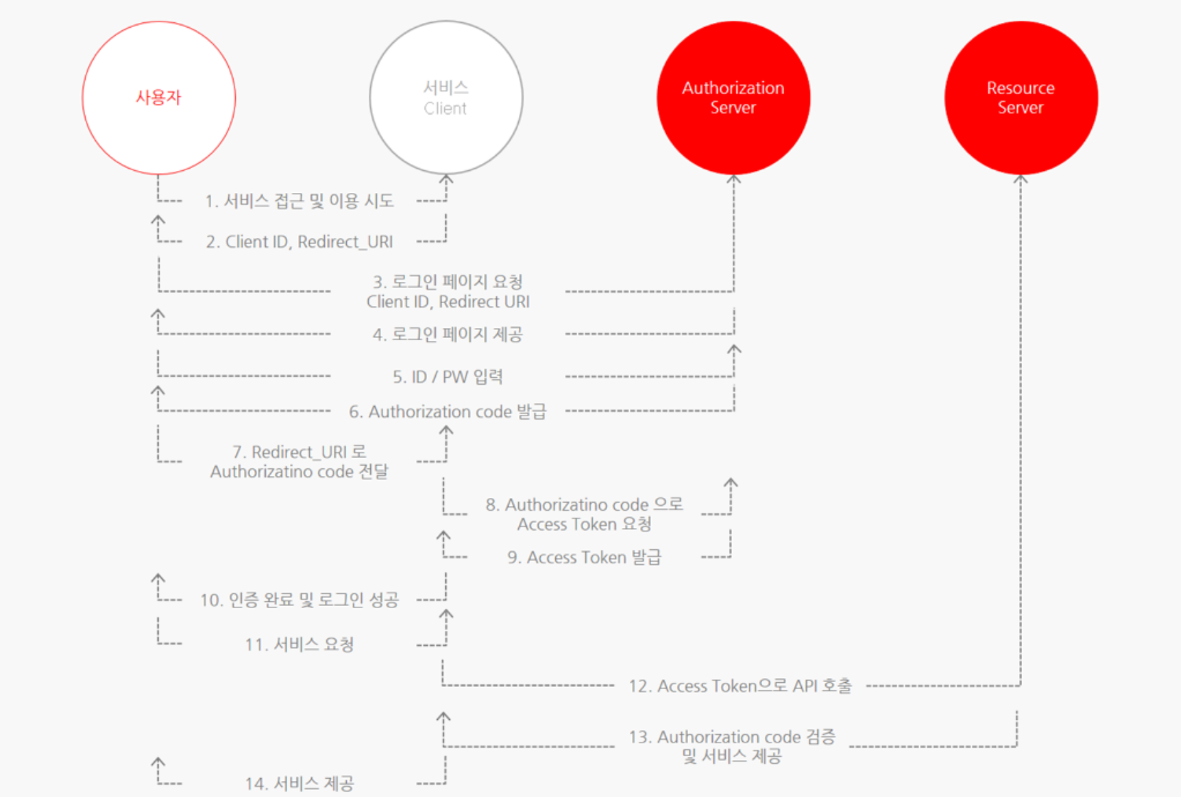
기본적인 OAuth Flow이다.
중요하게 여겨봐야 할 사항은 2가지이다.
Authorization Code
-> 사용자가 로그인 시, Redirect URI로 해당Authorization Code가 전달Access Token
->Authorization Code를 통해Authorization Server에서 발급 받는Token
🌟 적용 방식
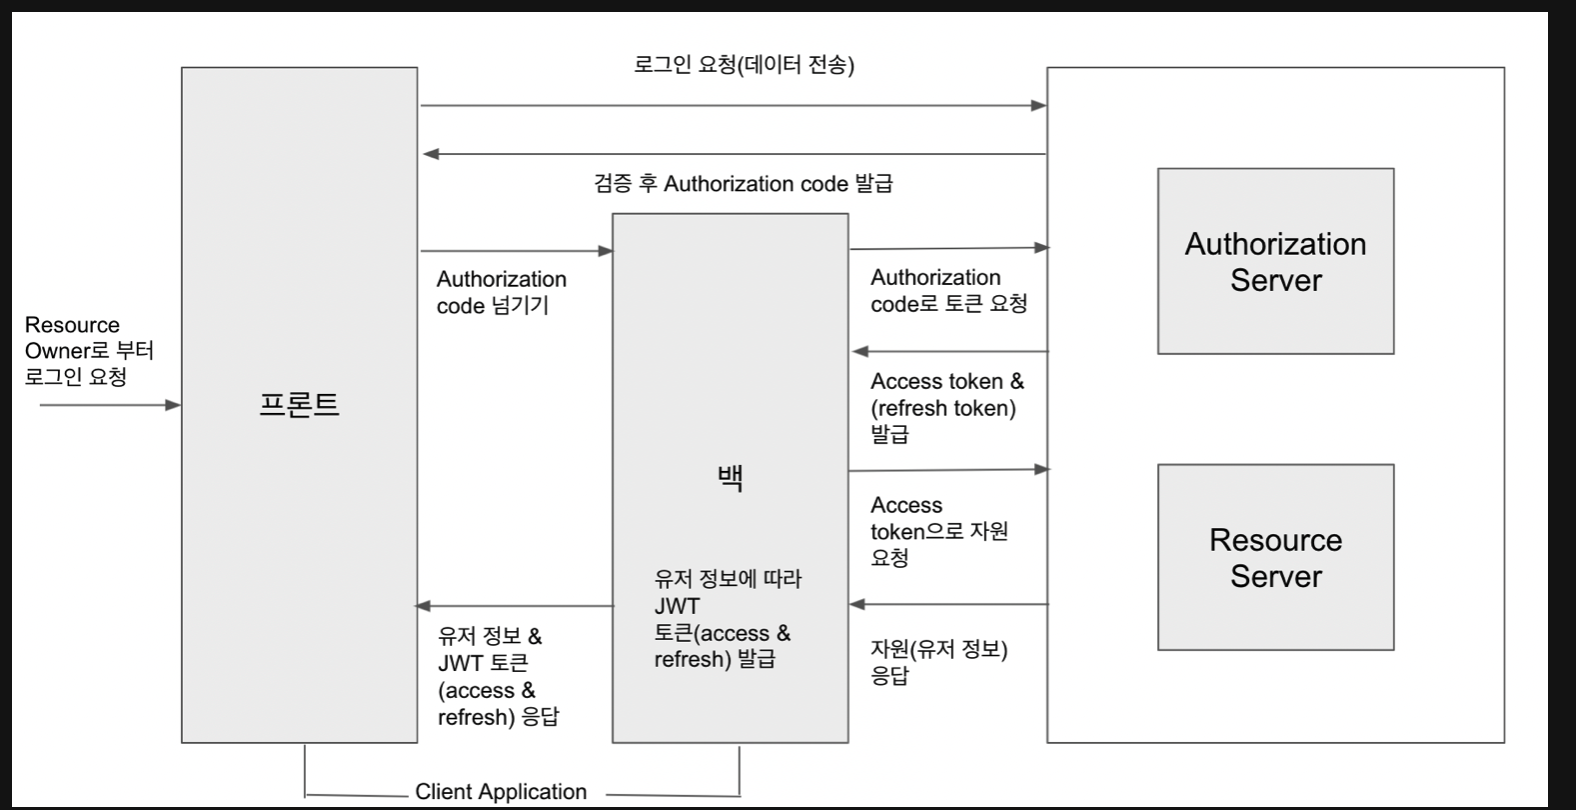
1. 사용자 로그인 시, Authorization Server에서 Front로 Authorization Code 발급
2. Front -> Back으로 Authorization Code 전달
3. Back에서 전달된 Code를 통해 Authrorization Server로부터 Token 요청 및 응답
4. 발급된 Token으로 Resource Server로 부터 사용자 정보 요청 및 응답
5. Back -> Front 유저 정보 및 로그인 성공 Response
[특징]
- Authorization Server에서 발급되는 AccessToken이 서버에만 존재해서 탈취 위험성이 낮음
- Authorization Code를 Front에서 Back으로 직접 전달해줘야 함
📃코드
위 적용 방식의 번호를 기입해서 서술
OAuthController
회원가입과 로그인이 분리된 이유는 서비스 설계 및 기획으로 분리
1번~2번
Controller에서 Authorization Code를 전달 받은 형태
    @PostMapping
    public ResponseEntity<?> signup(@PathVariable("socialType") String social, @RequestParam("code") String code,
                                   HttpServletResponse response) throws JsonProcessingException {
        LoginResponse loginResponse = oAuthService.signUp(social, code);

        return new ResponseEntity<>(Response.create(SUCCESS_SIGNUP, loginResponse), SUCCESS_SIGNUP.getHttpStatus());
    }

    @GetMapping
    public ResponseEntity<?> login(@PathVariable("socialType") String social, @RequestParam("code") String code,
                                   HttpServletResponse response) throws JsonProcessingException {
        LoginResponse loginResponse = oAuthService.login(social, code);

        return new ResponseEntity<>(Response.create(SUCCESS_LOGIN, loginResponse), SUCCESS_LOGIN.getHttpStatus());
    }
application-oauth.yml
들어가기에 앞서, ClientRegistrationRepository 에 관해 설명
Spring Security OAuth Client에서 제공되는 객체로 Property 주입을 통한 OAuth 2.0 정보들의 복사본이 저장되어 관리되는 클래스
ClientRegistrationRepository의 구현체가 InMemoryClientRegistrationRepository
spring:
  security:
    oauth2:
      client:
        registration:
          kakao:
            client-name: Kakao
            client-id: ${KAKAO_CLIENT_ID}
            client-secret: ${KAKAO_CLIENT_SECRET}
            redirect-uri: ${KAKAO_REDIRECT_URI}
            authorization-grant-type: authorization_code
            client-authentication-method: POST
            scope:
              - profile_nickname
              - account_email

        provider:
          kakao:
            issuer-uri: https://kauth.kakao.com
            authorization-uri: https://kauth.kakao.com/oauth/authorize
            token-uri: https://kauth.kakao.com/oauth/token
            user-info-uri: https://kapi.kakao.com/v2/user/me
            jwk-set-uri: https://kauth.kakao.com/.well-known/jwks.json
            user-name-attribute: id
OAuthService
signUp 과 login 의 기능이 동일해서 묶어서 설명
    private OAuthUserRequest getOAuthUserInfo(String social, String code) throws JsonProcessingException {
        ClientRegistration clientRegistration = inMemoryRepository.findByRegistrationId(social);
        OAuthTokenRequest oAuth2Token = getOAuthToken(clientRegistration, code);
        Map<String, Object> oAuthAttributes = getOAuthAttributes(clientRegistration, oAuth2Token);

        return OAuthUserFactory.getOAuthUser(social, oAuthAttributes);
    }
3번
전달 받은 Authorization Code를 통해 AccessToken을 요청 및 응답
주의해야할 점은 요청 메서드를 POST로 요청
    private OAuthTokenRequest getOAuthToken(ClientRegistration type, String authorizationCode) throws JsonProcessingException {
        HttpHeaders headers = new HttpHeaders();
        headers.add("Content-type", "application/x-www-form-urlencoded;charset=utf-8");

        return OBJECT_MAPPER.readValue(getResponseBody(
                type.getProviderDetails().getTokenUri(), HttpMethod.POST,
                new HttpEntity<>(setQueryParams(authorizationCode, type), headers)), OAuthTokenRequest.class);
    }

    private MultiValueMap<String, String> setQueryParams(String authorizationCode, ClientRegistration type) {
        MultiValueMap<String, String> formData = new LinkedMultiValueMap<>();
        formData.add("code", authorizationCode);
        formData.add("grant_type", "authorization_code");
        formData.add("redirection_uri", type.getRedirectUri());
        formData.add("client_secret", type.getClientSecret());
        formData.add("client_id", type.getClientId());
        return formData;
    }

    private String getResponseBody(String uri, HttpMethod method, HttpEntity<?> request) {
        try {
            return new RestTemplate().exchange(uri, method, request, String.class).getBody();
        } catch (HttpClientErrorException ignore) {
            throw new CustomException(ResponseCode.INCORRECT_OAUTH_CODE);
        }
    }
4번
발급 받은 Token을 통해 유저 정보 요청
해당 요청 메서드는 GET
    private Map<String, Object> getOAuthAttributes(ClientRegistration type, OAuthTokenRequest token) throws JsonProcessingException {
        HttpHeaders headers = new HttpHeaders();
        headers.add("Content-type", "application/x-www-form-urlencoded;charset=utf-8");
        headers.add("Authorization", "Bearer " + token.getAccessToken());
        headers.setContentType(MediaType.APPLICATION_FORM_URLENCODED);

        return OBJECT_MAPPER.readValue(getResponseBody(
                type.getProviderDetails().getUserInfoEndpoint().getUri(), HttpMethod.GET,
                new HttpEntity<>(null, headers)), Map.class);
    }
이후, 응답된 유저 정보를 가공해서 서버 DB에 저장 및 JWT 생성 및 Front 응답 과정을 통해 OAuth 로그인 기능을 구현