과도하게 공통 로직을 추출해 내려고 하지말자
다음은 테스트 하려는 컴포넌트 입니다. 간단한 Form을 구현합니다.
// login.js
import * as React from 'react'

function Login({onSubmit}) {
  const [error, setError] = React.useState('')

  function handleSubmit(event) {
    event.preventDefault()
    const {
      usernameInput: {value: username},
      passwordInput: {value: password},
    } = event.target.elements

    if (!username) {
      setError('username is required')
    } else if (!password) {
      setError('password is required')
    } else {
      setError('')
      onSubmit({username, password})
    }
  }

  return (
    <div>
      <form onSubmit={handleSubmit}>
        <div>
          <label htmlFor="usernameInput">Username</label>
          <input id="usernameInput" />
        </div>
        <div>
          <label htmlFor="passwordInput">Password</label>
          <input id="passwordInput" type="password" />
        </div>
        <button type="submit">Submit</button>
      </form>
      {error ? <div role="alert">{error}</div> : null}
    </div>
  )
}

export default Login
테스트 코드도 간단히 구현해보겠습니다.
/* eslint-disable testing-library/prefer-screen-queries */
/* eslint-disable testing-library/no-render-in-setup */
// eslint-disable-file testing-library/no-render-in-setup
import { render, screen } from "@testing-library/react";
import userEvent from "@testing-library/user-event";

import Login from "../login";

describe("Login", () => {
  let utils,
    handleSubmit,
    user,
    changeUsernameInput,
    changePasswordInput,
    clickSubmit;

  beforeEach(() => {
    handleSubmit = jest.fn();
    user = { username: "michelle", password: "smith" };

    utils = render(<Login onSubmit={handleSubmit} />);
    changeUsernameInput = (value) =>
      userEvent.type(screen.getByLabelText(/username/i), value);
    changePasswordInput = (value) =>
      userEvent.type(screen.getByLabelText(/password/i), value);
    clickSubmit = () => userEvent.click(screen.getByText(/submit/i));
  });

  describe("when username and password is provided", () => {
    beforeEach(() => {
      changeUsernameInput(user.username);
      changePasswordInput(user.password);
    });

    describe("when the submit button is clicked", () => {
      beforeEach(() => {
        clickSubmit();
      });

      it("should call onSubmit with the username and password", () => {
        expect(handleSubmit).toHaveBeenCalledTimes(1);
        expect(handleSubmit).toHaveBeenCalledWith(user);
      });
    });
  });

  describe("when the password is not provided", () => {
    beforeEach(() => {
      changeUsernameInput(user.username);
    });

    describe("when the submit button is clicked", () => {
      let errorMessage;
      beforeEach(() => {
        clickSubmit();
        errorMessage = screen.getByRole("alert");
      });

      it("should show an error message", () => {
        expect(errorMessage).toHaveTextContent(/password is required/i);
      });
    });
  });

  describe("when the username is not provided", () => {
    beforeEach(() => {
      changePasswordInput(user.password);
    });

    describe("when the submit button is clicked", () => {
      let errorMessage;
      beforeEach(() => {
        clickSubmit();
        errorMessage = screen.getByRole("alert");
      });

      it("should show an error message", () => {
        expect(errorMessage).toHaveTextContent(/username is required/i);
      });
    });
  });
});
어떤 문제점이 보이시나요?🧐
테스트를 쭉 읽어내려갈 때 뭔가 불편하지 않았나요?
하나식 살펴 보겠습니다.
과도한 추상화(Over Abstraction)
it("should call onSubmit with the username and password", () => {
        expect(handleSubmit).toHaveBeenCalledTimes(1);
        expect(handleSubmit).toHaveBeenCalledWith(user);
});
여기서 handleSubmit은 어떤 함수를 모킹한 것인가요?
그리고 user의 값은 무엇인가요?
테스트를 작성한 사람은 코드 몇줄의 중복을 피하기 위해서 이런 값들을 공통화했겠지만,
테스트를 보고 유지 보수하는 사람은 스크롤을 위로 올려가며 이 값들을 하나하나 다시 확인해야 합니다.
코드 중복을 허용한 테스트
코드가 중복되든 말든, 각각의 테스트 블록이 공통으로 사용하는 유틸함수와 값들을 최소화 하고 테스트를 작성해봅시다.
import { screen, render } from "@testing-library/react";
import userEvent from "@testing-library/user-event";
import * as React from "react";

import Login from "../login";

test("calls onSubmit with the username and password when submit is clicked", () => {
  const handleSubmit = jest.fn();
  render(<Login onSubmit={handleSubmit} />);
  const user = { username: "michelle", password: "smith" };

  userEvent.type(screen.getByLabelText(/username/i), user.username);
  userEvent.type(screen.getByLabelText(/password/i), user.password);
  userEvent.click(screen.getByText(/submit/i));

  expect(handleSubmit).toHaveBeenCalledTimes(1);
  expect(handleSubmit).toHaveBeenCalledWith(user);
});

test("shows an error message when submit is clicked and no username is provided", () => {
  const handleSubmit = jest.fn();
  render(<Login onSubmit={handleSubmit} />);

  userEvent.type(screen.getByText(/password/i), "anything");
  userEvent.click(screen.getByText(/submit/i));

  const errorMessage = screen.getByRole("alert");
  expect(errorMessage).toHaveTextContent(/username is required/i);
  expect(handleSubmit).not.toHaveBeenCalled();
});

test("shows an error message when submit is clicked and no password is provided", () => {
  const handleSubmit = jest.fn();
  const { getByLabelText, getByText, getByRole } = render(
    <Login onSubmit={handleSubmit} />
  );

  userEvent.type(screen.getByText(/username/i), "anything");
  userEvent.click(screen.getByText(/submit/i));

  const errorMessage = screen.getByRole("alert");
  expect(errorMessage).toHaveTextContent(/password is required/i);
  expect(handleSubmit).not.toHaveBeenCalled();
});
비록 코드 중복이 있지만, 각각의 테스트의 가독성이 훨씬 좋아졌습니다.
각각의 테스트가 '자급자족'하기 때문에, 공통으로 빠진 값을 확인하기 위해 스크롤을 올릴필요도 없습니다.
유닛 테스트보다, 통합 테스트에 집중하자
테스트는 보통 unit - integration - E2E 세 단계로들 나눕니다.
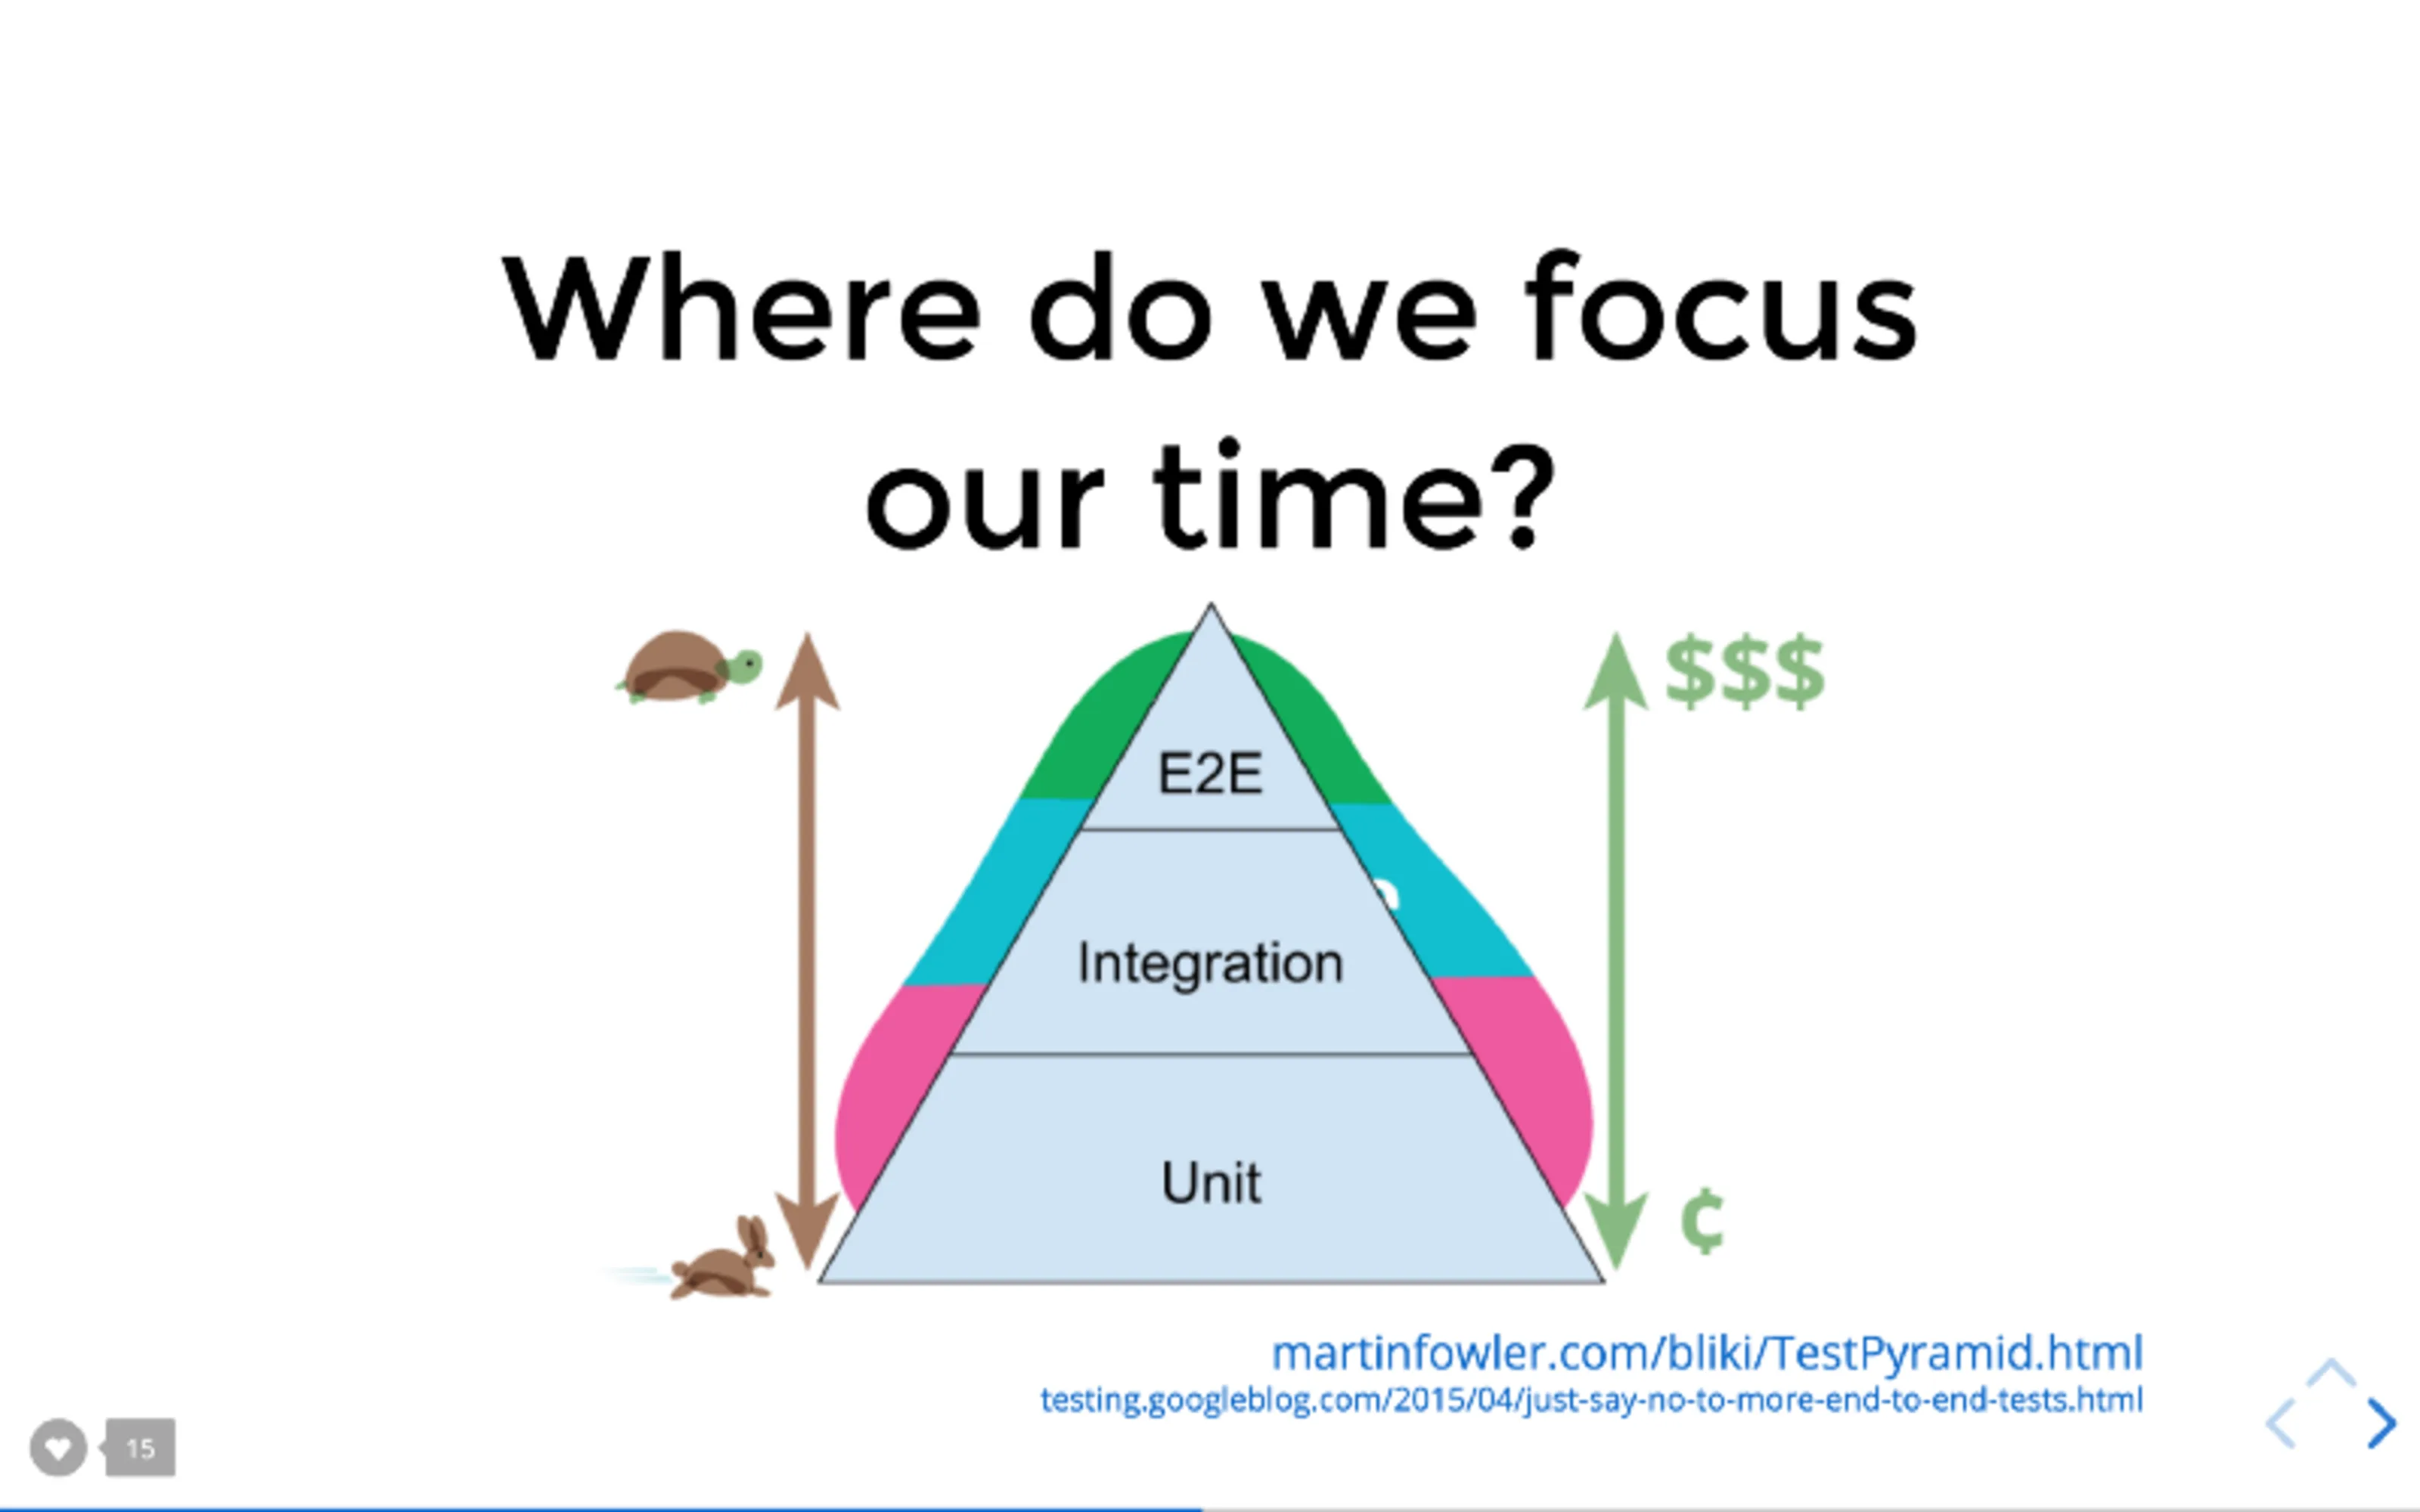
보다 통합된 테스트일 수록 공수가 더 많이 들지만, 그만큼 컴포넌트들이 잘 맞물려 하나의 기능을 제대로 수행한다는 보증을 해줍니다.
단순히 코드 커버리지를 올리기 위해, 혹은 PR에는 반드시 상응하는 테스트가 있어야 한다는 규칙을 지키기 위해 간단한 테스트만을 기계적으로 작성하는 것은 의미가 없습니다.
예시를 살펴보겠습니다. 흔히 볼수 있는 댓글을 구현한 것입니다.
<Message />컴포넌트는 <MessageInput />, <MessageItem />등의 서브 컴포넌트로 구성됩니다.
// message-input.test.tsx
  it('submit 시 prop으로 전달된 "handleSubmit"을 호출한다.', async () => {
    const handleSubmit = vi.fn();
    setup({ onSubmit: handleSubmit });
    const $input = screen.getByRole("textbox");
    const $button = screen.getByRole("button", { name: /submit-message/i });
    userEvent.type($input, "new message");
    userEvent.click($button);
    expect(handleSubmit).toHaveBeenCalledWith("new message", []);
  });
<MessageInput />에 대한 테스트로, prop으로 전달된 함수를 유저가 입력한 값으로 제대로 호출하는지 테스트 하는 것입니다.
다음은 통합 테스트입니다.
// message.test.tsx
  it("새로운 메세지 작성", async () => {
    const { user, render } = setup();
    render();

    await waitFor(() => {
      expect(screen.queryByTestId("loader")).not.toBeInTheDocument();
    });
    const $input = screen.getByRole("textbox");
    const $button = screen.getByRole("button", { name: /submit-message/i });

    await user.click($input);
    await user.keyboard("화이팅~");
    await user.click($button);

    const $newChatItem = await screen.findByText(
      "화이팅~"
    );
    expect($newChatItem).toBeInTheDocument();
  });
<MessageInput />을 통해 입력된 값이 화면에 제대로 디스플레이 되는지를 확인하고 있습니다.
이 테스트를 작성한 시점에서 앞선 유닛 테스트는 사실상 쓸모가 없어집니다. 통합테스트가 성공하면 유닛테스트는 무조건적으로 성공하지만, 반대로 유닛테스트가 성공한다고 해서 통합테스트가 성공하지는 않기 때문입니다.
따라서, 이런 고립된 유닛 테스트는 단순히 테스트의 갯수만 늘리는 것 외에는 하는 것이 없죠😅
테스트 피라미드를 올라가지말고, 내려와라
저는 테스트를 unit-integration-E2E의 순서로 작성합니다.
하지만, 앞서 살펴봤듯이 테스트를 이런식으로 작성하면 쓸모없는 테스트를 대량 생산해낼 수 있습니다. 코드 커버지리는 올라가겠지만, 유즈케이스 커버리지는 오히려 낮아지는 상황도 발생할 수 있구요.
오히려, E2E테스트를 통해 가장 "정상적인" 플로우를 테스트하고, E2E에서 미처 테스트하지 못한 엣지케이스를 Integration와 Unit 테스트로 커버하는 것이 좋습니다.