
CustomOAuth2UserService 만들어보기
구글 로그인 이후 가져온 사용자의 정보들을 기반으로 가입 및 정보수정, 세션 저장 등 기능을 지원하는 CustomOAuth2UserService를 만들어보자
아직 OAuth2UserService에 대해서 확실히 이해하지 못해서 이전에 작성했던 코드를 이용해서 작성
package com.qkrtprjs.happyexercise.config.auth;

import com.qkrtprjs.happyexercise.config.auth.dto.OAuthAttributes;
import com.qkrtprjs.happyexercise.config.auth.dto.SessionMember;
import com.qkrtprjs.happyexercise.member.Member;
import com.qkrtprjs.happyexercise.member.MemberRepository;
import lombok.RequiredArgsConstructor;
import org.springframework.security.core.authority.SimpleGrantedAuthority;
import org.springframework.security.oauth2.client.userinfo.DefaultOAuth2UserService;
import org.springframework.security.oauth2.client.userinfo.OAuth2UserRequest;
import org.springframework.security.oauth2.client.userinfo.OAuth2UserService;
import org.springframework.security.oauth2.core.OAuth2AuthenticationException;
import org.springframework.security.oauth2.core.user.DefaultOAuth2User;
import org.springframework.security.oauth2.core.user.OAuth2User;
import org.springframework.stereotype.Service;

import javax.servlet.http.HttpSession;
import java.util.Collection;
import java.util.Collections;

@RequiredArgsConstructor
@Service
public class CustomOAuth2UserService implements OAuth2UserService<OAuth2UserRequest, OAuth2User> {

    private final MemberRepository memberRepository;    //db에 저장하기위함
    private final HttpSession httpSession;  //세션에 저장하기위함

    @Override
    public OAuth2User loadUser(OAuth2UserRequest userRequest) throws OAuth2AuthenticationException {
        OAuth2UserService<OAuth2UserRequest, OAuth2User> oAuth2UserService = new DefaultOAuth2UserService();    //OAuth2UserService 생성
        OAuth2User oAuth2User = oAuth2UserService.loadUser(userRequest);    //OAuth2User 객체 생성 loadUser 를 통한

        String registrationId = userRequest.getClientRegistration().getClientId();  //구글, 네이버 카카오 알기위한 id
        //무슨값인지 알아보기
        String userNameAttributeName = userRequest.getClientRegistration().getProviderDetails().getUserInfoEndpoint().getUserNameAttributeName();

        //무슨값인지 알아보기
        OAuthAttributes attributes = OAuthAttributes.of(registrationId, userNameAttributeName, oAuth2User.getAttributes()); //OAuthAttributes 생성


        Member member = saveOrUpdate(attributes);	//attributes를 통해서 member 객체를 저장&업데이트 시키고 리턴받기
        httpSession.setAttribute("user", new SessionMember(member));	//어디서든 정보를 받기위한 세션 저장


//반환하기위한 OAuth2User 객체 생성
        return new DefaultOAuth2User(
                Collections.singleton(new SimpleGrantedAuthority(member.getRole().getKey())),
                attributes.getAttributes(),
                attributes.getNameAttributeKey()
        );
    }

    private Member saveOrUpdate(OAuthAttributes attributes) {
        Member member = memberRepository.findByEmail(attributes.getEmail())
                //람다함수 entity는 현재 진행되는 entity를 말함 즉, Member
                .map(entity -> entity.update(attributes.getName(), attributes.getPicture())) //기존의 회원이라고 찾아진다면 Member의 update 메서드를 실행
                .orElse(attributes.toEntity());
        return memberRepository.save(member);
    }
}
세션에 저장하기위한 DTO
package com.qkrtprjs.happyexercise.config.auth.dto;

import com.qkrtprjs.happyexercise.member.Member;
import lombok.Getter;

import java.io.Serializable;

@Getter
public class SessionMember implements Serializable {    //세션에 저장하기위한 직렬화
    private String email;
    private String name;
    private String picture;

    public SessionMember(Member member) {
        this.email = member.getEmail();
        this.name = member.getName();
        this.picture = member.getPicture();
    }
}
소셜 로그인 API를 사용했을때에 소셜에서 가져온정보를 매핑해서 사용하기위한 클래스
package com.qkrtprjs.happyexercise.config.auth.dto;

import com.qkrtprjs.happyexercise.member.Member;
import com.qkrtprjs.happyexercise.member.Role;
import lombok.Builder;
import lombok.Getter;
import lombok.NoArgsConstructor;
import org.apache.catalina.User;

import java.util.Map;

@Getter
@NoArgsConstructor
public class OAuthAttributes { //소셜 로그인 API를 사용했을때에 소셜에서 가져온정보를 매핑하기위한 클래스
    private Map<String, Object> attributes;
    private String nameAttributeKey;
    private String name;
    private String email;
    private String picture;
    private String platform;

    @Builder
    public OAuthAttributes(Map<String, Object> attributes, String nameAttributeKey, String name, String email, String picture, String platform) {
        this.attributes = attributes;
        this.nameAttributeKey = nameAttributeKey;
        this.name = name;
        this.email = email;
        this.picture = picture;
        this.platform = platform;
    }


    public static OAuthAttributes of(String registrationId, String userNameAttributeName, Map<String, Object> attributes) {
        if (registrationId.equals("naver")) {
            return ofNaver(userNameAttributeName, attributes);
        } else if (registrationId.equals("google")) {
            return ofGoogle(userNameAttributeName, attributes);
        } else
            return ofKakao(userNameAttributeName, attributes);
    }

    private static OAuthAttributes ofGoogle(String userNameAttributeName, Map<String, Object> attributes) {
        return OAuthAttributes.builder()
                .attributes(attributes)
                .email((String) attributes.get("email"))
                .name((String) attributes.get("name"))
                .picture((String) attributes.get("picture"))
                .nameAttributeKey(userNameAttributeName)
                .platform("GOOGLE")
                .build();
    }

    private static OAuthAttributes ofNaver(String userNameAttributeName, Map<String, Object> attributes) {
        return new OAuthAttributes();
    }

    private static OAuthAttributes ofKakao(String userNameAttributeName, Map<String, Object> attributes) {
        return new OAuthAttributes();
    }

    public Member toEntity() {
        return Member.builder()
                .role(Role.USER)
                .platform(platform)
                .name(name)
                .picture(picture)
                .email(email)
                .build();
    }
}
일단은 구글 로그인 API만 적용시켰기때문에 정상적으로 로그인 및 회원가입이 진행되는지 확인해보자
/oauth2/authorization/google해당 주소로 이동했을때에 OAuth2관련 클래스들이 yml에 저장되어있는 정보와 비교하고 작업한다.


정상적으로 이동후에 회원가입까지 완료!
로그인했을때에 홈화면 변경을 위한 타임리프의 spring-security 네임스페이스 추가하고 설정
 <nav class="navbar navbar-expand-sm bg-dark navbar-dark">
        <div class="container-fluid">
            <ul class="navbar-nav">
                <li class="nav-item">
                    <a class="nav-link active" href="/">홈</a>
                </li>
                <li sec:authorize="!isAuthenticated()" class="nav-item">
                    <a class="nav-link" href="/auth/login">로그인</a>
                </li>
                <li sec:authorize="isAuthenticated()" class="nav-item">
                    <a class="nav-link" href="/logout">로그아웃</a>
                </li>

            </ul>
        </div>
    </nav>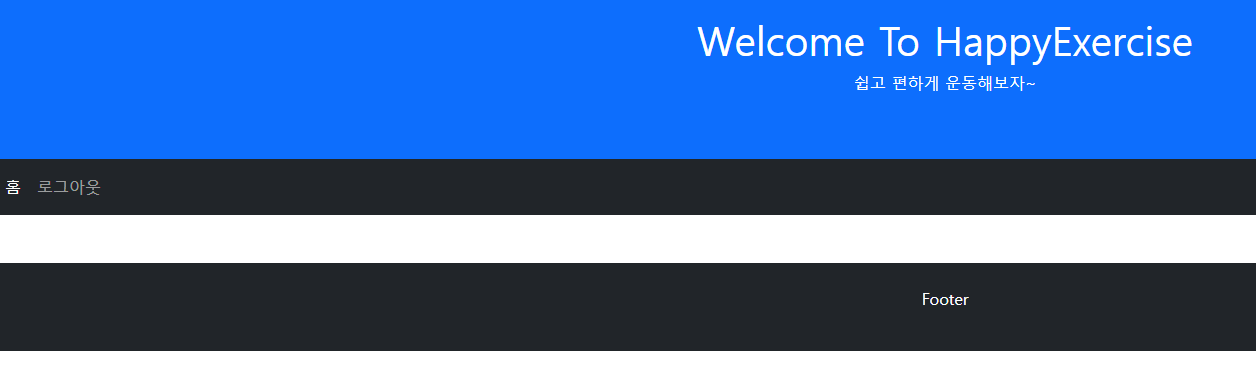
로그인 했을때에 홈화면 변경 완료!
네이버, 카카오 로그인 API 적용
스프링이 지원하는 서비스 : 구글,깃헙,페이스북,옥타
외에 서비스들은 yml에 정보를 더 저장해야한다.
#원래는 gitignore로 관리해야하지만 깃허브에서 코드를 보고 다 시알기위해서 제거
spring:
  security:
    oauth2:
      client:
        registration:
          google:
            client-id: 887320296338-k54do6aqbimphneakj1an4d691r4qesg.apps.googleusercontent.com
            client-secret: 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
            #              원래는 이 scope를 별도로 등록하지않는다 기본값으로 설정해도 문제가 없기때문에 강제로 이렇게 설정한이유는 openid가
#  scope에 있으면 Open Id Provider로 인식하기때문에 다른 서비스를 사용해서 로그인 API를 진행할때 각각 나눠서 OAuth2Service를 만들어줘야하기때문에 openId를 빼고 등록
            scope:
              - profile
              - email
          naver:
            client-id: tAEkd3bBJveOj70lQQRZ
            client-secret: TngrcEeDmr
            redirect-uri: http://localhost:8080/login/oauth2/code/naver #{baseUrl}/{action}/oauth2/code/{registrationId} 라고 한쓰고 이렇게 써도 정상적으로 작동?
            authorization-grant-type: authorization_code
            scope:
              - name
              - email
              - profile_image
            client-name: Naver
          kakao:
            client-id: 20c66978b03bcfb37f3f31f7a06a2488
            client-secret: S7vMBhIxpEp9ids63NUkzZWB6WIkJESi
            redirect-uri: http://localhost:8080/login/oauth2/code/kakao
            authorization-grant-type: authorization_code
            scope:
              - profile_nickname
              - account_email
              - profile_image
            client-name: Kakao
        provider:
          naver:
            authorization-uri: https://nid.naver.com/oauth2.0/authorize
            token-uri: https://nid.naver.com/oauth2.0/token
            user-info-uri: https://openapi.naver.com/v1/nid/me
            user-name-attribute: response
          kakao:
            authorization-uri: https://kauth.kakao.com/oauth/authorize
            token-uri: https://kauth.kakao.com/oauth/token
            user-info-uri: https://kapi.kakao.com/v2/user/me
            user-name-attribute: id
- client-id : 애플리케이션 등록한 후 나오는 client id
- client-secret : 애플리케이션 등록 후 나오는 client secret
- redirect-uri : 애플리케이션을 등록할 때 설정한 callback url
- provider : 서비스 제공하는 곳
- authorization-uri : 네이버 로그인 인증을 요청하는 uri
- token_uri : 접근 토큰의 발급, 갱신, 삭제를 요청하는 uri
- user-info-uri : 네이버 회원의 프로필을 조회하는 uri
- user_name_attribute : 네이버로부터 요청이 승인되면 출력 결과가 (response)설정한 값의 이름을 가진 JSON으로 반환이 됩니다.
이제 yml 설정이되었다면 로그인 API를 호출했을때에 정상적으로 작동하는지 확인해보자
이전에 지정한 로그인 페이지로 이동해서 확인하자
먼저 카카오부터 확인해보자면 카카오 로그인 API를 사용하면 kakao 응답 데이터 형태는
HTTP/1.1 200 OK
{
    "id":123456789,
    "kakao_account": {
        "profile_needs_agreement": false,
        "profile": {
            "nickname": "홍길동",
            "thumbnail_image_url": "http://yyy.kakao.com/.../img_110x110.jpg",
            "profile_image_url": "http://yyy.kakao.com/dn/.../img_640x640.jpg",
            "is_default_image":false
        },
        "email_needs_agreement":false,
        "is_email_valid": true,
        "is_email_verified": true,
        "email": "sample@sample.com",
        "age_range_needs_agreement":false,
        "age_range":"20~29",
        "birthday_needs_agreement":false,
        "birthday":"1130",
        "gender_needs_agreement":false,
        "gender":"female"
    },
    "properties":{
        "nickname":"홍길동카톡",
        "thumbnail_image":"http://xxx.kakao.co.kr/.../aaa.jpg",
        "profile_image":"http://xxx.kakao.co.kr/.../bbb.jpg",
        "custom_field1":"23",
        "custom_field2":"여"
        ...
    }
}
이런 형태를 갖는다.
우리는 이 JSON 형태를 받아오기위해서 OAuthAttributes라는 클래스를 만들어주었고
 OAuth2User oAuth2User = oAuth2UserService.loadUser(userRequest);    //OAuth2User 객체 생성 loadUser 를 통한

 oAuth2User.getAttributes()
하게되면 oAuth2User의 attributes에는 위에 kakao 응답 데이터 형태가 저장되게된다.
이 attributes값에서 원하는 정보를 가져오기위해서
private static OAuthAttributes ofKakao(String userNameAttributeName, Map<String, Object> attributes) {
        // kakao는 kakao_account에 유저정보가 있다. (email)
        Map<String, Object> kakao_account = (Map<String, Object>) attributes.get("kakao_account");
        // kakao_account안에 또 profile이라는 JSON객체가 있다. (nickname, profile_image)
        Map<String, Object> profile = (Map<String, Object>) kakao_account.get("profile");


        return OAuthAttributes.builder()
                .attributes(attributes)
                .email((String) kakao_account.get("email"))
                .name((String) profile.get("nickname"))
                .picture((String) profile.get("profile_image_url"))
                .nameAttributeKey(userNameAttributeName)
                .platform("KAKAO")
                .build();
    }
로 설계해준다.
그럼 이 방식대로 네이버 로그인 API 결과값에 적용시켜주면
네이버 응답 데이터 형태는

이런 형태를 갖고있다
따라서 attributes에서 response안에 있는 정보를 접근해야한다.
private static OAuthAttributes ofNaver(String userNameAttributeName, Map<String, Object> attributes) {
        Map<String, Object> response = (Map<String, Object>) attributes.get("response");

        return OAuthAttributes.builder()
                .attributes(attributes)
                .email((String) response.get("email"))
                .name((String) response.get("name"))
                .picture((String) response.get("profile_image"))
                .nameAttributeKey(userNameAttributeName)
                .platform("NAVER")
                .build();
    }
네이버 응답 데이터의 정보까지 골라내서 저장완료
이제 로그인이 정상적인지 확인해보자!
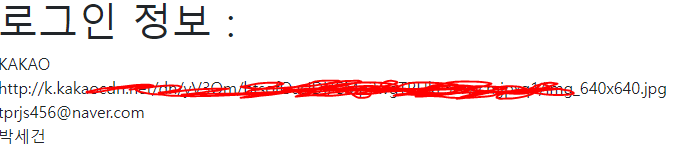
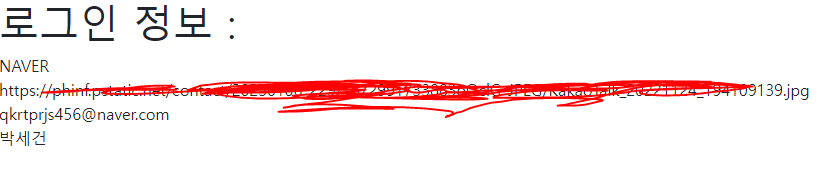
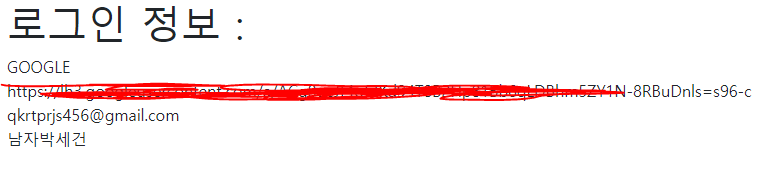
3개의 소셜모두 로그인 API가 정상적으로 실행되는 것을 확인할 수 있습니다!