지금까지 간단한 게시판 프로젝트와 그 프로젝트를 이용해서 AWS를 이용해서 빌드 및 배포까지 진행해보았다. 이번에는 내 생각이 들어간 나만의 프로젝트를 만들어보고 배포까지하는 웹 서비스를 만들어보려고 한다.
이 프로젝트는 운동과 관련된 프로젝트이고 주요 기능은
- 운동할 수 있는 장소를 표시
- 운동할 수 있는 장소 예약 시스템
- 운동관련 물품 구매
에 추가로 이전에 만들어보았던 로그인, 관리자권한, 게시글 작성, 댓글 등등 추가로 만들어보려고한다!
추가로 기본적인 프론트는 부트스트랩을 사용해서 개발하려고 한다.
로그인 구현
일단 먼저 로그인을 구현해보고자 하는데 이전에 이동욱님의 책에서 추천한 방법인 로그인 기능을 외부 소셜 로그인 API를 사용하면 더 본기능에 집중해서 개발할 수 있다는 생각이 나서 이번 프로젝트에서는 항상 만들어왔던 기능인 로그인 기능대신에 OAuth2.0 을 사용해서 로그인을 처리해 보도록하자, 지금까지 구현했던 방법은 구글, 네이버, 카카오 이기에 모두 사용해서 개발해 보도록 하자!
로그인 페이지 구현
먼저 로그인을 할 수 있는 페이지부터 만들어보자
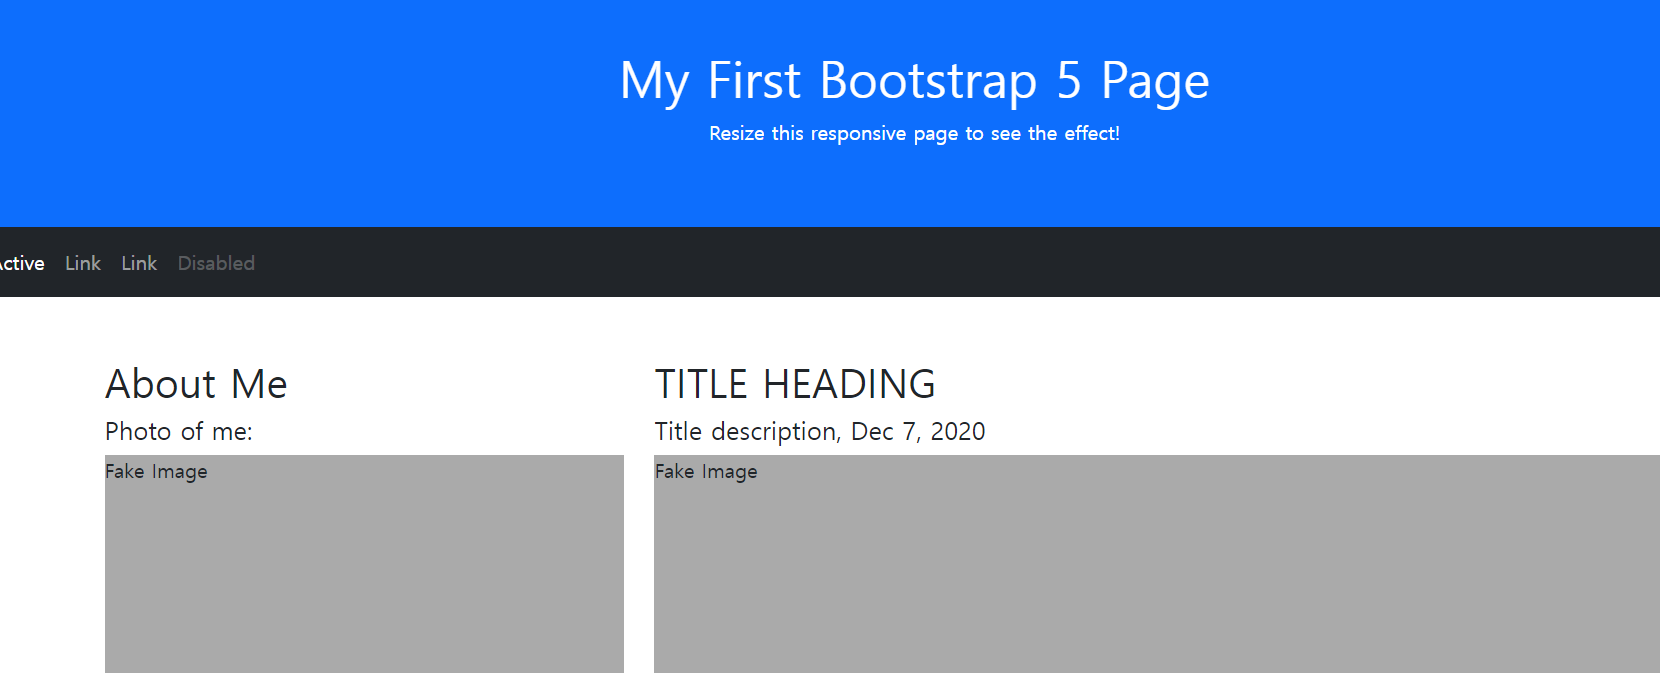
타임리프의 레이아웃을 설정해서 페이지를 만들어갈 것이기때문에 레이아웃을 설정한다.

구조를 이렇게 만들어주고
default_layout에
<!DOCTYPE html>
<html lang="en"     xmlns:th="http://www.thymeleaf.org"
      xmlns:layout="http://www.ultraq.net.nz/thymeleaf/layout">
<head>
  <th:block th:replace="fragments/head :: headFragment"></th:block>
</head>
<body>
<th:block th:replace="fragments/header :: headerFragment"></th:block>
<th:block layout:fragment="content"></th:block>
<th:block th:replace="fragments/footer :: footerFragment"></th:block>
</body>
</html>
를 작성해줘서 틀을 만들어주고
head.html은
<div th:fragment="headFragment">
    <title>Bootstrap 5 Website Example</title>
    <meta charset="utf-8">
    <meta name="viewport" content="width=device-width, initial-scale=1">
    <link href="https://cdn.jsdelivr.net/npm/bootstrap@5.3.1/dist/css/bootstrap.min.css" rel="stylesheet">


    <style>
        .fakeimg {
            height: 200px;
            background: #aaa;
        }
    </style>
</div>
주 내용이 들어갈 부분인 content도
<div layout:fragment="content">
    <div class="p-5 bg-primary text-white text-center">
        <h1>My First Bootstrap 5 Page</h1>
        <p>Resize this responsive page to see the effect!</p>
    </div>
</div>
이렇게 작성해주면 정상적으로 적용되 되는것을 확인할 수 있다.
이어서 사용하지 않는 부분과 내 프로젝트맞게 수정한다.
레이아웃을 사용해서 로그인페이지를 구현합니다

<!DOCTYPE html>
<html xmlns:sec="http://www.thymeleaf.org/extras/spring-security"
      xmlns:th="http://www.thymeleaf.org"
      xmlns:layout="http://www.ultraq.net.nz/thymeleaf/layout"
      layout:decorate="~{layout/default_layout}">

<div layout:fragment="content">
    <div class="container mt-3">
        <br>
        <h5>로그인할 플랫폼을 클릭해주세요</h5>
        <br>
        <a href="/oauth2/authorization/kakao">
            <img src="/image/kakao.png" class="rounded float-start" width="304" height="236">
        </a>
        <a href="/oauth2/authorization/google">
            <img src="/image/google.png" class="rounded float-end"  width="304" height="236">
        </a>
        <div style="text-align: center">

        <a href="/oauth2/authorization/naver" >
            <img src="/image/naver.png" class="rounded"    width="304" height="236">
        </a>
        </div>

    </div>
</div>
</html>
이제 해당 플랫폼을 클릭했을때에 OAuth2.0을 사용해서 로그인을 진행해봅니다.
OAuth 연결
OAuth2.0을 사용하기위한 의존성 설정
implementation("org.springframework.boot:spring-boot-starter-oauth2-client")
SecurityConfig 설정
package com.qkrtprjs.happyexercise.config;
import com.qkrtprjs.happyexercise.config.auth.CustomOAuth2UserService;
import lombok.RequiredArgsConstructor;
import org.springframework.beans.factory.annotation.Autowired;
import org.springframework.context.annotation.Bean;
import org.springframework.context.annotation.Configuration;
import org.springframework.security.authentication.AuthenticationManager;
import org.springframework.security.config.annotation.authentication.configuration.AuthenticationConfiguration;
import org.springframework.security.config.annotation.method.configuration.EnableGlobalMethodSecurity;
import org.springframework.security.config.annotation.web.builders.HttpSecurity;
import org.springframework.security.config.annotation.web.builders.WebSecurity;
import org.springframework.security.config.annotation.web.configuration.EnableWebSecurity;
import org.springframework.security.crypto.bcrypt.BCryptPasswordEncoder;
import org.springframework.security.oauth2.client.userinfo.OAuth2UserRequest;
import org.springframework.security.oauth2.client.userinfo.OAuth2UserService;
import org.springframework.security.oauth2.core.user.OAuth2User;
import org.springframework.security.web.SecurityFilterChain;
import org.springframework.security.web.firewall.DefaultHttpFirewall;
import org.springframework.security.web.firewall.HttpFirewall;
import org.springframework.security.web.firewall.HttpStatusRequestRejectedHandler;
import org.springframework.security.web.firewall.RequestRejectedHandler;
//빈 등록 : 스프링 컨테이너에서 객체를 관리할 수 있게 하는 것
@Configuration //빈에 등록(IoC관리)
@EnableWebSecurity //시큐리티 필터가 등록이 된다(필터 설정을 여기서 해주겠다).
@EnableGlobalMethodSecurity(prePostEnabled = true) //특정 주소로 접근을 하면 권한 및 인증을 미리 체크하겠다
@RequiredArgsConstructor
public class SecurityConfig {
private final CustomOAuth2UserService customOAuth2UserService;
@Bean
public SecurityFilterChain filterChain(HttpSecurity http) throws Exception {
http
.csrf().disable() //csrf 토큰 비활성화 (테스트시 걸어두는 게 좋음)
.authorizeRequests() //인증요청이들어올때
.antMatchers("/", "/auth/**", "/js/**", "/css/**", "/image/**", "/header", "/footer") //auth/밑으로 들어오면 + 폴더 허용도 해줘야한다
.permitAll() //누구나 허용
// .antMatchers("/api/v1/**").hasRole(Role.USER.name())//해당 주소는 USER의 권한을 가직 사람만 열람
.anyRequest() //그밖에는
.authenticated() //인증이 되어야된다
.and()
.oauth2Login() //OAuth로그인 설정 시작
.userInfoEndpoint() //로그인 성공이후 설정 시작
.userService(customOAuth2UserService);
// 우리는 로그인을 OAuth로 진행
// .formLogin()
// .loginPage("/auth/loginForm") //auth/ 밑이 아닌 주소들은 인증이필요하기때문에 /aut/loginForm으로 전달된다
// .loginProcessingUrl("/auth/loginProc") //시프링 시큐리티가 해당 주소요청오는 로그인을 가로채고 대신 로그인해준다
// .defaultSuccessUrl("/"); //정상적일때 이 주소로 보낸다.
return http.build();
}
}OAuth2.0 의 흐름
OAuth2.0의 로그인 과정에 대해 너무나 자세히 잘 알려주고 있기때문에 참고하면 좋을거 같습니다!!
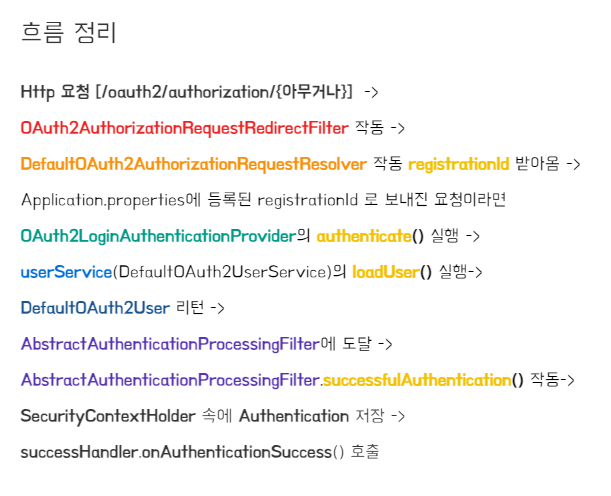
나도 OAuth를 사용하던 중에 어떻게 yml에 설정한 정보를 갖고와서 인가 코드를 받고 인가코드로 토큰을 받고 그 토큰으로 사용자 정보를 요청할 수 있는것인지 궁금했는데 이 글을 보고 해결되었다.
자료 추천
내일 이어서 OAuth2.0 로그인에서 중요한 역할을 하는 OAuth2UserService 클래스에 대해서 알아보자...