Spring Boot를 통해 백엔드 프로젝트를 구현하고 Spring Cloud Gateway와 Eureka Server를 통해 내외부 통신을 구현했다. 이제 완성된 API를 사용하고 사용자에게 정상적인 화면을 제공할 수 있도록 React로 구성된 Frontend 프로젝트를 배포해보려고한다.
우선 먼저 Nginx를 적용해서 React 프로젝트를 배포하려고한다.
왜 Nginx를 사용해야할까?
- 정적 파일 서빙
- Nginx는 정적 파일을 매우 빠르게 서빙할 수 있는 웹 서버입니다. 사용자가 웹사이트에 접속하면 Nginx가 React 애플리케이션의 정적 파일(예: index.html, app.js, styles.css)을 즉시 제공합니다. 이로 인해 페이지 로딩 속도가 빨라집니다.
- React는 정적파일들로 구성되어 있기 때문에 이 두 기술을 함께 사용하는 것이 이상적입니다.
- 리버스 프록시
Nginx는 리버스 프록시 기능을 제공하여, 백엔드 서버와 프론트엔드 서버 사이에서 통신을 효과적으로 관리할 수 있습니다. 이를 통해 보안과 성능 최적화를 동시에 달성할 수 있습니다.
- ex) 보안, 로드 밸런싱, SSL/TLS 암호화, 캐싱 등
- HTTPS 지원
- Nginx는 SSL 인증서를 쉽게 설정할 수 있어 HTTPS를 지원합니다. 이를 통해 데이터 전송 시 보안을 강화할 수 있습니다.
- 캐싱 및 압축
Nginx는 클라이언트에게 전달되는 리액트 애플리케이션 파일에 대해 캐싱 및 압축을 적용할 수 있어, 로딩 속도를 향상시킬 수 있습니다.
우선 이전 포스트에서 진행했던 방식대로 Gitlab과 Jenkins를 연결해준다.
React 프로젝트 CI/CD 진행
React 프로젝트 또한 PUSH과정에 웹훅을 걸어서 Dockerfile을 통해서 이미지를 생성하고 만들어진 이미지를 토대로 컨테이너화를 진행해서 서비스를 배포하려고한다.
nginx.conf 작성
Nginx 웹 서버의 동작 방식이나 이전에 설명했던 Nginx의 장점과 같은 점들을 설정해주기 위해서 nginx.conf 파일을 작성합니다.
events {
    worker_connections  1024;  # 동시에 처리할 수 있는 최대 연결 수
}

http {
    include       mime.types;  # MIME 타입을 정의하는 파일 포함
    default_type  application/octet-stream;  # 기본 MIME 타입 설정
    sendfile        on;  # 파일 전송을 최적화하기 위한 설정
    keepalive_timeout  65;  # 클라이언트와의 연결을 유지하는 시간

    server {
        listen       8080;  # 서버가 수신할 포트 번호
        server_name  localhost;  # 서버 이름 설정

        location / {
            root   /usr/share/nginx/html;  # 정적 파일이 위치한 루트 디렉토리
            index  index.html index.htm;  # 기본 인덱스 파일
            try_files $uri $uri/ /index.html;  # 요청한 파일이 없을 경우 index.html로 포워딩 (리액트 라우팅 지원)

            # gzip 압축 설정
            gzip on;  # gzip 압축 활성화
            gzip_types text/css application/javascript application/json;  # 압축할 MIME 타입
            gzip_min_length 1000;  # 최소 크기 이상의 파일만 압축
        }

        # 에러 페이지 설정 (예시)
        error_page 404 /404.html;  # 404 에러 발생 시 보여줄 페이지
        location = /404.html {
            internal;  # 내부 요청으로만 접근 가능
        }
    }
}
코드 설명
-
events 블록:
-
worker_connections 1024;: 서버가 동시에 처리할 수 있는 최대 연결 수를 설정합니다. 여기서는 1024로 설정되어 있으며, 이는 서버가 동시에 처리할 수 있는 최대 클라이언트 연결 수를 의미합니다.
http 블록: -
include mime.types;: MIME 타입을 정의하는 외부 파일을 포함하여 다양한 파일 형식의 콘텐츠 타입을 설정합니다.
-
default_type application/octet-stream;: 명시되지 않은 파일 유형에 대한 기본 MIME 타입을 설정합니다.
-
sendfile on;: 효율적인 파일 전송을 활성화하여 성능을 향상시킵니다.
-
keepalive_timeout 65;: 클라이언트와의 연결을 유지하는 시간을 설정합니다.
-
-
server 블록:
- listen 8888;: 서버가 클라이언트의 요청을 수신할 포트 번호를 설정합니다. 즉, 프론트 프로젝트가 실행될 포트 번호
- server_name localhost;: 서버의 이름을 설정합니다. 일반적으로 도메인 이름이나 IP 주소를 사용합니다.
-
location 블록:
- root /usr/share/nginx/html;: 정적 파일의 루트 디렉토리를 설정합니다.
- index index.html index.htm;: 기본적으로 사용될 인덱스 파일을 설정합니다.
- try_files $uri $uri/ /index.html;: 요청된 파일이나 디렉토리가 없을 경우 index.html로 포워딩하여 리액트 라우팅을 지원합니다.
-
gzip :
- gzip on;: gzip 압축을 활성화합니다.
- gzip_types: 압축할 MIME 타입을 설정합니다.
- gzip_min_length 1000;: 최소 크기 이상의 파일만 압축하도록 설정합니다.
-
에러 페이지 설정:
- error_page 404 /404.html;: 404 에러 발생 시 보여줄 페이지를 설정합니다.
- location = /404.html: 내부 요청으로만 접근할 수 있도록 설정합니다.
Dockerfile 작성
Docker Image로 빌드하기 전에 어떤 설정과 과정들을 통해 Image를 생성할지 Dockerfile를 작성해줍니다.
# build stage
FROM node:18 as build-stage
WORKDIR /app
COPY package*.json ./

# Yarn is already installed
RUN yarn install
COPY . .
RUN yarn build

# production stage
FROM nginx:stable-alpine as production-stage
COPY --from=build-stage /app/dist /usr/share/nginx/html

# copy the custom nginx configuration file
COPY nginx.conf /etc/nginx/nginx.conf

EXPOSE 8888
CMD ["nginx", "-g", "daemon off;"]
코드 설명
빌드 단계
의존성을 설치하고 애플리케이션을 빌드
-
FROM node:18 as build-stage: Node.js 18 버전을 기반 이미지로 사용하여 빌드 단계를 시작합니다. as build-stage는 이 단계를 "build-stage"라는 이름으로 명명하여 나중에 참조할 수 있게 합니다.
-
WORKDIR /app: Docker 컨테이너 내에서 작업할 디렉토리를 /app으로 설정합니다. 이후의 명령어는 이 디렉토리에서 실행됩니다.
-
COPY package*.json ./: 현재 디렉토리의 package.json과 package-lock.json 파일을 Docker 이미지의 /app 디렉토리로 복사합니다. 이 파일들은 애플리케이션의 의존성을 정의하고 있습니다.
-
RUN yarn install: yarn install 명령어를 실행하여 애플리케이션의 의존성을 설치합니다. 이 단계에서 Yarn 패키지 매니저가 사용됩니다.
-
COPY . .: 현재 디렉토리의 모든 파일을 Docker 이미지의 /app 디렉토리로 복사합니다. 이는 애플리케이션의 소스 코드와 관련 파일들을 포함합니다.
-
RUN yarn build: yarn build 명령어를 실행하여 React 애플리케이션을 빌드합니다. 이 과정에서 최적화된 정적 파일들이 생성되어 /app/build 디렉토리에 저장됩니다.
프로덕션 단계
Nginx를 설정해서 애플리케이션이 실행될 수 있는 환경을 설정하고, 필요한 파일과 설정을 구성.
즉, Nginx 웹 서버를 사용해서 정적파일을 실행시킬 준비
-
FROM nginx:stable-alpine as production-stage: Nginx의 경량 Alpine 버전을 기반 이미지로 사용하여 프로덕션 단계를 시작합니다.
-
COPY --from=build-stage /app/build /usr/share/nginx/html: 빌드 단계에서 생성된 정적 파일들이 있는 /app/build 디렉토리를 Nginx의 기본 웹 서버 디렉토리인 /usr/share/nginx/html로 복사합니다. 이 디렉토리에 있는 파일들이 웹에서 제공됩니다.
-
COPY nginx.conf /etc/nginx/nginx.conf: 사용자 정의 Nginx 설정 파일인 nginx.conf를 Nginx의 기본 설정 파일 위치로 복사합니다. 이 파일에서 Nginx의 동작 방식을 설정할 수 있습니다. Nginx가 실행될때 /etc/nginx/nginx.conf 주소에 있는 nginx.conf라는 설정파일을 읽기때문에 복사해둔다.
-
EXPOSE 8888: Docker 컨테이너가 8888 포트를 사용하겠다는 것을 나타냅니다. 이는 외부에서 이 포트로 접근할 수 있도록 합니다.
-
CMD ["nginx", "-g", "daemon off;"]: Nginx를 포그라운드(foreground) 모드로 실행합니다. daemon off;는 Nginx가 백그라운드에서 실행되지 않도록 하여, Docker가 컨테이너의 상태를 모니터링할 수 있게 합니다.
왜 Jenkins와 mysql같은 서버들은 백그라운드에서 실행시켰는데 nginx는 포그라운드에서 실행했을까?
- Foreground : 포그라운드에서 실행되는 프로세스는 터미널이나 콘솔에서 직접 실행되며, 사용자가 해당 프로세스와 상호작용할 수 있습니다. 일반적으로 프로세스가 종료되면, 그 프로세스가 실행 중인 세션도 종료됩니다.
- Background : 백그라운드에서 실행되는 프로세스는 터미널에서 분리되어 실행되며, 사용자가 직접적으로 상호작용하지 않습니다. 백그라운드 프로세스는 다른 작업을 수행하는 동안에도 계속 실행됩니다.
언제 사용해야 하나?
- Nginx는 클라이언트의 요청에 즉시 응답해야 하므로, 항상 실행되고 있어야 합니다. 포그라운드 모드로 실행하면 Nginx가 메인 프로세스가 되어, 종료되면 컨테이너도 종료됩니다. 따라서, Nginx가 계속 실행되도록 보장할 수 있습니다.
- Jenkins는 여러 작업을 동시에 스케줄링하고, 필요할 때 자동으로 빌드와 테스트를 수행해야 합니다. 따라서 백그라운드에서 실행되면서, 사용자가 필요할 때 웹 UI를 통해 접근할 수 있도록 하는 것이 적합합니다.
결론
포그라운드: 즉각적인 반응이 필요한 서비스(예: 웹 서버)에서 사용.
백그라운드: 지속적인 작업이나 스케줄링이 필요한 서비스(예: CI/CD 도구)에서 사용.
Pipeline Script 작성
pipeline {
agent any
stages {
stage('Repository clone') {
steps {
sh 'pwd'
git branch: 'frontend', credentialsId: 'qkrtprjs', url: 'https://lab.ssafy.com/s11-fintech-finance-sub1/S11P21A604.git'
}
post {
failure {
echo 'Repository clone failure !'
}
success {
echo 'Repository clone success !'
}
}
}
stage('Build image') {
steps {
dir('frontend') {
sh 'pwd'
sh 'docker build -t qkrtprjs/frontend .'
}
echo 'Build image...'
}
post {
failure {
echo 'Build image failure !'
script {
def Author_ID = sh(script: "git show -s --pretty=%an", returnStdout: true).trim()
def Author_Name = sh(script: "git show -s --pretty=%ae", returnStdout: true).trim()
mattermostSend (color: 'danger',
message: "도커 이미지 빌드 실패: ${env.JOB_NAME} #${env.BUILD_NUMBER} by ${Author_ID}(${Author_Name})\n(<${env.BUILD_URL}|Details>)",
endpoint: 'https://meeting.ssafy.com/hooks/bb6j17ansjnambc9cjddf8gw7o',
channel: 'CICD'
)
}
}
success {
echo 'Build image success !'
script {
def Author_ID = sh(script: "git show -s --pretty=%an", returnStdout: true).trim()
def Author_Name = sh(script: "git show -s --pretty=%ae", returnStdout: true).trim()
mattermostSend (color: 'good',
message: "도커 이미지 빌드 성공: ${env.JOB_NAME} #${env.BUILD_NUMBER} by ${Author_ID}(${Author_Name})\n(<${env.BUILD_URL}|Details>)",
endpoint: 'https://meeting.ssafy.com/hooks/bb6j17ansjnambc9cjddf8gw7o',
channel: 'CICD'
)
}
}
}
}
stage('Remove Previous image') {
steps {
script {
try {
sh 'docker stop frontend'
sh 'docker rm frontend'
} catch (e) {
echo 'fail to stop and remove container'
}
}
}
post {
failure {
echo 'Remove Previous image failure !'
}
success {
echo 'Remove Previous image success !'
}
}
}
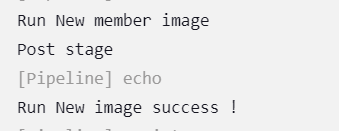
stage('Run New image') {
steps {
sh 'docker run --name frontend -d -p 8888:8888 qkrtprjs/frontend'
echo 'Run New member image'
}
post {
failure {
echo 'Run New image failure !'
script {
def Author_ID = sh(script: "git show -s --pretty=%an", returnStdout: true).trim()
def Author_Name = sh(script: "git show -s --pretty=%ae", returnStdout: true).trim()
mattermostSend (color: 'danger',
message: "서비스 배포 실패: ${env.JOB_NAME} #${env.BUILD_NUMBER} by ${Author_ID}(${Author_Name})\n(<${env.BUILD_URL}|Details>)",
endpoint: 'https://meeting.ssafy.com/hooks/bb6j17ansjnambc9cjddf8gw7o',
channel: 'CICD'
)
}
}
success {
echo 'Run New image success !'
script {
def Author_ID = sh(script: "git show -s --pretty=%an", returnStdout: true).trim()
def Author_Name = sh(script: "git show -s --pretty=%ae", returnStdout: true).trim()
mattermostSend (color: 'good',
message: "서비스 배포 성공: ${env.JOB_NAME} #${env.BUILD_NUMBER} by ${Author_ID}(${Author_Name})\n(<${env.BUILD_URL}|Details>)",
endpoint: 'https://meeting.ssafy.com/hooks/bb6j17ansjnambc9cjddf8gw7o',
channel: 'CICD'
)
}
}
}
}
}
}코드설명
Pipeline Script는 마이크로서비스들의 방식과 유사하고 빌드과정이 Dockerfile에 속해있다는 점만 다르기 때문에 생략한다.
[트러블슈팅] 빌드 디렉토리 명명 에러
Dockerfile과 nginx.conf, Pipeline Script 모두 설정한 후에 PUSH를 띄어서 파이프라인을 진행하니 빌드파일 관련 에러가 발생
ERROR: failed to solve: failed to compute cache key: failed to calculate checksum of ref 8e2f0dc0-fe83-4abe-bd9d-9657e5882786::unzrv03nygh8n273plq4zvoch: "/app/dist": not found위와 같은 에러 발생
- 시도 1 : 빌드 결과물의 디렉토리 명(dist)를 build로 수정
- dist 파일을 찾지 못한다면 build할때 어디에 파일이 저장되는지 확인
- 로컬에서 yarn을 설치한뒤에 빌드를 실행
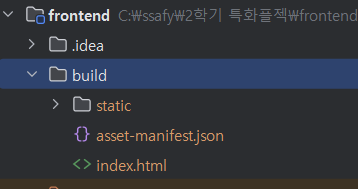
- 빌드를 진행하면 dist가 아닌 build 디렉토리명으로 만들어지는 것을 확인
- 결과 :
 성공적인 결과 확인
우리는 React 애플리케이션을 8888포트 번호로 지정했기때문에 해당 주소로 접근
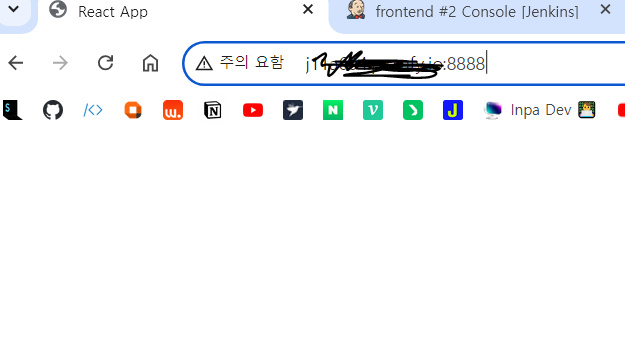
정상적으로 React 애플리케이션 홈화면이 확인되는것을 확인